Replacing glass in a VAZ 2110 headlight
When your car has problems with the headlights, you shouldn’t get upset right away, because you can do all the work yourself. One of the most common and not at all difficult car repairs is replacing the glass in the headlight of a VAZ 2110. Even novice drivers can handle this job. This article will tell you how to quickly and without much difficulty carry out a process called replacing glass in a VAZ 2110 headlight.
Reasons for replacement
Replacing glass on a VAZ 2110 headlight
Why do you need to change the glass on your headlights? Here are just a few reasons:
- A separate glass will cost much less than a whole headlight , and the reason why you have to change the glass is a small stone that gets into and breaks the glass of the headlight. A crack in the glass causes the headlight to shine dimly and the road illumination becomes poor at night.
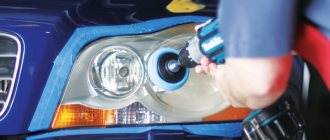
- Over time, the glass of your car's headlights can become significantly dull, which also leads to poor road illumination at night. Polishing the glass is unlikely to help in this situation; it is much easier to buy new glass and replace it on the headlights.
- The easiest way is to find glass for a headlight on the private market and buy it second-hand. It will be much cheaper than in a store, and it’s not profitable to buy the headlight itself in auto stores; it will cost at least five thousand rubles for each headlight.
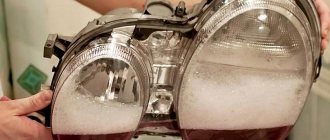
- The headlights fog up and do not have time to dry on short trips. A regular flashlight may sweat, but it dries completely after a short trip. If this does not happen, it means moisture is somehow getting into the headlight. This can happen either through a damaged case or through a crack in the glass.
Note. Some seal the damage with sealants, but it would be better to replace the headlight or the glass in it.
- Another reason why headlights fog up is condensation deposits inside the headlight itself.
Work order
Disconnect the negative cable from the battery.
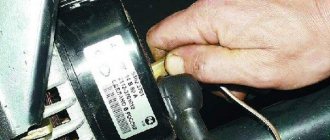
Disconnect the two electrical connectors of the headlight unit.
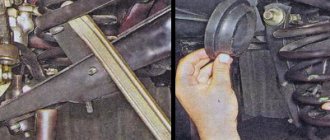
If there is a fender liner, unscrew it on the side of the bumper, usually 2-3 outer screws.
Using a 10mm wrench, unscrew the two bolts of the upper headlight mounting.
Unscrew the 2 bolts securing the decorative radiator grille.
Lifting it and sticking your fingers into the gap between the grille and the bumper, release 2 latches on each side
We unscrew the bolt of the lower fastening of the headlight unit.
Unscrew or loosen the 2 bolts of the upper bumper mounting and slightly pull the bumper towards you.
Using your fingers or a screwdriver, carefully pull the edge of the decorative trim — the “eyelash” — away from the headlight unit. In the resulting gap we see a plastic tab-latch, with the help of which the edge of the eyelash is attached to the edge of the wing.
CAREFULLY remove the tongue from engagement with the wing, without applying extra effort, it’s easy to do with your fingers!
We move the trim to the center of the car and remove it.
Main signs of a faulty or dim headlight
Replacing glass on a headlight on a VAZ 2110
The problem associated with road lighting overtakes every motorist, but what to do in this situation is an individual matter. If, for example, the flashlight starts to work poorly, you can replace it completely; for this you need to buy sealant and new spare parts, and then, after dismantling the old flashlight and applying a new sealant, insert the headlamp into the place where the old one was. It is very important to prevent dirt from getting into the connections. The first signs that the car light is not working properly:
- Shaking headlights;
- Darkening and deterioration of lighting;
- Poor adjustment of the light beam;
- Malfunction of the hydraulic corrector.
Types and types of lanterns
Headlights for VAZ
The search for high-quality headlights should be undertaken with all responsibility, although it is not easy. The main problem is that domestic cars are mainly sold on products that come from China or Taiwan. For example, a significant part of xenon flashlights are from there. This kind of product often comes with low quality indicators and lasts much less than their factory counterparts. And high-quality products always cost much more. Headlights for a VAZ 2110 car come in two popular varieties. Both types of lanterns are of fairly high quality, but differ in their shape and appearance, as well as functionality.
- Headlights from Bosch. Bosch flashlights have reflectors, but do not have lenses in their design;
- Kirzhach headlights have both a reflector and lenses.
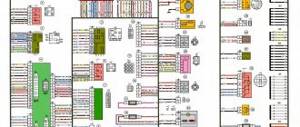
Video “How to repair wiring yourself”
Find out more about how electrical circuit repair is carried out in a garage from the video below (video author - Ramanych).
Wiring in a car plays one of the most significant roles, since it is actually the connecting link of many functional elements of the car. In the VAZ 2110, wiring is replaced if it malfunctions, or if the owner decides to upgrade. This, in turn, will help to significantly improve the efficiency of the vehicle's electronic systems. Often, old wiring simply cannot withstand the load of various additional high-tech devices. Replacing the wiring in a VAZ 2110 can be easily done on your own.
Replacing headlight glass
Replacement of headlight glass for VAZ 2110 Kirzhach
In order to correctly replace the headlight glass, you need to know the design of the entire lamp. Therefore, every motorist who encounters breakdowns in his car related to electronics is obliged to know the components of his vehicle.
What does the headlight consist of?
Replacing headlight glass on a VAZ 2110
The main component of any headlight is the reflector or flashlight reflector. Externally, it looks like a concave mirror surface that shapes the light from the headlight into the desired shape. Three types of special automobile lamps are used as a light source:
- Conventional incandescent lamps are an ordinary sealed flask with inert gases, inside of which there is a tungsten filament. Under the influence of electricity, the spiral heats up to 3000K and emits thermal and light energy;
- Halogen lamps are similar in components to an incandescent lamp, as well as in the principles of operation of the lamp. The only difference in such a part is the presence of bromine and chlorine inside it, and in addition various kinds of halogens. Lamps of this type allow the headlights to last much longer;
- Xenon lamps are classified as HID lamps. It is a gas-charging lamp, inside of which there is xenon. A xenon lamp is made of quartz glass inside two bulbs. One such light bulb consumes very little energy - only 35 W.
Corrugated glass is the most important part of any headlight.
Clear headlight glass
Another component of the headlight is corrugated glass, the replacement of which is discussed in this article. It can be transparent or tinted (see How to tint VAZ headlights with your own hands). The most popular is clear glass. There are other types of glass, such as crystal or reflective.
Two ways to replace glass
Replacing headlight glass on a VAZ 2110
There are two ways to replace the headlight glass of a VAZ 2110. The first method is used if you need to do it quickly. The second method is used when replacing parts inside the headlight itself. The most appropriate method in this case should be used. When choosing a technique, you need to take into account not only the breakdown, but also the location of the car when replacing the glass on the lamp. Let's consider both methods, but first it is recommended to watch this video, where everything is shown in detail.
1st glass replacement method
So, here is the first method of replacing glass on a car headlight, which can be done quickly, without any special tools, right on the street or on the road:
- The radiator grille is removed, which needs to be lifted and your fingers inserted into the gap between the bumper. Then, having found the latches, we unfasten them and take out the entire grille.
- Then you need to find the front bumper mounting bolts and unscrew them to pull out the bumper.
- After that, we find the headlight mounting bolts and unscrew them too.
- We push the headlight inside and pull it out by the eyelashes of the headlight towards the center of the car
- Use a screwdriver to pry up the headlight eyelashes from the outer side, thanks to this you can pry the headlight out from the bumper, as in the photo.
Replacing a headlight or glass
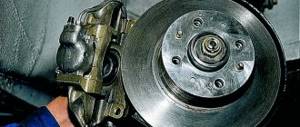
- Remove the headlight and unscrew the lower mounting nuts.
- Now you need to unhook the connectors from the headlights, turn signals and hydraulic corrector.
Note. If the headlight does not want to go out all the way, then one of the possible reasons is the side brackets, they can be picked up with a screwdriver.
When the headlight is removed, you need to remove the glass, then blow off dirt and dust particles from the reflectors, and then adjust the rubber gasket. Now you can install the new glass. We assemble everything in reverse order.
Note. By the way, installing the brackets is easier if you first hook them onto the body of the headlight itself, and then press, thus snapping the glass into place.
2nd glass replacement method
The second method will be needed when you need to repair the headlight inside. It is better to use it in the garage so as not to lose any parts from the car lamp:
- Special pads are disconnected along with thin wires.
- You need to remove the upper part of the radiator grille, for this you will need a ten key.
- When the block with wires has been disconnected, you need to remove the hydraulic corrector by pressing the latches and turning it in the direction of the clock hand.
Note. This can be done quickly using a narrow screwdriver.
- Now you need to find the bolts that secure the headlight and unscrew them. For this you will need a ten key.
- We push the headlight a little inside to continue dismantling it.
- You need to move the eyelashes to the center exactly four centimeters so that you can reach the headlight.
- Now you can push the headlight over the edge using a screwdriver or other sharp object.
Note. The work should be done carefully so as not to damage the parts.
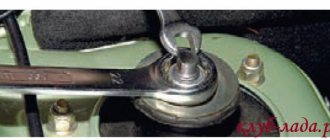
- Loosen the bolt that secures the top of the headlight; a wrench and a screwdriver will help with this.
- You need to remove the eyelash by pressing on the lower perimeter of the lining with such force that the flange comes out. It's pretty simple.
- Then take a 10mm wrench and unscrew the last fixing nut - (the headlight is disassembled).
- You can now remove the lamp itself.
Now you need to completely disassemble the lamp if you need to replace some part in the headlight, and not just replace the glass:
- Using a knife or screwdriver, open the headlight by inserting the tool into the corner of the lamp.
- Using a utility knife, we cut off the excess old sealant that is no longer needed.
Note. When cutting off unnecessary sealant, the second hand should lift the corner part of the glass. If suddenly you can’t cut off the unnecessary sealant with a stationery knife, you can heat it until it starts to melt and then cut it off.
After the glass is removed from the car headlight, you can start repairing certain parts of the lamp, for this you need:
- Unscrew the three bolts that hold the headlight reflector and remove it.
- Then remove the board with the reflective surface.
- Remove the module from the car headlight.
Note: so that the board can be removed without any problems, we remove the special pressure spring. You can remove the pressure spring using the hole in the hydraulic corrector. After all the manipulations, tighten the adjustment tightly, and then unscrew the two adjustment screws in turn.
- We remove the board from the lantern.
Do-it-yourself headlight tuning on a VAZ-2110: tinting
After dismantling the old headlights, it is necessary to remove the spring in the hydraulic corrector hole. Next, the adjusting screw is unscrewed, after which the optics module with reflector is removed. Before you start painting the part, you need to clean it thoroughly. A degreasing primer is suitable for this. It is not advisable to paint with enamel, since the temperature inside the headlight is always very high. In this case, heat-resistant paint is perfect. It is advisable to carry out the painting procedure itself in a dry room, very carefully, keeping this part at a distance from you.