Most owners of the domestic small car Lada Kalina 2 often have questions related to the design of the head optics, its purpose and basic repair, maintenance and replacement measures, for example, how to remove the headlight.
As you know, headlights serve to illuminate the road surface and to indicate a vehicle in traffic. Modern optics have a block structure that contains lamps that perform different roles: low or high beam, turn signals, dimensions, etc. Today, headlights have become an attribute of safety when driving. And when replacing, a logical question arises: how to remove the headlight? Also, sometimes only the headlight glass needs to be replaced.
About the design and purpose of headlights
In Lada Kalina 2, the headlights are endowed with their own design features. Each headlight unit contains three sections that perform the following functions:
- road lighting in low beam mode;
- the same, only in long-range mode;
- dimensions lighting;
- direction indicators.
Headlights must be adjusted correctly, otherwise they can cause not only the driver, but also other traffic participants a lot of inconvenience. Correctly adjusted optics will allow you to confidently illuminate the side of the road and will not dazzle oncoming drivers.
By activating a special switch in the interior of the Lada Kalina 2, the driver turns on the low beam mode. If the same handle is switched to the high beam mode, then in parallel with the switching on of the corresponding lamps, the lighting devices responsible for the low beam also remain active.
The turn signal lamps have bright orange bulbs, and the section housings have transparent lenses.
In Lada Kalina, the headlight units are equipped with electromechanical drives, which makes it easy to adjust the light beam depending on the load on the body and the road situation. A special regulator is located on the panel in the cabin, and the drive mechanism is in the headlight.
When assembling the Lada Kalina body, the manufacturer uses headlights from such well-known manufacturers as Bosch and Avtosvet. To find out which brand produced the headlight for a particular car, you should carefully examine the body of this optics. The “AL” symbol will indicate that the headlight was produced in “Bosch” (Russia). This brand uses material such as polycarbonate. This headlight model does not use a cap that would be visible above the low beam bulb.
Avtosvet products are also made of polycarbonate, but the design already includes the specified cap.
Having disassembled the headlight, the owner of the Lada Kalina can discover the presence of many parts and other elements in it, including:
- wiring;
- lamps and reflectors;
- glass;
- fastening brackets and plugs;
- drive mechanism, etc.
Thanks to the active work of the manufacturer's engineering corps, the headlight design is constantly being improved. This is how neon headlights appeared in the Lada Kalina arsenal. Although their light transmittance is slightly lower compared to standard options, however, during testing, this modification of optics demonstrated enviable results.
Next, we will tell you how to remove the headlight and replace it.
How to replace the front and rear bumpers on a Lada Kalina?
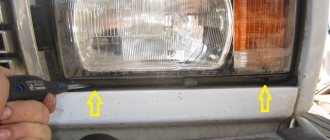
Due to the body design of the Lada Kalina, even a simple replacement of headlights has to be done by removing the front bumper. Without a doubt, this is inconvenient, but unfortunately, there is no other way. Many people prefer to use the services of professionals by visiting the nearest car service center, but there are also those who want to figure everything out on their own to gain experience in repairs.
If you need to remove the bumper on Kalina for any purpose, first look in the garage for the following tools:
- Phillips and flathead screwdrivers;
- a 10 mm wrench and a 13 mm socket wrench (this will be useful when removing the front bumper amplifier when replacing headlights).
And do not forget to disconnect the battery terminal before work. For what? Just in case. Those who are lucky enough to watch how, when shorted, the insulation instantly melts and ignites - they always remove the battery terminal and calmly tinker with the car to their heart's content.
You can also call a couple of friends for help, because it may be difficult to install the bumper back.
Removing the front bumper on Kalina
Removing the Lada Kalina bumper
Removing the front bumper on Kalina is not very easy, but even a fragile girl can do it if you know the procedure.
- First you need to open the hood, under which there are 3 fixing bolts holding the radiator grille and unscrew them. But do it carefully, otherwise you can ruin the coating and immediately put the screws that were unscrewed in a box so that they do not get lost.
- Now we remove the Lada Kalina radiator grille and see that there is access to the place where the front bumper is secured with 2 bolts and 2 self-tapping screws. We also unscrew everything.
- We also unscrew the 2 screws that are on the bottom grille and remove the grille without much tension.
- Now we have access to 2 more bumper bolts, which are located immediately behind the grille in the lower part, which you previously removed.
- Next, you should unscrew 3 more screws where the bumper is secured to the body (they are located at the bottom and can be easily felt by hand). It is also necessary to get rid of 2 self-tapping screws; they secure the bumper to the fender liners.
- To remove the front bumper of the Lada Kalina, all you have to do is unscrew 4 screws (2 on both sides of the bumper, located in the wheel arches). For greater convenience, you need to thoroughly turn the steering wheel in any direction before unscrewing it.
- And now you can, since nothing else is in the way, remove the front bumper, for which you just need to pry it a little on both sides with your hands.
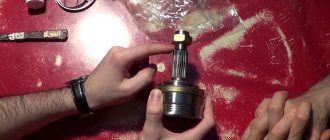
Replacing head lamps
Each lamp has its own resource, the value of which depends on many factors. Over time, devices break down and require replacement. And then the question arises: how to disassemble the headlight?
Dimensions Kalina
Fog lights Kalina
Wiper size for Kalina
The replacement procedure is simple, but before that you need to choose the right lighting devices from the mass of products offered on today's market. Although sometimes all you need is to replace the headlight glass.
So, if the headlights are purchased, then we change:
- Remove the protective cover from the headlight housing. It's rubber, so it's easy to pull off if you pull on one of the three tags.
- Disconnect the power connector.
- Release the spring clip.
- How to remove the headlight? We take out the lamp and install a new element in its place.
Attention! When replacing a halogen lamp, avoid touching the bulb with your hands. This may damage the device. Over time, greasy fingerprints will cause the glass to darken, causing the lamp to overheat and eventually burn out.
- If contact occurs, it is necessary to wipe the surface of the flask with a cloth moistened with alcohol.
- Changing side lamps
- We also remove the cover and disconnect the corresponding cartridge from the on-board network.
- We remove the lamp and install a new one in its place.
Design and features of optics on Kalina
Before you disassemble the front or rear lights or change the bulbs in the optics of the Kalina station wagon, sedan or hatchback, let's understand its structure:
- external glass designed to protect light sources and prevent moisture and dust from entering them;
- a plastic case onto which the main components are fixed;
- a rubberized seal between the headlight housing and the glass is used to ensure the tightness of the structure;
- low and high beam lighting sources, as well as turning lights;
- a plastic reflector located inside the housing, characterized by the presence of a mirror surface and used to reflect light from lamps.
If the lights are not adjusted, this can cause inconvenience not only to the car owner, but also to drivers of oncoming cars. If the car owner can properly adjust the headlights, this will allow optimal illumination of not only the road, but also the side of the road. At the same time, the optics will not blind oncoming drivers.
When the low beam is operating, only the corresponding bulbs turn on. If the driver activates the high beam, then the high and low beam sources are turned on. The headlight itself for Kalina is equipped with an electromechanical drive and can be easily adjusted using a corrector. The corrector itself is installed on the center console, so adjustments are made from the passenger compartment. The regulator is connected to the drive located directly in the headlight using wiring (the author of the video is the Lada Kalina channel).
Adjusting the headlight beam
Correctly adjusting headlights can only be done in a service station. However, let's look at how this operation is performed by experienced craftsmen.
Kalina-2 block headlight, correct adjustment of the beam direction
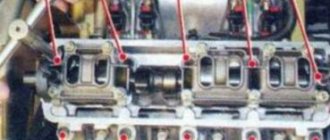
There are two adjustment screws on the back wall of the unit called the headlight unit. The first of them, located closer to the radiator, allows you to deflect the light beam “up and down”, and the “horizontal” direction is adjusted with the second screw. Ideally, this should happen: when the car is 5 meters from the screen, the border of the light spot touches line “2” (see figure). Line “1” is spaced from the ground at a distance equal to the height of the centers of the headlights. The second line is drawn 65 mm lower.
When making adjustments, the corrector switch is moved to position “0”. Of course, you only need to turn on the low beam. We also note that the headlights are adjusted one by one (the “excess” light source is covered with a cloth).
Here are a couple more tips that will be useful:
- The centers of the beams should be on lines AE, BE;
- Line “0” has the following meaning: it intersects with line “1” at one point, so the border of the spot should pass exactly through this point;
- The caps of the plastic adjustment screws are compatible with a hex screwdriver. However, a Phillips screwdriver will also work.
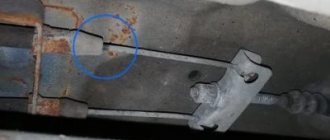
Removing the headlight without removing the bumper
Not every driver has enough knowledge and experience to remove the bumper on their own the first time. Also, this stage takes a lot of time, so there is another way to remove the headlights from Kalina. The approach under consideration requires the following actions.
- Get rid of the coolant unit and air filter housing for a while.
- Use a screwdriver to remove the PTF plug.
- Find the lower fastener for the lighting element and unscrew the bolt in this area. After the manipulation, insert your hand into the PTF hole.
- Find the bolts on the top of the light block structure and remove them using a size 8 wrench. You can find them not far from the radiator.
- The element is secured to the wing of the car by a screw, which should also be unscrewed using a Phillips screwdriver of the appropriate size.
- Try to carefully move the part that is located closer to the radiator closer to the engine by rotating the block light. Remove the lower fasteners from the seats.
- Use a short socket to remove the bolts and lower headlight mountings.
- A slight pull towards you will allow you to remove the flashlight. Make sure that the paintwork is intact, as the light will now be very close to the fender and bumper.
How to remove the tail light of a Lada Kalina station wagon? Replacing bulbs in the taillights of Kalina 1
Hello everyone, dear motorists! Today in the “Repair” section I’ll tell you how to remove the taillight and replace the bulbs in the taillights on a Lada Kalina. The work is not difficult, but it does require certain skills.
Light bulbs can be called consumables; they don’t burn very often, but unfortunately, this still happens to almost everyone from time to time. However, there are cases when the lights come on very often, almost every week or more often, in which case you should check the on-board network and some other points, which are discussed below.
Why do the car lights light up?
- The first thing you should pay attention to is the increased voltage in the car’s on-board network; if it exceeds 14.5 Volts, replacing the headlight bulbs will be frequent. In addition, other energy-dependent nodes will suffer.
- If the headlight glass is leaky or poorly ventilated, condensation may accumulate inside the headlight, causing the bulbs to burn out.
- The frequent failure of lamps can also be explained by the poor quality of the product itself. If the light bulbs are cheap, of low quality, you can hardly expect long service from them. Cheap non-original lamps do not have special gas and the correct pressure; as a result, after some time, tungsten evaporates and the lamp burns out.
- Poor contact. If the bulb is loose or has poor contact, it will most likely cause the bulb to burn out prematurely.
Before removing the rear light on Kalina, you need to prepare:
- Key to "8";
- New light bulbs;
- And straight limbs (just kidding ;-))
Replacement of glass in the headlight unit of a Lada Kalina car (for Bosh headlights)
1. Remove the headlight unit from the car, see the operations described above 2. Remove the six metal rivets that hold the glass. You can remove the rivets using a flat blade screwdriver.
3. Remove the glass. 3. Install new glass on the headlight unit. (The seal between the glass and the headlight housing is sealed with a rubber seal. If the rubber has lost its plastic properties, use a sealant. Apply a thin layer to the place where the glass contacts the seal. Replace the glass, remove excess sealant. 4 Install the metal clips in their places. Reinstall the headlight.
Many motorists are interested in how to remove the headlight on Kalina. Indeed, among all the elements of the car, it is the headlights that most often become the subject of modification or replacement. The headlight itself is considered a simple source of directional light. Its main purpose is to illuminate the road and the surrounding area.
Maintenance and replacement of the rear light
To replace the lamps in the rear light of Kalina 2 station wagon and hatchback, you need to remove the entire headlight unit. To do this you need:
- Unclip the plug next to the seat belt bolt.
- Unscrew the nut.
- Open the seal window and unscrew the remaining fasteners.
- Pull out the flashlight.
- The lamps are pulled out by turning the base counterclockwise.
When replacing lamps in a hatchback body, carefully remove the nuts so that they do not roll under the trim. The missing part will rattle while driving and you will end up having to disassemble the entire luggage compartment.
The Kalina sedan has special compartments in soft upholstery for access to the nuts. There is no need to remove additional plugs.
To keep your car in excellent condition, you need to periodically replace lamps, clean optics, or install new ones. Removing front, rear headlights and foglights in Kalina does not require expensive tools or special knowledge.
Headlight design Lada Kalina 2
14 customers chose this product
The left headlight is the same as the original for the second Kalina.
Weight, kg: 2.3 Dimensions, cm: 57 x 22 x 21 Volume, m3: 0.02633
Removing the rear light, replacing lamps Lada Kalina
The work is shown on the left lantern.
Disconnect the wire terminal from the negative terminal of the battery.
To replace the lamps in the rear light, simply unscrew the mounting nuts and remove the light from the body without disconnecting the wiring block.
Inside the trunk we bend the cut out part of the upholstery.
Using a wrench or a high 10mm socket, unscrew the three nuts securing the light (the third nut is located under the upholstery and is not visible in the photo). We move the lamp away from the body. Turn the side light and fog light bulb socket counterclockwise.
. remove the socket with the lamp from the flashlight body. Pressing the lamp, turn it counterclockwise all the way.
. and remove the lamp from the socket. Install the new lamp in reverse order.
The combined parking and fog light lamp has two protrusions located at different levels. When installing it, the protrusions must fit into the corresponding grooves of the cartridge.
The grooves on the flashlight body have different widths. . This should be kept in mind when installing the lamp socket. We carry out the operations for replacing the remaining lamps in the same way.
Position of lamps in the rear light
:
1 — reversing lights;
2 — brake signal;
3 — direction indicator;
4 - side and fog lights.
To remove the light, squeeze the clamps of the wiring harness block and disconnect it from the rear light wiring block.
Using your hand, push the rubber sealing cover of the wires out from the hole in the body. Unscrew the nuts securing the lamp (see above).
. remove the light by pulling the wires with the block through the hole in the body. Install the lamp in the reverse order.
Video on the topic “Lada Kalina. Removing the rear light, replacing lamps"
Replacing brake light bulbs on Lada Kalina Replacing brake light bulbs on Lada Kalina hatchback VAZ 1119 Replacing tail light bulbs on Lada Kalina
conclusions
The installation and repair of the Lada Kalina headlight is quite simple and dismantling and installing the element will not take much time. Of course, if the housing is destroyed, the entire element will need to be replaced. As experience shows, if the fastening elements, the so-called “ears”, break, the headlight does not change, and the damaged part is simply “soldered”. It's much cheaper than replacing an entire element.
The headlight is a source of directional lighting on the Lada 1118. It is installed in front of the car, illuminating the road surface and the surrounding area. Due to the huge range of lighting systems to choose from, the elements of which can be installed on the Kalina, lights are often the subject of replacement or modification. To replace the Kalina headlight unit, it is worth first considering its structure. On this model, the car manufacturer installs 2 headlights equipped with 3 sections:
- low beam;
- side and main beam;
- turn signals.
Block headlight of Lada Kalina
When you turn on the low beam, only the low beam lights come on, and when you turn on the high beam on the 1118 model, the low and high beam complex with a power of 55 W each starts to burn. The sections of the front indicators have transparent light diffusers. The 21 W turning lights have an orange glow.
To be able to adjust the headlights on the Lada 1118, the package includes a headlight leveler with an electromechanical drive. The adjustment system has a device that is installed on the dashboard, as well as a connection wire and electric drives pre-installed in the lights.
The plant where Kalina is produced provides for installed lights from two manufacturers:
- Bosch;
- Avtosvet CJSC (Kirzhach).
Front optics of Kalina
To determine which company is the manufacturer of the flashlights on the 1118 model, you just need to carefully inspect the glass. If there are AL symbols on the glass, then the lighting complex was manufactured by Bosch. If the material for the flashlights is polycarbonate, which does not have a low beam lamp cap, then this model is also made by Bosch. However, if a polycarbonate flashlight has a low beam lamp cover, then it is made.
Among the main reasons why it is necessary to remove or replace the lighting system are:
- replacing old components with new ones;
- the need for tuning or adjustment of the device.
Tuning headlights for Kalina