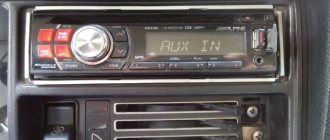
It doesn’t take long to choose the size of a car radio, because if you own a car with a 1-DIN radio, then installing a double-din version simply won’t work. The audio signal is noticeably distorted, especially when listening at high volumes. After that, transfer the sound to the 2 front speakers. Sometimes there are two of them, and they control the operation of devices that operate only when the system is turned on. How to connect a radio.
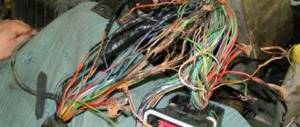
Next, we are left with paired wires that are similar in color, for example, white and white with a stripe, etc. Connecting the antenna Of course, now the range of music is large and some people simply do not use the radio.
Unfortunately, we are still far from universal standardization and interchangeability.
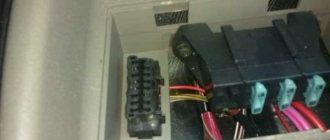
Removing the radio: The mass is removed from the battery so that while digging in the wiring it does not accidentally short out; The insert on the center panel box is pulled out and pulled up from the front; The screws located above the climate control console are turned out, at least this is the case on many foreign car sedans; The ashtray is removed; The front panel of the Sony car radio is removed from the mounts and then moved to the side; 4 screws fixing the central blocks are removed; The car radio is removed.
Thus, each wire is marked. Surely you have noticed more than once that when you turn the key to the ACC position in the car, the stove, cigarette lighter, radio and other devices start up.
This happens but, unfortunately, very rarely.
Wires on the radio, what colors to connect to what.
Head unit connector pinout
One of them is the antenna. But don’t be upset, because to install and connect the car radio, you need to find the right connector in the store and use the instructions to connect the radio to the car.
To connect a passive one, just insert its plug into the socket. A good solution would be to purchase stranded copper wires with silicone insulation. Also in each bundle there is a wire without a plus strip and with a minus strip.
Done, you got rid of the old device - you can install a new one. Connecting speakers This procedure is carried out carefully and carefully, since not only the purity of the sound depends on this, but also the operation and durability of the radio and speakers. As for the ISO connectors, they are much more convenient. Next are the connectors.
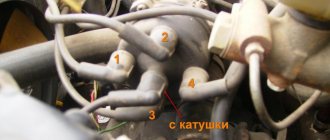
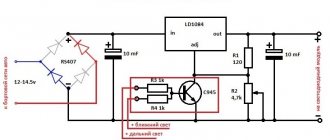
The described circumstances are a sign of incorrect phasing. With this connection, the PG works constantly, and if the car is parked for a long time, you can simply press the button and stop power from the battery. Detailed car radio connection diagram First, you should understand the connection of the black and yellow wires. How to find the wire pinout and connect the MYSTERY MCD 664MPU car radio without a chip
Kenwood
According to the instructions for this type of device, you can see the same standard connection diagrams as described above. The radio is connected via adapters.
If no car radio has yet been installed in your car, the connection diagram for the Kenwood radio remains the same, but you need to extend the speaker wire to the speakers. In this case, you need a stranded wire with a cross-section of at least 2 sq. mm. The wires must be insulated with heat-shrinkable casings or specialized terminals for clamps. The cables are pulled in accordance with the pinout given in the instructions. It is not permissible to connect a consumer with more than 300 mA to the blue (or white with a blue stripe) antenna power wire, intended for powering active antennas.
Sanyeng Kuron
To connect the radio to Sanyeng Kuron you will need a Daewoo Lanos - ISO adapter. The wiring diagrams for the radio tape recorder at Sanyeng Kuron are very standard. The main difficulty when changing a standard device arises only in the mechanical part of the removal. After which the wires of the stationary radio are disconnected, and the wires from the new head unit are connected through the Euro adapter.
Mystery 909u has a standard ISO connector. The Mystery 909u connection diagram involves connecting to a 12V source with a minus to ground. The power wires are connected through fuses. The black wire goes to negative ground.
How to connect a radio in a car
Usually, the way the wires are located is how you need to connect the speakers, that is, the front two pairs of lighter wires go to the front speakers, and the rear wires to the rear speakers. Since installation difficulties arise precisely in the absence of an ISO adapter, all wires must be stripped and then insulated.
In addition, such a circuit consumes much more electricity.
This method is not the best, but it is very often used not only by car enthusiasts, but also by car repair shops. The connection of the audio system and car wires is carried out in accordance with the color marking. Disconnect the battery, watch the colors of the wires and you won't have any problems. Plus the right front speaker; Green with stripe marking RL-. Also, more expensive models have an LCD display, support for watching videos, watching TV channels, a navigation system and many more interesting functions. They have paired colors. Therefore, it is worth thinking about what is more important: the operation of the radio independent of the ignition switch or the long-term operation of the battery?
How to install a car radio
Plus left rear speaker; Purple with stripe marking RR-. If you have an idea about the electrical equipment of a car, connecting wires and a little accuracy in work, then you can make the connection yourself. To connect a passive one, just insert its plug into the socket.
As you can see, connecting a car radio based on the color of the wires is not difficult and, if done carefully, will take no more than hours. There is no power lead out or it was done incorrectly. Working with 2 din car radios The process is similar, but there are several nuances.
All the necessary wires for installation are supplied and connected to the connector, however, the plug does not fit into the car radio socket. A special diagram will help us with this, on which you can see which wires are responsible for what and where they go. Purpose of Toyota Corolla radio tape recorder wires since 2013
Markings and types of connectors
To answer your silent question about what kind of connectors there are in car radios, I must answer that most modern car radios are equipped with two standard connectors, designated by the abbreviation “ISO”. Each of these connectors is designed as an eight-pin rectangular plug, sometimes they are combined into one housing (see photo).
Car radio ISO connector pinout
One of the connectors carries “power” circuits, that is, current consumption sources are connected to it, and is designated in the diagrams as a connector under the letter “A” and is colored brown. The second connector is intended for connecting the car’s acoustic system, in other words, speakers. Unlike the previous one, it is made in black and is designated on electrical circuit diagrams as connector “B”.
What connectors do car radios have?
Sometimes there are car radios with three connectors, but this is the exception rather than the rule. The same exception as non-standard connectors, which still have wiring with standard markings and in any case allow you to connect the wires of a standard speaker system with non-standard “connections” in at least two ways. So:
- “Skolkhoz”, namely, cut off the non-standard plug and overlap the wires, which “is not very good”, since over time the twist will become loose due to oxidation/shaking and, in the best case, you will have to do all the work again while simultaneously replacing the fuses.
Pinout of ISO connectors for car radios
- Buy an adapter (the price of which is in no way close to the amount of work that the method described above includes) and, without any problems, decorously/nobly, connect the car radio with other elements of the acoustic circuit of your car.
The choice of adapters at the moment is huge, and it is simply physically impossible for any troubles to arise in the use of this variety.
Car radio ISO connector pinout
Post navigation
Connecting speakers This procedure is carried out carefully and carefully, since not only the purity of the sound depends on this, but also the operation and durability of the radio and speakers. MUTE Responsible for muting the sound when the button is pressed.
Sometimes there are two of them, and they control the operation of devices that operate only when the system is turned on. To ensure safety, disconnect the battery.
If the connector in the purchased radio does not match the car connector, then that’s okay too.
It will be better to use shrink sleeves and other precautions. Double-din radios are twice the size of single-din radios, which allows manufacturers to make models with a larger touch screen, as well as introduce more multimedia functions. Of course, the downside in this case is that the radio is in standby mode all the time. If the car does not have standard wiring from the battery, you will need a copper stranded wire with a cross-section of approximately 4.2 mm2.
Connections and installation of car radio
It is not recommended to connect the device to the cigarette lighter or ignition switch. Look in stores for an adapter for a multifunction steering wheel.
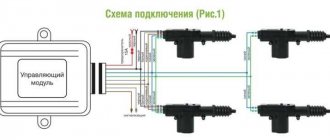
White ANT wire The wire with this marking is responsible for controlling the car radio's antenna. How to connect a car radio without getting tangled in the wires? Japanese, Korean and American usually work with 2 din - such models have 2 times the height, so the car must have a niche of the appropriate size. Connection method using an alarm Often the driver thinks whether I turned off the music in the car or not while parked. Thus, there are three main options for the procedure for connecting the radio yourself.
Connections and installation of car radio
Minimum wire length reduces resistance that distorts sound. Sometimes, if the phasing is not observed, some problems arise, namely, distorted transmission of low frequencies and bass. If your speakers are equipped with these types of connectors, you can use them for connection. It will be better to use shrink sleeves and other precautions. That's it.
Working with 2 din car radios The process is similar, but there are several nuances. It is best when they are as short as possible and do not have additional twists. ISO connector pinout for connecting a radio
Pinout of a standard Euro connector
The Euro connector is a standard plug for many modern devices. An ISO plug is installed on the machine, thanks to which it becomes possible to connect any model of radio with the appropriate connector.
Standards 1DIN and 2DIN
The difference between the standards lies in the size of the devices: a 2-din device is 2 times higher than a 1-din device.
The most common are 1-DIN radios, because Installation of higher devices due to the lack of a seat of appropriate size on the front panel of the car is not possible in every car.
There are 2 types of radio tape recorders:
- With proprietary connector. You need to choose a product whose pinout matches the desired car.
- With universal connector. The device connects directly to the ISO socket provided in the car.
Pinout is carried out according to ISO 10487 standard.
Upper power connector A
The connector serves as a connector between sources and consumers of electricity from the on-board network.
Plugs 1, 2, 3, 6 are rarely used in radio circuits of the lower and middle price segments. The elements are used when connecting additional options in higher quality player models. Wire colors may vary.
You should understand the purpose of the contacts:
- ANT. Used with a retractable antenna.
- Remote. Designed for connecting external amplifiers. Thanks to it, you can increase the number of mounted speakers, which is necessary in the interiors of large cars.
- Illumination. Adjusts the brightness of the player screen (the higher the driving speed, the less intense the backlight, so as not to distract the driver).
- Mute. Adjusts the sound of the device.
- A4. Turns the audio system on and off.
This connection scheme allows you to protect the battery from discharge, because turning on the system is possible only when you turn the ignition key, while the acoustic cascades consume electricity even when turned off.
The pinout of the ISO connector of the radio (European) looks like this:
- Connector A5 (blue) is for the antenna. If the permissible current value (300 µA) is exceeded, both the amplifier stages and the entire head unit may break.
- Wire A7 (red) is intended to power the head unit. When it is disabled, the settings are returned to factory settings. Voltage - 12 V.
- Cable A8 (black). Responsible for connecting the speaker system to the car.
To protect the audio system, the wires must be equipped with a fusible link. If interruptions occur in the operation of the player, you should place a capacitor between connectors A7 and A8, which will act as a filter, smoothing out fluctuations in the electrical circuit.
Bottom speaker connector B
The speakers are connected through it as follows:
- Rear right + (purple).
- Rear right - (black and purple).
- Front right + (gray).
- Front left - (black and gray).
- Front left + (white).
- Front left - (black and white).
- Rear left + (green).
- Rear left - (black and green).
Most devices are designed for 4 channels; 8 wires are used for this (2 pieces per speaker).
The sound quality of the system depends on the “flattening”. If you mix up the connectors, the device will not fail, but the radio will not work correctly.
Audio system elements should be connected with cables with a cross-section of 1.5 mm or more. Thicker wires are used on power lines.
How to connect a car radio
The bundle contains cables with insulation of a standard color for connecting the radio and speakers. Positive power is supplied through red and yellow cords, which are connected to the ignition switch and directly to the battery, respectively. The black cable is for supplying negative power and grounding the elements. An additional wire is also used to power an antenna amplifier or additional audio equipment.
To connect the car radio to the car's on-board network, you need to purchase a special adapter. The configuration of the plugs depends on the radio model and vehicle. It is allowed to connect conductors by soldering or crimping, followed by protection of the joint with a special tube.
Before starting installation, it is necessary to find out the purpose of each cable in the bundle; erroneous connection leads to deterioration in sound reproduction and damage to components.
When using equipment capable of displaying video, it is possible to install an additional rear view camera. To turn on the broadcast, a separate cord is laid, connected to the reversing lamps. On some machines, a switch located in the box selector is used for this.
Scheme
The connection diagram of the head unit depends on the modification. Kenwood radios use 16-pin rectangular connectors that are compatible with ISO adapters.
There are modifications with a double plug, consisting of rectangular sections installed in a single housing with an offset. Equipment is produced with a connector made up of 2 rectangular elements placed coaxially.