The principle of operation of a four-stroke power plant
You can understand why it is important to connect high-voltage wires correctly if you study the principle of operation of the power plant. The carburetor or injector of the VAZ-2109 operates on approximately the same principle, since both power plants are four-stroke.
- First, the cylinder volume is filled with the fuel mixture and exhaust gases. This process is called "inlet".
- The engine then goes into compression. With it, the valves are closed, and the crankshaft and connecting rod move the piston upward. The mixture of fuel and air is transferred to the combustion chamber.
- During the expansion stage, the ignition is switched on and a spark appears. It ignites the fuel mixture, resulting in the formation of gases. They put pressure on the piston, causing it to move down. This force is transmitted through the connecting rod to the crankshaft.
- The process is completed by the “release” of exhaust gases through the exhaust system.
In order for the engine to operate smoothly and without jerking, the processes must take place in a certain order. This, first of all, concerns the order in which the cylinders are put into operation.
Engine workflow through cylinders
The cylinders are activated as follows:
- In the first there is an upward movement. The gases expand and the mixture of air and fuel burns.
- In the third, to carry out the compression procedure, the piston rises.
- In the fourth, “injection” occurs - the piston moves down and at the same time a mixture of air and gasoline enters the cylinder.
- In the second cylinder, the piston rises and takes the upper position so that gases escape through the valve system. After which the exhaust gases are removed from the power unit.
Based on the principle of operation of the cylinders, their activation diagram looks like this: 1-3-4-2. It is important to connect them correctly so that the cylinders work in that order.
How to connect wires correctly
When replacing high-voltage conductors, they are first connected to the ignition distributor. The distributor cover is convenient in that it is always installed in one position. There is a special mark on it, thanks to which it will not be difficult to place the part in place. Before connecting the wires, inspect the cover. It must be intact, since if cracks appear, the performance of this unit is not guaranteed.
The mark on the distributor cover is located next to the wire socket of the first cylinder. The firing order of the cylinders is slightly out of order (1-3-4-2) due to the ignition slider. It moves around the circle (distributor) counterclockwise. It is precisely by this principle of movement of the slider that it is easy to remember the order of the wires. They need to be connected to carburetor and injection VAZ-2109 according to the same principle. On the distributor cover, connect the wires according to the principle of movement of the slider, this is the only way you can set the ignition correctly:
- the socket of the first cylinder is located at the mark;
- the third one is connected at the very bottom;
- on the same line with the socket of the first, there is a place for the wire to the 4th cylinder;
- at the top point the second cylinder is connected.
On the engine itself, the cylinder numbering goes from the location of the timing belt to the starter, that is, from left to right. The fourth cylinder is closest to the starter, and the first is closest to the timing belt. When connecting, it is important to look at which socket of the distributor cover the wire comes from, if you confuse their location, the car will not start.
If you have connected the wires correctly, but the car still does not start, then the problem may be in them. Check high-voltage conductors for integrity. If you haven't changed them in a while, it's worth buying a new set. The peculiarity of these wires is that over time microcracks can form on their surface. They lead to a lack of spark when the ignition distribution system is working. Moisture and dust get into these cracks, which damages the wire from the inside, although it appears intact from the outside.
Car enthusiasts recommend purchasing sets of high-voltage wires from foreign manufacturers, as they last much longer than stock or domestic ones. It is advisable to replace the spark plugs along with the wires, especially if cracks or carbon deposits appear on their surface. This is necessary so that after repair you definitely do not have problems with ignition.
Replacing the distributor oil seal on a VAZ 2109
The ignition system of the VAZ 2109 consists of a number of devices whose task. creating an electrical discharge that ignites the air-fuel mixture in the engine. Among these devices there is a distributor.
Distributor and ignition distributor are synonymous. Remember this so that you do not have problems in the future if you do not understand the instructions for repairing the ignition system.
Adjustment
In some cases, it is enough to adjust the ignition system to restore the engine to its previous performance.
Several symptoms indicate this.
Symptom
Causes
Excessive detonation of the piston system
A characteristic feature of this problem is a ringing sound when you press the accelerator pedal. Cause. Pre-ignition, which can cause the piston rings to become deformed.
Black smoke from the chimney when starting the engine
This indicates that the ignition is too early.
Engine power has decreased, fuel consumption increases
It’s too late to light it here, because the mixture won’t burn completely
The engine begins to idle unevenly
It is caused by both early and late inflammation.
To set up a distributor you will need:
Let's start.
READ Installing Rear View Camera Skoda Octavia A7
The operating order of the VAZ 2109 cylinders
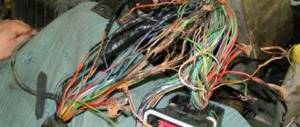
Very often, during repairs, high-voltage wires are removed from the ignition distributor or spark plugs. The only problem is that few people remember how they were connected before. To avoid confusion, you need to know the sequence of connecting the high-voltage wires of the VAZ 2109, first to the ignition distributor, and then to the spark plugs of each cylinder.
Connecting wires to the ignition distributor
The ignition distributor cover is placed on it only in one position; it cannot be put on in another way.
The distributor cap has a mark; this mark indicates the socket of the high-voltage wire of the first cylinder of the VAZ 2109 engine. The operating sequence of the engine cylinders is as follows: 1-3-4-2. The ignition distributor slider rotates counterclockwise when viewed from the cover. Therefore, the lower socket corresponds to the high voltage wire of cylinder No. 3. The next socket, going counterclockwise, corresponds to cylinder #4, and the top socket corresponds to cylinder #2. All this is depicted in the picture below. The numbering of engine cylinders starts from the timing belt and goes from left to right.
Cylinder arrangement VAZ 2109
That is, the cylinder closest to the timing belt is the first, the cylinder closest to the starter is the fourth. If the wires from the ignition distributor are mixed up, the car will not start. Therefore, if you remove high-voltage wires, then you need to connect them back as they were before. And then there are comrades who remove the wires, mix them up and then start a panic that the car has stopped starting.
Causes of failure
There are several main reasons why a distributor may break and only need to be replaced:
All of these situations, except for poor sensor contact, are a signal to replace the distributor.
Unit location
Disassembly and repair
Often measures to repair the distributor are associated with wear and the need to replace oil seals (couplings). To replace the oil seal, as well as other faulty components of the distributor, we offer you the appropriate instructions and advice.
Disassembling the unit
Check for damage
During the disassembly of the distributor, you can find damaged components and replace them with new ones using a repair kit. If the damage is severe, it is best to replace the entire ignition distributor.
Shock absorber. an important and sometimes capricious element. But replacing it and repairing it shouldn’t cause any problems.
Features of device operation
The “sore spot” of the distributor cap and rotor (ignition distributor) is the electrodes pressed into it:
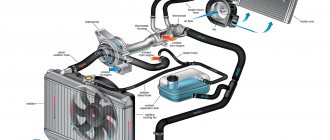
Distributor VAZ 2109 device
1. sealing ring, 2. coupling, 3. shims, 4. roller with centrifugal adjuster, 5. base plate, 6. dust protection, 7. slider, 8. Hall sensor, 9. lock washer, 10. thrust washer, 11 . housing, 12. vacuum corrector.
The main cause of malfunction of the VAZ distributor is wear of the oil seal and, in rare cases, the roller with the centrifugal regulator. To eliminate oil leakage in the Hall sensor, we recommend replacing the oil seal on the VAZ 2109 distributor.
Replacing the slider:
1) First remove the plastic cap from the distributor as above. (see "Removing the distributor cap")
2) Next, remove the slider from the shaft by pulling it with your hand.
The note! The slider is installed in its place in only one position, namely only when the gap on the shaft is directed in the direction opposite to the contact.!
READ Changing the Oil in the Rear Axle of a Mercedes Sprinter
Additional Materials: Detailed information on how to replace the distributor can be found in the below:
Replacing the oil seal on a VAZ 2109 distributor
The main essence of repairing the ignition distributor on a VAZ 2109 car is its complete disassembly in order to replace failed elements. Prepare a standard set of tools.
How to replace the distributor, also known as the ignition distributor, on a VAZ 2108-VAZ 21099?
The operating order of the VAZ 2109 cylinders
Thus, the working cycle of the VAZ 2109 internal combustion engine is represented by the following sequential actions: 1. In the 1st cylinder, a downward movement occurs, the working stroke, that is, the combustion of the working mixture and the expansion of gases. 2. “Compression” occurs in the 3rd cylinder, the piston moves up. 3. In the 4th cylinder there is an “intake”, the piston moves down, and the working mixture is pumped into the cavity. 4. “Exhaust” is carried out in the 2nd cylinder; exhaust gases leave the cavity through the exhaust valves.
Now let's look at several cases of malfunctions in the operation of the VAZ 2109 engine. In order to find out the cause of the breakdown, you should use the following algorithm of actions:
• Start the engine and go to idle speed. Listen to the sounds of exhaust. If uniform, periodic popping noises are observed, then most likely the cylinder is not working due to suction, a faulty spark plug, reduced compression or lack of spark. • Inspect the spark plugs; there should be no traces of soot, oxidation or moisture. The gap between the electrodes should average 0.8-0.9 mm. • Replace the spark plug set. • Check the condition of the high-voltage wires of the ignition system. The insulation must be intact, and the contacts must not be oxidized or burnt. If the wires are damaged, they must be replaced. • Inspect the rotor and distributor cap. The lid must be intact, without cracks and clean, without traces of soot. The carbon contact must not be worn or damaged. The rotor must also be intact and have no signs of burnout. All faulty elements must be replaced. • If, after the actions taken, interruptions in the operation of the cylinders continue, then you should contact a service station for a full diagnosis and adjustment of the ignition system, which should be carried out on a stand. • It should be noted that normally the compression should be above 1.1 MPa. If fluctuations within 0.1 MPa are observed in one of the cylinders, then it is necessary to urgently repair the engine itself.
Thus, it is quite obvious that knowledge of engine operation will allow timely repair work and avoid serious breakdowns.
What is the order of operation of the cylinders in the VAZ 2109 engine?
Operating procedure
Often when repairing an engine, it becomes necessary to disconnect high-voltage wires. Some drivers, after disconnecting the wires, do not remember the order in which they were installed. As a result, there may be confusion with the wires, and if they are connected incorrectly, the car will not start. To avoid an unpleasant situation, you need to know how the internal combustion engine operates.
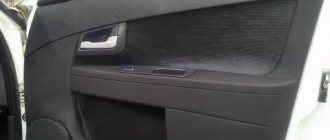
Connecting wires to a VAZ 2109
The principle of operation of the power unit is based on such a property of gases as the ability to expand when heated. A standard four-cylinder engine operates in 4 strokes:
- During the first stroke, the air-fuel mixture and part of the exhaust gases are “injected”. This mixture completely occupies the volume of the cylinder.
- In the second cycle, the “compression” process occurs. In this case, the valves are closed, and the piston moves upward due to the movement of the crankshaft and connecting rod. The working mixture fills the combustion chamber.
- On the third stroke, called “expansion,” a spark appears thanks to the spark plugs, which ignites the working mixture. The expanding gases exert pressure on the piston and force it to move downward. Then, thanks to the connecting rod, the crankshaft begins to move.
- On the fourth stroke, the process of “release” of exhaust gases is carried out. Through the exhaust valves they enter the exhaust system of the VAZ 2109.
In order for the operation of a multi-cylinder engine to be smooth and the crankshaft not to experience uneven loads, it is necessary that the work processes be carried out in a certain order.
There are different schemes that determine in what sequence the cylinders will function. The VAZ 2109 uses the following scheme: 1-3-4-2. The cylinders are numbered starting from the front cover of the power unit.
Cylinder numbering on the VAZ 2109
If we imagine the working process of the engine through the cylinders, then the order of operation is as follows:
- In the first cylinder, an upward movement occurs, the working process takes place: the air-fuel mixture burns, the gases expand.
- In the third, a “compression” process is carried out, in which the piston moves upward.
- The fourth receives the working mixture as the piston moves downwards, thus carrying out the “injection” process.
- In the second, the piston moves upward, while the exhaust gases exit through the exhaust valves.
Possible causes of failure
During the operation of the internal combustion engine, various malfunctions are possible. To detect them, you should perform the following sequence of actions:
- First you need to start the car. The engine should idle. At this time, you should listen to what sounds are coming from the exhaust pipe. If you hear regular popping noises, then one of the cylinders is faulty. The cause may be faulty spark plugs and lack of spark. The malfunction can also be caused by a large amount of incoming air or insufficient compression in the cylinder.
- It is necessary to inspect the candles. If there is carbon deposits, moisture or oxidation, you need to clean it. Check the gap between the electrodes, which should be 0.8 - 0.9 mm.
- Replace all spark plugs, regardless of their appearance and vehicle mileage.
- If there are irregular emissions, you need to inspect the high-voltage wires. There should be no traces of oxidation on their tips, and the insulation should not be damaged. If defects are found, the wire should be replaced.
Wires connecting to the coil - The gas distributor cap should be inspected. There should be no soot or cracks on it. The carbon contact should be checked for damage and wear.
- The rotor needs to be inspected. It must be solid and have no signs of burnout. All parts with defects must be replaced.
- The pressure in the cylinders is allowed to be no lower than 1.1 MPa, and the compression difference should not exceed 0.1 MPa. If the indicators do not correspond, engine repair is necessary.
If after the above steps the problems remain, then you need to contact a service station to undergo a more accurate diagnosis of the VAZ 2109 engine and adjust the ignition system on the stand.
Sources
- avtozam.com/vaz/2109/poryadok-raboty-tsilindrov/
- navaze.ru/108-poryadok-raboty-cilindrov-vaz-2109.html
- vaz2109.net/ekspluatatsiya-avtomobilya/poryadok-raboti-cilindrov-vaz-2109.html
- ladaautos.ru/vaz-2109/kakoj-poryadok-raboty-cilindrov-vaz-2109.html
repair of the ignition distributor (distributor) on a VAZ 2108, VAZ 2109, VAZ 21099 car
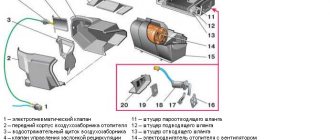
The ignition distributor (distributor) consists of the following parts (see Figure below): 1. sealing ring; 2. clutch; 3. adjusting washers; 4. roller with centrifugal regulator; 5. base plate; b. dust screen; 7. slider; 8. Hall sensor; 9. lock washer; 10. thrust washer; 11. distributor housing; 12. vacuum corrector. 1. Remove the distributor from the VAZ 2108, VAZ 2109, VAZ 21099.
2. Loosen the two captive screws and remove the distributor cap. Then remove the slider by pulling the slider up.
3. Replace the carriage with cracks, signs of fire, significant wear or corrosion of external contact 1. The carriage should fit snugly to the distributor shaft. This is ensured by leaf spring 2. A slider with a weakened or broken spring must be replaced. Use an ohmmeter to measure the resistance of resistor 3; it should be equal to 1 kOhm. Otherwise, replace the slider.
4. Remove the dust shield from the distributor.
5. Unscrew the screw securing the low voltage wire terminal and remove the terminal from the distributor body.
6. Using a screwdriver, open the tabs on the holder and remove the wire from the holder.
7. Remove the two screws that secure the base plate to the Hall effect.
8. Remove the retaining ring from the support plate journal.
9. Loosen the two screws that secure the vacuum corrector.
10. Using a screwdriver, remove the vacuum adjuster rod from the pin support plate.
11. Remove the vacuum corrector from the distributor.
12. Using a screwdriver, lift up the support plate and remove it.
13. If the plug is clogged or severely worn, replace the gasket.
14. Remove the retaining ring from the camshaft, and then the thrust washer.
15. Remove the retaining ring that holds the clutch retaining pin.
16. Replace a torn or loose o-ring.
17. Remove the clutch retaining pin using the appropriate bit.
18. Remove the ignition distributor drive coupling and gasket. Replace clutch with badly worn clamps.
19. Remove the roller with the centrifugal regulator.
20. Inspect the bushings in which the roller rotates on both sides of the distributor housing. If the bushings are frayed or significantly worn, replace the distributor and bushing assembly.
21. Using a screwdriver, remove the two counterweight springs from the struts. To avoid confusing the springs during assembly, mark the post to which the small spring is attached.
22. Remove the driven plate of the centrifugal regulator with the screen.
23. The scales of the centrifugal regulator must rotate freely along the axes. Otherwise, remove the rings holding the weight in place.
24. Then remove both axle weights. Clean the holes in the weights and lubricate them. Replace the roller if it is severely worn or clogged.
25. To replace the Hall sensor, loosen the two screws and remove the Hall sensor from the base plate.
NOTE On some ignition distributors, the Hall sensor is secured to the base plate with a rivet. In this case, the Hall sensor is replaced together with the base plate.
26. Wipe the outer and inner surfaces of the distributor cap. Replace a distributor cap that has cracks, signs of breakage (very fine cracks), chips, or badly worn contacts. The contact angle must move freely inside the distributor cap. If the contact carbon is chipped, cracked, heavily worn, or has a broken carbon spring, remove it and the spring from the distributor cap and replace it. 27. Reassemble the ignition distributor (distributor) in reverse order, lubricating the spark plugs and roller with a thin layer of engine oil.
28. Before installing the clutch, install the slider with the outer contact towards the contact of the 1st cylinder in the cover.
READ Replacing the Light Bulb Opel Zafira A
29. Then install the clutch on the shaft so that the tie pins align with the holes on the camshaft when the piston of the 1st cylinder is installed at TDC.
parts of the ignition distributor (distributor) of the VAZ 2108, VAZ 2109, VAZ 21099
Rate this article: Share with friends!