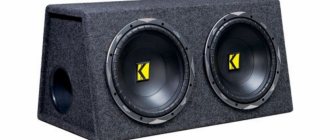
Why do you need an amplifier?
Multimedia head units have a built-in amplifier, which is not suitable for all car owners. Installing additional equipment allows you to clear the signal of interference and install additional speakers that improve the reproduction of low or high frequencies. When using an additional amplifier, the power of the generator and the capacity of the battery should be taken into account; to reduce the likelihood of voltage failure, electrolytic capacitors (storage) are used.
How to calculate power and choose
To select the equipment yourself, you need to calculate the power of the loudspeakers installed in the circuit of each channel. Based on the obtained values, an external signal amplification device is selected. It is recommended to purchase a more powerful device (10-15%) to reduce the load on the equipment and allow you to subsequently replace the acoustics. You should also take into account the resistance of the coils in the speakers and the frequency range for which the products are designed.
The choice of type of amplification machine installation depends on the configuration of the future speaker system. If you plan to connect a subwoofer to an amplifier, a device with 2 channels that are connected via a bridge circuit is sufficient. If the reason for the modification is the desire to get rid of noise in the speakers and increase the sound volume, you need to purchase a 4-channel unit. To use 4 speakers and a subwoofer at the same time, you will need to install a 5-channel amplifier or use 2 separate devices.
To connect the car amplifier to the radio, “tulip” or RCA connectors are used, located on the rear wall of the head unit housing. Before purchasing an external device, it is recommended to check the type of outputs used on the player. If there are no connectors, it is possible to switch the amplifier unit to standard acoustic outputs through a signal amplitude reduction module (attenuator).
Now the car audio amplifier should be configured
There are usually several typical settings:
- Sensitivity level. On amplifiers it can be indicated as “level” or “Gain”.
- Low pass filter. LowFrequency or LPF. Cuts the upper frequency limit for the subwoofer.
- High pass filter. High Frequency or HPF. Cuts the lower frequency limit. Used when midrange and tweeter speakers are connected to the amplifier or these channels.
- Crossover or x-over, switch between low and high pass filters. Also has a third position when filters are not enabled (Full or Flat).
Setting up an amplifier for a car
- Set the sensitivity level to minimum (turn it counterclockwise until it stops).
- We turn on the head unit and turn up the volume level to the maximum (or almost maximum, until sound distortion appears), now smoothly turn the sensitivity control on the amplifier until noticeable noise and sound distortion appear, turn it down a little and leave it. Caution: May be very loud.
- We turn down the volume level on the head unit (radio tape recorder) to a normal level.
Preparation
At the preliminary preparation stage, the car owner develops a connection diagram for the amplifier, taking into account the location of standard equipment. If additional loudspeakers (for example, a subwoofer or tweeters) are installed in the vehicle structure, it is necessary to consider the method of installing the devices. Based on the data obtained, the car owner purchases power cables, interconnect cords with tulips, additional decorative elements and other parts necessary when installing amplification equipment.
Wires
To connect the amplifier to the vehicle's on-board network, you need a special cable designed for the current consumed by the additional equipment. The cord is selected based on the power of the installed components, taking into account additional heat losses (up to 30%). For example, when switching a 2-channel amplifier with a nominal power of 200 W, the thermal load must be taken into account, which is approximately 60 W. The resulting power value requires the use of a cable rated at 21.6 A (it is recommended to make a safety margin of another 10-15%).
To calculate the wire cross-section, there are special tables that display the dependence of the cable diameter on the transmitted current. For installation, you should use a cord with a copper core that does not collapse under vibration loads. When purchasing a cable, you should pay attention to the thickness and characteristics of the insulation, since low-quality materials spontaneously crack when the temperature drops to -15°C.
Fuse
It is necessary to install a fuse in the power supply circuit of the amplifier in the car to prevent the product from igniting in the event of a short circuit (for example, due to destruction of the insulation of the power cables). The design of the equipment includes standard protection elements; an additional insert is located near the battery terminal. To properly connect a car amplifier, you must use fuses with a rating of no more than 50 A.
Interconnect cable
The mounted amplifier must be connected to the head unit using a special interconnect cable equipped with metal mesh protection. The screen reduces the likelihood of interference occurring during the operation of the ignition system and electronic components of the vehicle. It is not recommended to lay patch cords near standard control units and electric motors installed in the vehicle's air conditioning system.
How to connect 2 amplifiers in a car
Before installing two amplifiers in a car, be sure to ensure that they are very hot. Radiators of amplifiers should not be located nearby, and a flow of fresh air should be provided to them. This does not mean that the amplifiers are located under the hood; the main thing is not to cover them with thick fabric or install them in a narrow space.
First, let's consider connecting 2 amplifiers in the car to the on-board circuit, that is, supplying power to them. A prerequisite for any method remains the installation of a fuse, the fuse link of which is designed to burn out when the maximum current increases by 1, 2 -1, 3. The maximum current develops at the maximum output power and is indicated in the technical data sheet for the sound amplifying device.
There are two ways to connect power:
- Connecting the power wire directly from the first amplifier. That is, one line with one fuse is laid to the installation site, which is designed for the total current of two amplifiers. In this case, it is necessary to take into account the cross-section of the conductors, since if this condition is not met, the wiring will overheat while listening to music at high volume, which will lead to dire consequences, including fire.
- Laying two separate lines requires the installation of two separate fuses designed for the current of each amplifier. This method has its advantages associated with the separation of power circuits, but also disadvantages associated with the purchase of long-length wires. The cross-section of the wire is calculated, like the fuse, for the operation of one amplifier installation. This method is used when connecting powerful stereo systems.
Power is routed to the devices in such a way as to reduce the amount of interference when listening, so it is recommended to separate the power and audio signal wires on opposite sides of the car.
Where and how to install
Installing the amplifier in the car determines the length of the speaker cables required for connection and the length of the line to connect to the battery. For example, when placing the device in the luggage compartment, connecting each loudspeaker will require a cord 3-4 m long (taking into account bends and laying under the trim). The product is installed in a horizontal position on a special podium. On some cars, a second amplifier is used, intended for front acoustics, which is carried into the cabin.
It is allowed to place the equipment in a special niche under the rear parcel shelf (used on cars with sedan or coupe bodies). If you need to install a car amplifier under the passenger seat, you must take into account the placement of the air ducts of the air conditioning system and the presence of electrical wiring harnesses for heating the seats and controlling the side airbags. With such a scheme, the length of the cable running from the radio to the amplifier is shortened, which improves the quality of the transmitted signal.
Additional sound amplification devices installed in the car generate heat, which must be removed by ventilation. For normal ventilation, it is not recommended to install the case vertically, or cover it with plastic or fabric covers. To improve air circulation, additional fans are installed, which turn on together with the car's acoustic system.
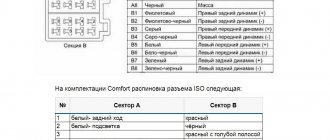
Connecting the amplifier to the car radio according to the pinout
The connection diagram for an external amplifier to a car radio is performed in the following sequence:
A red power wire of a certain cross-section is pulled from the installation location of the external amplifier (usually the rear of the car or its luggage compartment) into the engine compartment. Where it is attached to the battery (on the positive terminal). The reverse end of the cable is fixed through a plug connector into the corresponding socket of the amplifier.
The negative wire (ground) in a black sheath is connected to the car body and the amplifier connector, marked as - GROUND (GND).
The sockets remaining after the above connections are intended for connecting an external sound amplifier (not standard equipment) with signal wires of any color, to the car’s multimedia system.
Connection to the radio is not standard equipment
The connection diagram for any additional equipment to the head unit of a passenger car almost completely repeats the steps described above for connecting the amplifier. In which always:
- Power (power) wire - red.
- Ground - black wire.
- Depending on the device being installed, the signal cable can be:
- Yellow. For connecting the rear (side) view camera and the radio.
- A blue wire with or without a stripe, for connecting an active antenna and the like.
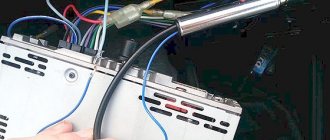
How to connect to the standard radio
To connect the amplifier to the car radio, you need to remove the head unit, gaining access to the outputs on the rear of the case. Signal cables are laid along the shortest route; installation will require lifting the carpet and dismantling some of the plastic coverings. Interconnect cables are laid at a distance from the standard electrical wiring of the vehicle.
The cords brought out into the instrument panel are connected to the connectors; an additional control signal cable is laid, which is switched to the Rem output (used for synchronous start-up and shutdown of the amplifier).
If the radio is equipped with a standard microphone or additional USB outputs with extension cables, you should check the tightness of the connectors and install the head unit in the standard socket. Then you need to install the removed plastic frames and air deflectors.
Connecting two-channel and four-channel
Connecting the amplifier to the standard radio depends little on the number of channels. The power cable is routed into the engine compartment through the holes in the engine panel. On some cars, the battery is located in a niche under the rear seat or in the luggage compartment. The cord is laid parallel to the standard wiring under the floor carpet; it is not recommended to bend the insulation over the sharp edges of the body panels. The negative cable is led out to the ground bolt or out to the car battery.
Then interconnect cables and a synchronous switching cord are connected to the amplifier; details of connecting the equipment are given in the factory operating instructions. The speakers are connected to the channel terminals; negative cords are prohibited from being combined into a common circuit or connected to the car body. When switching loudspeakers, you should take into account the location of the loudspeakers and the purpose of the channels. If the connection is incorrect, the sound picture is disrupted.
The subwoofer connection diagram includes the output of signal cables to the rear channels via a bridge circuit. The positive signal is taken from one rear output, and the negative signal from the opposite one. The remaining front outputs are used to power standard speakers connected side by side into common circuits. The type of connection depends on the resistance of the coils; the total value must correspond to the technical characteristics of the amplifier.
Connecting a single channel
1-channel type devices are used to power a passive car subwoofer. Due to the reduction in the number of channels, the power of the device increases, which allows it to operate with a load of up to 4 ohms. The design of the equipment uses a special electronic filter that limits the frequency of the audio range to be amplified. The bass amplifier for the subwoofer is a product type D.
The equipment is connected to the subwoofer using 2 cables connecting the positive and negative outputs to the speaker coil. Connecting the amplifier to the radio is carried out according to the method outlined above. It is allowed to use 2 identical subwoofers, which are connected into a single circuit using a parallel or series circuit. Negative outputs are switched to the amplifier block. Do not connect cables to vehicle body parts.
Connection without tulips
If there are no linear outputs on the head unit (typical of Chinese car radios), the cables from the speakers are connected to standard acoustic outputs through additional resistance. For switching, you will need to purchase 2 resistors with a nominal value of 0.1 and 1.0 kOhm. The elements are soldered into circuits, ensuring that the signal amplitude is reduced to an acceptable value.
It is possible to connect the amplifier through a ready-made adapter, which is connected by cables to the outputs on the head unit. On the other side of the block there are cords with tulip-type connectors, which are connected to an amplification device. It is recommended to check the operation of the paired devices in different sound modes, since the converter reduces the quality of the transmitted signal.
How to connect a subwoofer to an amplifier
Single channel connection
Connecting a subwoofer to an amplifier is not difficult; just connect the amplifier's audio output jack to the subwoofer coil or coils using speaker wires.
The wires should not be thin. In most cases, choose copper wiring with a cross-section of 4 mm and there will be no problems.
Connecting speaker wires
This subwoofer connection diagram is suitable for one channel of an amplifier or monoblock.
Monoblock is a single-channel amplifier designed specifically for subwoofers.
Connecting to a subwoofer via terminal block
Connecting to a subwoofer directly
Connecting a subwoofer with a bridge
In the case of using a multi-channel amplifier, the sub can be connected to two channels simultaneously, using the minus of one and the plus of the other, this connection is called bridged, with this method the power output by the amplifier increases significantly (see the specifications for specific numbers).
So you can connect a subwoofer to a two or four channel amplifier, using 2 channels for acoustics, and the remaining 2 for the subwoofer.
To connect a subwoofer with a bridge, make sure that your amplifier supports this feature.
If you connect a low-frequency speaker to an amplifier by changing the polarity, that is, connect the plus of the subwoofer to the minus of the amplifier output and vice versa, then the speaker will work in antiphase, there is nothing wrong with that, sometimes such a connection is used intentionally if the amplifier does not have phase adjustment (more about adjustment phases).
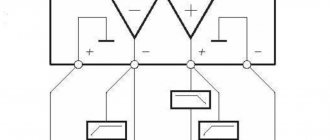
Connecting the subwoofer coils
The technical documentation for the subwoofer states the resistance of its coils (1 Ohm, 2 Ohm, 4 Ohm, rarely 0.5 Ohm), and the technical documentation for the amplifier indicates what resistance it can work with, this information is needed so that you connect correctly and effectively subwoofer to amplifier. The lower the resistance of the sub, the more power the amplifier will produce, provided that it can operate at this resistance. A subwoofer speaker may have several coils (1 or 2, rarely 4).
When the coils are connected in series, the resistance increases, while in parallel it decreases. If you don't want to learn definitions and count fractions, just save this cheat sheet (parallel and serial connections).
How much ohm to connect the subwoofer
The higher the resistance, the better the sound quality; the lower, the more power the amplifier delivers. If you need a lot of loud bass, then turn it to the minimum that the amplifier can provide, and if the overall sound quality of the system comes first, then it is 2 Ohms or 4 Ohms, depending on the power output.
Video on how to connect 2 subwoofers or more. Subwoofer connection diagram 2x2 Ohm, 4x4 Ohm, 1x1 Ohm. Serial connection of speakers. Parallel connection of speakers. Basic principles.
Happy connections!
It may be easier to connect a single-coil subwoofer to a monoblock or multi-channel amplifier. It's a completely different matter if the subwoofer has two voice coils or two or more of them.
A two-coil subwoofer, as well as two, three or more subwoofers, can be connected in four ways: each coil separately, parallel connection of coils, serial and combined.
What each of these subwoofer switching options gives is, first of all, versatility, different capabilities. Let's consider each option separately. But first of all, you need to understand what happens when the coils are connected in parallel or in series.
When the coils are connected in parallel, the total resistance, roughly speaking, becomes half as much. For example: if we connect two 4 Ohm coils in parallel, we get a total resistance of 2 Ohms, if we connect two 2 Ohm coils, we get a total resistance of 1 Ohm.
The opposite effect occurs with a series connection. When connecting two 4 Ohm coils in series, we get a resistance of 8 Ohms, when connecting two 2 Ohm coils, we get 4 Ohms. etc.
Connecting each coil separately . This option allows you to connect a powerful two-coil subwoofer to a less powerful four-channel amplifier if it is not possible or not possible to purchase a powerful monoblock. Naturally, the resistance of the coils must correspond to the operating load of the amplifier in a bridge connection and the GAIN controls must be at the same level.
Parallel connection of coils - subwoofers . As described above, when connected in parallel, the resistance is halved, allowing the amplifier, operating at a lower load, to deliver more power. But as they say, “if it leaves somewhere, it will definitely arrive somewhere.” In this case, this is true, only on the contrary, the power has increased, and the amplifier’s control over the subwoofer has decreased, as a result of which the bass becomes smeared.
Series connection of coils . If the amplifier is powerful, why not, increase the impedance (resistance) and get a more developed bass. I would also like to add that if the resistance of the connected coils exceeds the permissible load of the amplifier, this is not at all scary, it’s just that the output power of the amplifier will be less. Let's say an amplifier with a declared operation for a load of 4 ohms produces 500 watts, and with a load of 8 ohms, for example, it will produce 350 watts.
Combined connection . Subwoofers are coils that are simultaneously connected in serial and parallel connections for switching to a specific load. There are a great many connection options, it all depends on the number of subwoofer speakers, the resistance of the subwoofer voice coils and the capabilities of the amplifier.
Some car owners don't like the audio capabilities of their stock radio. This characteristic can only be corrected by connecting a subwoofer. Independent installation of built-in devices for transport can be carried out only if you have professional tools and study in detail the radio setup diagram. With a detailed algorithm, it is not difficult to fix the technique in a new way.
How to setup
Setting up the amplifier allows you to ensure uniform sound through all speakers of the speaker system. To adjust, you need to turn the Gain knob (indicated as Level on some devices) to the minimum level, and then set the HP filter corrector to maximum. If the amplifier unit is equipped with a built-in equalizer or bass booster, it is necessary to disable the functions (due to the effect on the sound picture). When using high-frequency speakers, the position of the LP corrector is additionally adjusted.
For further setup, you need to enable playback of music content on the head unit. After turning off the loudness compensation, the volume control is turned up to a position corresponding to the appearance of wheezing in the acoustics. Then the user lowers the volume and adjusts the position of the Gain corrector using a similar method. The operating mode is adjusted until a soft sound is obtained, uniform for all speakers. A correctly configured subwoofer does not stand out against the background of other frequencies, harmoniously complementing the sound picture.
Installing an amplifier for a car
- We choose a place in the car. There should be good ventilation - the amplifier heats up quite well. Also, the place should make it possible to later get to the amplifier for tuning.
- We fasten the amplifier using self-tapping screws or bolts.
- We secure the main fuse with two self-tapping screws near the battery.
- We stretch all the wires to the amplifier (speakers, interconnect wire, power supply) and connect them. It should be noted that it is better to route the power wire away from the speaker wires and interconnect wires to minimize interference.
- We supply power to the head unit, amplifier. We check for short circuits. Most amplifiers have an LED to indicate problems. If it lights up green or blue, then everything is fine. If it's red, it means something is connected incorrectly or has a short to ground. If two wires going to the speaker are shorted together (for example, at the speaker terminals), protection is also triggered. Cheaper amplifiers may not have protection, so you should check everything carefully before applying power.
Problems and their solutions
If the installed unit does not turn on, the cause of the defect is a violation of the integrity of the power supply circuit or the built-in adapter, which can be checked outside the car by connecting the product at home through a power supply that produces direct current, 12 V. If the equipment turns on correctly at home, you need to check the condition of the cables on the car using a test device. A coating of oxides and rust on the contacts impairs the transmission of electricity; as the current increases, circuit breaks occur.
From the radio there is a cable through which a signal is passed to activate the amplification circuit. Under normal conditions, the voltage in the cable is 5 V; when the parameter decreases, you need to check the reliability of the contact and make sure that there are no breaks in the cord. Additionally, the condition of the fuses and the reliability of grounding of the power circuit and interconnect cables are checked.
The amplifiers are designed with a protective unit that generates an error (blinking control indicator) when a faulty speaker is detected or when the audio cables are shorted. To restore functionality, turn off the speakers one by one to find the damaged circuit. To determine a grounding fault, an ohmmeter is used, which the user connects one by one to the loudspeaker circuits.
Squeaks during playback indicate an overload of the amplification device. It is recommended to lower the sound volume or select speakers with improved characteristics. The defect occurs when the patch cables are damaged, so you should additionally check the connection points of the wires for connecting the subwoofer and amplifier. If the sound periodically disappears, you should check the condition of the interconnect and speaker cables. If the broadcast of only one input is disrupted, you should look for a breakdown in the radio.