The engine compartment of the car is arranged quite tightly. Removing and replacing the alternator belt on a Vesta requires freeing up space in the engine compartment to provide access to the unit.
Author of the article: Yaroslav Alchevsky 05/20/2020 0 0
The Vesta alternator belt is one of the consumables without which it is impossible to operate the car. A break is an unpleasant malfunction that will quickly discharge the battery and immobilize the car. In such cases, the battery powers the car's electrical network alone, without help from the generator, and it does not last long.
Changing a part yourself is not easy; you need skills. It is better to choose original spare parts or products from well-known brands. The cost of work is 900-1500 rubles. Belts are offered at an average price - from 800 to 1,400 rubles, tension rollers - from 800 to 2,000 rubles.
Generator design and functions
A car generator is one of the auxiliary devices without which the operation of a vehicle is impossible. Its task is to provide sufficient electricity to all consumers on the car and charge the battery.
Malfunctions lead to the fact that the battery is left without an assistant; on its own, it can only provide movement for a short distance. To avoid such situations, manufacturers install a battery charging indicator lamp that signals a breakdown.
Generator belt. Photo source: https://www.drive2.ru/l/503533995397480550
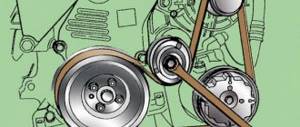
The generator is a mini power plant that produces three-phase alternating current. Then it is converted into a permanent one that powers the vehicle's electrical network. The device operates synchronously with the engine, driven by a poly-V-belt that transmits rotation from the crankshaft to the rotor. This generates electromotive force in the stator windings.
To assemble such a device, more than 20 parts are required. Main nodes:
- Rotor. It is an electromagnet whose winding is located around a rotating shaft. Contact between them is ensured by graphite brushes.
- Stator. These are 3 fixed windings made of copper. They are wound on a magnetic core and connected to each other.
- Relay regulator. Its function is to control the voltage at the output terminals at a level of 13.5 V. The relay has overload protection functions. More complex designs have a built-in temperature sensor, which provides a higher voltage supply in winter. At low temperatures, electricity consumption in a car increases. It is installed on the housing using a special brush holder, or inside the generator in one block along with the brushes.
- Rectifier (diode bridge). Its functions include converting an alternating signal into direct current.
- Frame. Made from light metals or their alloys to reduce weight. Since a running generator is subject to heat, the housing has many ventilation holes to ensure that the device is cooled by air currents.
An additional impeller is provided, the blades of which rotate along with the rotor and provide more efficient cooling by increasing air flow.
How to replace a belt yourself
For such work you need to prepare. If it is possible to use a hydraulic lift, then this would be the best option. But a viewing hole is quite enough.
First, prepare a set of tools and accessories:
- Lifting device.
- Wrench No. 17.
- Hex key 5 mm in size.
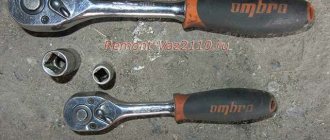
- Torx socket set with wrench.
- Set of open-end and socket wrenches.
- Several slotted screwdrivers.
- Extension.
- Device for securing camshafts.
- Key for circlips.
This is a sample set of tools, other accessories may be required.
Preparing for work
Place the car on a lift, but do not lift it yet. First, pull the handbrake all the way, then remove the negative cable from the battery. Before starting work, lift the machine and remove the alternator belt. Also remove the starter, as it will interfere with operation.
To perform this preparation, you will first need to remove the front right wheel and mudguard.
Perform the remaining steps in the following order:
- Use a screwdriver or other tool to secure the engine flywheel from rotating. Insert a screwdriver or suitable tool into the starter hole.
- Using a 17 mm socket wrench or a socket, unscrew bolt 1 securing crankshaft pulley 3.
- Remove the pulley, and screw bolt 1 with washer 2 into place and tighten.
- Pull out the screwdriver that secures the flywheel from turning.
- Lower the vehicle using the lifting device.
1 - bolt, 2 - washer, 3 - crankshaft pulley.
For further preparation you will need a special device - a traverse. This will help raise the right side of the engine.
- Secure crossbar 1 as shown in the photo.
- Insert hook 2 into the eye bolt.
- Raise the power unit using a traverse.
To suspend the engine, install cross-beam 1, hook 2 to eye-bolt 3
To make it easier to install the engine mount in place, draw a marker around it.
Next, using an E12 Torx socket, unscrew two bolts No. 1 securing the right support to the engine. Then remove two more #3 bolts that secure the support to the body and remove it. To do this you will need an E16 Torx head.
Right engine mount: 1 — bolt securing the engine to the right mount, 2 — support, 3 — bolt securing the support to the body
Remove the cover protecting the belt drive. To do this, using a 5 mm hexagon, unscrew 5 screws in the upper half of the cover, then 3 in the lower half.
Timing drive covers: 1 - upper half, 2 - lower half
What kind of generators are installed on the Lada Vesta?
The Volzhsky Automobile Plant does not produce automobile generators. The provision of Lada Vesta vehicles with such devices is the responsibility of suppliers. The main manufacturers carrying out conveyor deliveries are Bosch and Valeo.
Drive belt. Photo source: https://www.zr.ru/content/articles/779188-lada-vesta-proverka-i-zamena/?
The original generators produced by these companies are sold under the Lada brand. Article number - 8450006900, output current - 120 A. For equipment with a heated windshield, a version producing 150 A is available.
There are many analogues on the market. Among the domestic ones, the most widely used products are those with an output current of up to 200 A.
When to change the timing belt
The timing of replacing the timing belt on the Lada Vesta, as in other cars, depends on many factors. The manufacturer recommends performing this procedure every 90,000 km, however, given the possible consequences of a break, it is recommended to replace it much more often. Especially if your car's engine has significant mileage. Any oil leaks, water splashes and dirt can significantly reduce the life of the timing belt. So how much mileage does it take to replace? – we recommend changing it every 50,000 km.
We answered questions about how to replace and after how long to change the timing belt on Vesta. If you still have questions about a procedure such as replacing the timing belt on a Lada Vesta, videos and photos on the Internet will help you answer them. And remember a very important point - diagnose the condition of the timing belt as often as possible, because a broken timing belt can lead to considerable financial and time costs.
What belts are installed on Lada Vesta
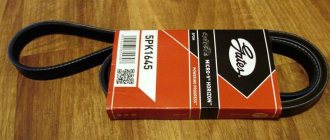
The article number of the Lada Vesta alternator belt with air conditioning is 8450006328. Modifications 6PK1039 are used for cars equipped with an air conditioning system, and 6PK778 for the Vesta alternator belt in the configuration without air conditioning. The official suppliers of these parts to the VAZ conveyor are Gates and Contitech.
Vesta generator tensioner roller. Photo source: https://doktormobil.ru/katalog/roliki/330889/
On cars with 1.6 16v and 1.8 liter engines equipped with air conditioning, the necessary tension is provided by the support roller of the Lada Vesta generator under number 8450006996. Its design is such that if the part is in good working order, no adjustments are required.
What engines are installed on Vesta
Before getting acquainted with the work, let us remind you what types of engines are equipped with the new machine. AvtoVAZ offers consumers a whole series of engines:
- VAZ-11189, 87 l. pp., 1.6 l.
- VAZ-21129, 106 l. pp., 1.6 l.
- VAZ-21179, 122 l. pp., 1.8 l.
- Engine Renault-Nissan HR16DE-H4M, 114 l. s., volume 1.6 l.
The specified range of power units may change over time. Therefore, do not blame me if there are inaccuracies in the list. The first three types of power units were created in Russia at AvtoVAZ on the basis of old models. The latter type was the result of a joint development of Japan and France from the Renault-Nissan concern. This engine uses a chain drive for the camshaft, but there are no hydraulic compensators. Therefore, every 80 thousand kilometers the timing valve clearances need to be adjusted.
Most often in Lada Vesta configurations you can see engines 21179 and 21129. Regarding the 8-valve engine with 87 “horses”, many complain that there is not enough power. But together with a manual transmission it produces good results.
The best option is the VAZ-21129 engine. It has 16 valves and produces 106 hp. With. The main problem with the motor is the belt drive. The service life of the entire power unit depends on its performance.
How to check the belt
The technical regulations provide for checking the condition of the drive of mounted units every 15,000 km, replacement - after 90,000 km. The surface condition and tension are checked visually. It is checked as follows:
- A thin metal plate is applied to the longest straight section.
- Using your fingers, applying medium force (no more than 10 kg), pull the belt.
- Measure the resulting gap, which should not exceed 10 mm.
Alternator belt tensioner. Photo source: https://www.lkforum.ru/showthread.php?t=67012&page=44
In this case, the Vesta generator belt is tensioned according to the rules. Over-tightening is also unacceptable; it leads to accelerated failure of bearings on rotating shafts.
Timing belt replacement interval Lada Vesta SV Cross
AvtoVAZ recommends replacing the timing belt after 180,000 km. Yes, this is a very strong statement. But you just need to open the Lada Vesta SV instruction manual on the desired page to see documentary evidence of this:
Just remember the Lada Priora, which also had a similar timing belt replacement interval. But 90% of all Priors produced from the factory had a belt that lasted barely 120,000 km. I think it’s unlikely that Vesta has changed anything for the better. Therefore, it is better to change the timing belt not at 180 thousand km, but at a maximum at 70 thousand km.
How much will it cost to replace the timing belt on a Lada Vesta Cross SV?
If we do not take into account the work, then we will need the timing belt itself, tension and parasitic rollers. Such a kit will cost from 2500-3500 rubles. It is best to replace the water pump immediately with the belt. They often jam, which causes the valves to bend. The pump costs 1000-1500 rubles. In addition to the pump, you will also need to take antifreeze to top up, since something will spill out in any case. This is another 150-300 rubles. In total, we get 3650-5300 rubles for spare parts.
The rest can be done by hand. If you do the work at a service, you will have to spend another 1000 rubles for the work. We will save on work and do everything ourselves. So, let's go.
Signs of belt and tensioner wear
There are a number of characteristic symptoms that indicate an abnormal drive condition:
- Whistle when starting the engine. Appears due to insufficient tension caused by a worn belt or a faulty roller (on cars with air conditioning). If it rotates freely, there are no visible signs of wear, the cause is looked for in the belt. It has a polycline structure. The surface consists of several longitudinal ridges, called wedges, and depressions, “streams,” located between them. When the ribs are ground down, the wedges sink deeper into the pulley grooves, thereby reducing the internal diameter of the drive. The increase in length at a certain stage goes beyond the limits that the tension roller can compensate for.
- Cracks on the surface. With use, transverse cracks appear, often on the inner surface. Several of these are a warning sign; when there are many of them, the drive must be replaced immediately.
- Worn roller surface. An evenly ground pulley is not so bad if the sagging is compensated by moving the roller. Otherwise, the belt will slip and may even jump out of the groove. Uneven wear can create edges that cut the belt.
There are no effective ways to restore the functionality of the mechanism. The only way out is to replace worn parts.
How to change the Vesta timing belt with your own hands
You should immediately warn car owners that the work of replacing the belt on Vesta is labor-intensive, requiring special technical equipment and experience in carrying out such work. Access to the timing belt is difficult, blocked by attached engine parts. Also, during repair work, you will need to remove the right engine mount; for this, it will need to be hung.
After removing the protective cover of the timing drive, we check that the timing marks match . The marks on the camshaft pulleys must match the marks on the rear timing cover. Therefore, using a “17” wrench, we turn the crankshaft by the damper mounting bolt until it matches.
If you are removing the timing belt not for replacement, then you need to mark the directions of its rotation and marks for the pulleys. To do this, you can use a marker or white paint.
During repairs, it is prohibited to rotate the timing belt by rotating the camshaft pulleys.
To make it easier to turn the crankshaft, you need to unscrew the three screws and remove the starter. Then, using the inserted slotted screwdriver, we hold the crankshaft from turning.
If you are the owner of a car with a manual transmission, then you can unscrew the pulley bolt by shifting into high gear and pressing the brake pedal to briefly start the engine.
After dismantling the timing belt, you need to make sure that the tension and guide rollers are working properly and, if necessary, replace them.
The tension roller mounting bolt is tightened to a torque of 33.2-41.2 Nm.
How to replace the alternator belt on Vesta
The engine compartment of the car is arranged quite tightly. Removing and replacing the alternator belt on a Vesta requires freeing up space in the engine compartment to provide access to the unit. First, prepare the tools.
Replacing the alternator belt tensioner on a Lada Vesta. Photo source: https://www.zr.ru/media/?media=photo&p=594
To work you will need:
- Torx keys T-55,T-20, T-30;
- slip-on “13”;
- set of open-end wrenches;
- Phillips and flat screwdriver;
- wheel wrench;
- jack (in the absence of a lift or inspection hole).
The sequence of actions depends on the vehicle configuration: type of gearbox, presence of an air conditioning system, tension roller.
Sequencing:
- Hang the right front wheel, or use a lift or inspection pit.
- Remove the fender liner. First unscrew the fastening screws.
- Remove the metal engine protective shield.
- On vehicles with a manual transmission, unscrew the hydraulic clutch cylinder and hang it on a service hook.
- Dismantle the clutch hydraulic cylinder mounting bracket.
- Unscrew and hang the starter without disconnecting the wires. This will open access to the flywheel and allow you to lock it with a large screwdriver or a special insert;
Then the differences begin. For a car without air conditioning:
- Disconnect the crankshaft damper by unscrewing the mounting bolt.
- Use a screwdriver to remove the plastic plug on the roller.
- Use a 13mm spanner to loosen the tension roller nut.
- Using a Torx T-55 wrench, rotate the roller counterclockwise until the top position is reached.
- Remove the loose drive belt.
The belt is installed on the device pulleys in the following order:
- damper;
- air conditioning compressor;
- generator;
- tension roller.
After installation is complete, the alternator belt must be tensioned. On Vesta, the tension roller is moved to the lower position by rotating clockwise. Once the desired position is reached, the position of the roller will be fixed, and the belt will receive the necessary tension. Then tighten the fastening nut.
Work progress
Removing the fender liner
First, you need to drive the car onto an overpass, jack it up and remove the front right wheel.
Next, the fender liner is removed. To do this, using a wrench and a Torx T-20 bit, first unscrew 2 self-tapping screws, with which the locker is fixed to the bumper at the bottom, after which 2 more self-tapping screws are unscrewed, but along the edge of the wheel arch.
Then, using a Torx T-30 bit, remove 2 screws that secure the locker to the subframe.
Attaching the locker to the subframe
The fender liner is fixed to the mudguard with 3 pistons, the clamps of which must be pryed and removed, and then the clips themselves must be removed.
In the end, all that remains is to pull the locker back so that it does not interfere with work.
We move the locker to the side
Of course, there is another option to simply cut out a piece of the fender liner with a knife, so as not to waste time on removing and installing it, but it is still not recommended to damage the component.
Features of belt removal
The process of independently replacing the alternator belt on a Lada Vesta directly depends on the vehicle’s equipment – the presence or absence of air conditioning, as well as on the type of gearbox.
Equipment without air conditioning requires removal of the standard protection. To do this, 13 bolts are unscrewed using a wrench and a 10-point head.
Attachment points for standard Lada Vesta protection
Version with manual transmission - remove the clutch hydraulic cylinder. It is fixed with 2 bolts. When the cylinder is removed, it should be hung by the hook, but there is no need to disconnect the tube.
Configurations without air conditioning - you need to remove the starter (along with the wiring), as well as the bracket, and then also hang it up. It is secured with 3 bolts. In addition, it is necessary to block the flywheel, which is done through the technical hole, which is intended for the starter mounting bolts on the transmission.
Versions with “conduit” - first you need to loosen the nut, then turn the roller (tension) to the left until it is in the upper position.
Configurations without “condya” - you will need to remove the crankshaft damper, for which you first unscrew the bolt and then remove the washer.
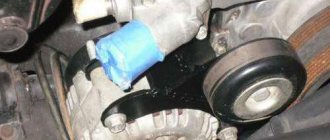
How to replace the tension roller
The manufacturer recommends replacing the roller together with replacing the belt.
Belt tensioner key. Photo source: https://mashintop.ru/dvigatel/kak-i-kogda-pomenyat-remen-grm-na-lada-vesta-lada-vesta-metki-ustanovka-i-natyazhenie.html
This is a labor-intensive operation. The roller rests on the spar and it is impossible to dismantle it without hanging the engine. After removing the alternator belt used on the Vesta, it is necessary to carry out the following operations:
Removing the timing belt
To remove the timing belt, you must perform the following steps:
- Remove the terminal from the battery
- Raise the car on a lift
- Remove the accessory drive belt
- Remove the crankshaft damper, first stopping the rotation with a screwdriver or special tool, then tighten the crankshaft bolt
- Unscrew the 2 bolts securing the right support to the internal combustion engine (Torx E12), having previously suspended the engine on a traverse or other device
- Unscrew the remaining 2 bolts securing the support to the body (16 mm head) and remove it
- Remove the timing belt guard by unscrewing 5 bolts (5 mm hexagon)
- Rotating the crankshaft, align the camshaft marks at the same level with the marks on the rear cover
- Loosen the tension roller bolt with a 17 mm wrench
- Remove the timing belt
For convenience, use a special tool: a camshaft clamp and a crankshaft clamp.
Thanks for subscribing!
Replacing the timing belt of a Lada Vesta car
We prepare the vehicle for work. We place the car on a lift or inspection hole. Disconnect the negative terminal of the battery.
Remove the drive belt.
Stop the flywheel from turning.
Using a 17mm socket, unscrew bolt 1, Figure 1, of the damper fastenings, remove washer 2 and damper 3 of the crankshaft.
We screw the damper mounting bolt into place.
Remove the flywheel locking device (if used).
We install traverse 1 on the car, Figure 2, to hang the engine, insert hook 2 of the traverse into eye 3 of the right eye, and hang the power unit on the right side.
Using a TorxE12 head, unscrew and remove two bolts 1, Figure 3, securing the power unit to the right mount 2 of the engine mount.
Mark the position of the right support with a marker.
Using the same head, unscrew the two bolts 3 securing the right support of the power unit suspension to the body and remove the right support.
Using a 5mm hexagon, unscrew the five bolts with washers and remove the upper protective cover 1, Figure 4.
We unscrew the three bolts with the same key and remove the lower protective timing cover.
Using a 17 key, turn the crankshaft by the damper mounting bolt until the mark on the crankshaft toothed pulley matches the mark on the oil pump housing. In this case, the marks on the camshaft pulleys must coincide with the marks on the rear protective cover.
Loosen bolt 1, Figure 5, fastening the automatic tensioner 2, unscrewing it 2 - 3 turns, and remove the spacer washer and timing belt 3 from the crankshaft pulley (use a 17-mm spanner and a flat-head screwdriver).
Article continued on page 2..
The timing belt drives the camshafts and valves in accordance with the positions of the pistons. If you do not take care of this unit, there is a high probability of complete engine failure followed by expensive repairs. What could happen?
A worn belt can break, and a worn tension pulley can cause the belt to slip through the teeth. All this disrupts the position of the valves relative to the pistons, which can lead to their “meeting,” which usually results in bent valves and camshafts broken into several parts.
If you do not want such consequences, then the only correct solution is to timely replace the timing belt and tension pulley. To perform this procedure in a Lada Vesta car, use the instructions given below.
Preparation
Before you start replacing the timing belt on the Lada Vesta and X-Ray yourself, you need to drive the car onto an overpass, put it on the handbrake, and reset the negative terminal from the battery. It is recommended to work together. You also need to prepare tools for work:
- Driver and set of heads;
- Key to 17;
- Traverse;
- Set of Torx bits;
- Slotted screwdrivers;
- Extension;
- Special key or pliers for rings (circlips);
- Set of open-end wrenches;
- Device for fixing camshafts.