Checking and replacing the coolant temperature sensor in Lada Priora
The standard coolant temperature sensor in the automotive electronic control system is designed to establish the temperature values of the power plant at the current moment of its operation. The impulse emanating from this electrical device forces the on-board computer to set the required optimized number of idle speed control steps, while simultaneously regulating the supply of the fuel mixture.
The coolant temperature sensor itself is nothing more than an ordinary thermistor, i.e. a resistor whose resistance value is directly related to the change in the temperature value of the coolant. This effect in electrical engineering is called “negative temperature coefficient” and means that as the temperature of the coolant (antifreeze) increases, the resistance value of the coolant temperature sensor drops.
An increased temperature value of antifreeze entails a reduced resistance value (70 Ohm + 2% at a temperature value of 130°C), and, accordingly, a decrease in temperature value implies an increased resistance value of the sensor with values of 100-700 Ohm ± 2% at a temperature parameter of - 40°C.
The operating principle of the coolant temperature sensor is as follows: the controller, as an actuator, sends a voltage supply signal with a value of 5 V to the device through a constant resistance integrated into the controller. This executive component calculates the temperature values of the coolant based on changes in voltage readings on a sensor with a variable resistance.
On an unheated motor, the voltage value is high; on an engine that has reached the temperature value of the operating operating mode, the potential difference parameters are low. Thus, if the power plant is not turned on, then the voltage on the temperature sensor has increased values; if it has reached the optimal operating temperature, the values are low.
When the coolant temperature sensor operates in the engine start mode, when the ignition system is initiated, the on-board computer transmits a signal to the electric fuel pump relay. This device, having received a command signal, generates the corresponding pressure value in the fuel line for supply to the injection system.
The on-board computer tests the pulse of the Priora coolant temperature sensor and sends a signal to supply the optimal volume of fuel and air masses. When the vehicle's crankshaft rotates, the on-board computer initiates the creation of a fixed-type signal to fire the injectors, the pulse interval being related to the frequency of the signal supplied by the temperature sensor. This interval will be longer when the engine is not warmed up and shorter when the power plant has entered operating mode.
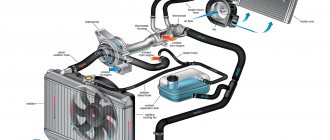
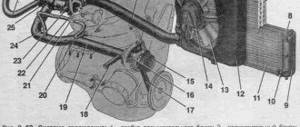
Let's look at the location of the coolant temperature sensors in the Priora. It should be remembered that the two-contact temperature sensor is located between the cylinder head and the thermostat, while the single-contact temperature sensor is located on the dashboard.
Identified defects in the coolant temperature sensor in a Priora car include unstable contact and its loss in the internal cavity of the device and damage to the insulating layer. In other cases, the product is quite reliable if you monitor the condition of the supply wiring. There are times when the device produces incorrect information.
To check the temperature sensor using a tester, set it in ohmmeter mode to the output contact and the body of the product. When located in a room where the temperature is approximately 18-25 degrees Celsius, the resistance of the coolant temperature sensor should be in the range of 1.5-1.7 kOhm.
To measure the resistance of the device at different temperature positions on the output contacts of the device, you need to immerse this electronic gadget in heated water. When the water temperature decreases due to cooling of the liquid, we continue measuring the resistance values and, if the device is in working order, the resistance should increase.
To replace the temperature sensor, you will need basic plumbing tools and a set of wrenches. The procedure for replacing the coolant temperature sensor for Priora:
- Remove the negative wire from the battery terminal.
- Drain a little antifreeze from the radiator.
- We dismantle the air purification filter for comfort during work.
- Squeeze the plastic fastener.
- Disconnect the wiring connector from the Priora coolant temperature sensor.
- Using a wrench, slightly loosen the tightening of the DTOZH and unscrew it from the thermostat body.
- To install the coolant temperature sensor, you need to do all the above steps in reverse order.
- Pour antifreeze into the vehicle's cooling system.
At this point the procedure can be considered successfully completed.
Methods for removing air lock from the cooling system
How to remove an air lock from the cooling system of a VAZ classic
There are three main methods by which you can eliminate an air lock. Let's list them in order. The first method is great for VAZ cars . Its algorithm will be as follows:
- Remove from the engine all protective and other elements that may prevent you from reaching the expansion tank with coolant.
- Disconnect one of the pipes that are responsible for heating the throttle assembly (it doesn’t matter whether it’s direct or reverse).
- Remove the expansion tank cap and cover the neck with a loose cloth.
- Blow inside the tank. This will create a slight excess pressure, which will be enough for excess air to escape through the pipe.
- As soon as antifreeze comes out of the hole for the pipe, immediately put the pipe on it and preferably secure it with a clamp. Otherwise, air will get back into it.
- Close the expansion tank cap and reassemble all previously removed engine protection elements.
The second method is carried out in accordance with the following algorithm:
- Start the engine and let it run for 10.15 minutes, then turn it off.
- Remove the necessary elements in order to get to the expansion tank with coolant.
- Without removing the lid from it, disconnect one of the pipes on the tank. If the system has been aired, then air will begin to escape from it.
- As soon as the antifreeze flows out, immediately replace the pipe and secure it.
The third method of how to remove an air lock from the system must be done as follows:
- It is necessary to place the car on a hill so that its front part is higher. It is important that the radiator cap is higher than the rest of the cooling system. At the same time, put the car on the handbrake, or better yet, put chocks under the wheels .
- Let the engine run for 10.15 minutes.
- Unscrew the caps from the expansion tank and radiator.
- Periodically press the accelerator pedal and add coolant to the radiator. This will cause air to escape from the system. You will notice it by the bubbles. Continue the procedure until all the air is released. In this case, you can turn on the stove to maximum mode. As soon as the thermostat opens the valve completely and very hot air enters the cabin, it means that the air has been removed from the system. At the same time, you need to check for bubbles coming out of the coolant.
As for the last method, on machines with an automatically turned on cooling system fan, you don’t even have to over-gas, but calmly let the engine warm up and wait until the fan turns on. At the same time, the movement of the coolant will increase, and under the influence of circulation, air will leave the system. In this case, it is important to add coolant to the system in order to prevent airing again.
As you can see, the methods of how to get rid of an air lock in the engine cooling system are quite simple. They are all based on the fact that air is lighter than liquid. Therefore, it is necessary to create conditions under which the air lock will be forced out of the system under pressure. However, it is best not to bring the system to that state and take preventive measures in a timely manner. We will talk about them further.
Coolant temperature sensor on Priora: what do you need to know and be able to do?
The coolant temperature sensor (CTS) in a Priora car performs the function of monitoring the thermal state of the power unit. Thanks to DTOZH, the driver always knows to what temperature the engine is warmed up and whether there is overheating in the system. You can learn more about the principle of operation, as well as replacing the controller, from this material.
Many motorists confuse the DTOZH with a cabin or ambient temperature sensor, but this is completely wrong. The purpose of the DTOZH is to monitor the temperature of the refrigerant in the cooling system.
There are two regulators in Lada Priora cars:
- One of them is installed on the cylinder head and its purpose is to display information about the engine temperature on the dashboard. Essentially, this is a pointer.
- The thermostat housing contains the DTOZH, which plays a more important role. This device transmits pulses to the control unit to activate the ventilation device. In addition, it plays an important role in the formation of the combustible mixture during startup of the power unit.
As for the principle of operation, it is as follows. The main regulator is located in the thermostat housing, which allows for the highest pulse accuracy. Since the DTOZH in any case comes into contact with consumables, that is, antifreeze, it instantly detects changes in temperature and sends corresponding signals to the ECU. The latter, based on the information received, adjusts the operation of the engine and changes the composition of the air-fuel mixture. If there is no or too low level of consumable fluid in the system, the controller will provide incorrect data.
Possible sensor malfunctions
If the regulator fails, this is fraught with the following problems for the car owner:
- gasoline consumption will increase;
- the volume of exhaust gas emissions into the atmosphere will increase;
- the engine may stop working and will be difficult to start;
- overall deterioration in vehicle dynamics, poor handling;
- the power unit will take much longer to warm up, since due to incorrect readings from the DTOZH the control unit may randomly turn on the fan;
- Overheating of the engine is also possible.
How can you remove an air lock from the cooling system?
The presence of air in the cooling system is fraught with problems for both the engine and other components of the car. In particular, overheating may occur or the stove will heat poorly. Therefore, it is useful for any motorist to know how to remove an air lock from the cooling system. This procedure is quite trivial, so even a beginner and inexperienced car enthusiast can do it. Due to its importance, we will talk about three methods of removing air. But first, let's talk about how to understand that air jams are occurring and the reasons for their occurrence.
How to eliminate error 4 on BC Lada Kalina: check light is on, photo
According to the service manual, error number 4 in the control unit indicates a malfunction of the coolant temperature sensor. According to reports from members of our community and according to motorists, this error is quite common and appears often on the Lada Kalina. It’s worth figuring out why errors pop up and how to fix the problem.
Causes of 4 errors
There are several reasons why error 4 appears in the ECU. Let's consider all possible options:
- The coolant temperature sensor has failed.
In the process of replacing and repairing the coolant sensor on Kalina
How to remove a plug in the cooling system on a VAZ 2170-VAZ 2172?
1. There are only a few ways, each of which we will consider today, firstly, the very first method is very simple and does not require a lot of effort, you will need to find at the beginning any climb or slide and after finding it, drive up it and putting the car in neutral gear (the front should be higher than the rear), after standing for two minutes, let it idle and turn on the heater, make sure that the plug is removed from the system, otherwise let the car sit the same time, but apply gas at the same time, this way the traffic jam will most likely be removed.
2. The second is also an effective method and it consists of the following: you need to unscrew the cap of the expansion tank (Indicated by the arrow in the photo below) when the car is not warmed up (it will still be cold, to put it simply), then get into the car and start its engine , let the car run for three, four or even five minutes (If necessary), then turn it off and turn on the heater, thereby making sure whether the air lock has left the system or not.
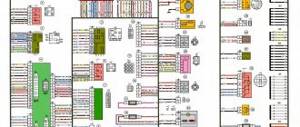
3. Well, the last way is to press all the thick hoses of the cooling system with your hand, there are four hoses in total, as you can see in the diagram just below (these hoses are indicated by numbers 4, 10, 13 and 18), so these are all the hoses that are shown in the diagram and you need to press it, then start the engine and let it warm up, check the result, if one of the methods does not help you, then in this case drain the liquid and fill it (If it is new) again (If it is old, then change it to a new one) , but don’t forget to disconnect the hose from the throttle assembly fitting; by the way, you don’t have to drain the liquid, but at the beginning just try to disconnect the hose itself from the fitting (Which hose needs to be disconnected and from which fitting, read the article: “Replacing the coolant”, in everything is written in paragraph 1) and if liquid does not flow out of it, then feel free to open the cap of the expansion tank and add coolant to the reservoir until it flows out of the hose or until the MAX mark reaches (All this is done on a cold engine ).
Replacing and checking the coolant temperature sensor on LADA
The coolant temperature sensor (CTS) is one of the elements of the engine management system. Its purpose is to control the temperature of the fluid in the cooling system. Based on these data, the engine control unit adjusts the composition of the fuel-air mixture, crankshaft speed, and ignition timing.
On all modern LADA cars (XRAY, Vesta, Largus, Granta, Kalina, Priora or Niva 4x4), replacing and checking the coolant temperature sensor is carried out in the same way.
SIGNS OF DTOZH MALFUNCTION
The coolant temperature sensor affects engine starting and operation. Here are some symptoms that indicate that the sensor may be faulty:
Other interesting articles on maintenance and repair Lada Xray
Lada Xray: air conditioning device
Maintenance and repair of Lada Xray chassis
New VAZ 21179 engine for Lada Xray
Replacing the coolant temperature sensor
The coolant temperature sensor is located in the thermostat housing; it is number 14 in the diagram.
To change the DTOZH with your own hands you should:
- Drain the coolant (car mechanics do not drain it);
- Disconnect the connector with wires;
- Unscrew the sensor (key “19”).
Installation is carried out in reverse order. To eliminate the leak, replace the copper washer or apply a heat-resistant sealant to the threaded part of the sensor.
How to check the coolant temperature sensor
After removing the sensor, it should be visually inspected for damage or corrosion. The easiest way to check the DTOZH is to replace it with a known good one.
- multimeter (in voltmeter mode, ohmmeter with a measurement limit from 100 Ohm to 10 kOhm);
- thermometer (with a measurement limit of at least 100 °C);
- heat-resistant container with a volume of 0.5 l.
The procedure for checking the power supply circuit of the DTOZH:
- Switch the multimeter to voltmeter mode;
- Remove the block with wires from the sensor and turn on the ignition;
- Connect the negative probe of the multimeter to the engine ground, and the other to terminal No. 1 of the block;
- The voltage at the terminal must be at least 12 V. If there is no voltage or less than 12 V, it means the battery is discharged, the power circuit or the computer is faulty.
We also recommend that you read
Procedure for checking DTOZH:
- Switch the multimeter to ohmmeter mode;
- Prepare a container with hot water (about 100 oC);
- Connect the multimeter probes to the sensor terminals and lower its working part into water;
- We measure the resistance of the DTOZH as the water cools.
The sensor resistance should be close to the data shown in the table:
The verification process is also shown in the video:
If the DTOZH turns out to be in good order, the cause of the malfunction may be poor connector contact, broken wiring, or a faulty ECU.
Reasons why air appears in the cooling system
Air appears in the system due to malfunctions, actions or inactions on the part of the driver. The following reasons are identified:
- The tightness of the system is broken. This could be a loose clamp, fitting, or cracks in the hoses.
- Work has been carried out to replace or top up the coolant. This is, as a rule, the most common reason for air getting in, because not everyone knows that it should be poured in a thin stream. If you pour in a thick stream, a funnel is formed that swirls the air.
- The air valve is out of working order. This valve is located in the coolant reservoir cap. During natural heating or by installing and starting an autonomous engine preheater, the volume of liquid increases, the pressure in the tank increases and excess air must be discharged through the valve in the lid. This is also a common reason. This is the first place to look for the reasons for airing in the cooling channels. This cover costs 100 rubles for modern VAZ cars. Whoever changes it, when he has already double-checked all the reasons, even after replacing the cylinder head, it turned out that the reason was precisely the non-working cover.
- Problems with the pump (pump). The seals and fibers in the pump may be faulty, causing air leaks.
- There is a leak through a bolt in the cooling radiator (not available on all models). If there is a leak of antifreeze, antifreeze or water, the lost volume is filled with air.
- Burnt cylinder head gasket. If the engine has already been overheated, then there is a possibility that the cylinder head gasket has burned out. When it burns, coolant is released either into the crankcase or into the exhaust system. Seething and boiling begins when the volume of coolant (coolant) has decreased and the entire void is filled with air. In this case, repairs and replacement of the head gasket will be required; for this you need to know what types of cylinder head gaskets there are.
If coolant gets into the engine crankcase, it is easy to check with the oil level dipstick; the level will be higher than expected. If water is used as coolant, the engine oil will turn white. Sometimes air gets into the brake system, in which case the system also needs to bleed air. And for this you need to know the diagram, which wheel to start with and what exactly to do to bleed brakes with ABS and how to bleed brakes without ABS. If the entire fuel fluid has leaked or you want to replace it, then such work also has its own nuances. In particular, you need to know which brake fluids can be mixed and how much brake fluid is needed for replacement.
see also
After driving the car after purchasing it, I noticed a fairly high temperature. On the highway it was the normal 90C, but in the city in traffic jams it reached 110C. It's the middle of summer and even at night it gets hot.
First of all, I changed the antifreeze. Without changes. Further, it was noticed that the fan does not turn on above 90C, but approximately closer to 105C. I connected it directly and made sure that the fan was in working order. Through the on-board computer I found an error in the coolant temperature sensor, decided to change it, it’s inexpensive, about 130 rubles, after replacing there is no difference. Carlson stubbornly refuses to turn on earlier.
FakeHeader
Comments 17
My fan is spinning at 110. Right before the red line. What should I do? Maybe the sensor can be changed.
If you have a multimeter, you can check the resistance of the sensor, or set the fan to turn on at a lower temperature. In general, the Priora has a high engine operating temperature from the factory, about 100 degrees in my opinion.
Maybe my sensor is like this. Pump it to 100 so that it turns on and it's normal. Or are there different sensors on the Prior?
The temperature for turning on the fan is registered in your ECU; it does not depend on the sensor, it simply shows the temperature. Another thing is if it shows incorrect data, then replace it.
Is flashing needed to turn on even earlier? And where is it made?
Diagnostics can flash. If possible, it’s better to come in for a consultation, maybe everything is okay.
Well, if you say that everyone has a Priora so that just before the red light the fan turns on, then it’s normal... But I want it to turn on at least 10 degrees earlier... Otherwise, the overheating beeper went off a couple of times... I had to stop... although I immediately turned it on The temperature has already dropped ten degrees. It can’t happen right away, can it? It's not the same anymore
Well, in my opinion, there are 2 options: 1. The temperature sensor is faulty and shows inflated readings, while everything is fine with the temperature - change the sensor. 2. The sensor is working, everything is fine - I don’t see any point in driving further, flashing my brain to turn on the fan earlier. What about the thermostat, at what temperature does it open and operate normally?
When I discovered that my Honda's temperature was at 86 degrees, I thought the thermostat was screwed. After VAZ I couldn’t even imagine that this could be the operating temperature of the engine.
102 - 105 degrees, fan speed according to specifications
The temperature doesn’t seem to be critical... But what’s interesting is, through which BC did you see the error?
Well, everything is simple here)
Using the standard on-board computer of the Priora, built into the instrument panel, you can read error codes.
To read the errors, you need to turn on the testing mode: press the daily mileage reset button, and without releasing it, turn on the ignition. On the liquid crystal display (LCD) of the instrument panel, all positions of the familiar areas (segments) will light up, and the arrows of the tachometer, speedometer, coolant temperature indicator and fuel level indicator will move from minimum to maximum values and back. Thus, the serviceability of the LCD and indicators of the above sensors is visually checked. Next, on the right steering column switch, press the button for switching functions of the on-board computer - the program version (Ver 1.0 and higher) will be displayed on the LCD.
Press the BC function switch button again. Error codes are displayed on the LCD (if there are errors). If necessary, you can reset error information. To do this, press and hold down the daily mileage reset button for 3 seconds.
Decoding the error codes of the standard on-board computer priors: 2 – increasing the voltage of the on-board network; 3 – fuel level sensor error*/***; 4 – coolant temperature sensor error*; 5 – outside temperature sensor error**; 6 – engine overheating***; 7 – emergency oil pressure***; 8 – defect in the brake system***; 9 – battery discharged***; E – error in the data packet stored in the EEPROM.
* – an error is registered if within 20 seconds. a sensor break is detected; ** – an error is registered if there is no sensor reading within 20 seconds (indication on the LCD is “–C”); *** – accompanied by an acoustic signaling device.
If you do not press the BC function switching key for 10 seconds, the instrument panel goes into operating mode.
Note: In some instrument panels, the error codes and descriptions may differ from those shown above. In my case, code 3 is an error in the coolant temperature sensor, and code 4 is an error in the fuel level sensor. In addition, a fuel level sensor error appears every time the gauge needle enters the red sector and a warning signal sounds.
By the way, you can use it when buying a car)
Signs of air in the engine cooling system
How can you tell if something is wrong with your car’s cooling system? The first thing you should do is listen to how it works and simply inspect it visually. We have identified the main symptoms of malfunctions:
- The pump makes a lot of noise when operating. If it begins to fail and some structural elements break, then it makes loud sounds during operation.
- Antifreeze leak. If there is a defect somewhere in the system, then an antifreeze leak can be easily detected even without a magnifying glass. Carefully inspect the engine and chassis of the car; stains from dried or fresh coolant will be visible on it.
- The stove is malfunctioning. Of course, there are a huge number of reasons why the stove may work poorly or stop heating altogether. But malfunctions can also occur due to the fact that there is an air lock in the system. A more detailed examination is needed here.
- Difficulties in the operation of the thermostat. When the CO (cooling system) activates extremely quickly after starting, it is most likely due to the fact that the thermostat is broken. In almost 80% of cases, malfunctions occur precisely because of a thermostat failure. Also, the thermostat may stop working if air gets into the pipes. Then the following happens - the valve is not constantly closed due to a small air lock, and therefore the antifreeze circulates only in a small circle. If you find that the engine is already very hot, then there are only two reasons: the thermostat has broken or it has become airy.
If you determine that at least one of the above signs suits you, then you need to conduct a full diagnostics of the CO at a car service center as soon as possible. But before that, you still need to determine the reasons, since many of them can be eliminated with your own hands.