Materials used for interior insulation
Today, manufacturers of insulating materials produce a fairly large number of products that have their own specific performance qualities. Common insulating materials include:
- Visomat is a self-adhesive substance that is designed to absorb the resulting vibration. Note that it is produced on the basis of bitumen impregnation. Recently it has been used quite often.
- Vibroplast is one of the most common insulating materials today, which has increased elasticity. Like the previous one, this one is designed to absorb the resulting vibration.
- Isotone is a material designed to absorb sound waves.
- Stizol is a design option used as a sealant. Also suitable as sound insulation and for keeping heat in the car.
- Bitoplast is a sealing material whose purpose is to prevent the formation of various skips. An important point is that it has a sticky layer, which ensures quick fixation.
- Madeline is another sealant that is made on a fabric basis.
To perform high-quality insulation of the interior, it is not necessary to use all the materials under consideration; only a few are selected. Today, glass wool is used less and less, as it has one significant drawback - when moisture accumulates, its performance characteristics are significantly reduced.
Main stages of interior insulation
All work carried out on insulating the interior can be divided into several main stages:
- The entire interior is being dismantled. Insulating materials should be laid exclusively on bare metal, which is still carefully prepared, rust is removed, and painting is carried out. Dismantling the interior space can take quite a long time, as care must be taken.
- Once the interior space has been cleared, the selected insulating materials can be installed. An important point is that all air ducts should be left open, as they do not allow moisture to form.
- Fastening materials can be done in different ways. Some have their own adhesive layer, others require the use of special glue.
- After laying the insulating material, the interior is reassembled and all equipment is installed.
Sidebar: Important: Particular attention is paid to insulating the door structure. This is due to the fact that in most cases they become the source of noise in the car interior.
Engine modernization
A more powerful engine will not only make you feel more comfortable behind the wheel on long trips, but will also make it easier to overcome off-road obstacles. bored from 1700 to 1900 cubic cm and installation of other pistons. Pistons are manufactured in factories and can be either cast or forged. After installing the pistons, it is very often necessary to reflash the engine control unit or replace it with a special modified one.
More serious modifications require serious intervention in the design of the car and are illegal without obtaining the appropriate permit. You can install a turbocharger on a standard engine, which will add another 30-40 hp.
Some Niva owners change engines along with transmissions to more powerful ones. As a rule, Japanese or German motors are used. Paired with the engine, you can choose an automatic gearbox, then the SUV was very pleasant to use in the city. After this modification, the driving sensation is completely different, it seems that you have a foreign car, and not a Chevrolet Niva. Refinement of the engine must be carried out in accordance with all regulations and it is necessary to obtain a certificate of conformity.
Basic methods of interior tuning
After the interior has been insulated, you should consider how it can be modernized. You can significantly increase comfort in the cabin in several ways:
- By installing various decorative chrome elements that will attract attention.
- Having reupholstered the interior and dashboard.
- By installing a new radio and speakers. Today, many people pay attention to high quality sound in the cabin. This can be achieved by replacing the standard music system.
- By installing various diode strips as a light source. Today, a modification that involves the use of diodes as a light source is very popular.
- Carrying out LED tuning of the dashboard.
Let's take a closer look at some of the works.
Trunk trim
The easiest way to tune the luggage compartment yourself is to install LED bulbs on the roof. They are also attached around the entire perimeter of the rear door arch.
The luggage compartment volume of more than those hundreds of liters provides great opportunities to experiment. Loud music lovers are happy to install the most powerful speaker systems in it, sparing no space. A small billiard table that can be automatically pulled out and disassembled for play will look quite unusual and quite exotic in the trunk.
Niva upholstery reupholstery
The standard materials used for upholstering the interior of the car in question are of low quality, which determines a short service life, as well as an unattractive appearance. If desired, you can reupholster the interior, which will make the car look more attractive and comfortable to use. All work on reupholstering the interior can be divided into several stages, which we will discuss in more detail later.
To begin with, it is recommended to decide on the most suitable color. Of course, the choice largely depends on the taste preferences of the car owner, but when making a choice you can follow some recommendations:
- It is recommended to select the upholstery color to match the body color. They should be in harmony, but not look alike.
- To select the right color combination, special schemes are often used. They make the choice much easier.
- In most cases, two basic colors are used to decorate the interior in a ratio of 45% to 55%. Due to this it becomes more interesting.
- In many cases, the ceiling surface is left virtually unchanged. Then it is recommended to adjust other colors exactly according to it.
- If you plan to use materials with pronounced stitching, then you need to pay attention to its shade. In some cases, it stands out against the general background, which allows you to emphasize the style of the salon.
An extremely unfortunate option is to use black material and light-colored stitching. This is due to the fact that in such a case almost all the shortcomings will immediately be evident.
The next step is to directly select the most suitable material. On sale you can find simply a huge number of different materials, each with its own specific advantages and disadvantages. In most cases, price is the deciding factor.
The following materials are often used for interior trim:
- Leather.
- Velours.
- Faux suede.
- Substitute for genuine leather.
- Velveteen.
It is not recommended to purchase material via the Internet. This is due to the fact that you need to check its quality directly upon purchase.
When choosing a material, you must also take into account the fact that there should be a supply of it. Approximately 20% of the total amount of material is taken as reserve. The threads for covering must be of increased strength and elastic, otherwise after some time the surfaces will begin to sag.
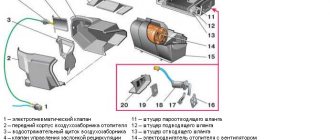
Repair of heating system components
The recirculation damper mechanism is dismantled and the cable is removed. Each end must be twisted into a ring and securely fixed.
Using a cable, the position of the air supply flap is changed. Assembly is carried out in the reverse order. Replacing the interior heating control unit A faulty control unit can also cause incorrect operation of the interior heating system. Its dismantling, necessary for repair or replacement, requires the following procedure. The negative terminal is disconnected from the battery. All handles are removed from the heater control mechanism.
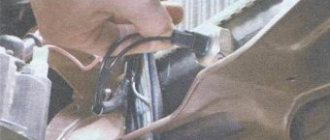
To do this, you need to carefully pull them towards you. All handles are removed from the heater control mechanism. Use a flat screwdriver to remove the air circulation lever.
Use a flat screwdriver to remove the air circulation lever. Use a screwdriver to pry up and then remove the block lining. Use a screwdriver to pry up and then remove the block lining. Under the lining, use a Phillips screwdriver to unscrew two self-tapping screws.
Under the cladding, two self-tapping screws are unscrewed. The control unit is removed. Remove the connector with the wires going to the speed switch. The block of wires that provide illumination of the unit is disconnected. The connector with wires is removed from the control unit. If there is an air conditioner, all hoses coming from the vacuum switch are disconnected.
Also interesting: New VAZ 21214 interior upholstery (full set of 17 products) buy in the SUV online store
Use a screwdriver to remove the bracket holding the damper cable braid and other similar elements. All rods are disconnected from the control unit. A new or repaired device is installed in the reverse order.
After dismantling, the control unit is repaired or replaced with a new one. Replacing the stove pipes If a coolant leak is detected, the pipes along with the clamps should be replaced. The work is performed in the following sequence: The coolant is drained from the system.
The screws securing the glove compartment are unscrewed and it is removed. Use a Phillips screwdriver to unscrew the clamp of the lower pipe. The hose is removed carefully - the antifreeze should not get on exposed skin. If difficulties arise, the pipe should be rotated around its axis. Correctly turning on the foot airflow It turns out that even after several years of owning a Chevrolet Niva, not everyone knows how to properly turn on the warm air airflow to the feet.
By using fan speed controls and damper position controls, and using sound logic, we can end up with a situation where the entire flow of hot air is directed onto the windshield and into the face of the driver and front passenger. Of course, the car is warm, even hot, but your feet are cold.
Practice has shown that Shniva has a special algorithm for supplying hot air to the legs. On most copies this is done like this: Warm up the engine until the flow of warm air is clearly felt by your hand.
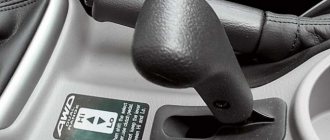
The fan speed switch is set to the fourth position, 4th speed. Turn the airflow direction knob to exactly 12 o'clock. Immediately return it to the position around the clock. Correct position of the stove blower control. The air damper will make a characteristic click and the air flow will flow to your feet.
Exceptions are the heater valve built into the partition of the engine compartment, and the pipes connecting the heater to the engine cooling radiator. If necessary, this unit can be replaced entirely.
The radiator and heater dampers are combined into a single unit: The air forced by the heater fan enters the heating system through the air intake located under the windshield.
Depending on the position of the damper, the air flow goes either through the heater radiator or directly into the air ducts. The distribution damper is responsible for distributing the flow between the air ducts. The selection of the stove operating mode, temperature and air flow direction is made using the stove control unit located on the center console.
Heating system with air conditioning The principle of operation of a car heater with air conditioning is similar to that described above. However, its design is significantly different. Instead of an intermediate heater housing, an air conditioner evaporator is installed, hidden by a plastic casing. When the air conditioner is turned on, air is supplied to the cabin through the evaporator using a damper.
The design of a car heater with air conditioning is somewhat different: To carry out high-quality repairs, you first need to understand the reasons and identify the faulty element of the system. The stove does not heat the footwell. There may be several reasons why the stove does not direct air to the feet.
First you need to find out whether this mode is turned on correctly. Due to the design features of the damper system, the direction of air to the legs is carried out as follows: Set the fourth rotation speed of the stove fan. Set the heater mode switch to the upper vertical position. Switch the mode controller one position to the left.
After this, air should begin to flow into the legs. If this does not happen, the procedure should be repeated several more times. If the mode still does not turn on, you should check the following components: Coolant leak If antifreeze leaks from the cooling system without visible streaks on the radiator and pipes, you need to pay attention to the condition of the heating system. The main signs of a coolant leak through the heater are: Typically, the leak occurs through the heater radiator.
To verify this, you need to remove the lower part of the center console. If traces of moisture are detected in the area of the stove body, it is recommended to replace the radiator.
If a coolant leak is detected through the heater radiator, it should be replaced. Before replacing the heater radiator, you should check the tightness of the heater pipes and their connections. The stove does not warm up the air well. Often the stove does not warm up the interior effectively enough. Instead of hot air, slightly warm or even cool air comes from the deflectors. This usually happens for the following reasons: Thus, when diagnosing a malfunction, first check the coolant level in the cooling system.
If it is insufficient, they begin to look for leaks. If the stove cannot melt the ice on the windshield, it is faulty. If the amount of antifreeze is OK, and the stove does not respond to changes in the position of the temperature regulator, the damper is faulty.
With proper diagnosis, this will not be difficult. Replacing damper control cables Damper control cables fail quite often. Usually the cable braid is damaged, which leads to the need to replace the entire part.
You can purchase suitable cables at almost any auto parts store. When choosing a new heater cable, you should pay attention to its length. To replace the cables, you only need flat-blade and Phillips-blade screwdrivers.
Read news about the new Niva
- Clutch adjustment on Niva 21214 - Online reference book to help the car owner - looking for and fixing faults
- How to eliminate vibration of the VAZ-21213 transfer case
- Fuses and relays (location and purpose of fuses and relays) Niva Chevrolet "
- Mud tires for Niva 4x4: radius 15 and 16 - which one is better to install "
- Liquids used and filling volumes Niva VAZ 21213, 21214, 2131 lada 4×4
- Wheel stud M12x1.25x41 2121, 21213, 2131, 21214, 2123 rear
- Niva Chevrolet transfer case: device, connection diagram and how to use?
- How is a CV joint replaced on a Chevrolet Niva?
The process of reupholstering doors and panels using glue
The most problems arise with reupholstering complex surfaces, for example, doors or panels. The features of such work are the following:
- First, high-quality surface preparation is performed. To do this, it is washed, sanded and degreased. Due to this, surface adhesion significantly increases, which will ensure reliable fastening of the material. Degreasing is carried out using special substances.
- The next step is to apply glue to the surface and the material itself. If the surface has a large number of uneven areas, then they should be treated with a brush.
- In order for the material to adhere better to the surface, it is heated with a hairdryer. Due to this, the material used becomes more elastic.
In general, we can say that, as a rule, there are no problems with fitting the sheathing material to the glue.
General recommendations for upholstery when using a sewing machine
General recommendations for carrying out the work under consideration include the following points:
- The surface and elements for the pattern are prepared.
- The resulting elements are transferred to paper, which will be used as a blank.
- Using the created template, lines are marked on the material used when upholstering the interior.
- The material is sewn along the marked lines, after which it should be stitched.
- Next, the excess is carefully trimmed.
- The adhesive is applied to the reverse side and applied to the product. At this stage, you should avoid getting glue on the front of the material.
In general, we can say that the process of upholstery is relatively simple to perform, but requires compliance with some recommendations and accuracy. Mistakes made may cause damage to the material used. Therefore, it is recommended to take it with a sufficiently large reserve.
Expert comments
Eugene. I bought myself a Chevrolet Niva. Of course, I didn’t expect much from this car, but a little more. I especially didn’t like the interior: dull, uncomfortable, and most importantly, very noisy. If this model was designed as a work car, why is the interior so noisy? In general, it was necessary to carry out complete isolation, after which only the car became more or less comfortable for execution.
Dmitriy. I received the Niva in a deplorable condition. At the same time, it cannot be said that before me it was used for wear and tear. It’s just that we don’t yet know how to assemble good cars, and Chevrolet hasn’t helped revive the old classics. Conducted a wide variety of tuning, including the interior. First I did full insulation, then I changed the trim a little, installed new seats, and so on. Everything was a bit expensive, even though I did the work myself.
Alexei. They did soundproofing. This work is not very difficult, but troublesome. There are a lot of modern materials on the market for interior insulation, and their effectiveness is great. Therefore, the result was very pleasing.
Valery. I took the car to one service station to have the interior insulated. After completing the work, I simply did not recognize my Niva, which began to rattle, howl, squeak and make other extraneous sounds less. In general, if you need a Niva for every day and comfortable trips, then it is best to carry out this kind of tuning.
Let's sum it up
Almost all cars of domestic origin are not famous for their high-quality interior and its good insulation. In most cases, this is the weak point. Despite the participation of a foreign company in the design of this car, problems remained. However, many of them can be solved. You can increase comfort in the cabin in summer and winter by soundproofing the cabin. You can do this kind of work yourself. Before tuning, you should decide whether such tuning is needed. This is due to the fact that the Chevrolet Niva has a fairly large number of various shortcomings, and high-quality insulation of the interior requires significant investment.
Suspension lift
An upgraded suspension with increased ground clearance is probably the main thing that SUV owners do with their cars. When tuning a Chevrolet Niva, the suspension lift is carried out in two ways:
- installation of spacers;
- installation of reinforced shock absorbers and struts.
Spacers are used when the car is slightly raised, when only a slight increase in ground clearance is required. With such a modernization, it will not be possible to install wheels with a larger diameter; you can only use mud tires that are more prepared for off-road conditions.
When installing upgraded struts, you can achieve not just increased ground clearance, but also greater suspension travel. This suspension will help the car overcome much larger obstacles.