A month and a half ago I did a complete overhaul of the cylinder head.
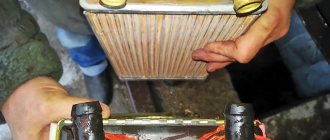
. But, as it turned out almost immediately, it was not successful. The car was smoking and there was oil in three cylinders. Almost 2000 km later, I added 1.5 liters of oil. The last time I had guides burst, I bought two sets. They were the reason. I hammered them in with a punch and hit them not on the neck, but on the top, where the oil seal fits. And the guides burst from the blows. I bought everything I needed and decided to fix the problems again. Along the way, I decided to replace the piston rings with larger ones on the advice of kosmoss10. Because The compression is already reduced and, moreover, is not the same in all cylinders and increases when oil is added to the cylinders. By the way, I also bought a special device for hammering in the guides (as it turned out, I bought it in vain). I'll start in order. I removed the cylinder head and this view opened before me, an oil painting:
For example, last time it was like this (over 240,000 km):
We have piston size 82.0 and new rings size 82.40. I adjusted the rings with a diamond file to a gap of 0.25 mm in the lock. No photos. But there is a photo of the old oil scraper ring. The rings and grooves in the pistons were all clogged with carbon deposits.
I fitted the rings, along with the analysis, in half a day (6 hours). These are already cleaned pistons with new rings:
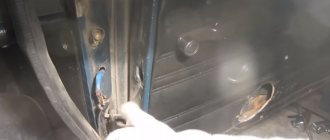
Next, of course, is cylinder head repair. I took it apart and knocked out the old guides. And he began to fill new ones with the help of a device. The first one went well, but there was an incident with the second one. She burst. And it’s the fault of the devices for hammering in the guides. The device flared and began to hit the top of the guide. This is what the device looked like:
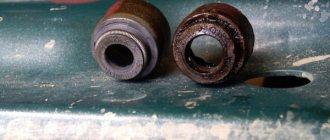
I tried it with a tube, but couldn’t find a suitable diameter and broke the guide again. Then he gave up on the matter and, having agreed with the foreman, put the cylinder head in a bag and hit the road, 20 km away. I also bought guides, it was 4 sets
. The master pressed it in using a tool with a bolt. The same type as for pressing silent blocks. But I barely knocked out one guide that I had clogged. Even the nest was torn a little. And while grinding the valves, the guide began to move. It was on the inlet of cylinder 4. Knocked her out. And I had to request from the remaining guides myself, but only the graduation one. By the way, I still had AvtoVAZ production. And they are 15-20 acres larger in diameter. She's already gone too tight. I don't think it's a big deal that there's an exhaust guide on the inlet. I had no choice, the store is 20 km away from me. The guides were passed through with reamers. Then they cut the saddles with cutters:
And they rubbed it in with paste. After all the manipulations, I washed the cylinder head and it looked like this:
During assembly, it seemed that nothing could happen, but no... The thread in the cylinder head, where the low oil pressure sensor is screwed in, broke off. What to do? Cut the thread to 16 and screw it in for the sensor. But it’s hard to find a turner. We found different fittings from fuel equipment. And two fittings were welded together. It turned out to be a screw, but long. When cutting the thread, everything didn’t go smoothly either. About a centimeter the thread was not cut, but the aluminum was chipped and that’s it (I don’t know what the reason was). They cut deeper. Tighten the screw with thread locker. It already has a sensor. The tests went well. Everything is fine. This is what the sensor looked like:
After assembly, I adjusted the valves. Started up the first time, almost instantly. As a result, immediately in the first cylinder the spark plug was in oil, but in the rest everything was dry. After 3.5 hours of engine operation, the spark plug became almost dry. Most likely, it was thrown through the rings. Because they need to run in due to the wear of the cylinders. After two hours of work, I measured the compression - about 12 atm in all cylinders. Now it's a matter of running in. I'll check again after the break-in. As a result, two cylinder head repairs cost me 10,000 rubles... I already regretted that I didn’t immediately buy a new cylinder head. Thank you to everyone who read such a long post. ______________________________________________________________________________
After running-in (mileage 1,000 km), compression became 13 atm in all cylinders.
Piston
Cast from aluminum alloy. To improve run-in, the outer surface of the piston (Fig. 5) is coated with a layer of tin. To compensate for uneven thermal expansion, the piston skirt has a complex shape. The piston has a conical shape: the upper part has a smaller diameter than the lower part. Therefore, it is necessary to measure the piston diameter only in a plane perpendicular to the piston pin and at a distance of 52.4 mm from the piston bottom.
The hole for the piston pin is shifted from the axis of symmetry by 2 mm to the right side of the engine. Therefore, in order to correctly install the piston into the cylinder, there is a “P” mark shown in the figure near the hole for the piston pin, which should be facing towards the front of the engine.
According to the outer diameter, the pistons are divided into five classes at 0.01 mm intervals, and according to the diameter of the piston pin hole - into three categories at 0.004 mm. The piston class (letter) and piston pin hole category (number) are indicated on the piston crown.
Spare parts include pistons of classes A, C, E. These classes are sufficient to select a piston for any cylinder, since pistons and cylinders are divided into classes with some overlapping sizes. For example, a class C piston may be suitable for class B and D cylinders. In addition, when repairing engines, pistons are usually replaced on worn cylinders, so a class C piston may be suitable for a slightly worn cylinder that was class B. The main thing when selecting a piston is to ensure the necessary installation gap between the piston and cylinder.
Since 1986, repair size pistons for all engine models have been manufactured with an outer diameter increased by 0.4 and 0.8 mm. Until 1986, pistons of the following repair sizes were produced: for engines 2101 - with an increase of 0.2; 0.4 and 0.6 mm; for 21011 - with an increase of 0.4 and 0.7 mm.
The pistons of engines 2101 and 21011 are easy to distinguish from each other by appearance. In addition to the fact that they have different diameters, the 2101 pistons have a smooth bottom, while the 21011 pistons have a cylindrical recess on the bottom with a diameter of 55 mm and a depth of 1.9 mm.
Gap in the lock
The slot in the piston ring is usually called a lock. This gap is necessary, but it also creates an obvious problem - at this point gases from the cylinder can easily penetrate into the crankcase. Therefore, it must have a minimum width during assembly, but not zero - due to the uneven thermal expansion of the cylinder, ring and piston, the lock may collapse, after which the ring will break.
For each specific engine, based on both the materials and the operating temperature range, the minimum thermal gap in the lock is set - when assembling the motor, we check the gap in the lock so that it is not less than the lower threshold of the rating.
Wear of the ring and cylinder leads to the fact that the ring “diverges”, the gap in the lock increases, as pressure losses increase and oil penetrates into the combustion chamber. Based on this, the maximum gap size is set, if exceeded, the ring is replaced with a new one.
Let's compare the nominal clearance values for different engines:
- VAZ-2108: 0.25-0.45 mm;
- GAZ-24: 0.25-0.6 mm;
- Honda CR-V (K20A4 engine): 0.2-0.35 mm.
What do these numbers tell us? The minimum gap limit in the new ring lock for domestic engines is close, but the maximum is higher in an engine with a lower degree of boost: the pressure loss remains tolerable. For the Japanese motor, the materials are better selected, the cooling of the upper ring is more efficient, so the minimum size is reduced, and fewer “liberties” are allowed during assembly. The maximum limit for troubleshooting is different - on VAZ engines it is 1 mm, GAZ - 1.2 mm, while on a Honda the upper compression ring is considered worn out already at a gap of 0.6 mm, with which it would still be possible to assemble a new twenty-four engine "Volga".
We recommend: 6 reasons why the automatic transmission jerks when shifting into gear
The gap in the lock is an important indicator when troubleshooting a motor. By moving the ring to different heights, where the cylinder wears out differently, you can find out the degree of wear without a bore gauge: at the top, where the ring does not come into contact with the walls, the cylinder retains its nominal diameter, and it is in this place that the gap in the lock reflects the wear of the ring. Going lower, the ring widens, indicating an increase in the diameter of the cylinder closer to the middle, then narrows again. Roughly, but quite indicatively, we calculate the difference in cylinder diameters at different heights, starting from the measured gap.
Suppose the nominal diameter of the cylinder is 78 mm, which corresponds to a circumference of 122.522 mm. The measured gap in the lock when installing the ring at the top is 0.4 mm, the length of the ring itself is 122.122 mm. Now we lower it to the center of the cylinder and measure the gap of 0.8 mm - from a circle of 122.922 mm we get a diameter of 78.25 mm. This method does not take into account the fact that the cylinder becomes barrel-shaped or ovoid, and in the middle the ring is not adjacent to the walls with its entire surface. However, the change in the gap in the lock indicates to us that the engine problem is not wear of the rings, which are easy to replace: the cylinders will need to be bored.
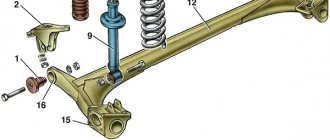
Connecting rod VAZ 2101 dimensions
This article contains some information about the modification of classic VAZ engines. There are a lot of different articles floating around the Internet, here, so to speak, a little from everywhere, and from myself, of course.
Information on the sizes of VAZ classic engines:
The height of the cylinder block for a classic VAZ car (from the crankshaft axis to the plane of the cylinder head gasket): - 2101, 21011, 2105 = 207.1 tolerance -0.15, - 2103, 2106, 2121, 2130 (1.8 liters) = 215.9 tolerance -0.15, - 21213 (on motor 21214 block 21213) = 214.58 tolerance -0.15.
The thickness of the cylinder walls usually allows the diameter to be increased by no more than 3 mm; if the water jacket, or rather the diameter of the cylinder, is shifted relative to the jacket, problems may arise. The casting leaves much to be desired.
We also do not forget that for some classic blocks, such as 2103/2106, the piston undershoot ranges from 1.9 to 2.3 mm. 2101/212123 has from 0 to 0.7. Those. the blocks were cast at random.
I would advise reducing this shortfall in 03/06, if possible, by milling the plane of the block. Of course, unless we are talking about a different crankshaft, when the ratio of cylinder volume to combustion chamber changes. After all, the compression ratio of classic engines is only 8.6-8.8 units. After reducing the income loss to 0.9mm, the lifespan is obtained
9.5-9.8 units For a block with a small income loss, the coolant can be increased only by milling the cylinder head.
Those. block milling, etc. By the way, like the cylinder head plane, it increases the coolant by about 1mm!, mind you, exactly by about 1 unit. More accurately, you need to pour it with a syringe and count using a calculator. The resulting coolant is quite acceptable for civilian use on 92 gasoline.
A subsequent increase in coolant is possible by milling the cylinder head plane. You can shoot down to 3mm! At least I’ve read about such actions many times - and everything drives fine. Naturally, this will entail a transition to high-octane gasoline of at least 95, or even 98, in the case of severe milling.
Knee stroke 2101, 2103, 21213: stroke 2101 - 66mm (commonly called low) stroke 2103 - 80mm stroke 21213 - 80mm (more balanced due to more developed counterweights, apparently to the detriment of weight) stroke 2130 - 84mm
There are tuner elbows with a stroke of 84,86,88 mm. But they cost from 10 thousand.
Piston diameter for classics: 2101 - 76mm (76.4/76.8) 21011/2105 - 79mm (79.4/79.8) (have puddles 2mm deep and
10cm2) 21213/2108 - 82mm (82.4/82.8)
There are many cast and forged pistons available in any diameter from stock to 84mm. One of the main geometric characteristics of the piston is compression height. It is determined by the distance from its bottom to the piston pin axis. For a classic VAZ engine it is 38 mm. There are pistons with a lower compression height, such as TPT pistons. The height is 31 mm.
Dimensions and markings of the connecting rod and piston group
The main dimensions of the connecting rod and piston group are given in Fig. 1, 2, 3.
The piston is cast aluminum.
According to the outer diameter, the pistons are divided into five classes (A, B, C, D, E) every 0.01 mm. The outer surface of the piston has a complex shape.
Therefore, it is necessary to measure the piston diameter only in a plane perpendicular to the piston pin, at a distance of 55 mm from the piston bottom.
Based on the diameter of the hole for the piston pin, pistons are divided into three classes (1, 2, 3) every 0.004 mm.
The piston rings are made of cast iron.
The upper compression ring has a chrome-plated barrel-shaped outer surface.
The lower compression ring is scraper type.
The oil scraper ring has chrome-plated working edges and an expansion coil spring.
Repair size rings are marked digitally “40” or “80”, which corresponds to an increase in the outer diameter by 0.4 or 0.8 mm.
The classes of piston diameters and holes for the piston pin are stamped on the bottom of the piston (Fig. 4).
By weight, pistons are sorted into three groups: normal, increased and decreased by 5 g.
These groups correspond to markings on the piston bottom: “G”, “+” and “-”.
All pistons on the engine must be of the same mass group.
Repair size pistons are manufactured with an outer diameter increased by 0.4 and 0.8 mm.
An increase of 0.4 mm corresponds to a marking in the form of a triangle, and an increase of 0.8 mm corresponds to a marking in the form of a square.
The arrow on the piston crown shows how to properly orient the piston when installing it into the cylinder. It should be directed towards the camshaft drive.
The piston pin is a hollow steel, floating type, which rotates freely in the piston bosses and connecting rod bushing.
The pin is secured in the piston hole by two retaining rings.
According to the outer diameter, the fingers are divided into three classes every 0.004 mm.
The class is marked with paint on the end of the finger: a blue mark is the first class, a green mark is the second class, and a red mark is the third class.
The connecting rod is steel, forged. The connecting rod is processed together with the cover and therefore they are individually non-interchangeable.
To avoid mixing up the caps and connecting rods during assembly, they are marked with number 2 (Fig. 5) of the cylinder in which they are installed.
A steel-bronze bushing is pressed into the upper head of the connecting rod.
Based on the diameter of the hole in this bushing, the connecting rods are divided into three classes every 0.004 mm.
The class number 1 is stamped on the connecting rod cover.
Based on the weight of the upper and lower heads, connecting rods are divided into classes, marked either with a letter or with paint on the connecting rod cover.
Connecting rods of the same weight class must be installed on the engine.
The weight of the connecting rods can be adjusted by removing metal from the bosses on the upper head and on the cover to a minimum size of 33 and 32 mm (Fig. 6).
After removing the metal from the connecting rod cap, it is necessary to mark the classes of the connecting rod on it by the hole for the piston pin and by weight.
Classes of connecting rods based on the weight of the upper and lower heads
Replacing piston rings
On VAZ cars, as well as on all other models of passenger cars, it is advisable to change only the piston rings only if:
- there is no exhaust in the cylinders;
- there are no signs of damage to their inner surface.
If the liners are significantly worn, they need to be bored, and if the last size was already used before, the cylinder block needs to be relined. You can replace the PC on any VAZ engine without removing the internal combustion engine; this will require removing the cylinder head and oil sump. PCs are replaced if the gap at the joints does not exceed 1 mm.
We recommend: Replacing the camshaft oil seal on a VAZ 2109
For example, let's consider replacing piston rings on a VAZ-2114 car with an 8-valve internal combustion engine; such work must be carried out on a pit or a car lift:
- turn off the ignition, put the gearbox in neutral, disconnect the negative terminal from the battery;
- drain the antifreeze, remove the air filter housing along with the pipe (injector corrugation);
- remove the valve cover, camshaft, loosen the timing belt and move it to the side;
- disconnect the wires and cooling system pipes from the cylinder head, unscrew the head bolts;
- unscrew the nuts of the exhaust pipe of the muffler;
- We completely free the cylinder head from all fasteners that prevent it from being removed, and we remove the cylinder head;
- if there is protection under the engine, remove it;
- place a container under the engine sump, unscrew the plug on the crankcase, drain the oil;
- remove the lower hatch of the gearbox housing (three bolts);
- Using a 10 mm wrench or a socket wrench, unscrew all the oil pan bolts;
- dismantle the pan, remove the oil receiver;
- Unscrew the connecting rod nuts, remove the lower connecting rod caps, and carefully knock the pistons and connecting rods upward. Pistons should be knocked out through a soft metal drift or through a wooden block. First, you need to carefully knock out the connecting rod bolt without damaging the threads on it, then place the drift on the end of the connecting rod - in no case should you hit the bearings or the seat underneath them;
- It is recommended to remove the connecting rods one at a time, and immediately attach the caps to them; the caps should not be confused with each other, they are placed back strictly in their places, and a lock to the lock is required;
- remove the PC from the pistons, use a piece of the old ring to clean the piston grooves to bare metal. Be sure to check the cleanliness of the groove all around; there should be no coke left in it;
- We install new rings in the grooves, start with the lower MPC, then install the middle compression PK, and lastly the upper one. For installation, you can use a special device, but it is still more convenient to install the rings by hand. If the MPCs are cast iron, they cannot be bent along their axis, they can only be carefully moved apart. Compression rings also need to be bent carefully, to a minimum;
- we install the piston in place using a special mandrel, hammer it in with a wooden hammer handle or a brass or bronze drift;
- We install one piston-rod at a time, and immediately attach a connecting rod cap to each one. The connecting rod nuts should be tightened with a torque wrench, force - from 4.5 to 5.5 kg;
- then we put everything in place - the oil receiver, the engine sump, the cylinder head. We fill the radiator with antifreeze, oil into the crankcase, and start the engine to check. After replacing the PC, the internal combustion engine may initially smoke and consume oil - the engine needs to be run in for approximately 2 thousand km. It happens that despite the seemingly normal condition of the liners, the internal combustion engine continues to smoke even after replacing the rings after break-in. In this case, you will have to bore the cylinders and install a repair piston group.
Pistons - replacement
To complete the work, you will need mandrels to remove the piston pin and compress the rings.
1. Place the car on an inspection hole or overpass (see “Preparing the car for maintenance and repair”).
2. Remove the cylinder head from the engine (see “Cylinder head gasket - replacement”).
3. Remove the engine sump (see “Engine sump - removal and installation”).
4. Unscrew the nuts of the connecting rod caps (without removing the crankshaft) and push the piston and connecting rod out of the cylinder block (see “Crankshaft - removal and installation”).
5. Remove the steel-aluminum liner from the connecting rod cover.
The connecting rod and cap are stamped with the number of the cylinder in which they are installed.
6. Place the connecting rod in a vice and remove two compression rings and one oil scraper ring with an expander from the piston.
7. Press the pin out of the connecting rod through the mandrel and remove the piston.
Similarly, remove the pistons of the remaining cylinders.
Before installing the piston group on the connecting rod, it is necessary to select its parts.
Selection of connecting rod and piston parts
1. Select the piston to the cylinder. The calculated gap between the cylinder and the engine piston should be 0.06-0.08 mm. It is determined by measuring the cylinders and pistons and is ensured by installing pistons of the same class as the cylinders. The maximum permissible gap is 0.15 mm. The piston diameter is measured in a plane perpendicular to the piston pin, at a distance of 52.4 mm from the piston bottom. The outer diameter of the pistons is made into five classes (A, B, C, D and E) every 0.01 mm, and the diameter of the hole for the piston pin is made into three categories every 0.004 mm. Spare parts include pistons of groups A, C and E. The piston class (letter) and the category of the piston pin hole (number) are stamped on the piston bottom.
For correct orientation of the piston relative to the cylinder, there is a “P” mark on the piston wall (next to the boss), which should be directed towards the front of the cylinder block.
Piston group of the VAZ 2110 car
When the car has traveled approximately 150 thousand kilometers, noticeable wear of the piston group occurs. This can be determined by the following signs:
- gasoline consumption has increased;
- Engine compression dropped below 10 kgf/cm2;
- oil consumption has increased. Over 1000 kilometers, the oil level decreased from the maximum to the minimum;
- The color of the exhaust gases changed to a bluish tint.
When replacing oil seals, oil consumption decreases slightly. Therefore, there is a need to diagnose the piston system and replace worn parts. If the liners and pistons have acceptable wear, no more than 0.15 millimeters, only the piston rings are replaced. On a VAZ 2110, piston rings can be replaced without removing the engine from the car. In this case, you will need to replace the gaskets under the head and pan. If other parts are found to be faulty, they are replaced during the assembly process.
Removing the piston rings
The work is performed in a pit or overpass. To complete the work, you will need a set of keys, a torque wrench, and a special mandrel to compress the rings on the piston. Work order:
- The battery, air filter, carburetor, ignition distribution sensor, and ventilation hose are removed.
- Oil is drained from the engine sump.
- The cooling fluid temperature sensor is disconnected, the plug is unscrewed from the engine block and the coolant is drained.
- The “stove” is disconnected from the block head.
- Disconnect the hose from the vacuum brake booster from the intake manifold.
- The hoses are removed from the nozzles located at the front of the block head.
- The bolt on the clamp securing the exhaust pipe to the gearbox is unscrewed and disconnected from the resonator pipe.
- The exhaust pipe to the manifold is disconnected from the engine.
- The upper and lower nuts securing the air intake are unscrewed. The latter also secures the front part of the shield, which protects the starter from the heated exhaust manifold.
Tip: To simplify the removal and installation of the starter shield, it is better to remove the lower mounting eye.
- Unscrew the fasteners of the protective casing, which covers the camshaft drive belt.
- The tension of the belt is loosened and removed from the camshaft sprocket.
- The star is removed.
- The rear belt cover is removed.
- The screws securing the head to the cylinder block are unscrewed.
- Having unscrewed all the bolts securing the cylinder head, it wobbles off the cylinder block and is removed along with the gasket.
- The clutch housing cover is unscrewed and removed.
- The screws are unscrewed and the engine oil pan is removed.
- The oil receiver is removed from the oil pump housing.
- The nuts of the connecting rod screws are unscrewed and the connecting rod caps are removed.
- The 18 screws securing the tray are unscrewed and the latter is removed.
- By lightly tapping with the handle of a hammer, the piston with the upper liner and connecting rod is pushed up.
Is it possible to replace one connecting rod?
During my practice, I have seen many different engines, and those in which one connecting rod was replaced and did not match the weight of the other connecting rods. I also had to change one connecting rod on the engine if the bearings had turned, but I made sure to adjust the connecting rods to the same weight.
You can balance the connecting rods yourself at home.
Actually, according to normal, the difference in connecting rods should be on average no more than 5 grams, but maybe more, it all depends on the brand of engine.
I came across engines in which the difference in the weight of the connecting rods was more than 20 grams in VAZs and others, these engines were repaired before me and the connecting rods were installed without selecting the weight. In principle, such engines with very different connecting rods work, but the engine may chatter slightly at idle. And of course, a large difference in the weight of the connecting rod affects the acceleration of the car, and the engine is dumber than the one in which the connecting rods are weight-balanced.
Therefore, you can replace one connecting rod, nothing terrible will happen, but do not expect good dynamics from the engine when driving.
Tuning
Recently, tuning connecting rods have appeared; their advantage over conventional connecting rods is that they are lighter. Tuning connecting rods are made from light but strong metal alloys, and since the weight of the connecting rods plays a big role for the engine, the lighter the connecting rods, the faster the engine. For example, take a heavy stone and quickly lift it up and down, and then a light one, and you will understand that it is faster to raise and lower a light stone than a heavy one, and for the engine it is easier for the crankshaft to raise and lower light connecting rods.
Engines are boosted in different ways, they are equipped with turbocharging, special gas installations, etc. But this leads to overloading of engine parts, and such engines usually quickly fail. And if you put lightweight connecting rods in the engine, then, on the contrary, its resource increases, plus agility and power are added. For me, it’s much more interesting to drive a standard engine, but it’s easy to overtake new cars of the same class, while other drivers think that the car has a more powerful engine.
Tuning connecting rods can be easily bought online, but it’s true that they are more expensive than standard ones, but if you want to make your engine more playful, install tuning connecting rods, or lighten the standard ones by removing excess metal and adjusting them by weight, but don’t overdo it.
Shortened connecting rods
I’ll explain why shortened connecting rods are needed, since there are idiots who are ready to install them on any engine, believing that the engine’s power will immediately increase.
VAZ engines are divided by model and by piston stroke, for example, in the 2101 and 21011 engines the piston stroke is ten millimeters shorter than on the 2103 and 2106 engines. Therefore, if you want to make the 2101 engine equal in power to the 2103 engine, and since in these engines the diameter The piston is 76mm, which means you can make an engine from the 01 engine into an engine with the power of 03. To do this, for the 01 engine they buy a crankshaft from the 03 engine, and so that the pistons do not extend 10mm higher than the cylinder, shortened connecting rods are installed. But the pistons also have to be modified by grinding down the metal skirts below the piston pin so that it does not rest against the plumb line of the crankshaft. That’s just why shortened connecting rods are needed, and the engines turn out to be even faster than 03. But don’t think about buying a chain for an 03 engine, but install a chain for an 01 engine, since you have not increased the height of the engine block, but only increased the piston stroke.
An incident from life, a young guy drove up to me in a VAZ 2107 with a 2106 engine and asked if I recently had the engine done by a motor mechanic, but after repairs, the car doesn’t start well, it barely pulls, it consumes gasoline, but does not consume oil. I asked him what they did to the engine, he said they bored out the crankshaft (that’s good), bored out the block for new repair pistons (also good), and the mechanic also advised me to buy shortened connecting rods, he said that it would be very good. I laughed for about five minutes and told him, but now you can drive even on 66 gasoline, which has not been produced for a long time, there will never be detonation. Of course, the boy was not laughing, but I wasn’t laughing at him, but at the stupid master.
I explained to him that now his pistons do not reach the top of the cylinder by 10mm, and thus the engine has become very derated. Go to the mechanic who assembled the engine, let him remake the engine at his own expense and install normal connecting rods.
Review of popular models of piston rings VAZ 2109 – 2115
There are many companies that produce piston rings, as well as many fakes, and there is simply not enough time to look through them all. Therefore, let's look at those manufacturers of piston rings that differ from others in normal quality and price. The first thing I want to recommend is piston rings.
We recommend: Antifreeze red, green, blue - what's the difference?
Piston rings from .
These companies produce piston rings for VAZ cars of various diameters and are perfect for us. They are most likely produced in China, because the original ones will cost much more. But this does not mean that everything is so bad, their quality is excellent. I still recommend the rings, because their price is much lower than that of Mahle, and the quality is the same, so why pay more and overpay for the brand.
The upper compression ring of these manufacturers is chrome-plated steel, but its copper-plated one, which is clearly visible in the top photographs. The second compression ring is black and made of cast iron, but the ring from it has a darker color.
I recommend using metal oil scraper rings, because, unlike box-type rings, they fit perfectly in the cylinder, are resistant to overheating (they do not lose their spring properties) and their main advantage is that they work as two rings independent of each other. The rings are box-type, very afraid of overheating. When they overheat, they lose their spring properties and do their job poorly. And one more serious disadvantage: they require very careful running-in. At the slightest deviation from the running-in conditions, the working edges of the ring may break off in some places and allow oil to leak through.
Of course, there are other manufacturers of piston rings, but as usual they are complete fakes and sometimes it’s not possible to choose quality ones