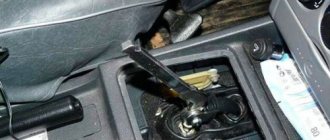
Adjusting Priora headlights using a corrector
Let's adjust the headlights on the Priora
Headlights are important and necessary devices for any vehicle. Their repair or tuning involves dismantling work.
Optics on a car is one of the components of the safety of the driver and passengers; visibility on the road depends on its quality. Like any car part, the optics on a Lada Priora car sometimes require replacement. The article describes the reasons for replacing optics, how to properly replace and adjust the headlights on a Priora.
The main reason why optics are replaced is their failure and the inability to perform their functions: high-quality road lighting. In addition, the lamps in the lanterns are changed. Bosch lamps are in demand. Bosch brand xenon produces better quality light and has a longer service life.
Bosch xenon lamps
Optics should be changed for the following reasons:
- the headlight sweats, its ventilation is impaired;
- cracks, chips on glass;
- reflector malfunction;
- faults in electrical connectors;
- defects in fasteners;
- tuning
During the replacement process, you can not only restore the functionality of the flashlight, but also improve its performance characteristics by replacing halogens with xenon. Using xenon in lamps, the driver receives better lighting. At the same time, tuning of the headlights is also carried out: lens glass is installed, black headlights look impressive. LED lamps are installed in the parking lamps, as well as in fog lamps.
Front lights with lenses
To make your car tuned, you need to know how to remove the front and rear optics.
Headlights are important and necessary devices for any vehicle. Their repair or tuning involves dismantling work.
- Rules for replacing headlights
- Setting up lighting elements
Return
Lada Priora is a very good car, but very often the owners have a desire to change something in the appearance of the car, for example, tuning the optics. Often there may be an urgent need for changes, for example, you need to replace the headlights on a Priora.
For those who decide to do this procedure on their own, without the help of a professional mechanic, it will be useful to familiarize yourself with the recommendations presented below. Let's look at what are the reasons for replacing a headlight and how to do it yourself.
Below are instructions on how to disassemble the headlight and adjust it correctly.
Return
If you adjust the headlights correctly, the Priora will be ensured safe operation. That is why, when inspecting the technical condition of a vehicle, increased attention is paid to this aspect. The traffic police officers do not lose sight of the quality of the lighting elements. Switched on and properly working low beam headlights improve visibility of the road.
VAZ 2110How to properly adjust the headlights on a Priora
Abnormally adjusted car headlights are a real danger to traffic safety at night. They not only poorly illuminate the roadway, but also “blind” drivers moving in the oncoming lane. This applies exclusively to cars with xenon headlights, which include the Lada Priora. In order not to create emergency situations and not harm other road users, it is necessary to adjust the headlights in a timely manner, and most importantly, correctly.
You will need
- - pressure gauge;
- - a piece of plywood;
- - hex wrench set to “6”
326
The headlights on the Prior, depending on the configuration, can be switched on either manually or automatically. The headlight circuit of the Priora differs from the circuits of other domestic cars in the presence of a sensor with a built-in light sensor and an automatic lighting control unit.
Owners of cars from the domestic automobile industry have a kind of hobby for repairing, minor modernization, and tuning their combat vehicle. Such work as: removing a headlight, replacing optics with a new one, failure of lighting devices - on Priora deserve a separate discussion. The headlights on the Priora are equipped with bulbs that burn out once a season. Lada Priora cars also have a problem: sometimes the headlights sweat, which means you need to remove them and glue them.
Adjusting the headlights is not the least important in traffic safety; for this purpose, an electronic and manual corrector is provided. The factory headlight of the Priora car (Bosch and Kirzhach) underwent changes during restyling; in addition, there are many Chinese analogues, for example, black headlights. Tuning is also problematic without removing them from the mount. The price of headlights varies - starts from 5,000 rubles for a factory headlight.
Read the article to the end and find out the subtleties in this matter!
Bosch headlight from Priora - looks like this
Abnormally adjusted car headlights are a real danger to traffic safety at night. They not only poorly illuminate the roadway, but also “blind” drivers moving in the oncoming lane. This applies exclusively to cars with xenon headlights, which include the Lada Priora. In order not to create emergency situations and not harm other road users, it is necessary to adjust the headlights in a timely manner, and most importantly, correctly.
You will need
- – pressure gauge;
- – a piece of plywood;
- – hex key “6”
The importance of anti-fog optics cannot be underestimated. Everyone knows that fog lights on Priora allow better illumination of the road surface when driving in fog. Therefore, in order to protect themselves while driving, many car owners decide to install PTF themselves. You can learn about the process of installing and connecting the lights below.
Before installing and connecting fog lights on Priora 2, weigh your strengths. If installing fog lights on a Priora 2 or restyling may cause difficulties, then it is better to contact an electrician.
A specialist, like no one else, knows how to install headlights on a Priora and how to connect fog lights. If you decide to do everything yourself, then first prepare the necessary tool.
To do this, you only need a set of keys and screwdrivers, as well as pliers (the author of the video about choosing fog optics for the Priora is the Simple Opinion channel).
Replacing headlights on a Priora and the process of adjusting their light
Lada Priora is a very good car, but very often the owners have a desire to change something in the form of the car, for example, tuning the optics. Often there may be an urgent need for configurations, for example, it is necessary to change the headlights on a Priora.
For those who decide to do this procedure on their own, without the help of a professional mechanic, it will be useful to familiarize yourself with the recommendations presented below. Let's look at what are the preconditions for replacing a headlight and how to do it yourself.
Below is an annotation on how to disassemble the headlight and adjust it correctly.
Let's highlight two manufacturers (not taking into account the copies of Chinese origin) that have a number of differences. Popularly known as kirzhach, bosh. There is a significant difference between them: Kirzhach - a corrugated inner surface of the well, a cast low-beam lamp reflector without a cutout, glass (plastic) attached with a refractory sealant.
The marker lamp is located at the bottom of the reflector well. Two separate plugs for the rear of the optical device. The device from the Bocsh brand has a smooth inner surface of the well, a low-beam lamp reflector with a cutout, and a low-melting sealant is used to fix the glass (plastic).
More on the topic Interior tuning: 90 photos of options on how to improve the interior of a car with your own hands
The size lamp is placed in the upper part of the well; one plug from the rear of the lighting unit is used. Minor differences in design, quality of parts, presence of a chrome-plated rim of the signal amplifier of the rotary element. The number of taillight design variations available to the buyer is numerous.
The main reason is failure, failure to perform the direct functions of the device. There may be a lot of reasons for replacing the headlights on a Prior. Broken outer glass, loss of tightness, fogging of lenses from the inside, deterioration of the reflector itself, breakdown of fixing elements. Replacement, repair of old contacts, installation of a new type of light bulbs.
To solve them, you will have to unscrew the entire module from the car body, which will make it more convenient to repair and modernize optical devices. The block is not completely dismountable: to separate the glass from the body, it is better to heat the joint with a hair dryer until the sealant softens. Next, remove the melted sealant as much as possible using improvised means.
As their service life increases, sand, small stones, dirty water, and road chemicals negatively affect the light conductivity of the outer glass of lighting fixtures, and overall efficiency decreases. The solution will be restoration and polishing of the glass surface. When you decide to polish glass, thoroughly study the technical side of the process, materials, stages of work - everything affects the result.
If you are not confident in your abilities, it is better to entrust the work to professionals, otherwise the result of the work done may be worse than the original result. If, nevertheless, you decide to polish the optical devices of your car, first remove the entire module, remove dirt, and protect surfaces that cannot be treated.
For polishing use:
- Abrasives;
- Sandpaper (1000 - 4000 units);
- Circles: felt, fabric, foam rubber;
- Polishing pastes.
First, a rough layer of plastic is removed with a depth equal to the depth of chips and scratches. As a result, the protective layer of varnish applied by the manufacturer will be erased, which must be restored after polishing. Applying a special varnish is a rather technically complex process. Another option is to stick a protective film, otherwise the result of your work will disappear in a couple of months.
- Phillips and flathead screwdrivers;
- key 10mm;
- construction hair dryer;
- assembly knife;
- polyethylene film;
- masking tape;
- sealant;
- sandpaper of different grain sizes (1000 - 4000 units).
- Access to the lamp is blocked by the battery. No matter how hard you try, you will not get to it without removing the battery. Some inactive people try to make their task easier by moving the battery towards the front. In fact, they are only creating an excuse for themselves to do acrobatics and wasting their time. Anyway, the battery is practically dismantled, so almost all the manipulations to install it back will have to be done, and changing the light bulb will be difficult. So to speed up the process, it’s easier to remove the battery;
- In the vacated compartment you will find 2 rubber plug covers covering the lamp sockets. The low beam is located closer to the car fenders, so the leftmost one is removed;
- The contacts are disconnected from the block, and the entire harness with wires is moved to the side;
- The lamp in the reflector is held on a spring clip. To release the burnt-out element, the latch is pressed from top to bottom. The light bulb is released and pulled out. This can be done without unnecessary ceremony, since it is only suitable for throwing away, but you should not be too careless: crush it - you will have to carefully clean all the fragments from the reflector;
- The new light source is inserted into the socket, the latch snaps into place, and you are again provided with low beam. All you have to do is put the plug in and put the battery back in place.
- You need to disconnect the wiring connector going to the light on the trunk side;
- unscrew the three plastic wing nuts;
- remove the lantern;
- pull out the wires along with the rubber seal through the mounting hole.
How to remove a taillight on a Priora and glue vinyl
Car enthusiasts often have a desire to highlight the uniqueness of the vehicle on the road in every possible way. To achieve the goal, the owners are upgrading the taillights on the Priora. They change the color of the vinyl film glued on top and install additional LEDs. Additional modifications to the design of the light signaling system must comply with safety standards.
It will be easier to work by removing the rear light. What is not difficult:
- You need to disconnect the wiring connector going to the light on the trunk side;
- unscrew the three plastic wing nuts;
- remove the lantern;
- pull out the wires along with the rubber seal through the mounting hole.
How to adjust headlights with your own hands
If you find an error in the text, highlight it with the mouse and press Ctrl Enter. Thank you.
Today we will tell you how to independently adjust the headlights without resorting to the services of a service station.
Check and adjust the headlights when the vehicle is equipped: with a fully filled fuel tank, a set of tools and a spare tire.
1. Pre-check and, if necessary, adjust the tire pressure to normal.
1 - 1 – horizontal line corresponding to the centers of the headlights;
2 - 2 – line passing through the centers of light spots;
3 - A, B - vertical lines corresponding to the centers of the headlights;
4 - O - center line; h – distance from the centers of the headlights to the floor;
5 - d – distance between the centers of headlight lamps.
2. Place the car perpendicular to a smooth wall (for example, a garage) at a distance of 5 m. Place an additional weight weighing 75 kg on the driver’s seat. Mark the screen on the wall and draw vertical lines on it: center line O and lines A, B passing through the points corresponding to the centers of the low beam headlights.
3. Turn on the ignition and low beam headlights, turn the headlight adjustment knob to position “0” (this position corresponds to the load of a car with one driver).
4. Open the hood and adjust screws 1 (in the vertical plane) and 2 (in the horizontal plane) for manual adjustment of the light beam to the position of the light spot for each headlight on the screen, if the location of the light spots on the screen does not correspond to the picture.
5. Adjust the direction of the light spot for each headlight separately. During adjustment, cover the second headlight with opaque material or disconnect the wiring harness from it.
6. The headlights are considered adjusted if the upper border of the left parts of the light spots coincides with line 2, and the vertical lines A and B pass through the intersection points of the horizontal and inclined sections of the light spots.
The article is missing:
- Photo of the instrument
- High-quality photos of repairs
- Repair manuals
- Repair manual for VAZ 2170 (Priora) 2004.
- Checking and adjusting headlights
Check and adjust the headlights when the vehicle is equipped: with a fully filled fuel tank, a set of tools and a spare tire.
You will need a 6mm hex.
1. Pre-check and, if necessary, adjust the tire pressure to normal.
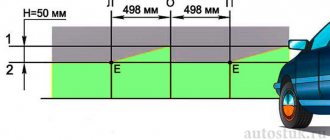
| Rice. 4.4. Headlight adjustment diagram: 1 – horizontal line corresponding to the centers of the headlights; 2 – line passing through the centers of light spots; A, B – vertical lines corresponding to the centers of the headlights; O – center line; h – distance from the centers of the headlights to the floor; d – distance between the centers of headlight lamps |
2. Place the car perpendicular to a smooth wall (for example, a garage) at a distance of 5 m. Place an additional weight weighing 75 kg on the driver’s seat. Mark the screen on the wall as shown in Fig. 4.4, and draw vertical lines on it: center line O and lines A, B, passing through the points corresponding to the centers of the low beam headlights.
| 3. Turn on the ignition and low beam headlights, turn the headlight adjustment knob to position “0” (this position corresponds to the load of a car with one driver). | 4. Open the hood and adjust screws 1 (in the vertical plane) and 2 (in the horizontal plane) for manual adjustment of the light beam to the position of the light spot for each headlight on the screen, if the location of the light spots on the screen does not correspond to the picture. |
More on the topic Car engine tuning - how to increase power and do it yourself
5. Adjust the direction of the light spot for each headlight separately. During adjustment, cover the second headlight with opaque material or disconnect the wiring harness from it.
6. The headlights are considered adjusted if the upper border of the left parts of the light spots coincides with line 2, and the vertical lines A and B pass through the intersection points of the horizontal and inclined sections of the light spots.
Check and adjust the headlights when the vehicle is equipped: with a fully filled fuel tank, a set of tools and a spare tire.
You will need a 6mm hex.
| Rice. 4.4. Headlight adjustment diagram: 1 – horizontal line corresponding to the centers of the headlights; 2 – line passing through the centers of light spots; A, B – vertical lines corresponding to the centers of the headlights; O – center line; h – distance from the centers of the headlights to the floor; d – distance between the centers of headlight lamps |
| 3. Turn on the ignition and low beam headlights, turn the headlight adjustment knob to position “0” (this position corresponds to the load of a car with one driver). | 4. Open the hood and adjust screws 1 (in the vertical plane) and 2 (in the horizontal plane) for manual adjustment of the light beam to the position of the light spot for each headlight on the screen, if the location of the light spots on the screen does not correspond to the picture. |
It is advisable to place an assistant in the driver's seat or place a load weighing about 75 kg. The vehicle's tires should be well inflated and the tank at least half full to bring its weight closer to the weight at which it is driven daily.
The adjustment is carried out on a vertical wall or stand on which markings are applied. To correctly adjust the optics, it should be possible to move away from the wall at a distance of 5-10 meters. This makes it possible to create an imitation of lighting on the road.
Scheme of marking on the wall
To apply markings, you need to place the car closer to the wall and turn on the low beam. Then you need to alternately mark the center of the trace from each headlight and the centers of their symmetry. By connecting these points, we get a horizontal line. Then, below, two more lines should be drawn in parallel. The second is at a distance of 5-12 cm, and the third is at a distance of 22 cm from the first. In addition, you need to draw vertical lines through the center points of the car and the lights.
After turning on the light, you need to ensure that the top point of the light is on the second line. The adjustment is made using an electric headlight adjuster. The adjusted light will illuminate the road well and will not blind oncoming drivers.
Sorry, there are no surveys available at this time.
We adjust the direction of the headlight beams on a fully fueled and equipped car, with normal air pressure in the tires. We install the car on a flat horizontal area at a distance of 5 m from the screen (you can use a garage wall, a sheet of plywood or hardboard measuring 1x2 m).
Scheme for adjusting the direction of headlight beams. We draw a horizontal line 1 on the screen at a height equal to the distance from the center of the headlights to the floor. Below it, 65 mm, we draw a parallel line 2. We draw on the screen a vertical center line 0 (the distance from it to the center of the left and right headlights should be equal) and lines corresponding to the centers of the headlights (AE and BE).
Set the headlight range control switch to position “0” (single driver or driver with a passenger in the front seat) and turn on the low beam headlights. Cover one of the headlights with opaque material. We insert the “6” hexagon into the regulator socket through the hole in the upper cross member of the radiator frame.
By turning knob 1, located closer to the axis of the car, with a hexagon, we change the position of the light beam of the headlight in the vertical plane. By turning regulator 2, located closer to the car's fender, we change the position of the light beam in the horizontal plane. When adjusting, the upper boundary of the light beam should coincide with the lower horizontal line (see Fig.
Location of light beam direction regulators on the headlight body: 1 - light beam regulator in the horizontal plane; 2 - regulator of the light beam in the vertical plane
Auto mechanics know how to adjust headlights on a Priora. It is necessary to take into account that their incorrect adjustment can lead to a real threat to traffic safety at night. In this case:
- the roadway is poorly lit,
- Drivers of oncoming cars are blinded.
Scheme for adjusting headlights on a Lada Priora car
To prevent the situations described above, it is recommended to promptly and correctly adjust the lighting elements. To do this you will need the following tools.
Adjusting the headlights begins with choosing a location. Lada Priora is installed on a flat area at a distance of 5 m from a smooth wall. After filling a full tank of gasoline, check the tire pressure using a pressure gauge. If there is a deviation from the norm, it is adjusted to the minimum value. If the headlight is sweaty or dirty, then it is wiped and washed accordingly.
Next, the functionality of the light bulbs is checked. To do this, the light is turned on. If faulty lighting elements are identified, they are replaced with new ones. The next step is to move the headlight beam adjustment lever to the zero position. The headlights turn on and the car rocks from side to side. This action will allow the suspension parts to take the appropriate position.
Special markings are drawn on the wall. The center line is drawn in such a way that the distance from the centers of the lighting units to it is the same. Then the centers of each headlight are located. They are marked on the wall with dots. 2 vertical lines are drawn through them. A straight line is drawn between them and o. Parallel to it below, at distances of 12 and 22 cm, 2 more lines are drawn.
Next, the low beam is turned off and one headlamp is closed. The upper part of the light spot should coincide with the middle horizontal line “B” (see Diagram for adjusting headlights on a Lada Priora car). It should be taken into account that the intersection points of the inclined and horizontal sections of the boundary of these spots coincided with a vertical line, which was drawn through the point corresponding to the center of the lighting device.
Necessary tool
To adjust the headlights on a Lada Priora you will need:
How to adjust Priora headlights manually in the field
FTAROY CHANNEL “To the point” (for frostbitten +18) SUBSCRIBE...
Adjusting the headlights
Lada Priora
, subscribe to my channel.
- First of all, we park the Priora car on a flat area five meters from a flat wall. Fill the tank with fuel until it is full and use a pressure gauge to equalize the pressure in the wheels. After inspecting the headlights, thoroughly wash them from contamination. We check that the headlight bulbs are working properly. If necessary, we install new ones.
- After the preparatory procedures, we proceed to adjustment. We move the lighting width control lever to position “0”. This position corresponds to the load of the vehicle with the driver. Turn off the lights and rock the car from side to side. Thanks to the rocking, all suspension elements will take a standard position. We ask a colleague (about the same weight as you) to sit in the driver’s seat of the car.
- For further adjustment, draw a special marking on a flat wall. The center line should be drawn so that the distance from the center of each headlight to the axle is identical. We mark the centers of each headlight with dots on the wall and draw two lines vertically through them. Draw a straight line between the lines and mark it with the letter “A”. Below, at a distance of 12 and 22 centimeters, draw two more lines in parallel.
- With the low beam on, close one of the headlights. The top point of the light spot from the headlight should coincide no higher than the horizontal center line. Also, the boundaries of the light beam of the fog lights are located along the same line.
- We make sure that the intersection of the inclined and horizontal sections of the boundaries of the light fluxes (at the point where the light beam breaks) coincides with a line that is drawn vertically and passes through the point marked as the center of the headlight. If deviations in the luminous flux are detected, we adjust the headlights with a hexagon of 6 millimeters by rotating the horizontal and vertical position screws. These screws are located under the hood in the headlights.
There is a special offer on our website. You can get a free consultation with our corporate lawyer by simply submitting your question in the form below.
| 1 | cracks and breaks in the body |
| 2 | damage to the headlight electrical connectors |
| 3 | reflector failure |
| 4 | defects in fasteners |
| 5 | clouding of the optics (the headlight sweats or becomes dirty) |
In what cases is it necessary to replace and adjust headlights?
| № | Cause |
| 1 | cracks and breaks in the body |
| 2 | damage to the headlight electrical connectors |
| 3 | reflector failure |
| 4 | defects in fasteners |
| 5 | clouding of the optics (the headlight sweats or becomes dirty) |
The replacement process allows not only to restore the original properties of lighting devices, but also to increase the level of safety of driving. By replacing the rear or front headlight, the driver provides better control of the car at night and in bad weather, and for other drivers on the road.
Experienced mechanics can replace both front and rear lights in a short time and without any problems. But to do this work yourself, you will need the following tools:
- key to 10;
- Phillips screwdriver.
To remove the headlights, you first need to disconnect the wire from the “-” terminal of the battery, and then remove the bumper of the Priora car. Then you should press the latch, which will allow you to easily disconnect the wiring harness blocks from the headlight. Having pulled out the side fastening screw, you need to unscrew the 4 latches.
The taillights are removed using the same principle. First, disconnect the wires from the battery terminal, after which you need to remove the trunk trim behind the lighting element. Then you need to release the latch and disconnect the rear harness block from the wiring that connects the rear lights.
More on the topic What is a transmission - an explanation in simple language
In some cases, owners may need to disassemble the headlight in a Priora car. This often happens due to the failure of the component parts of this unit, if the lights are foggy (condensation forms when cold air enters) or the light bulb has burned out. Before disassembling the headlight, you need to prepare an industrial hair dryer, since the sealant that separates the taillights from the housing melts at a temperature of 300°.
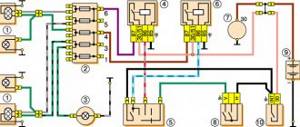
Wiring diagram for headlights on Lada Priora. 1 — block headlights; 2 - indicator lamp for turning on the high beam headlights in the instrument cluster; 3 — mounting block; 4 — steering column headlight switch; 5 — lighting control module; 6 — ignition switch (lock); K7 - headlight high beam relay; A - to the main fuse block (F3); B - to the electrical package controller, pin “14”
Return
During the replacement process, you can not only restore the functionality of the flashlight, but also improve its performance characteristics by replacing halogens with xenon. Using xenon in lamps, the driver receives better lighting. At the same time, tuning of the headlights is also carried out: lens glass is installed, black headlights look impressive. LED lamps are installed in the parking lamps, as well as in fog lamps.
The toolkit for the procedure for replacing headlights on a car consists of:
- socket wrench to “10”;
- Phillips screwdriver;
- flat screwdriver.
Replacing a headlight on a Priora begins with disconnecting the negative terminal of the battery (the author of the video is the channel In Sandro's Garage).
Before removing the headlight on a Priora, you need to remove the bumper. Then you need to remove the headlight covers from above. Next, pressing the latch, the block with wires is disconnected. When the headlights are removed, you can change the bulbs, for example, with Bosch xenon ones. The glass version of the optics can be replaced with a lens one.
The rear lights of Priora 2 are removed in the same way. The upholstery is dismantled and the wires are disconnected. Now you can remove the rear lights of Priora 2.
Tail lights on Priora
To disassemble and replace the headlight glass, you will need the following materials and tools:
- industrial dryer;
- thin screwdriver;
- new glass;
- new lamp;
- sealant.
Before disassembling the headlights on the Priora, you need to place them on a clean, dry surface. Then heat the glass until the sealant begins to melt. Next, the glass should be pryed off with a screwdriver and separated from the body. The next step is to remove the old sealant.
Before changing the light bulb and replacing the headlight glass, the seat must be lubricated with a fresh layer of sealant. Then the glass is carefully placed and pressed firmly. After 12 hours you can assemble the lantern.
Before disassembling the headlights on the Priora, you need to place them on a clean, dry surface. Then heat the glass until the sealant begins to melt. Next, the glass should be pryed off with a screwdriver and separated from the body. The next step is to remove the old sealant.
Experienced auto mechanics know how to remove rear and front headlights. To do this you will need the following tools:
- key to "10"
- Phillips screwdriver.
The wire is disconnected from the negative terminal of the battery. Then the front bumper of the Priora is removed. The latch is released and the wiring harness block is disconnected from the headlight. Having unscrewed the side screw securing the lighting element, unscrew its 4 latches. Removing the casing involves the subsequent dismantling of the upper mounting bolts. Thus, the headlights on the Priora have been removed. Installation of these devices is carried out in reverse order.
The rear lights on the Priora are removed in the same way. Initially, the wires are disconnected from the negative terminal of the battery. Next, the trunk lining behind the lighting unit is folded back. The clamps are released and the rear harness block is disconnected from the wiring of a similar lamp.
Having turned the upholstery to the side on the side of the last element being replaced, first unscrew its fastenings. Unscrew the 3 nuts of the studs on which the rear lights are attached. The wiring is displayed. The lamp itself is removed. The installation process of dismantled devices is carried out in reverse order.
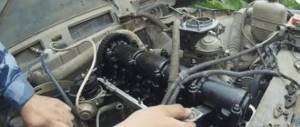
In some cases, Priora car owners wonder how to disassemble the headlight. A similar question may arise if the constituent elements of this unit fail. Initially, the rear lights, like the front ones, heat up. In this case, the sealant begins to melt, and the lighting device will separate from the housing without any problems.
Before you figure out how to disassemble the headlight, you need to purchase an industrial hair dryer. You need to keep it at a distance of 2 cm. For 30 seconds. The headlight on the Priora is heated along its entire circumference. Similar steps need to be performed several times. It should be noted that there are 2 types of headlights for the Lada Priora.
Removing, disassembling and adjusting the second product will not be difficult. The first one will require effort. This is due to the fact that the glass used is attached to the body using a solid sealant. It is difficult to straighten it without damaging the headlights. In this case, auto mechanics advise using a mounting cutter.
They use it to cut a strip of plastic from the lighting fixture housing along with the sealant around the circumference of the glass. The final step of this process involves using a screwdriver. With its help, the glass is carefully pryed off, and at the same time the sealant located under it is cut. Next, the last element is disconnected from the first.