Trouble from noise
Uniform sounds surround us everywhere, often unnoticeable. However, excessive noise levels cause a lot of trouble. Additional sound insulation of the Niva is needed in order to avoid the following consequences:
- driver irritation, distraction and fatigue;
- occurrence of emergency situations for the above reasons;
- reducing the driver's reaction;
- narrowing of blood vessels;
- increased stress on the heart;
- headaches;
- raising your voice when talking to passengers.
As you can see, noise is not just an annoying nuisance, but a rather serious burden on the body.
Do-it-yourself soundproofing of Niva
To begin with, you will need to prepare suitable material. You should not chase the cheapness of batting or linoleum. Their quality characteristics are low, and their toxicity is off the charts.
It is better to pay attention to the following components:
- A special vibration absorber with a plastic structure that transforms vibrational energy into heat. Such materials are made on the basis of bitumen (not to be confused with a construction analogue).
- Vibration reflector – “mirrors” all noise in the opposite direction. If you do not plan to install high-quality acoustics, this component is optimal.
- A noise absorber is an analogue of a reflector; it is installed instead of it if good acoustics are provided in the cabin. Felt is used as this material.
- Decoline, viek, madeline are components responsible for finishing doors, decorating, and absorbing squeaks from friction.
Which material to choose?
Try not to chase a low price, especially when it comes to a personal car. The miser pays twice - this principle also applies to sound insulation. Linoleum, foam rubber, polystyrene foam and other materials will not work. For one simple reason - they are not intended for this.
We advise you to buy splen, vibration-proofing material and Kicx sound insulation in advance. All interior elements, except for the arches, will have two layers of 2 millimeters each, and the arches will have two layers of 4 millimeters each. In total, it can take about 40 sheets of products and this is not the limit.
Hood treatment
Soundproofing of the Niva begins with finishing the hood, since this is the simplest design. The stages of work are given below:
- open the hood, remove the standard insulation;
- thoroughly wash the surface;
- the dry cover is degreased, areas with corrosion are cleaned, primed, and painted;
- Initially, the vibromaterial is laid (a piece is cut to size, the film is removed, the material is heated, applied in place and rolled with a roller);
- degrease the surface again, glue the sound reflector so that a single piece covers the entire part of the hood, including the stiffeners;
- many recommend using special foil because it is more temperature resistant;
- The engine partition (the shield between the engine and the passenger compartment) is treated in the same way.
Sound insulation of Niva doors
At this stage of work, a certain sequence is also followed:
- Remove all handles, panels and trim.
- The surface is degreased through technological sockets. For safety, you should wear gloves.
- The anti-vibration material is inserted through the same holes, rolled with a roller or the handle of a screwdriver (in hard-to-reach places).
- After gluing, a control check of the functioning of the window lift cables and handle rods is carried out.
- Seal the technological holes (foil material like “Viek” is good).
- The noise absorber is glued on top in a continuous piece; it is advisable to treat the inside of the skin in the same way.
- The edges of the doors at the point of contact with the casing are glued with “Madeline”, which will eliminate most squeaks.
- At the last stage, the casing is screwed on and the handles are installed.
How to make Niva quieter?
Should you pay for cross-country ability with comfort?
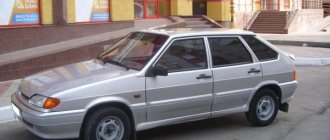
For off-road driving, traveling to hard-to-reach places, hunting and fishing trips, a Russian with an average income chooses the Niva.
And there would be no competitors for her if she didn’t deafen with her howl on the track. And the Niva’s lifespan from constant shaking is insignificant - 90 thousand km. The vibrations of the engine, transfer case mechanisms, gearbox and cardan shafts, merging into a single frequency, slowly but surely destroy themselves and the driver’s health. A long trip gives off a ache in the lower back. One day the vibration in my car became so noticeable that it loosened the bolts under my seat! This is its design.
Looking for silence
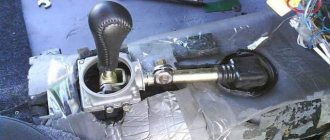
Now I have firmly decided to adjust the transfer case - the noisiest unit - maybe it will become quieter. To which a familiar car mechanic shook his head.
“Enough for a couple of thousand,” he explained, “and then he’ll break the box.” What do you want from an obsolete design?
And so it happened. The gearbox had to be thrown out at 15,000 kilometers. Another one - for 60,000. How many driveshafts, bearings and broken crosspieces were replaced? Considering that the price of a new box with installation is 12,000 rubles, and a new cardan is 3,000, I spent a lot. And so, when my “swallow” ran 80,000 km, I found the master Vladimir Eremenko, who promised that he would remove the noise and vibrations in the cabin of my Niva for 20,000 rubles. According to him, the alteration does not affect the technical inspection in any way - only the transmission is being modernized, and not the brake and steering systems. And I decided!
Kulibiny
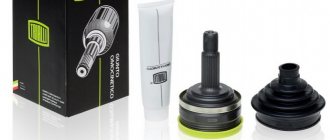
In the workshop I was met by a former employee of the Automotive Institute, designer and author of the development, Alexander Mironov, and master Vladimir Eremenko. I had to separate the transfer case and rear gearbox support from the body onto a single subframe. It took specialist Fuad Hasanov two days to complete the modernization. The work is not easy. Before installing the kit, you need to almost completely strip the Niva transmission and add more homemade parts so that they fit into the design. He disassembled the front axle, removed the driveshafts, transfer case and gearbox. The front axle has undergone major changes.
For example, the front gearbox was completely separated from the engine. The craftsmen screwed it to the front beam using their own silent blocks. A gap of four centimeters has formed between the engine and the gearbox. This means that the units will no longer touch each other. The previous fastenings for the transfer case and gearbox were no longer needed; they were covered with anticorrosive. The transfer case and gearbox were bolted onto a subframe, which was screwed to the middle side members. The power units will no longer be attached directly to the very bottom of the body. This means that the floor in the cabin is protected from rust.
Tests
The first feeling is an unusually easy start, smooth gear shifting and softness when overcoming road unevenness.
The chair stopped vibrating and the side view mirror stopped shaking. And most importantly, the service life of all transmission units will probably increase. There are no vibrations, which means there are no causes of most breakdowns. Didn’t AvtoVAZ’s designers come up with this simple solution earlier, at the stage of developing this necessary but noisy model?
Full results of comparative tests are in the author's diary.
CALL TO THE FACTORY
We called AvtoVAZ and asked to comment on the transformations that had occurred with the Niva. Representatives of the car plant responded that until they have detailed documentation of the work performed (drawings, photographs and detailed descriptions), they cannot draw conclusions about the benefits or dangers of “modernization” for the car. Komsomolskaya Pravda will publish the conclusion of the AvtoVAZ designers after Togliatti becomes familiar with the scale of the alteration in detail.
Roof finishing
After dismantling the ceiling cladding, sound insulation of the Niva 21213 and analogues in the roof part is carried out as follows:
- the surface to be treated is cleaned and washed;
- perform degreasing;
- a vibration absorber is glued, followed by rolling;
- when finishing the roof, it is recommended to use thinner material (2-5 mm) so as not to weigh down the ceiling;
- if you overdo it, the roof of the car may bend into the interior;
- The gluing sequence is identical to the hood treatment.
Basic moments
Niva is very noisy
Do-it-yourself soundproofing of the Niva is carried out using special materials:
- foamed noise-insulating open-cell material with a protective aluminized film, the thickness of which is 12 mm - this material reduces the noise of the Niva from the outside and has a low thermal conductivity coefficient. The noise absorption coefficient can reach 95% in the range of 1000 Hz - 2000 Hz,
- vibration-damping bitumen material with protective aluminum foil, the thickness of which is 2 mm. This material is resistant to aggressive environments,
- vibration-damping bitumen laminate - this is the most effective material from the Noisebuster range, the thickness of which is 4 mm,
- bituminized cardboard with a special vibration-damping layer, 1.5 mm thick,
- vibration-damping bitumen laminate, 2 mm thick.
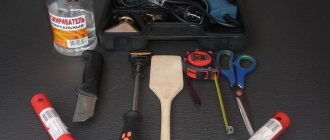
Do-it-yourself soundproofing of the Niva 21213 interior is done using some tools: scissors, ruler, level, marker or chalk, glue, hand gloves and others.
It should be noted that during the operation of the Niva 2121, 21213 and 21214, the issue of sound insulation quality is transformed into the problem of thermal insulation of the interior of these models. This is explained by the long heating of the interior in the winter and poor air conditioning in the summer.
Work in the salon
Soundproofing the Niva in this part is one of the most difficult and crucial moments. It is better to do the work with an assistant. First, unscrew and remove the seats, rugs and floor coverings. Recommendation - it is advisable to collect the fasteners in one container so as not to lose them, and plug the technological holes to prevent glue from getting into them. Areas with rust are treated accordingly, and the bottom and other areas are thoroughly washed.
Degrease the surface after it has dried. The thickness of the laid vibration absorber is 5-6 millimeters, the noise material is up to 10 mm. The vibration absorber is laid in a double layer on the wheel arches. The interior is being assembled.
Where to begin?
The most important event is the choice of material. Someone is chasing cheapness and trying to get by with something like linoleum. Nothing good will definitely come of this. We recommend choosing good material right away.
What can you recommend? I recommend immediately purchasing splen, Kicx vibration insulation and noise-absorbing wavy material. Elements such as doors, roof, floors and wings will require two layers of 2 mm (a total of 23 sheets of product), for arches and the distribution area - 2 layers of 4 mm (a total of 12 sheets). It is advisable to buy sheets 54 by 37.
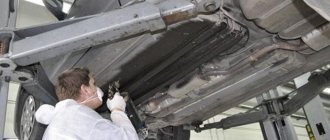
What to do outside?
Noise insulation of the Chevy Niva or other modifications will be incomplete if you ignore the treatment of the outer part of the bottom. This is due to the fact that various sounds and noises pass through this element, including vibration of the transmission unit, operation of the muffler, and the ingress of road stones.
The specified part of the machine is processed by standard application of layers of material or by applying liquid noise insulation. In any case, you will need an overpass or a garage pit.
Stages of work:
- The surface of the bottom of the car is washed with a directed stream of water under pressure.
- After drying, degreasing is carried out.
- Next, glue the prepared pieces of materials according to the instructions, or spray liquid “Shumka”.
- The second option is preferable because it is easier to apply to hard-to-reach places and has a longer service life.
- In addition, the liquid composition is significantly lighter than the sheet components, although more expensive. At the same time, the price will definitely pay off in the final quality.
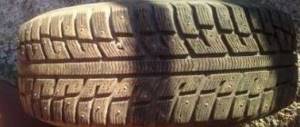
After proper treatment of all parts of the car, the audibility of the rustling of tires, the knocking of stones, and the operation of the transmission and engine will disappear. Plastic fender liners, if available, are glued along the internal contour with a noise reflector of the “Spleen” type.
Sound insulation of the trunk door
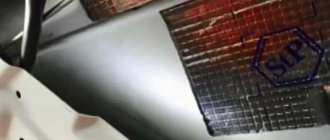
The noise and heat insulation of the tailgate was carried out in approximately the same way as in the case of the rear doors. The main stages of the work are shown in the photo below. The first layer was installed with an overlap of vibration insulation, using both Vizomat MP (on open surfaces) and Vibroplast Gold (in door cavities). Shown in the photo below.
Next, based on the installed vibration insulation, I installed Accent noise insulation in two layers, 15 mm each. Shown in the photo below.
Before installing the plastic trim of the trunk door, I covered almost the entire plane of the panel with vibration insulation. This was done because the plastic on the rear door turned out to be very soft compared to the plastic on the rear doors.
As it later turned out, when the car moved over bumps, the layer of vibration material located on the trunk door panel began to come into contact with the same layer installed on the door itself. The sound effect was, to put it mildly, very unpleasant. As a result, in order to eliminate the sound, I had to purchase a thin heat insulator Spleen 3004, since it was no longer possible to install an Accent with a thickness of 15 mm.
As a result, after installing the separation layer, the noise disappeared, and the thermal insulation of the rear door increased slightly. But it was worth the extra cost in both money and time.