The trend that has become fashionable to go to a car service center for every minor issue has no logical basis. With the question of how to install a deflector on the hood, there is absolutely no need to seek advice from specialists and spend money on it. This procedure is quite within the capabilities of any car enthusiast. To do this, you just need to choose the right “fly swatter”, study the instructions in detail, and spend literally 10-15 minutes on installation.
Buy deflectors - money well spent
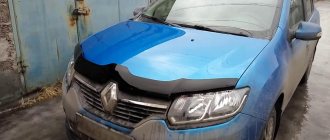
Deflectors on a car, whether they are on the hood, doors or for the hatch, of course, immediately change its appearance. A tuning kit from a well-known manufacturer cannot fail to make changes to the exterior. The main task of glossy plates is to protect the car. The front part of the hood, the false radiator grille and the bumper are the most vulnerable places for sand, stones, and insects that mercilessly bomb the paintwork while driving. What does a fly swatter do:
- is a physical obstacle that repels flying solid particles;
- changes the air flow path, which removes flying debris from the hood and windshield.
The secret to success when choosing the right fly swatter
Correct and accurate installation of the hood deflector largely depends on how the selection was made. Deflectors are exclusively model accessories, that is, you need to buy products exclusively intended for a specific car model. Next, you should understand the installation methods. The following types of fastenings can be found on sale:
- fastening with bolts through through holes;
- gluing with elastic bands;
- installation via clip-on brackets;
- screwing into standard technological holes.
The first two options should be discarded immediately, as they completely kill the paintwork on the hood. If you ever have to remove the deflector, then in the most visible place there will be holes or glue residues with rubber bands, which are almost impossible to wash off. Two others deserve attention.
How to install a deflector on a hood with clip fastenings
One of the easiest ways to secure a “fly swatter” is to use so-called clip fastenings. Their peculiarity is that they are put on the edge of the hood like clothespins. Having soft cushioning material inside, they spare the paint. Installation is done as follows:
- the car hood is washed and dried;
- the deflector is removed from the packaging and fitted to the hood;
- Next, you should secure the brackets to the deflector and repeat the fitting, marking the location of their installation on the hood with a marker;
- Having removed the brackets, you should now install them on the edge of the hood;
- the deflector is installed and screwed to the brackets;
- the brackets are secured with screws to the hood frame from the inside (if provided for by the design).
How to install a hood deflector without brackets
Manufacturers of tuning elements began to produce deflectors that do not have brackets at all. This is especially true for new car models. The deflector has three curved petals in the lower front part, the holes on which exactly coincide with the holes for attaching the rubber seal on the front edge of the hood. Installation in this case becomes even easier:
- Having opened the hood, you need to unfasten and remove the plastic fasteners from the holes in the projection of the deflector petals;
- plastic fasteners should be inserted into the holes;
- the deflector is put on the protrusions of plastic fasteners and fixed with screws;
- thanks to the oval shape of the holes in the plates, you can move the entire structure relative to the hood line for precise alignment;
- the screws are tightened.
Tips to help a novice car enthusiast
The main element of the kit when purchasing a “fly swatter” is not the plastic wing, not the mounting kit, but the instructions for installing the hood deflector. Even before the money is transferred to the seller in the auto shop for the deflector you like, you should definitely make sure that the instructions are available and read them. The installation should also be carried out in strict accordance with the sequence and recommendations specified in it.
What is it for?
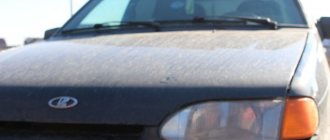
Surely everyone knows that any sports car has this part, but then why does Niva 21214 need it? Someone might assume that it is needed for air intake by the engine or for better cooling of the same engine. However, it is also worth considering that when designing a car, the air intake into the engine is modeled separately, so the engine does not need an air intake at all.
Not every car enthusiast knows that this accessory can be installed on the Niva in two ways and then it performs different functions:
- External air intake under the hood
- Movement of air masses located in the engine compartment
Air intake is required only when there is a front intercooler or, for example, a radiator under the hood of the car that handles cooling. Thanks to the oncoming flow of external, already cooled air, its temperature decreases.
Air intake for the hood of Niva 21214
The second option is needed so that the cold air flow can enter through the radiator grille, which will help to efficiently cool the engine. In this case, the heated air is drawn out through a hole located in the hood.
You can buy this part in online stores, which is what all car enthusiasts usually do. It is located in sections such as tuning or accessories. Such an air intake costs from 1000 rubles.
Technical details of the procedure
The efficiency of the new heating system on Niva will be determined not by the cost of the purchased parts, but by their quality. To operate, you will need the following elements: a car resistor, a figure-eight heater and a “snail”. It is a mistake to believe that only “original” spare parts are suitable for repairing a heating device. The main requirement is technical compatibility.
If in doubt, a drawing of the heating system will provide clarity. The further procedure is as follows:
- Cut a new mounting hole. This is done carefully, because the reliability of the heating system’s operation depends on the quality of the preparatory process. It is recommended to place the engine as low as possible in the air duct, otherwise the device will rest against the hood. This should not be allowed to happen, otherwise the stove fan will not last long.
- Smoothly remove engine power from the air duct. An outlet is used for this.
- Proper installation involves securely securing the motor to the duct. After this, all fastening points without exception are sealed with automotive sealant. It is highly recommended not to miss anything. Otherwise, due to vibration loads and the influence of external factors, the stove connection diagram will be disrupted.
- Take 2 stainless steel plates that adapt to the size of the nozzle and the upper opening. Measurements are carried out several times. Pedantry will eliminate the need for subsequent revision.
- Using a wrench and a screwdriver, remove the factory-installed valve. Tools must be used carefully. One careless movement is enough for 21213 to require expensive repairs.
- It is recommended to avoid having another heating device in the car. The second stove will not add heat, but it will increase the load on the engine several times.
- The process is completed by installing a new air duct with the engine.
Also interesting: Installing Hubs on Niva
The heating system of a new model is checked by test switching on. It is recommended to switch modes smoothly. The device must remain on each of them for at least 5-7 minutes. The driver’s task is to make sure that the operation of the system is not accompanied by extraneous noise and vibration.
Installation
The air intake must be installed according to the general rules.
When installing, you will need a special seal. It is advisable to initially purchase an accessory to match the color of the car or repaint it after purchase.
The hole must be cut in the hood itself. This can be compared to installing a sunroof in a car. Usually a grinder is used for this. You must remember to treat the edges to prevent rust from forming on them in the future.
Usually, during rough work, the installed part begins to stand out strongly as a separately installed part; to avoid such trouble, you should first align all fasteners with resin and fiberglass. Then you need to start careful puttying along with leveling.
Self-production
If the car enthusiast is not satisfied with the standard options, you can make this part yourself. Then Niva 21214 will look truly unusual, because the intake can be of absolutely any shape. It is usually made from polyurethane foam and fiberglass.
Let's look at it step by step:
- Place the foam on the hood (the foam should be unpainted). It is best to apply the foam on a special film so that the coating is not damaged
- After the polyurethane foam has completely hardened, you will have to use a knife and sand the air intake blank
- The resulting air intake shape should be secured with pre-prepared fiberglass
- Please note that the thickness of its layers should be more than 4mm
- Complete foam removal
- The air intake should be impregnated with mastic containing fiberglass. This is necessary in order to fill all the pores
- Varnish coating
- Fastening the completed part (sealant and special fasteners will be required).
Original parts vs analogues: practical advice
As mentioned earlier, such a choice does not affect the quality of the heating system. At the same time, car mechanics make several reservations. For those who plan to use VAZ stoves, it would be useful to check the power system. It is different for some modifications. That is why all actions are consistent with the drawings.
It is permissible to use the VAZ 2108 heater, provided that two recommendations are followed. Firstly, the mounting socket is 1-2 cm larger than the size of the device. The additional area will reduce the vibration impact. Secondly, the switch is installed taking into account the specifics of the VAZ heating system. You will have to tinker less when minor modifications to the system are needed.
The ventilation system is updated in 1-2 hours, depending on the degree of wear of the engine.
It’s worse if the factory equipment of a Chevrolet model has manufacturing defects. A complete replacement of the device is recommended. This will save time.
The operation of the heating system determines the comfort and safety of driving. The driver constantly monitors the system's performance. If extraneous noise appears, it is necessary to urgently carry out a technical inspection.
Read news about the new Niva
- Clutch adjustment on Niva 21214 - Online reference book to help the car owner - looking for and fixing faults
- How to eliminate vibration of the VAZ-21213 transfer case
- Fuses and relays (location and purpose of fuses and relays) Niva Chevrolet "
- Mud tires for Niva 4x4: radius 15 and 16 - which one is better to install "
- Liquids used and filling volumes Niva VAZ 21213, 21214, 2131 lada 4×4
- Wheel stud M12x1.25x41 2121, 21213, 2131, 21214, 2123 rear
- Niva Chevrolet transfer case: device, connection diagram and how to use?
- How is a CV joint replaced on a Chevrolet Niva?
Also interesting: What to check when buying a Niva
Advantages and disadvantages
Any car needs an air intake, not just the Niva, because it has a huge number of advantages:
However, it is always worth looking from the other side. Disadvantages of the air intake on the hood:
- Aerodynamics
- Possibility of damage to the hood during installation
In order to avoid the negative aspects of the air intake, it is best to contact specialists who can independently select and install it on the car.
The air intake for the Niva, if desired, can be made and installed with your own hands. This part plays a key role in the process of cooling important elements of the car. Unfortunately, not every one of us knows how to correctly install such an important element of the machine. Let's try to understand the intricacies of installing the parts together.
Where to install
You can buy and install an additional air intake on any car. It is important to understand here that all cars already provide in advance the presence of inlet paths for the passage of air with its further entry into the engine and inside the engine to create an air-fuel mixture.
That’s why they put in purely auxiliary elements. They can be found on cars such as:
- UAZ Patriot;
- Gazelle;
- VAZ 2107;
- Niva 2121;
- Niva 21214;
- Subaru Impreza;
- Mazda 6;
- Hyundai Coupe;
- Honda Accord;
- Mitsubishi Lancer, etc.
Some cars already have special windows with grilles on the hood, through which air enters for further passage into the heating system.
There are a number of companies that make air intakes for existing windows or for specific models of different car brands. They are even secured with double-sided tape. Although this is already some kind of hack. Such a structure should be properly secured.
But such air intakes will be ineffective, since the windows near the windshield for the air intakes are far from the engine. Therefore, the bulk of the air will begin to overheat or go directly to the heater. It won't do any good for the engine. In order to increase the efficiency of the power plant, experts recommend placing air intakes directly in the middle of the hood.
This position is considered optimal, since the air flows will go directly to the engine, and therefore they will not have time to warm up to a temperature equal to the engine temperature. Additionally, external cooling of the power plant is improved, which is extremely important in hot weather.
There is another implementation option. Namely, put the air intake in the center, and additionally its pipes. They will go straight to the air filter. Just keep in mind that this option is not suitable for sports cars. Here it is better to place the air intake directly above the filter. There is no need to adhere to strictly defined symmetry.
Self-installation
For greater engine efficiency and better cooling, air intakes really are a good solution. It’s easy to buy, and the price is reasonable for modern cars. Some people prefer to make the design themselves. But in my opinion, it is better to immediately purchase a universal ready-made element, or find an option specifically for your model. This is even preferable.
The installation procedure looks something like this:
see also
Exhaust system: design and tuning
- Determine the location where the air intake will be mounted;
- Draw lines in accordance with the dimensions of the element for air flow;
- It would be optimal to first remove the hood from the car and remove the insulation from the inside. I don’t recommend cutting directly on the machine;
- Using a grinder, cut out the required section according to the markings. Be careful, cut as smoothly as possible;
- Sand the edges to remove burrs. Apply anti-corrosion compound and a coat of paint. This will prevent rust;
- Now attach the air intake, align it along all the edges;
- Fastening can be done using glue, double-sided tape, bolts and other fasteners. Choose a more reliable one;
- The mounting method largely depends on the design of the air intake itself;
- Install the element, return everything to its place;
- Take some photos and brag to your friends.
Whether you have a metal or plastic fence, decide for yourself. Plastic ones are cheaper and easier to use. Metal ones are heavier, but more reliable and durable. Some even use thick foam. But this is no longer our option. Let's do it conscientiously.