Device Description
On Niva 21214 cars there is a generator of type 9412.3701, on VAZ 21213 - type 371.3701, on Niva Chevrolet there is a generator 2123. All of them are alternating current electric machines with electromagnetic excitation, having a built-in rectifier unit with silicon diodes and an electronic voltage regulator. The maximum current produced by the generator unit type 9412.3701 is 80 A, voltage - 13.2 - 14.7 V, rotation - right.
Design of unit 21214
The unit covers are attached to the stator using 4 bolts. The covers have bearings installed. They rotate the rotor shaft. In the front bearing, the inner race is clamped with a nut along with a thrust ring and washer. The 2nd bearing is also pressed into the back cover.
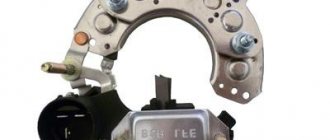
The stator has a 3-phase winding, one of the ends of which is connected to a rectifier unit consisting of 6 diodes. Of these, 3 diodes are negative, 3 are positive. According to the polarity, they are pressed into the plates. The entire structure consists of a rectifier unit, which is located on the back cover of the generator unit covered with a protective casing.
The design of the unit also includes contact rings and brushes. On the back side of the back cover there is a brush holder, which is structurally connected to the voltage regulator. The rectifier contains a capacitor that protects the electrical network from power surges.
The “B” terminal of the generator set must be connected to the positive terminal of the battery, and the negative terminal of the battery to the vehicle ground. If the connection is incorrect, this will lead to breakdown of the diodes.
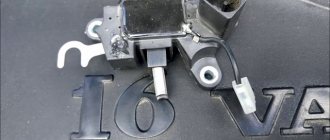
Generator Niva 21214
Basic malfunctions and ways to eliminate them
Checking the health of the unit is done using a multimeter. After the engine is started, the voltage at the battery terminals should be 13.6 V. If the value is higher or lower, this indicates a break or short circuit of the windings, oxidation of the slip rings, a malfunction in the brush assembly, or voltage regulator.
The generator unit may not work well due to weak belt tension or its breakage. In this case, you need to adjust the tension or replace the belt. Faulty voltage regulator, needs to be replaced. If a breakdown, short circuit, or damage to the rotor windings is detected, it should be replaced. If there is a break or short circuit in the stator windings, it requires replacement. If the diodes are damaged, the rectifier unit is replaced.
How to check a car generator? 5 ways to test with a multimeter
There are hardware and visual ways to check a car's generator. However, the owner must know the design and purpose of this electrical device in order to diagnose correctly. This guide will help you avoid a trip to the service station and save your operating budget.
Rice. 1 Checking the car generator
If a generator is suspected of malfunctioning, the car owner first tries to identify the breakdown himself. There are several verification methods that involve measuring both a removed and an undismantled device. The verification in both cases will be reliable. In addition to knowing how to check the generator, you need to find out the reasons why it may fail.
The car's generator serves to power the on-board network, electrical equipment and charge the battery during operation of the power unit. This is a mechanism that produces alternating current by converting the mechanical energy of rotation of the rotor (the “plus” winding) in the stator (the stationary part of the “minus” winding) into electrical energy. Torque is supplied from the crankshaft to the drive pulley.
All generator malfunctions are of two types: mechanical failure of components, electrical failures. In any case, the cause of the violation can be determined by checking the voltage in different areas and elements in several ways.
Table of typical generator faults
Symptoms of malfunction Diagnostics Remedy
| The battery charge indicator on the dashboard does not light up when the ignition is on | Battery is discharged | Charging the battery |
| The fuse in the unit or the indicator light has blown | Replacing fuse, light bulb | |
| Broken ground contact on the generator housing | Secure the bolted connection of the contact, cleaning it from oxides | |
| Broken wiring from the generator to the dashboard terminals, or broken contacts | Repair the break, clean the contacts | |
| Wear of generator commutator brushes | Replacing brushes or generator | |
| The gap on the brushes and slip rings of the rotor is broken | Adjust the gap | |
| Failure of rotor rings | Replacing the rotor or generator | |
| Voltage regulator relay failure | Regulator replacement | |
| The battery charge indicator goes out when the speed increases | Loosening the alternator belt drive | Adjust tension |
| Belt drive break | Replace belt | |
| Failure of the diode bridge | Replacing the diode block | |
| The power cable between the battery and the generator is broken | Replacing power cables | |
| The relay regulator has failed | Relay replacement | |
| The indicator is constantly on | Short circuit in the circuit | Eliminate wiring problems |
| Short circuit in the diode block | Check the contacts in the block, replace the wiring | |
| Failure in the ECU system | Check the controller unit, clear the ECU error | |
| Battery discharged | Charge the battery | |
| The indicator remains on when the ignition is turned off | Short circuit | Eliminate broken wiring |
| Short circuit in the diode block | Clean diode contacts or replace | |
| Overheating and boiling of battery electrolyte | Failure of the relay regulator | Relay replacement |
Design of a car generator link 1 Generator terminal designations, diagrams link 2 How to check the mass air flow sensor with your own hands link 3
How to check a car generator with your own hands
Also interesting: Niva Chevrolet installation of air conditioning - Auto magazine MyDucato
The generator plays a very important role in the car; for the engine it is like a mini power plant that supplies the entire on-board network of the car, including the battery. A malfunction of the generator will lead to an inevitable complete discharge of the battery, after which the engine of your car will simply stop working, as well as the entire on-board network.
As a result, you will have to “light up” your car or look for a new source of energy. It is very important to detect a generator malfunction in time in order to prevent the above scenario. In order to diagnose a generator, you need to have certain skills and tools.
In this article I will tell you how to test a generator at home using a multimeter.
- To begin with, about precautions and safety rules during inspection
- You need to be extremely careful and understand what you are doing so as not to accidentally damage the generator or its parts (regulator relay, rectifier bridge diodes).
- Forbidden:
Check the functionality of the generator by checking it “for a spark,” that is, using the short circuit method. Connect terminal “30” (sometimes designated as “B”) with terminal 67 (“D”) or “ground.” Allow the generator to operate with consumers turned off, for example, when disconnecting it from the battery.
- Check generator valves with voltages above 12 V.
- You can and should:
Check the serviceability of the generator using a voltmeter or ammeter. During welding work on the car body, it is necessary to disconnect the wires from the generator and battery. When replacing the wiring in the generator system, the wires must have the same cross-section and length as the “original” wires.
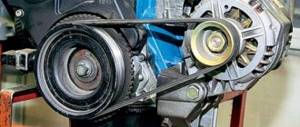
Before checking the generator, make sure that the tension of the generator belt is correct and that all connections and terminals are in good working order. The belt tension is considered normal when pressing the middle of the belt with your thumb, it will bend no more than 10-15 mm.
Checking a car generator yourself
To check the voltage regulator you will need a voltmeter with a scale from 0 to 15 V. Before starting the test, let the engine run at medium speed with the headlights on for about 15 minutes.
It would also be a good idea to check the regulated voltage; to do this, connect a voltmeter directly to the battery terminals. True, the results of such a test cannot be considered 100% correct, because there is a possibility of problems with the wiring. If you are confident that the wiring is working properly, then the results can be trusted.
The engine must operate at high speeds, which are close to the maximum, the headlights and other consumers of the vehicle's electricity must be turned on. The voltage size must match the parameters of your car.
Diode bridge
Checking the diode bridge is part of a set of generator checks. In order to check the diode bridge, connect a voltmeter or multimeter to terminal “30” (“B”) of the generator, as well as to ground, and turn the device into AC measurement mode. The alternating current on the diode bridge should not exceed 0.5 V; if you get more, the diodes are most likely faulty.
Breakdowns to ground
Checking the penetration for “mass” will not be superfluous if “the gene composts the brain.” To do this, you need to disconnect the battery and the generator wire that goes to terminal “30” (“B”).
After this, connect the device between terminal “30” (“B”) and the disconnected generator wire.
We look at the readings - if the discharge current on the device exceeds 0.5 mA, most likely there is a breakdown of the diodes or insulation of the generator windings.
Recoil current strength
The strength of the output current of the generator is checked using a special probe (“lotion” is an addition to the multimeter in the form of a clamp or pliers), which is used to cover the wire, thereby measuring the strength of the current flowing through the wire.
And also interesting: Tuning Niva 2121 with your own hands (photo video)
At the end of the measurements, you need to calculate the sum of the readings. Next, turn on all consumers (which you turned on one by one) at the same time and measure the multimeter readings. The value should not be less than the sum of the readings of separately measured indicators, the permissible discrepancy is 5 A.
Checking the generator excitation current is carried out by starting the engine and then running it at high speeds. The measuring probe is then placed around the wire leading to terminal 67 (“D”). A working generator should show an excitation current value of 3-7 A.
Winding check
To check the field windings, you will need to remove the voltage regulator, as well as the brush holder. If necessary, clean the slip rings and check the winding for breaks and short circuits to ground.
It is necessary to check with an ohmmeter; its probes are applied to the slip rings, after which readings are taken. The resistance should be between 5 and 10 ohms. Then connect one electrode of the device to any of the slip rings, and the other to the generator stator.
The display should show an infinitely high resistance, otherwise the field winding shorts to ground somewhere.
"question-auto ru"
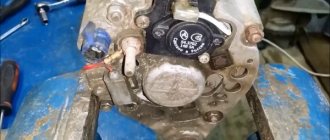
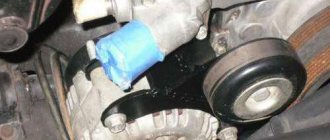
Nuances of moving a generator
The disadvantage of domestic Niva SUVs is the location of the generator unit - at the bottom of the engine compartment. It constantly gets contaminated when driving off-road, and coolant constantly drips. The problem is solved by moving the generator upstairs (the author of the video is SARTANETS).
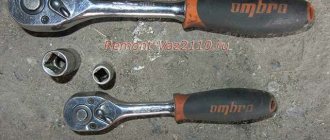
To transfer, you will need a set of keys, a bracket, mounting bolts, and a V-belt. You can make a generator transfer bracket with your own hands according to the drawing below.
Drawing of a homemade bracket
Sequence of actions during transfer:
- We dismantle the propeller, pump and remove the belt.
- By unscrewing the standard bracket, you can remove the generator.
- We cut off the bead around the side of the cylinder head and on the cylinder block.
- Then you should unscrew the two bolts and two studs.
- Next, the assembly is installed on a new bracket and final assembly is performed.
Thus, moving the generator unit upstairs is not difficult.
Mounting drawings for injection Lada 4×4 with power steering (VAZ 21214)
Niva is an excellent domestic SUV that can compete with modern jeeps.
VAZ 21214 received a durable body, a powerful power plant and a reliable suspension. Like any car it has its drawbacks. These include the location of the generator - the unit is installed in the lower part of the body. The problem can be solved by moving the generator upstairs.
After reading this article, you will learn:
- What is needed to move the generator upstairs. How does the process work for cars with and without power steering? Is it worth buying a new unit for VAZ 21214.
Study this drawing carefully. The author decided to make a bracket for moving the generator with his own hands. The part is made of metal, the thickness of which should be 4 mm, and the width and length should be 80 mm. To assemble the bracket, you will need parts from other domestic cars:
- Belt 6РК1290; Adjustment bar; Crankshaft pulley from tens.
As you can see in the photo, the standard fan is installed on a pump pulley from GAZ 3110, we also take a crankshaft pin from 2110 and a 6RK1290 brand belt. The generator should be located on the top left side. It must be attached to the top using an M8 cylinder head bolt; at the front, a standard bolt and studs are used. For fixation, the bracket must be secured with an additional lock nut.
This generator transfer drawing differs from the first one in that it uses a belt with a size of 1375 mm. There are fewer steps here, but you will have to work with a grinder - you need to reduce the plane on the head located in the area of the M8 bolt.
The front cover will need new bolts and studs. This drawing of a bracket for mounting a generator is also suitable for other models, for example, for 21213.
The drawing suggests moving the generator to the place of the hydraulic booster. To do this, you need to make a bracket and install it next to the power steering. You need to select washers for the bracket ears in advance.
This option uses a belt with a size of 1220 mm. It is important that the angle of its wedge must be exactly 40 degrees. An excellent solution would be to buy a belt with ZIL 157. The return hose has a center length of 1115 millimeters, and the high-pressure pressure hoses are 1450 mm. Check all dimensions carefully, remember the saying: measure 7 times, cut once, there is no need for mistakes here. There is no standard hole for these hoses in the right casing, so you will have to take it and cut it yourself.
If you don’t have much experience in carrying out such upgrades, then you can buy a ready-made kit. It will include a new bracket for the Niva and the necessary fastenings. Reviews from motorists indicate that the cost of this simple part is too high.
Should I install a more powerful current generation unit?
We have already described above why the unit wears out quickly. An excellent solution is to install a new generator. Another common reason is the installation of off-site equipment that consumes a lot of electricity. The current strength of a standard unit is not always enough, so you should think about installing a more powerful generator.
The model depends on the year of manufacture of the car and engine. For example, the first Nivas with a 1.6 power plant have a device with a remote regulator, which was used in the “classics”. In more modern machines the regulator is already built-in.
If you can modify the fastenings yourself, then the list of available gHepaTopoBs can expand significantly. Craftsmen even install devices from foreign cars.
In any case, you should strive to modernize and improve your car. And this applies not only to electricity. The Niva is a reliable SUV, but it lags far behind its foreign competitors in terms of comfort. You can move on to this issue immediately after improving the technical component of the car.
The standard location of the Lada 4×4 generator is at the bottom, which cannot be called a good solution. During off-road driving, water and dirt easily get on it, or antifreeze drips, which significantly reduces its service life. To protect an important part from moisture, owners resort to modifications. Let's look at how to move the generator up to a Lada 4×4.
And also interesting: Expedition racks Niva 2121 buy in Balashikha in the online store