Article number and price for the original ball joint
The original VAZ 2109 ball joint has article number 21082904185. Its price ranges from 320 to 400 rubles. There are also refurbished spare parts, costing from 80 rubles. It is impossible to determine their service life externally, so purchasing used supports should be avoided.
Original ball joints have a good reputation among car owners. They are optimal in terms of price to quality ratio.
With proper installation and a careful driving style, the supports will last 50-80 thousand km.
The process of replacing a ball joint on a VAZ 2108 car
- Next, the nut securing the ball joint is unscrewed towards the lever.
- Two bolts are unscrewed towards the steering knuckle, which also secure the support, after which it is necessary to dismantle them together with flat and spring type washers.
- The follow-up action is to move the steering knuckle to the side and install a puller, with the help of which the hinge pin is pressed out of the lever.
- After this, the lever is retracted to the lower part and the ball joint is dismantled.
- Before installing a new product, experts recommend applying a high-quality sealant to the support for its long service life.
- Next, all the elements are assembled.
Article number and cost of ball joint analogues
Many car owners prefer non-original ball joints. This is due to the fact that, at a comparable price, products from third-party manufacturers are often of higher quality compared to original supports. The brands that have proven themselves best among car owners are presented in the table below.
Table - Good analogues of the VAZ 2109 ball joint.
| Manufacturer | vendor code | Approximate cost, ruble |
| TRW | JBJ156 | 420-460 |
| Delphi | TC583 | 310-360 |
| Sidem | 19989 | 410-440 |
| Lemforder | 1545602 | 435-460 |
| ABS | 220119 | 550-700 |
Replacing the ball joint
When you are already convinced that the ball joint needs to be changed, you have chosen a good new ball joint and purchased it, then you can begin the repair. You need to start by preparing the necessary tool for the job. So, what does replacing ball joints on a VAZ 2109 require?
Tool
Replacing the ball joint VAZ 2109 - special puller
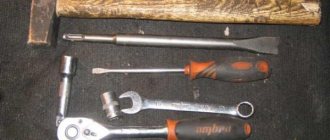
You will need:
- Jack
- Set of keys, heads
- Balonnik
- Wheel chocks
- Puller for ball joints VAZ 2109
- Hammer
- Mount
- Lubrication
- Metal brush
- WD-40 or equivalent
Now you can start - replacing ball joints on a VAZ 2109!
Diagnostics of the ball joint condition
When a ball joint fails, a number of characteristic symptoms are observed. The most pronounced among them are:
- a clear thud is heard from the front from the right or left side of the car when hitting bumps, holes or other unevenness in the road surface;
- more force is required on the steering wheel to turn;
- the car pulls to the side when driving on a flat road;
- squeaking and grinding noises come from the wheel arches when turning;
- upon inspection, uneven wear of the rubber of the front wheels is noticeable;
- turning into a turn is accompanied by a knock;
- when examining the wheel from a distance, you notice how it is tilted to the side;
- the stability of the car decreases and the car loses control when driving over uneven surfaces;
- turning into a turn at speed becomes problematic, since the car does not “listen” well to the steering wheel.
If the above symptoms of a ball problem are detected, the condition of the support must be checked. You can do it according to the instructions below:
- Jack up the front part of the VAZ 2109.
- Take the wheel from opposite sides. Place one hand on top and the other below.
- Rock the tire sideways.
- The presence of wheel play indicates a possible ball failure. It should be borne in mind that similar symptoms appear when steering tips or stabilizer struts fail.
You can more accurately check the condition of the ball after its dismantling. You should move your finger to the sides. The maximum possible displacement from hand force is up to 0.7 mm. If there is play, the support must be replaced.
Determining the malfunction of the VAZ-2109 ball joint
Structural simplicity gives the ball joint the necessary degree of reliability with a certain service life. It can range from 15 to 150,000 kilometers. This depends on your driving style and the condition of the roads on which the car is used.
The main signs that the ball needs replacement are:
- knocking in the suspension area when driving on uneven sections of the road;
- uneven tire wear;
- arbitrary displacement (wobbling) of the car from the center line of movement;
- creaking suspension and increased steering effort.
Required tools and materials for DIY replacement
Repairing a ball joint yourself is impossible without the tools listed below.
Table - Tools and materials required to replace the ball joint.
| Name | Note |
| Puller | It is not necessary to replace the ball, but it significantly simplifies the dismantling process |
| Spanner | "at 17", "at 19" |
| Socket wrench | "at 17", "at 19" |
| Heads | "at 17", "at 19" |
| Heavy hammer | Required if there is no puller |
| Grease | ShRB-4, Litol-24 or graphite |
| Balloon wrench | For wheel removal and installation |
| Installation | Can be replaced with any strong rod, piece of pipe or crowbar |
| Metal brush and rags | For cleaning work surfaces |
| Penetrating lubricant | To facilitate the separation of rusted and stuck joints |
Replacement of ball joints of the front suspension of VAZ 2108, 2109, 21099 cars
The service life of the front suspension ball joints of VAZ 2108, 2109, 21099 vehicles varies between 50-60 thousand kilometers.
But due to poor manufacturing quality and difficult operating conditions, this period can be reduced to 20-30 thousand km. A failed ball joint will make itself known by a knocking sound from the suspension when driving over uneven surfaces at low speed (for example, when driving over a curb). To establish that it is the ball joint that is faulty, we carry out a small check (see “Checking ball joints for VAZ 2108, 2109, 2109 cars”). If a faulty ball joint is detected, replace it with a new one. It is recommended to replace two ball joints at once, but based on practice, you can replace only one, the one that knocks. Necessary tools, accessories and spare parts
— Socket wrenches, ring wrenches or heads for “17” and “19”
— Ball joint remover (if you don’t have it, then use a mounting tool and a heavy hammer)
— Lubricant Litol-24 or ShRB-4
— New ball joint (or two, if the supports are replaced on both sides at once)
— We jack up and hang both wheels of the car (in this case, the anti-roll bar does not tighten the suspension and it is easier to remove the ball joint)
— We clean the front suspension parts from contamination
The procedure for replacing ball joints of the front suspension of VAZ 2108, 2109, 21099 cars
Unscrew the nut securing the ball joint to the suspension arm
We use a key or socket on “19”. Before unscrewing, you can lightly tap the nut and fill it with WD-40.
Press the ball joint pin out of the hole in the suspension arm
We use a special device - a ball joint remover.
Or, by screwing the fastening nut onto the ball pin a couple of turns, we create tension between the ball and the lever using a mounting tool and hit the lever boss with a hammer until the pin is pressed out.
Disconnect the ball joint from the steering knuckle
Using a socket wrench or a “17” socket, unscrew the two bolts securing the ball base to the steering knuckle and remove it.
Installing a new ball joint
We insert the ball pin into the hole in the suspension arm. We fasten its body to the steering knuckle with two bolts. With light blows on the lever, we push its boss onto the ball pin until it stops (so that the pin does not turn when tightening the nut). Screw it onto the pin and tighten the nut securing it. The tightening torque of the pin nut is 67-82 N.m, the bolts securing the ball joint to the steering knuckle are 49-62 N.m.
If necessary, we replace the second ball joint in a similar way.
Notes and additions
— It is recommended to put a little additional lubricant (Litol-24 or ShRB-4) into its hinge before installing a new ball joint. To do this you will have to remove its boot.
More articles on the front suspension of VAZ 2108, 2109, 21099 cars
Replacing a ball joint on a VAZ 2109
Step-by-step instructions for replacing the VAZ 2109 ball joint are located below.
- Place wheel chocks under the rear wheels.
- Secure the vehicle with the parking brake.
- Raise the side of the car with a jack on which repair work is planned.
- Remove the wheel.
- Apply penetrating lubricant to the ball fasteners.
- Unscrew the lower nut that secures the ball to the lever.
- Install the puller.
- Tighten the puller bolt with a wrench until the support pin leaves the lever.
- Unscrew the two fasteners that secure the support to the steering knuckle.
- Using a pry bar, press the lever down. This action will release the support. The ball must be removed as soon as it becomes available.
- Install the new ball joint into the seat.
- Reassemble everything in the reverse order of removal.
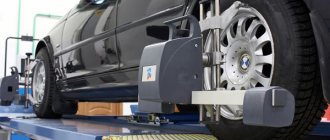
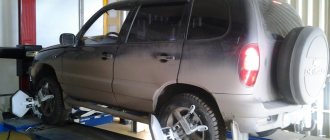
- Upon completion of repair work on the suspension, it is advisable, but not necessary, to check the wheel toe angle and camber on a stand.
- After driving the car for about 100 km, it is necessary to tighten the threaded connections and inspect the ball for lubricant leaks.
How to change the ball joint on a VAZ 2109?
After detecting all signs of malfunction, you can begin to replace the element. This operation is not complicated, and therefore can be done by any driver who has a standard set of tools and a place to carry out the appropriate repairs.
First of all, you need to purchase the appropriate ball joint. The most important thing in this matter is to save yourself from buying a defective part. First of all, pay attention to the price of the product. It shouldn't be too low. To save on materials, manufacturers make such ball joints from all sorts of rubbish, resulting in a hinge that must be replaced after just a month of use. The most famous and proven. If possible, buy ball joints from this company.
Procedure:
- Remove the wheel bolts and lift the wheel using a jack. Next, you need to completely unscrew the bolts and remove the wheel. For convenience, it is recommended to turn the wheel in advance in the opposite direction from the work.
- Now you need to find the connection between the ball joint and the arms. It is located at the bottom of the pendant. Treat the area with a metal brush and WD-40.
- Unscrew the pin nut, but not completely. Using a puller, press the ball joint out of the hub. After a corresponding click appears, pull out the puller and completely unscrew the pin securing nut.
- Now unscrew the ball joint on the arms and remove it. Install a new part in its place and tighten the fastening nuts.
- Drive a portion of lubricant under the boot of the new ball joint and install it in the reverse order. This time, during installation, the use of a puller is not at all necessary, since the pin can be tightened with a nut.
- Further assembly is carried out in reverse order.
This completes the replacement of the ball joint. We wish you good luck on the roads!
Additional recommendations for replacing the ball joint
The service life of the ball is directly related to the quality and quantity of lubricant contained in the boot. In original products and some auto parts from third-party manufacturers, the cuff is completely dry under the cuff. Therefore, car owners recommend removing the rubber band and checking the lubrication before installation. In its absence, it is necessary to lay down ShRB-4 or Litol-24.
The preservation of the original properties of the lubricant and the durability of the unit depend on the tightness of the boot. Therefore, some car owners recommend gluing the cuff to the ball joint. It is important to take into account that the sealant does not enter into a chemical reaction with metal, rubber and grease.
The absence of a puller complicates the process of dismantling the ball, but does not make it impossible. If you do not have special tools, then following the instructions below, you can press out the support.
- Slightly loosen the lower nut that secures the ball to the lever.
- Using a pry bar, press the lever down. At the same time, tap the lever with a hammer. Impacts should not leave deformations, but be quite heavy. It is prohibited to completely unscrew the lower nut. This is due to the fact that at a certain moment the lever will fall down. It will rest against the lower ball nut. Without it, nothing will stop the lever when it breaks, so there is a risk of damaging the car or hitting yourself.
- Unscrew the ball joint.
- Push the lever to the side and remove the knocked out ball joint.
Manufacturers of ball joints for VAZ 2108
- BELMAG
This company has been producing parts for VAZ cars for a long time. The most common series of parts is “Original”. They are in great demand because they are of good quality at a relatively low price. The Comfort line is created using a patented finger surface treatment technology. Surfactants and functional additives are added to the plate lubricant.
A special anti-corrosion surface is applied to the body. In the “Favorite” series, the body is made of heavy-duty forged metal, and a cellophane-free boot and a pressure spring are also used. Products from this line have increased elasticity properties and a wide temperature range: from -50 to +50 degrees.
Spare parts from this company are equipped with a large amount of lubricant during the manufacturing process, so additional addition to the cavity of the case is not required. They have proven themselves to be very reliable units and can be used in cars used for sports driving.
The BZAK company is the official supplier of spare parts for the AVTOVAZ automobile concern. Ball joints from this manufacturer have a reinforced all-metal forged body. This allows for good resistance to various loads, including vertical ones.
The surface of the ball pin has an anti-corrosion coating. Cold stamping method is used to make the upper body. The body is welded by spot welding in three places. Stable operation is ensured by a bearing made of metal powder, which has good anti-friction and wear-resistant characteristics.
Ball joints from this company have a number of advantages. First of all, we can highlight the one-piece forged body, thanks to which the product is able to withstand an explosion or extrusion of a finger with a load that will be several times higher than the normal value. During manufacturing, the ball surface is rolled using diamond rollers, and the ball pin is cast using the cold heading method. This allows you to obtain a high-precision shape that will provide increased wear resistance. The finger stem is made with special heat treatment.
Durability is ensured thanks to a reliable coating - yellow zinc, which is not cheap. To ensure protection from the penetration of dust and water, the boot contains labyrinth seals. The material used to manufacture these boots is rubber with increased elasticity, which complies with the ERDM standard. The main advantage of this material is the preservation of its original properties regardless of its service life.
Special channels are present in the antifriction liner, the material of which is graffito containing polyimide. This helps preserve lubrication and remove water and dust from the surface of rubbing areas. This anti-friction liner allows the ball joint to last much longer.
How to replace a ball joint VAZ 2108-2109
for replacing the ball joint described below is suitable for front-wheel drive VAZ 2108 - 2109 vehicles.
Before starting car repairs, for safety reasons, it is recommended to place wheel chocks under the wheels and set the car to the handbrake.
While the car is on the ground, it is necessary to tear off the mounting wheel bolts, and after that you can jack it up for subsequent removal. The tightening torque of the wheel bolts must be 65–95 N•m (6.5–9.5 kgf•m).
Sequence of actions when removing the ball joint VAZ 2108 - 2109
- Raise and support the front of the machine, then remove the wheel.
- Next, unscrew the ball joint mounting nut.
- Using a puller, press the ball joint pin out of the lever.
- If there is no puller, there is no need to unscrew the nut completely. You can press the lever using a pry bar, hitting it with a hammer along the lever, press the hinge pin out of the lever, then completely unscrew the nut.
- We unscrew the two bolts with which the VAZ ball joint is attached to the steering knuckle.
- Move the lever down and remove the ball joint.
- Before proceeding with installation, thoroughly lubricate the ball joint and the inside of the boot with grease.
- Installing the ball joint is done in the reverse order. Slowly lower the car to the ground, then rock the car with force several times.
Now you can do the final tightening (using a torque wrench is recommended):
- The tightening torque of the nut securing the ball joint to the lever is – 80–96 N•m (8.0–9.6 kgf•m),
- The tightening torque of the nut securing the ball joint to the steering knuckle is 50–63 N•m (5.0–6.3 kgf•m).
After the car has driven at least 100 km, additional tightening of these threaded connections will be required using the required tightening torques. If the protective boot of the ball joint is damaged, be sure to replace it.
Key words: VAZ ball joint, VAZ ball joint replacement
Source: https://remontauto-vaz.ru/page/kak-zamenit-sharovuju-oporu-na-vaz-2108-2109
Replacement of Ball Joint VAZ 2109 Without Puller ~ AUTOINTERLINE.RU
Replacing a ball joint on a VAZ 2108, VAZ 2109
, VAZ 21099
Welcome! Ball joint - there are about 2 of them in the Samara family car, one of which is located on the left front part of the car, and the second is located on the right side, also near the car wheel.
Ball joints , as they are also commonly called simply “Ball”, wear out over time and therefore must be replaced. Guide to removing and replacing the ball joint VAZ 2108, 2109, 21099 - videos and articles on do-it-yourself car maintenance and repair.
In fact, in Russian cars, replacing ball joints is a very common thing, because because of our roads, they are constantly subject to a very large load and, as a result, they break down a lot.
Some people have recently begun to classify ball joints as consumables, such as air filters and various other types of filters, so if you purchased a car only recently, you will most likely (Depending on your driving style, as well as the terrain joints very often
, therefore, we recommend that you read this information about substitution.
Note! To replace the ball joint
, you will need to stock up on: A special puller, which you can find at the end of the article in the “For Beginners!” section.
(But if puller
, then you can remove the ball without it; read all the details of removing
the ball
without
a puller
a little lower in the same annotation).
You will also need to take with you: A crowbar, another jack to lift the car, as well as a basic set of wrenches and a hammer in case you do not have a special puller .
Before you start replacing the ball joint on your VAZ 2109, you need to select a new element, check the current condition of the unit, and, based on the results obtained, carry out the replacement.
You may also need some grease, so if you have some lying around in the garage, grab that too, just in case.
- At your discretion, you can also take with you: Shoes to place under the rear wheels of the car, so that the car does not roll away when changing!
- Summary:
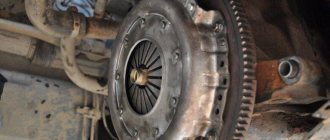
- Where is the ball joint located? As mentioned earlier, there are only two ball joints in front-wheel drive cars of the “Samara” family, and they are located next to the front wheels. For more details on the location of one supports , see the photo below:
- When do you need to change the ball joint? Basically, when the support , the first place where it begins to show itself is this:
- When hitting a bump, during which a distinct dull knock may be heard either on the left side of the car or on the right.
- And also, after the support
, when turning the steering wheel, you will have to make more efforts to put the car into a turn and to get out of it, while a worn ball joint can give out a squeaking sound. - Also, as a rule, when the support is worn out, the car can wobble when driving on a completely flat road and thus remain unsteady while driving, which again indicates worn out or worn out ball joints.
- And in conclusion, let us emphasize one fact from life: when the ball
joint wears out, the front wheel of the car may not stand as it should properly, namely, it may be slightly tilted to the side, etc. In this regard, with constant driving, the tires of the car will wear out unevenly and much faster.
How to replace a ball joint on a VAZ 2108-VAZ 21099?
Note! At the beginning, if you raise the handbrake up and if you took shoes with you, then put them up to the rear wheels!
Removal: 1) First, use a jack to lift the side you need on which you will replace the ball joint
, and then remove the wheel from the car.
(For information on how to lift a car with a jack and remove a wheel, see the article “ Replacing a wheel on a VAZ”)
2) Next, completely unscrew the lower nut that secures the ball joint to the lever.
3) Then install a special puller as shown in the figure, and then use a wrench to tighten the puller until the ball
joint comes out of the lever.
Replacing a ball joint on a VAZ 2109 without a puller yourself
Replacing a VAZ 2109 ball joint without a puller
with his own hand. Enjoy watching!
Replacement of ball vase 2108 2109 2110 2115 Kalina Priora
How to change a ball joint
on a
VAZ
2108
2109
2110 2112 2113 2115
Replacement
can be done in a pit.
4) Then remove both bolts that secure the ball joint
to the steering knuckle.
Note! Unfortunately, the second bolt is not visible in the photo, but its approximate location is also indicated by the arrow!
5) Next, using a crowbar, press the lower arm down, and then remove the ball joint
from the car.
Installation: 1) Before installing the new ball joint
, check the functionality of the old and new
ball joint
, because it may either be inoperative (This applies to the new support), or it may also be fully operational (This applies to the old support), for this:
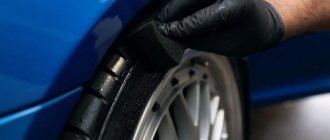
1. Removing the ball joint without a puller. Removing the ball joint without a ball joint or replacing it. Grasp the ball joint
hand, and then swing it in different directions, thereby feeling the presence or absence of play.
Note! There should be practically no play in the finger, and if the ball joint is in working order, as a rule, you will not be able to move the finger from the force of your hand, so shake your finger and perhaps it will only have a small play of about 0.7 mm (This is normal), but if it turns out that the play exceeds 0.7 mm , then in this case replace the ball joint
to a new one!
2.
Another small nuance associated with the ball joint, after removing the support , look at the rubber boot that is present on the support itself, if it is torn, then remove it from the support and then remove the top layer of dirty grease from that place on the support, and if possible apply new grease and in this regard you can simply buy a new rubber boot and put it on the old support and continue to use it.
The procedure for dismantling and installing a ball joint on a VAZ 2109-2108
The first step is to place wheel chocks or at least bricks under the rear wheels of the car, and for greater reliability, set the hand brake. After this, we lift the front part of the car with a jack on the side where we will make the replacement.
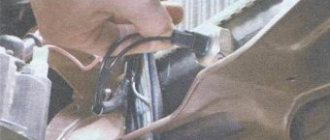
Unscrew the wheel mounting bolts and remove it. You need to remove the bolts before lifting the car. Then we unscrew, but not completely, the lower ball pin nut, as is clearly shown in the photo below:
The next picture will show the approximate level to which I unscrewed this nut. Next, unscrew the two nuts securing the ball joint to the steering knuckle.
After this is done, the brake disc is moved to the side, and the lever can also be moved down. This is presented more clearly below:
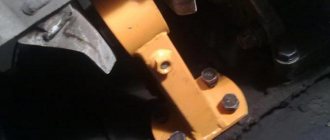
Now, without any problems, you can put on the puller, inserting one end under the rubber band and the other under the lower bolt. And we begin to twist the puller bolt, as shown in the photo below:
Personally, after a couple of turns of the bolt, when one of the puller arms was already resting sufficiently against the lower bolt of the support, it jumped out of the connection:
We unscrew the lower pin nut completely and easily remove the ball from its seat:
Now you can buy new supports and replace them in the reverse order. The price of new parts ranges from 250 to 400 rubles per piece.
Sources
- https://vaz-russia.ru/remont-vaz-2108/zamena-sharovoy-oporyi-na-vaz-2108-vaz-2109-vaz-21099.html
- https://www.avtorem.info/stati/vaz-2108-vaz-2109-vaz-2110/zamena-sharovoj-opory-na-avtomobilyah-vaz-2108-vaz-2109-vaz-21099-vaz-2110- vaz-2112-vaz-2115-vaz-1117-vaz-1119.html
- https://remont-vaz2109.ru/zamena-sharovyx-opor-svoimi-rukami/
How to replace a ball joint on a VAZ 2108-VAZ 21099?
Note! At the beginning, if you raise the handbrake up and if you took shoes with you, then put them up to the rear wheels!
Removal: 1) First, use a jack to lift the side you need on which you will replace the ball joint, and then remove the wheel from the car. (For information on how to lift a car using a jack and remove a wheel, see the article “Replacing a wheel on a VAZ”)
2) Next, completely unscrew the lower nut that secures the ball joint to the lever.
3) Then install a special puller as shown in the figure, and then use a wrench to tighten the puller bolt until the ball joint pin comes out of the lever.
4) Then remove both bolts that secure the ball joint to the steering knuckle.
Note! Unfortunately, the second bolt is not visible in the photo, but its approximate location is also indicated by the arrow!
5) Next, using a crowbar, press the lower arm down, and then remove the ball joint from the machine.
Installation: 1) Before proceeding with the installation of a new ball joint, check the functionality of the old and new ball joint, because it may not be functional (This applies to the new support), or it may also be fully operational (This applies to the old one). support), for this:
1. Grasp the ball joint pin with your hand, and then swing it in different directions, thereby feeling the presence or absence of play.
Note! There should be practically no play in the finger, and if the ball joint is in working order, as a rule, you will not be able to move the finger from the force of your hand, so shake your finger and perhaps it will only have a small play of about 0.7 mm (This is normal), but if it turns out that the play exceeds 0.7 mm , then in this case replace the ball joint with a new one!
2.
Another small nuance associated with the ball joint, after removing the support, look at the rubber boot that is present on the support itself, if it is torn, then remove it from the support and then remove the top layer of dirty grease from that place on the support, and if possible apply new grease and in this regard you can simply buy a new rubber boot and put it on the old support and continue to use it.
Note! But if it turns out that dirt has gotten into the inside of the ball joint and thus cannot be removed, then replace the ball joint with a new one!
3. Then take into account one important detail: there should be a spacer sleeve on the support, namely on its pin, so if you have it removed, be sure to put it on, otherwise the support will not work properly.
4. Now take the rubber boot in your hands and put grease into it half its volume.
Note! Before you begin installing the rubber boot, it is recommended to apply sealant to the place on the support on which this cover will be installed!
2) Finally, install a new ball or a repaired old one, in the reverse order of removal.
Note! When you install the support, try not to damage its protective cover, and if you do, then immediately replace it with a new one. Once the ball is installed, tighten all the nuts tightly, but not all the way.
After this, rock the car a couple of times and only after that tighten all the nuts! (The lower nut of the support must be tightened with a torque of 80-96 Nm "8.0-9.6 kgf-m", and the two bolts that secure the support to the lever must be tightened with a torque of -50-63 Nm "5.0-6.3 kgf-m" m")
How to remove a ball joint without a special key?
1) First, slightly loosen the lower nut securing the ball joint to the lever.
Note! There is no need to unscrew the lower ball joint nut completely!
- 2) Then, using a pry bar, press out the front lever, and at the same time, applying light blows to the lever with a hammer, wait until the lever itself falls down, thereby resting against the lower ball nut.
- 3) After the lever falls on the nut, completely unscrew the lower nut and then proceed to unscrew the two main nuts securing the ball joint, and thereby unscrew them in the same way.
Note! Unfortunately, you won’t see the second nut in the above photo, since the angle was chosen that way, but its approximate location is still indicated by the arrow!
4) Finally, using a mounting shovel, press the lower arm down and, as a result, remove the worn support.
Important! After replacing the ball joint, check after 100 km the tightness of all the bolts that secure the ball joint, and also check the tightness of the lower nut of the ball joint to the lever, if necessary, tighten all the bolts and the lower nut of the ball joint to the required torque!
For newbies! Question: What does a special ball joint remover look like?
- Answer:
- Additional video: Not everyone can understand the principle of replacing a particular part in a car just by reading the article, so to make it more clear to you, in this case, watch the video that shows everything in detail: