Any car intended for public roads has a reverse gear. It allows you to drive the car in reverse. In order for other road users to know about your intentions, the corresponding signals - the reversing lights - must be activated on the rear optics.
It is in this case that the reverse sensor on the VAZ 2110 comes into play. It transmits information, the voltage to the lights is turned on, thereby the drivers around you see that you are about to reverse. For safety purposes, having a working reverse sensor is incredibly important.
Symptoms of malfunctions
Of course, it is very easy to suspect that the reverse sensor is not working - when you engage reverse gear, the lights do not light up.
In such a situation, there are only three options for the development of events:
- The light bulb itself has burned out, so the element itself may be intact.
- The power fuse has stopped working. It’s not uncommon for him to simply burn out.
- The sensor itself does not work. This does not happen so often, but you will have to check its condition.
Is it because of the sensor?
Indeed, how can one determine that it is the one that has failed and not a fuse or light bulb that has blown? Everything is quite simple.
- You will have to remove the fuse and check it for integrity. For a VAZ 2110 car, it is planned to install a fuse number 19, the rated current of which is 7.5A. It is located in the mounting block, and the mounting block is under the dashboard.
- Check the condition of the lamp. If everything is fine with it too, then there is only one option left - the reverse sensor has broken.
Where is it located and how to check it
To begin replacing the reverse sensor on a VAZ 2110, you must first determine its location.
But really, where is he? There is nothing difficult in finding this element.
- You will need a trestle or pit. One way or another, you should end up under the car.
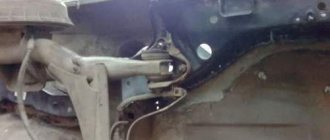
- Now look towards the rear wheels of the car and raise your eyes to the gearbox. To the left of it is your desired sensor.
- Can it be confused with other devices? Hardly. Only for this element is provision for wiring from the gearbox. Therefore, you definitely won’t find other similar devices nearby.
Let's start checking. We need to make sure that the sensor has failed, and that replacing it will actually produce results.
To check, do the following:
- Disconnect the terminal from the meter;
- Connect a multimeter to the connectors and turn it on in resistance measurement mode;
- Put the gearbox in reverse mode;
- Start the engine;
- Look at what the device produces;
- If the device shows a resistance of 0 Ohm, plus a beep sounds, then everything is fine, the sensor is working;
- It's bad if the meter shows infinity. This indicates that the sensor has served its purpose and needs urgent replacement.
Replacement
Should I rush to replace the reverse sensor? And how. After all, this device ensures traffic safety on the road. If other motorists do not know about your intentions to back up, then accidents and collisions cannot be avoided. You need to think not only about yourself, but also about others.
The procedure for replacing the reverse sensor on a VAZ 2110 does not involve anything complicated. Even a car owner without much experience and skills can handle it.
By following the step-by-step instructions, you can quickly and efficiently change the meter and continue driving in a fully functional car.
- Clean the unit of any accumulated dirt, as during removal, all this debris can get into your gearbox oil. Nothing good will come of this, so think about the safety of the checkpoint.
- The machine is placed on a pit or overpass. Again, you need access to the bottom.
- Remove the crankcase protection. This is done by unscrewing several fasteners.
- Take a small container into which the lubricant will be poured. The fact is that when you remove the sensor, a small amount of oil spills out along with it. It’s unlikely that you want it to end up on the floor, under your feet.
- Disconnect the wiring from the reverse sensor.
- Unscrew the meter from its seat.
- Clean the socket a little so that the new unit fits well into its new place.
- Place the purchased high-quality reverse sensor in place of the old one that has served its purpose.
- Add the required amount of oil. Just see how much lubricant has leaked out and pour the same amount back in. Although the oil level may be lower than expected as a result of operation. Take appropriate measurements to determine the missing amount of gear lubricant.
- Return all wires to their original places. If you have problems finding the location of the connections, mark them when disconnecting the wires. Although it is actually difficult to get confused there.
- Check the functionality of the new reverse sensor.
If all the manipulations were performed correctly, you made sure that the fuse and the light bulb are working, then a simple procedure for replacing the reverse sensor can return the functionality of the gearbox to its previous level.
With a careful approach, even for a beginner, such repairs will take a maximum of 30 minutes. You don’t have to spend a lot of time, and even more so, you can get by with minimal financial costs compared to going to a car service.
Let's hope that now the sensor will work for a long time and effectively, and your maneuvers on the road will always be safe and understandable for surrounding road users. Plus we wish the same for the motorists and pedestrians already around you.
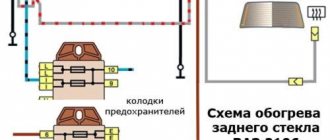
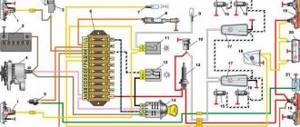
External lighting switching diagram
1 — side light lamps in the headlights 2 — mounting block 3 — exterior lighting switch 4 — ignition switch 5 — exterior lighting indicator lamp in the instrument cluster 6 — side light lamps in the outer rear lights 7 — brake light lamps in the inner rear lights 8 - license plate lights 9 - instrument lighting switch 10 - reversing light switch 11 - brake light switch 12 - on-board control system unit 13 - reversing light lamps in the internal rear lights K1 - relay for monitoring the health of the lamps (contacts are shown inside the relay jumpers that must be installed in the absence of a relay) A - to power supplies B - to instrument lighting lamps
The front side light lamps are located in the headlights, the rear lamps are located in the external rear lights (on the wings of the VAZ 2111). Brake and reverse lamps are located in the inner rear lights on the trunk lid. (To remove the brake light switch, see Removing the Vacuum Booster and Brake Pedal Assembly). The license plate lights are located on the bumper.
The parking light is on when the exterior light switch is pressed. The side light lamps of the VAZ 2112 and the brake light are powered through relay K1 for monitoring the health of the lamps in the mounting block. If any of the lamps burns out or the contact in the socket or supply circuit is broken, the corresponding indicator lights up in the control unit. If there is no lamp control relay, there must be jumpers instead, otherwise the lamps will not light.
The license plate lamps turn on simultaneously with the exterior lighting, but are connected bypassing the control relay, so their serviceability is not diagnosed.
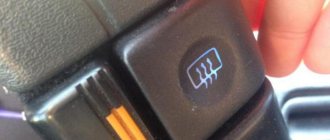
The backlight lamp for the VAZ 2110 glove box is turned on when the ignition is turned on by a switch under the box lid.
Voltage is also supplied to the switches of the interior lamp and the driver's individual lamp when the ignition of the VAZ 2110 is turned on. In addition, the interior lamp lights up if one of the doors is open and the lamp switch is in the appropriate position. A few seconds after closing the door, the brightness of the lamp decreases and it goes out. This is controlled by the display unit of the on-board control system.
The instrument lighting turns on simultaneously with the exterior lighting. The brightness of the backlight lamps is controlled by a rheostat on the instrument panel of the VAZ 2111.
The reversing lamps light up if the ignition of the VAZ 2112 is turned on and the reverse switch located on the gearbox is closed.
The trunk lighting turns on simultaneously with the side light lamps.
The nuances of replacing the reverse sensor VAZ 2110
Now let's look at how to replace the reverse sensor. Everything is simple here:
Attention! Before unscrewing the sensor, clean it from dirt and dust so that when unscrewing nothing gets into the gearbox oil.
- The machine is already installed on the pit (overpass). Let's leave it that way.
- Remove the crankcase protection.
- Find a small container (you will need it for oil). As a rule, when unscrewing the sensor, a small amount of lubricating fluid spills out.
- Throw wires away from the node.
- Unscrew the sensor and wait for the oil to drain.
- Install a new device.
- Add oil to the required level.
- Return the wires to their place.
- Check the operation of the device.
That's all. Within 10-15 minutes you have checked, replaced the reverse sensor and saved money. Good luck on the roads and of course no breakdowns.
External lighting switching diagram
1 — side light lamps in the headlights 2 — mounting block 3 — exterior lighting switch 4 — ignition switch 5 — exterior lighting indicator lamp in the instrument cluster 6 — side light lamps in the outer rear lights 7 — brake light lamps in the inner rear lights 8 - license plate lights 9 - instrument lighting switch 10 - reversing light switch 11 - brake light switch 12 - on-board control system unit 13 - reversing light lamps in the internal rear lights K1 - relay for monitoring the health of the lamps (contacts are shown inside the relay jumpers that must be installed in the absence of a relay) A - to power supplies B - to instrument lighting lamps
The front side light lamps are located in the headlights, the rear lamps are located in the external rear lights (on the wings of the VAZ 2111). Brake and reverse lamps are located in the inner rear lights on the trunk lid. (To remove the brake light switch, see Removing the Vacuum Booster and Brake Pedal Assembly). The license plate lights are located on the bumper.
The parking light is on when the exterior light switch is pressed. The side light lamps of the VAZ 2112 and the brake light are powered through relay K1 for monitoring the health of the lamps in the mounting block. If any of the lamps burns out or the contact in the socket or supply circuit is broken, the corresponding indicator lights up in the control unit. If there is no lamp control relay, there must be jumpers instead, otherwise the lamps will not light.
The license plate lamps turn on simultaneously with the exterior lighting, but are connected bypassing the control relay, so their serviceability is not diagnosed.
The backlight lamp for the VAZ 2110 glove box is turned on when the ignition is turned on by a switch under the box lid.
Voltage is also supplied to the switches of the interior lamp and the driver's individual lamp when the ignition of the VAZ 2110 is turned on. In addition, the interior lamp lights up if one of the doors is open and the lamp switch is in the appropriate position. A few seconds after closing the door, the brightness of the lamp decreases and it goes out. This is controlled by the display unit of the on-board control system.
The instrument lighting turns on simultaneously with the exterior lighting. The brightness of the backlight lamps is controlled by a rheostat on the instrument panel of the VAZ 2111.
The reversing lamps light up if the ignition of the VAZ 2112 is turned on and the reverse switch located on the gearbox is closed.
The trunk lighting turns on simultaneously with the side light lamps.
Car lighting VAZ 2110, VAZ 2111, VAZ 2112
- — Lighting scheme
- — Removing and installing headlights
- — Headlight hydraulic corrector
- — Replacement of the hydraulic corrector master cylinder
- — Adjustment of headlights
- — External and internal lighting
- — Direction indicators
- - Fog lights
- — Replacing the side turn signal
- — Replacing the reverse light switch
- — Replacement of reverse lights and brake lights
- — Replacement of rear license plate lighting
Headlights and lighting VAZ 2110, VAZ 2111, VAZ 2112
Dismantling and assembling headlight unit, replacing lamps VAZ 2110, VAZ 2111, VAZ 2112
Hydrocorrector of headlights VAZ 2110, VAZ 2111, VAZ 2112
Removing and installing the main cylinder of the headlight hydraulic corrector VAZ 2110, VAZ 2111, VAZ 2112
Adjusting the headlights of VAZ 2110, VAZ 2111, VAZ 2112 cars
Brake and reverse lamps, interior and trunk lighting of VAZ 2110, VAZ 2111, VAZ 2112
Direction indicators VAZ 2110, VAZ 2111, VAZ 2112
Replacement of side and fog light of VAZ 2110, VAZ 2111, VAZ 2112
Removing and installing the side direction indicator VAZ 2110, VAZ 2111, VAZ 2112
Removing and installing the reverse light switch VAZ 2110, VAZ 2111, VAZ 2112
Removing and installing a brake light and reverse light for VAZ 2110, VAZ 2111, VAZ 2112
Removing and installing the rear license plate lamp for VAZ 2110, VAZ 2111, VAZ 2112
Simultaneously with switching to reverse gear in a VAZ-2110 car, special white lights must be turned on. They perform several important functions at once. Firstly, they make the parking process much easier for the driver, secondly, they indicate to pedestrians that the car will back up, thereby ensuring their safety, and thirdly, it eliminates the occurrence of an emergency situation.
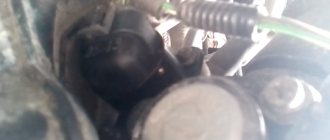
Where is the reverse sensor located on the VAZ 2110?
Any car intended for public roads has a reverse gear. It allows you to drive the car in reverse. In order for other road users to know about your intentions, the corresponding signals - the reversing lights - must be activated on the rear optics.
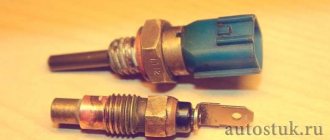
Reverse sensor for VAZ 2110
It is in this case that the reverse sensor on the VAZ 2110 comes into play. It transmits information, the voltage to the lights is turned on, thereby the drivers around you see that you are about to reverse. For safety purposes, having a working reverse sensor is incredibly important.
What to do if the reverse lights do not light up
In a situation where the reverse lights of a VAZ-2110 car do not light up, it is necessary first of all to identify the cause of the problem. For this purpose, you can either contact a specialized car service, or save money and do everything yourself. This is not difficult, since breakdown of the rear lights can occur for just a few main reasons:
- the lamp burned out. This part needs to be replaced, but first we recommend checking the voltage in the circuit and making sure that the risk of a short circuit is completely eliminated. Otherwise, the lights will remain on continuously;
- no voltage is supplied to the flashlight board;
- The fuse that protects the circuit from short circuit has blown. If this is the case, it is necessary to “ring” all elements of the system to find out which one is causing the problem;
- the contacts on the headlight film are broken or burnt;
- The electrical cable is damaged. Its break can be detected by visual inspection or using a digital multimeter;
- as a result of prolonged use and exposure to moisture, the contacts have oxidized, which is why the reversing lights do not want to work;
- the gearbox mechanism, which should turn on the rear light, does not work properly;
- The reverse sensor has failed. You can check its serviceability yourself, without resorting to professional diagnostics. To do this, remove the wires from the sensor and connect them to each other. If the light comes on, then the problem is either in the device being tested or in the gearbox.
How to check reverse sensor 2110
To check the reverse sensor and thereby make sure that it is faulty, you need to disconnect the connector from it and, with the ignition on, close the two contacts. If during this operation the reversing lights come on, then the reason is a non-functioning sensor. If the light bulbs in the flashlights do not light, you need to check the wiring, the light bulb, or the fuse on the panel.
Sometimes the contacts on the switch contact chip may oxidize, and as a result, the reverse sensor may not work. Therefore, during diagnostics it is worth taking this into account, and if necessary, clean the sensor contacts
How to restore normal operation of reverse lights
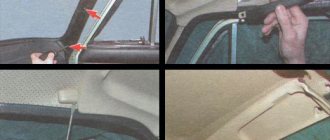
First of all, you will need to dismantle the reversing lights, as follows:
- open and empty the trunk of the car;
- carefully removes the casing to prevent damage during repair work;
- unscrew the protective casing made of plastic;
- We remove the back panel, which gives access to the sensor, lights and control board.
If the problem lies in a burnt-out lamp, it can be easily replaced without resorting to any additional actions.
If the problem is caused by a damaged fuse, you will also need to find it in a special block located under the steering wheel of the car, then carefully remove the broken part and install a new one.
A more difficult task is replacing the sensor, which has stopped responding to gear shifts and turning on the lights. To perform this operation you will need:
- drive the car onto the overpass and put it on the handbrake;
- remove the protective cover;
- place some container for transmission oil;
- remove the sensor and disconnect it from the electrical circuit;
- install the correct part. After this, it is necessary to check the oil level and replenish it if there is not enough lubrication in the gearbox;
- the last stage is assembly of the unit, performed in reverse order.
The safety of vehicle operation directly depends on the performance of the reversing lights. That is why it is necessary to promptly identify any malfunctions described above and efficiently eliminate them either on your own or with the involvement of experienced car service specialists.
Replacing the reverse sensor on the “ten”
Replacing the reverse sensor is carried out in several stages. To do this, if there is protection on the engine of the VAZ 2110, you need to remove it. At the same time, take a container for oil and place it near the place where the sensor is unscrewed to prevent it from leaking. Then you need to lie under the car in order to detach the wires attached to the part.
Unscrew the existing sensor, replace the oil container and attach the new vehicle device. In the standard set, a special sealing ring is attached to it, which is not recommended to be used more than once, since during the process of tightening the part it is subject to increased deformation.
Then you need to add technical oil to the gearbox and connect the wiring to the terminals. Oily stains on the gearbox casing and converter wires should be removed with a rag. It must be remembered that, according to safety regulations and to avoid fire, all oily tissues should be collected and removed from the place where the car is being repaired. The risk of spontaneous combustion is too high.
To final check the functionality of the alarm system, you need to start the electric motor and switch to reverse mode. The last stage will allow you to check the light bulbs while moving backwards.
If after replacing the reversing light sensor the problem is still not resolved, you should look for the reasons again. A complete list of possible problems includes the following factors:
- light bulbs burned out. The situation is complicated by a longer search for a violation. The test is carried out by removing it from the lanterns and then checking it with a multimeter;
- the wiring is damaged. Solving the problem complicates the lengthy search for a breakdown. Diagnostics are carried out with the same continuity or resistance measuring device;
- there are poor contacts on the sensor elements;
- the insulation on the wires near the converter is broken, which leads to a subsequent short circuit;
- the fuse has failed (blown);
- The sensor itself is broken. The presence of a breakdown is indicated by the lights not being turned on when reverse gear is engaged, as well as their constant burning.
So, the cause of the breakdown may be one of the listed defects or a combination of several of them. Only consistent action to eliminate each cause will lead to the long-awaited desired result. To troubleshoot problems, sometimes you have to carry out all the steps listed above, but it is recommended to start with the reverse sensor, since the price of this element is relatively low.
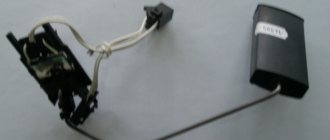
Hello friends, we are glad to see you on the DIY car repair website. The reverse sensor of the VAZ 2110 is triggered when reverse gear is engaged and transmits voltage to the light bulb (flashlight), signaling the movement in reverse.
How does the sensor work? After moving the handle to the appropriate position, reverse gear is engaged. At the same time, the power fork presses on the sensor and shorts one of its wires to ground. Result - the reverse lamp comes on.
How to check its functionality?
- Disconnect the wires from it. Just take them out.
- Connect a tester to them and set it to the mode: measure resistance or continuity.
- Engage reverse gear.
- Turn on the ignition.
- And look at the resistance the tester shows.
If 0 Ohm, then everything is fine with him. If not, then it needs to be changed (by the way, it definitely needs to be changed if the reverse lights are on even when the reverse gear is not engaged). Just further you will find out...
How to change?
- Place the VAZ 2110 in a pit or drive it onto an overpass.
- Remove the engine protection, if any.
- Find a small container for the oil. Because when you unscrew the sensor, oil will begin to flow out.
- You crawl under the car and disconnect the wires going to the part.
- Unscrew the old sensor, immediately replace the container and screw in the new one.
- Add leaked oil to the box.
- You plug in the wires and wipe the surfaces that got oil on them.
- Start the car and check if the lights come on when you put the vehicle in reverse.