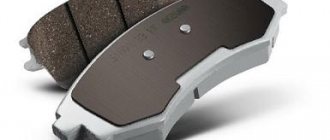
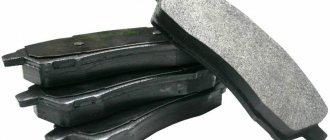
Article number and estimated cost for original rear drum pads of Lada Priora
Priora has two types of rear drum brake pads. Consumables with article number 21080-3502090-01 are used on cars without ABS. Their cost ranges from 720 to 900 rubles. The service life of the pads often exceeds 85-90 thousand km.
There is a second type of pads that are used on Priors with ABS. They have a special hole for the wheel speed sensor. Such pads have the article number 11180-3502090-10. The price for consumables starts from 680 rubles.
Articles of rear pads for Lada Priora
Let's start with the fact that there are 2 types of pads on Priora, for cars:
- with ABS.
- without ABS.
Unlike the choice of front pads, you cannot install a different type here; it simply won’t fit.
I won’t give you a unique article, it’s not good, I didn’t like it. Our Priora Bunker braked very poorly with them.
Without ABS, you should pay attention to the following models:
- Fedoro FBS240;
- Trialli GF231;
- Ate 03013702312;
- Finwhale VR318;
- BOSCH 0 986 487 813;
- BOSCH 0 986 487 219;
- LUCAS/TRW GS8210 (these are great for winter drifting, but aren't cheap).
Block without sensor.
When looking for rear pads for a Priora with ABS, you need to consider the following options:
- AT AT2090-118BP;
- AUTOREAL AV18-3502090;
- Pilenga BSP1005N;
- Sangsin SA183;
- Trialli GF239;
- LADA 21920-3502090-00 (original);
- LADA 21920-3502090-55 (praised and not expensive);
- LUCAS/TRW GS8210 (not cheap and excellent).
Brake pads with ABS sensor. Slots are marked.
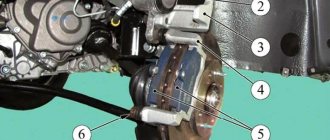
The process of replacing pads with and without an ABS sensor is generally similar. The only difference is in the sensor itself, which is installed on one bolt. To avoid destroying it, you need to unscrew the sensor before replacing it. E-8 sprocket head . The ABS sensor is located on the brake guard.
Read: Thule car accessories are the best representatives of Swedish quality
Replacing front pads on Lada Priora
Instructions for replacing the front pads on a Priora are given below.
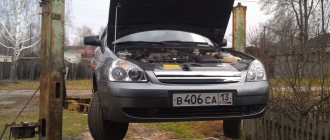
- Remove the wheel. Before doing this, it is necessary to jack up the car on the side from which the consumables are being replaced.
- Bend back the lock washer-plate.
- Unscrew the lower caliper bracket fastener.
- Lift the bracket up.
- Remove old pads.
- Pump out the brake fluid to the minimum level.
- Press in the brake piston.
- Install new pads.
- Assemble the caliper and install the wheel.
- Add fresh brake fluid to the maximum level.
- Check the operation of the brakes.
Preparatory procedures
So, if you decide to install new pads, please note that they are sold exclusively as a set. They cannot be changed individually, at least two, on both front or rear wheels at once. In order to carry out the procedure, you will need to carry out some preparatory procedures. Let's look at them briefly:
- prepare a set of wrenches that will be used in the work, as well as a hammer and a minus screwdriver;
- Make sure the brake fluid level is below the maximum level. If there is a lot of it, you will need to partially drain it;
- jack up the car and remove it from the handbrake.
When everything is ready, you can start. Read more about how the work goes.
Procedure for replacing brake pads on Lada Priora
1. Place the machine on a level surface, engage first gear, and place wheel chocks under the wheels. Do not apply the handbrake, otherwise this will complicate the process of replacing the pads.
2. Loosen the wheel bolts and lift the wheel. Unscrew the bolts completely and remove the wheel.
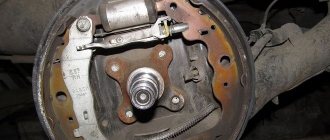
3. There will be a drum hanging in front of you that needs to be removed. Unscrew the guides using a 6 key. If there is nothing to catch on, you can use a small vice. Clamp the guide in a vice and unscrew it.
4. Remove the drum. There are times when it simply gets stuck and doesn’t move. Take a rubber mallet and knock it off the end, tapping it all the way around. Try to hit it very carefully, as the material from which the drum is made is very fragile and there is a risk of breaking it completely.
5. After the drum is dismantled, you can begin to remove the pads themselves. Remove the cotter pin securing the handbrake lever and free it from the spring.
6. Release the pads from the spring that secures them at the bottom. Then disconnect the springs that hold the pads in a vertical plane. The last spring should be removed with extreme care, holding the pistons of the brake cylinder. If they come out, brake fluid will leak, so try to hold the pistons with one hand.
7. When installing new pads, tie the pistons with a large layer of thread, and after installation, simply cut the thread and get rid of the remainder.
8. Installation of the pads is carried out in the reverse order. At the end of the work, tighten the handbrake cable. To tighten, use the nuts located under the machine.
Checking the rear brake pads of Lada Priora
It is better to check the rear pads on an overpass or inspection pit. On the brake mechanism shield you can see a special inspection hole closed with a rubber plug.
We take out the rubber plug and assess the condition of the pads. The thickness of the working surface of the pad must be at least 1.5 mm . If less, such pads require replacement.
If you find chips or grooves on the pads, it is also advisable to replace such pads, as braking efficiency decreases.
Pad life
The axles of the Lada Priora are equipped with mechanisms of different designs. The front brake is disc. This mechanism has good performance and provides better braking dynamics.
Front pads should be replaced much more frequently. According to the instructions, they travel 15 thousand kilometers. With an aggressive driving style, the life of the pads is reduced by 20-30%.
The rear brake on almost all VAZ models is drum. It does not provide such braking dynamics, but it needs to be changed much less frequently. When braking, the main force falls on the front axle, and the rear brake acts as an auxiliary one.
According to the regulations, replacement of rear brake pads is carried out after a mileage of 50,000 kilometers, provided that the mechanisms operate correctly. And on cars equipped with ABS (anti-lock braking system) - even longer. There are a number of situations when it is necessary to change the mechanism earlier.
- if the brake drum of the Lada Priora begins to knock or squeak, then you should inspect the mechanism and replace the pads;
- When driving aggressively, wear occurs faster, so it is necessary to monitor the part more carefully.
It is advisable to carry out the check on an overpass or lift. On the back of the device there is a special viewing window with a rubber plug. We remove it and analyze the condition of the friction part. The thickness of the lining must be at least 1.5 mm. Otherwise, unscheduled work is required:
- If chips or deep grooves are found on the pads, it is recommended to change them. Otherwise, the mechanism may jam at the most crucial moment;
- You can also identify brake fluid leaks on the rear pads. This indicates a faulty brake cylinder. The element should be repaired and new spare parts supplied. The old ones will not work well.
Pad life
The service life of the rear brake pads on Priora is 50-70 thousand km (this data is provided to us by the manufacturer). Moreover, this figure is in some places 30 thousand higher than the normal life of the front pads.
The degree of wear almost entirely depends on the operating conditions of the car, the driving style of the driver and the properties of the devices themselves.
Accordingly, cheap pads will wear out faster than their unique counterparts. Most Priora owners purchase Chinese analogues of the pads; accordingly, their service life will be lower than that of the original.
Therefore, there may not be a clear frequency of replacement. The above numbers are only approximate numbers. By monitoring the wear and tear of parts, you can replace them in a timely manner, ensuring your own car has the necessary safety on the road.
The need for replacement
Before replacing the pads, you should make sure that the old parts have already exhausted their service life. To do this, it is most convenient to drive the machine onto an inspection hole or overpass.
- Next, we pay attention to the brake mechanism shield, on which the inspection hole is located. It is protected by a rubber gasket.
- We remove it and evaluate the condition of the pads. So, the thickness of the working surface of each of them should be about 1.5 mm . When the pad becomes thin, it needs to be replaced. The same applies to those parts that have deep grooves or chips - the effectiveness of such brake parts decreases.
Which rear pads to choose for Lada Priora
Before deciding on the brand of pads, you need to know for sure whether your car has an ABS system or not. The pads for Priora with and without abs are different.
Rear brake pads for Priora with ABS
- Pilenga BSP1005N with ABS price from 600 rub.
- AT AT2090-118BP (chekhtya) price from 400 rub.
- AUTOREAL AV18-3502090 price from 400 rub.
Rear pads for Priora without ABS
- Pilenga BST1002N price from 500 rub.
- Start 2108-3502090 price from 400 rub.
- Bosch 0986487219 price from 800 rub.
- Fortech FB-2102 price from 500 rub.
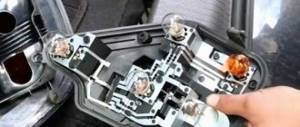
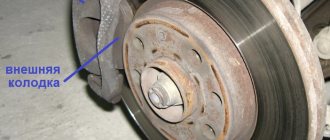
Determining the presence of an ABS sensor is not difficult. It is also located on the brake shield. You can see what the sensor looks like in the photo.
The brake system of the Lada Priora with ABS is slightly different from the model without a sensor. Design differences can be seen in the photo.
Instructions for replacing rear pads on a Priora
So, before we start replacing the pads, let’s first unscrew the ABS sensor so that we don’t damage it during the process of dismantling the old pads.
The sensor is held on by one screw. In order to unscrew it we need an E-8 sprocket head.
Replacing rear pads on a Priora without an ABS sensor
Using a wrench or a socket on “7”, unscrew the two guide wheels. We unscrew it carefully, if the wrench doesn’t work, it’s better to take the head so as not to break the thread.
Next, remove the drum. It can be removed easily or tightly; if it is tight, you should gently tap it with a hammer on the back side. Knock should be evenly.
. If the car has an ABS sensor, there is a special sensor disc located under the brake drum
.After we have removed the drum, we should compress the pistons of the working cylinder. To do this, use screwdrivers to press on the piston and try to push it inside the cylinder on both sides.
Next, using a screwdriver, carefully remove the upper tension spring from the groove as shown in the photo
Now remove the spacer bar between the pads. To do this, first remove the upper part of the pads from the cylinder
Pry up and remove the lower tension spring of the pads
Also, using a screwdriver, remove the tension springs of the pads.
Remove the front pad. The parking brake drive is attached to the rear block. It must be disconnected from the block.
To do this, use pliers to pull out the fixing pin as shown in the photo.
After this, remove the pin and move the lever to the side; it will need to be secured to the new brake pad.
As a result, we should end up with something like this:
We reassemble in the reverse order carefully and carefully, not forgetting to put anything in.
After we have assembled everything, it is necessary to adjust the parking brake (handbrake).
Self-replacement of rear pads of Lada Priora with and without ABS
Depending on operating conditions and driving style, rear brake pads last from 50 to 70 thousand kilometers. The service life of the pads also depends on them. Cheaper, lower quality pads will wear out faster than original or high quality replacements.
Before you think about replacing the pads, you first need to check whether they have exhausted their service life.
Checking the rear brake pads of Lada Priora
It is better to check the rear pads on an overpass or inspection pit. On the brake mechanism shield you can see a special inspection hole closed with a rubber plug.
We take out the rubber plug and assess the condition of the pads. The thickness of the working surface of the pad must be at least 1.5 mm. If less, such pads require replacement.
If you find chips or grooves on the pads, it is also advisable to replace such pads, as braking efficiency decreases.
Which rear pads to choose for Lada Priora
Before deciding on the brand of pads, you need to know for sure whether your car has an ABS system or not. The pads for Priora with and without abs are different.
Rear brake pads for Priora with ABS
- Pilenga BSP1005N with ABS price from 600 rub.
- AT AT2090-118BP (chekhtya) price from 400 rub.
- AUTOREAL AV18-3502090 price from 400 rub.
Rear pads for Priora without ABS
- Pilenga BST1002N price from 500 rub.
- Start 2108-3502090 price from 400 rub.
- Bosch 0986487219 price from 800 rub.
- Fortech FB-2102 price from 500 rub.
Determining the presence of an ABS sensor is not difficult. It is also located on the brake shield. You can see what the sensor looks like in the photo.
The brake system of the Lada Priora with ABS is slightly different from the model without a sensor. Design differences can be seen in the photo.
Instructions for replacing rear pads on a Priora
So, before we start replacing the pads, let’s first unscrew the ABS sensor so that we don’t damage it during the process of dismantling the old pads.
The sensor is held on by one screw. In order to unscrew it we need an E-8 sprocket head.
Replacing rear pads on a Priora without an ABS sensor
Using a wrench or a socket on “7”, unscrew the two guide wheels. We unscrew it carefully, if the wrench doesn’t work, it’s better to take the head so as not to break the thread.
Next, remove the drum. It can be removed easily or tightly; if it is tight, you should gently tap it with a hammer on the back side. Knock should be evenly.
Replacing rear brake pads on a Priora
The service life of the rear brake pads of the Priora is quite long, but provided that the quality of the components is decent.
Even factory ones can easily travel more than 50,000 km with careful operation without sudden braking or maneuvers using the handbrake. But there are also such instances that after the first 10,000 km they already begin to exhibit a terrible sound during operation, and efficiency sharply decreases. If you decide to replace it, then below I will try to provide detailed instructions for replacing the rear pads on a Priora with a detailed photo report of the work done. So, first of all, it’s worth talking about the tool that you will need for all this work:
- Screwdriver flat and Phillips
- Pliers and long-nose pliers
The procedure for replacing the rear pads of a Lada Priora
First you need to lift the rear of the car with a jack and place reliable supports in addition to the jack. Then try to remove the drum, for which you need to unscrew the two guide pins:
I repeat, if the drum cannot be removed in the usual way, then you can unscrew the hub securing nut and remove it together with it. As a result, it turns out even more convenient, since the hub will not interfere when removing the brake mechanisms:
Now we need a tool such as long-nose pliers. They need to remove the cotter pin of the handbrake lever, as clearly shown in the picture below:
Then you can begin to dismantle the right spring from below, prying it either with a screwdriver or pulling it a little with pliers until it comes off:
Next, on both sides you need to remove the small springs that fix the pads in a vertical position; they are located on the sides. This can be seen very clearly in the photo below:
When you have dealt with them, you can try to remove the pads. To do this, it is not even necessary to remove the upper spring; you can simply apply great force and move them apart at the top:
Thus, freed from the plate, they will spontaneously fall down:
When replacing the rear pads on a Priora, it is worth considering one important detail: after installing new ones, the drum may simply not fit. If this happens, then you need to slightly loosen the handbrake cable, which is located under the bottom of the car in the rear. It is necessary to loosen until the drum fits without unnecessary obstacles. We install all the removed parts in the reverse order and do not forget that for the first few hundred kilometers you should not resort to sharp braking, since the mechanisms are new and should get used to it.
Replacing rear brake pads (in drums) on Lada cars
The minimum permissible thickness of the friction linings of brake pads is 1.5 mm. Rear pads should only be replaced as a set on two rear wheels at once. Otherwise, the car may pull to the side. On all modern Lada cars (XRAY, Vesta, Largus, Granta, Priora, Kalina and Niva), replacing the rear pads is carried out in the same way without significant differences.
Required . new rear brake pads, a set of keys and remove the car from the handbrake.
Check the brake fluid level, if it is around 0, then pump out some of the fluid. Jack up the car and remove the wheel. Further:
- Unscrew the guide pins.
- remove the drum from the hub, knocking it with a hammer through a wooden spacer.
unscrew the drum guide pins
remove the drum from the wheel hub.
Next in order:
- disengage with the spring block.
- and remove the upper spring first.
- then the bottom one.
disengage the spring from the block, remove first the upper spring then the lower spring
- disengage the pressure spring from the block.
- remove the front pad.
- remove the spacer bar.
disengage the pressure spring from the block, remove the front block, remove the spacer bar
- Having disconnected the pressure spring from the rear block, lower the block.
- remove the rear shoe lever from the hole in the handbrake cable end.
Having disconnected the pressure spring from the rear block, lower the block
remove the rear shoe lever from the hole in the handbrake cable end
- pull the cotter pin out of the hole.
- remove the washer.
- pull out your finger.
pull out the cotter pin from the hole, remove the washer, pull out the pin
Before installing new brake pads, remove dirt and wipe the rear brake parts. Assembly is carried out in reverse order. To install the pressure spring with the block, use the lower tension spring, hooking its end to the hook of the pressure spring. We tighten the spring with a screwdriver and insert the hook of the spring into the hole in the block.
we use the lower tension spring, hooking its end to the hook of the pressure spring
we bring the pads together with two mounting blades
Move the pistons to the center of the cylinder, bringing the pads together with two mounting blades. After completing the work, press the brake pedal 2-3 times to bring the pads to the drum. For clarity, the entire process is also shown in the video:
Let us remind you that periodically monitor the serviceability of the brake system and change the front brake discs on time.