Since its appearance, Lada Largus has acquired enviable popularity among Russian car enthusiasts seeking not only comfort, but also practicality. This station wagon is adapted to the realities of domestic roads and is a clone of the popular Romanian car Dacia Logan MCV, produced since 2006.
Lada Largus (RF-90) went on sale in 2012 and is currently available in three variations:
- universal passenger car LADA Largus with five seats;
- high-capacity option with seven seats in the cabin;
- means for transporting goods.
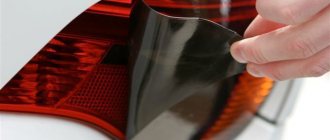
For this LADA Largus car, you can select and install additional rear lights. These devices make it possible to better identify the vehicle on the road surface, and also give the station wagon a more presentable appearance. The plug for the mounting socket of this optics is painted black and does not improve the overall picture of the exterior from the stern. Many Lada Largus owners agree on this opinion. This circumstance encourages most owners to get rid of these overlays by installing additional lighting devices instead. The most popular product option is the use of LED devices. Before installing additional rear lights, you will need to remove the specified plugs. Upon completion of installation, the devices are connected to the on-board network according to the attached instructions.
Features of additional optics
With such lights, the LADA Largus becomes much more visible to other traffic participants. It is especially important to turn on these devices in the dark or in poor visibility conditions. The use of optics improves safety on the road.
The material used for this product is ABS plastic and PMMA glass. The light source is diodes. Devices applicable to Lada Largus are capable of functioning in two modes:
- like brake lights;
- as dimensional lighting equipment.
The weight of the entire set reaches 2 kg. It includes:
- a pair of lighting devices (for both sides of the car);
- cable harness;
- diagram according to which installation and switching with the on-board network is carried out.
After the rear additional lights are installed, the exterior of the car is transformed; the rear looks especially impressive in the dark when the lighting devices are turned on.
Today, there are companies on the market that perform tuning of cars of domestic origin. Among such companies one can single out TuneAuto. This company sells additional rear lighting equipment made using LED technology and made of ABS plastic. These lighting devices have three functional modes:
- side light;
- brake signals;
- these two functions at the same time.
The devices are provided with a warranty for a period of six months. The weight of the set does not exceed 1.8 kg. The devices combine perfectly with standard optics and are not subject to fading under the influence of the sun.
Additional rear lights. Installation.
| Author: Engineer Published: 2198 days ago (October 25, 2014) Logbook: Largusovod's Blog Category: Uncategorized Edited: 2 times - last November 12, 2014 Mood: Determined mood Played by: Vesti FM | +3↑ Votes: 7 |
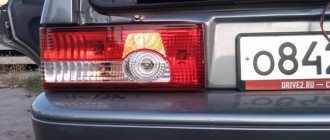
I decided to put it in. It's -3 outside. Here he is my Krymka (I bought it at the same time as Russia returned Crimea)
The image has been reduced. Click to see original.
and the result
The image has been reduced. Click to see original.
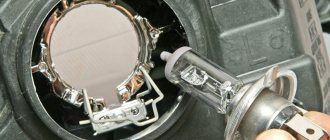
First of all, read the installation instructions. Remove the rear light. In the tool niche, unscrew a couple of plastic screws. This one is below
The image has been reduced. Click to see original.
And the top one is hidden under a plastic cover. Right here
The image has been reduced. Click to see original.
Now we remove the black cover, to do this we unscrew the 3 screws with a torx. These are the 2
The image has been reduced. Click to see original.
And the third one from below
The image has been reduced. Click to see original.
Remove the plastic cover like this
The image has been reduced. Click to see original.
To do this, we unscrew the loops of the gills. I was unable to remove the plastic covers without breaking them. 
The image has been reduced. Click to see original.
unscrew a couple of screws from the bottom of the trim
The image has been reduced. Click to see original.
The image has been reduced. Click to see original.
and unscrew the top loop of the rear straps
The image has been reduced. Click to see original.
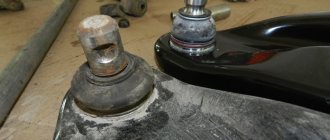
There is no need to remove the cover completely. Now, using a screwdriver with a magnetic head or with double-sided tape on the head, we climb into the hole and unscrew the screw that secures the black cover. ATTENTION, be extremely careful not to lose the nut!
The image has been reduced. Click to see original.
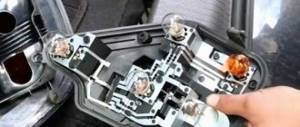
Let's move on to the electrical part of the installation. I did it on twists, because... There was no place to turn on the soldering iron. It's better to solder the connections, of course. We twist and wrap with electrical tape. The order of connecting the wires is indicated in the instructions, I will give it again: stop signal - additional light - red, main light - orange clearance - additional light - yellow, main light - blue ground - black in both cases.
The image has been reduced. Click to see original.
Next, install everything in reverse order. When screwing the lantern with a nut, I used the following method - I prepared 2 nuts with large fluoroplastic washers in advance. I made a sandwich from washer-double-sided tape-nut-double-sided tape-wrench head. If something falls into the abyss, then remove the rear bumper and get it through the gills, otherwise I don’t know if they’re lying. Result
The image has been reduced. Click to see original.
the left lamp fits normally with a gap of about 3 mm, but the right one fits crookedly with a gap of about 2 mm
The image has been reduced. Click to see original.
The image has been reduced. Click to see original.
The image has been reduced. Click to see original.
Hi all!
Fighting “snot” and squeaking wipers →
Create your own logbook, and you will be able to share with forum members your opinion about Largus, useful developments, installed additional information. equipment and tuning, trips and travel! To create a logbook, you must register on the site.
Tags: tuning lights, additional light installation
Popular in in-flight magazines
DRL Traveling on Largus Fuel consumption Armrest Mileage Discs Radio To1 First impressions Buying Largus Electrics Covers for Largus Bumper net Modifications HBO Speakers Rear view camera Wipers Interior lighting Brake light Tuning Tires and wheels Check valve Tuning lights Noise insulation Winter tires Rugs Largus DVR Rki-19 Winter operation Roof box PTF Tail lights Izhevsk Car audio Injectors Mudguards Washer reservoir Hood stops Low beam lamp Installing a cabin filter Parking sensors Thresholds Lada Largus LED Carpet covers Floating idle speed Trunk lighting Tinting Trunk shelf Trip to the sea Hood seal Accident Owner's review Fender liners Walkie Talkie Additional Socket Eyeglass case Replacement 5th gear
Comments (21)
| Sergey October 25, 2014 at 10:34 pm 0 | |
|
| Engineer October 25, 2014 at 10:47 pm 0 | |
|
| Admin July 29, 2020 at 01:30 pm 0 | |
|
| Willi October 26, 2014 at 11:30 am 0 | |
|
| Admin October 26, 2014 at 02:11 pm +1 | |
|
| Engineer October 26, 2014 at 02:30 pm 0 | |
|
| Largus Shop October 27, 2014 at 09:52 0 | |
|
| Engineer October 27, 2014 at 10:08 am 0 | |
|
| Engineer October 28, 2014 at 09:19 pm 0 | |
|
| Andrey November 4, 2014 at 00:23 0 | |
|
| Engineer October 28, 2014 at 10:10 pm 0 | |
|
| vozhava October 29, 2014 at 02:58 pm 0 | |
|
| Engineer October 29, 2014 at 03:38 pm 0 | |
|
| nix1956 October 30, 2014 at 02:51 pm 0 | |
|
| LarqusMen585 November 2, 2014 at 1:57 pm 0 | |
|
| LarqusMen585 November 2, 2014 at 1:59 pm 0 | |
|
| Andrey November 2, 2014 at 10:22 pm 0 | |
|
| Engineer November 3, 2014 at 10:07 am 0 | |
|
| Andrey November 4, 2014 at 00:19 0 | |
|
| Engineer November 4, 2014 at 01:13 pm 0 | |
|
| BASHMIK April 24, 2020 at 10:31 am 0 | |
|
| Add a comment | RSS comments feed |
Additional comments: