Rear struts and their replacement on a VAZ 2109
In a VAZ 2109 car, replacing the rear struts is simply necessary if they are even slightly damaged. Otherwise, driving your own car will bring nothing but trouble. Typically, such a breakdown leads to extraneous noise being heard in the rear suspension. Replacement of the rear struts of a VAZ 2109 is carried out either at a service station or in your own garage. How to carry out this work yourself will be described in this article.
Features of choosing silent blocks
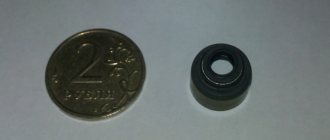
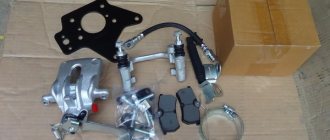
To carry out the work, you first need to buy new elements. For VAZ-2109, you should select hinges according to the catalog number (2109-08-054). When purchasing, it is important not to confuse them with the hinges for the 2110 model, since the size of the silent block of the rear suspension of the VAZ-2109 is different (they are slightly smaller in diameter). Although it is quite possible to install a “tenth” element, pressing it in will be somewhat more difficult.
size of silent blocks of the rear suspension of VAZ 2109
As for the front end, you can purchase assembled VAZ-2109 front suspension arms (with silent blocks) and install them. But this is not economically feasible, since levers are much more expensive than rubber elements. And although replacing silent blocks is a more labor-intensive operation compared to replacing a lever, repairs will cost many times less.
rubber silent blocks and polyurethane
As for the choice of hinges based on the elastic material used, VAZ silent blocks can be purchased in both rubber and polyurethane. The latter have a longer service life, but they are tougher and more expensive. But in general, the car owner himself will have to decide which elements to purchase.
Note that you should only buy hinges from well-established manufacturers - SS20 DAAZ Corteco, etc.
Replacing rubber joints on the rear suspension
More on how things are changing. First, let's look at how to replace the rear silent blocks of a VAZ-2109. To perform the operation you will need:
- Inspection hole;
- Jacks;
- Tools (key sets, hammer, attachments);
- Bench vice;
- Mount;
- Spring ties;
- Soap solution;
- Pullers for rubber joints;
First, the silent blocks of the rear beam of the VAZ-2109 are replaced. For this:
- We put the car in a pit, jack up the rear on one side, remove the wheel;
- Unscrew the nut of the bolt securing the beam to the body, remove the bolt;
- Using a pry bar, we press the beam down to remove it from the bracket, fix it in this position (by installing a wooden spacer between the beam and the body);
- Using a hammer, carefully knock out the worn hinge;
- Using a device (a long bolt with a nut, two wide washers and a piece of pipe), we press in a new element, having previously generously lubricated the seat and the hinge itself with soapy water;
- We install the beam into the bracket and fix it with a fastening bolt;
After this, the silent blocks of the VAZ-2109 rear pillar are replaced:
- Unscrew the fastening of the rack to the body (top) and beam (bottom);
- We press the beam down so that the stand goes down and the spring relaxes;
- Remove the stand;
- Using a silent block remover, remove the hinge from the rack body (bottom);
- We press in a new silent block using a vice;
- We tighten the springs with ties, then put the stand in place and secure it;
- Remove the ties;
Similar operations are carried out on the other side of the rear of the car. After assembly, you should check the tightness of all fasteners that have become loose. This should be done again after a couple of days of using the car.
Symptoms of a problem
There are several main signs of failure of the rear beam silent blocks, including:
- Unstable behavior of the car on the roads;
- Tires wear unevenly, which is not difficult to notice from the tread pattern;
- When driving on a bad road (that is, 95% of all our roads), unpleasant squeaks and impacts on the car body are observed.
These signs are indirect, since they may be associated with other failures of the vehicle’s chassis. For example, dull knocks are also a sign of a faulty rear pillar. Therefore, in order to make sure that there is a particular problem, you will need to fully diagnose the chassis.
Malfunctions
Often, replacing the rear beam bushings is due to the fact that defects arise in the design of the element. They are like this:
- The elasticity of the rubber element deteriorates;
- The rubber breaks;
- The central bushing is displaced;
- Rotations occur in the seat.
If problems are detected with the silent block of the rear beam, you will need to drive the car into the garage in the near future and replace the damaged components. Unlike foreign cars, changing the silent seal on a VAZ 2109 is quite simple and without outside help. Plus it costs almost pennies.
Replacing silent blocks in the front suspension
Now let’s talk about how to replace the silent blocks of the front levers of the VAZ-2109. For this:
- We hang up the front wheel and remove it;
- Unscrew the fastening of the lever to the ball joint;
- Unscrew the nut securing the stabilizer link and remove it from the lever;
- Loosen the fastening of the lever to the body bracket and remove it from the car;
- The silent block of the front lever of the VAZ-2109 can be removed in several ways - burn it out, knock it out or press it out with a puller or a vice;
- We prepare the hinge seat - clean it of rust and rubber residues with a file. Afterwards, generously lubricate it with soapy water;
- We make a small chamfer on the silent block and center it in the eye of the lever;
- We do the pressing using a vice. We install the lever with the silent block between the jaws of the vice, align the position of the hinge relative to the hole, and then slowly tighten the vice, while periodically checking whether the hinge fits evenly.
- After the silent block bushing rests against the jaws of the vice on both sides, remove the lever and finally seat the hinge in place;
After that, we put the lever on the car. We carry out a similar operation on the other side of the front of the car. After all work, check the tightness of the fasteners. Even if you do all the work yourself, you can complete it in 1 day.
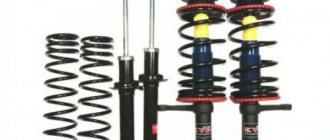
Welcome! Rear strut - it performs the function of holding the car on the road, does not allow it to roll too much in corners, and also keeps the car on the road when hitting a bump and thus it does not lose control from this, in addition, the struts cause either discomfort (If not high-quality rack), or, on the contrary, it gives pleasure from driving and makes the car smoother and more confident on the road.
Note! In order to change the rack, you will need to take with you: A set of wrenches, in which you will have large wrenches of approximately “17” and “19”, in addition to this you will also need a screwdriver, and you can also stock up on a wrench and to it with cap heads! (Also take an adjustable wrench or some healthy pliers with you)
Summary:
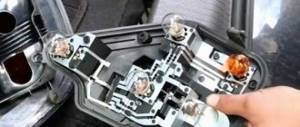
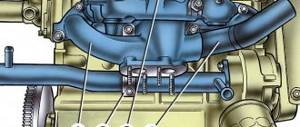
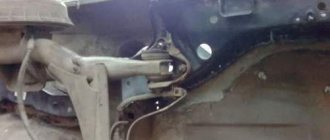
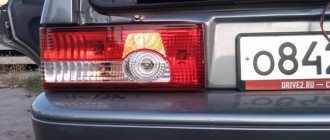
Where is the rear pillar? From the title you can already assume that since it is the rear, then it is located in the rear of the car, but not everyone knows where exactly, so just below you can see a photo in which the wheel has been removed from the car and you can almost completely see the rack itself.
Note! Any car strut, no matter the front or rear, consists of two important things, namely the shock absorber itself (Indicated in the photo above by a red arrow) and, accordingly, a spring (Indicated by a blue arrow) that holds the car and does not allow it to drop to too low a height, Well, in some ways, the spring softens the blow when hitting a bump, but still the most basic unit thanks to which the shock is absorbed when hitting a bump is the shock absorber itself!
When do you need to change the rear strut? To find out when it has become unusable, you need to go to a specialized car service center and have them undergo a technical inspection of the car (They have a special device for this) which will tell you whether the struts need to be replaced or not, but you can always manage to go to a car service station (For example you live in a village where there is no service that specializes specifically in suspension), so in this case you need to check the racks for serviceability yourself, namely look at them, you already know where they are, and if you suddenly find traces of oil on them then it is necessary to replace it quickly (Applies only to shock absorbers), and there should be no deformation on all parts, including the spring itself, namely, the spring should not have cracks, and in conclusion, let’s note a couple of facts, if when hitting a bump recently you start to experience knocking noises, and also if the car behaves loosely in corners and easily tips over to its side, then this all indicates a malfunction of the struts, which in this case you will need to replace.
Note! Carry out a small experiment that will help identify the malfunction of the struts, to do this, put your hands on the outer part of the rear wing of the car and rock the car, and then when the wing is at the lowest point, immediately remove your hands from it and if the car then swings first up, then down and stop, then everything is fine with the racks, but if it floats without stopping or sways more than once, then you will have to replace the racks! (Do this operation on each side, that is, if, for example, the car floats on the rear left side, and sits rigidly in place on the right side, then only the left strut is faulty and needs to be replaced)
How to remove and install the front ones on the “nine”
It is somewhat more difficult to remove the front strut from the car and change it, so when performing work it is important not to deviate from the prescribed instructions. To replace the front shock absorber, you must perform the following steps.
- Remove the protective cap of the desired pillar under the hood of the car. The cap, which prevents dirt from penetrating the rack, can be removed without additional tools - just grab it and apply a little force.
- After removing the cap, loosen the nut located inside the shock absorber rod. To do this, put the small part of the removable key on the rod and install the larger part on top.
- Raise the car with a jack and remove the wheel from the side where the faulty shock absorber strut is located. Then use pliers to remove the cotter pin.
- Unscrew the nut that secures the ball joint, and then remove it from the hole.
- Move the brake hose away from the bracket to avoid damaging it.
- Remove the front steering knuckle and all the components located on it. Next, unscrew the mounting nut on the top of the shock absorber and remove the strut.
- Following the reverse procedure, install the new shock absorber strut in place. Once the process is complete, perform a wheel alignment and camber check.
After replacing shock absorber struts, it is important to check the secure fit of all fasteners. In this case, even if all parts are secured, the check should be repeated after 100 kilometers of the vehicle.
Operating a vehicle with faulty shock absorber struts can significantly reduce the level of driving comfort and negatively affect vehicle control. Timely replacement of struts will ensure safety on the road and prevent breakdowns of other components. As practice shows, the financial costs of installing new shock absorbers VAZ 2108, 2109, 21099 are disproportionately small in comparison with the possible consequences of ignoring the malfunction.
If you find an error, please select a piece of text and press Ctrl+Enter.
How to replace the rear shock absorber on a VAZ 2108-VAZ 21099?
Removal: 1) At the beginning of the operation, take care of your safety and the safety of the car, that is, first place bricks or anti-roll stops under the front wheels (Whatever is available), then lift the rear of the car using a jack, thereby hanging the wheel that, after lifting, you you will have to remove the stand as well. (If you don’t know how to remove a wheel, then read the article called: “Properly replacing wheels on a car.”
Note! Before all this hanging, be sure to open the trunk of the car and from the glass on which the stand you are going to change is located, remove the protective cap (If you have one, see photo 1), then using pliers or an adjustable wrench or a small wrench, clamp the shock absorber rod (see photo 2) so that it does not rotate and then completely unscrew the nut that secures the shock absorber rod with a spanner wrench! (By the way, when you unscrew the nut completely, pay attention to the place where the rod was attached, because under it there should be a metal washer and a rubber cushion, remove them too)
2) After the operations have been completed and after the wheel has been removed, take two keys in your hands and use them to unscrew the lower bolt that secures the shock absorber; to do this, hold the nut of this bolt with one key (Indicated by the red arrow), and with the other at this time (Indicated blue arrow), unscrew the lower shock absorber mounting bolt, and after unscrewing, remove it.
3) Then remove the lower part of the shock absorber and then lower it down (see photo 1), when you lower it down you will have access to the upper part of the shock absorber rod, so put your hands through the spring and remove another one from the rod, but this time it’s narrower the lower rubber cushion and the metal washer (see photo 2), remove the washers and cushion simply so as not to lose it, so when they are removed, lower the shock absorber lower and remove the spring and everything that will be in it by hand (see photo 3), and inside the spring there will be a compression buffer, a protective cover to prevent dirt from getting into the shock absorber, and on top of all this there will be a cover, and when everything is removed, you can then take it by hand and remove the shock absorber itself from the car.
Note! There is another way to remove the strut, take a wrench in your hands and pry up the lower part of the shock absorber with it (in this case you use the key as a lever and it is indicated by an arrow for clarity), so remove the lower part of the shock absorber and, by compressing the spring, the shock absorber, and Also, the spring itself, the compression buffer and all the other parts will shoot out, but there is a chance that you will lose the bottom cushion and some other parts, so it’s better to do it as we showed above!
Something else you should know, after the strut is removed, look under the glass and look from the inside of it (the glass is the place where the shock absorber rod enters), whether the gasket is still sitting on it (Indicated by the red arrow), if remains, then use your hand or a screwdriver to remove it from there!
4) Now put the rack on the floor and disassemble it by removing the compression buffer (Indicated by a red arrow) from the protective case (Indicated by a blue arrow), then look at the buffer itself and if it is deformed, then replace it with a new one, the same carry out the very check with all other removed parts and if the protective cover or at least one shock absorber cushion is torn or otherwise damaged, then replace these parts with new ones, but when replacing the cover, do not forget to remove the cover from it (Indicated by the green arrow ) which would also be a good idea to check for serviceability.
5) We have sorted out some details, there are very few left, namely, do you remember about the gasket that was installed on the inside of the rack? So, inspect it too; it’s an insulating gasket; if there are any tears on it or if it loses its elasticity, then replace it with a new one too.
Note! Pay your attention also to the rubber-metal bushing (Silent block is also called), if it is damaged or torn, then replace it with a new one, see how to do this in the video below:
6) Well, in conclusion, inspect the spring, as mentioned earlier, there should be no deformation or cracks on it, you can also use a special device (If you have one) to check the spring’s settlement, for this you need to first press the spring three times until all the turns come into contact, and then you need to apply a force of 3188 N (325 kg) to it and after this force you will need to measure the length of the entire spring, which should be 201 mm.
Installation: All previously removed parts, as well as the new rack, are installed on the car in the reverse order of removal, but you need to know a couple of little things for faster installation of the rack itself, firstly, when you put the metal cover on the protective cover, be sure to ensure that its flange (Indicated by a red arrow in photo 1) is tucked into the edge on the case, after which you will need to install an insulating gasket on the spring so that the protrusion on the gasket (Indicated by a red arrow in photo 2) rests against the end part of the spring coil, and so that when installation of the strut, the gasket did not come off, we recommend wrapping it with tape or tape to hold it better, then install the strut in its place and pull the shock absorber rod all the way, otherwise it simply will not fit into the glass and you will not be able to secure the strut in any way, after the rod will be pulled out all the way, put a metal washer and a rubber cushion on it, also make sure that the beginning of the first turn of the spring hits the stamping in the cup located below (see. photo 3), and finally check whether the shock absorber rod has entered the glass; if it has, put on a rubber cushion and install a metal washer, if it does not fit into your glass (the spring may not give, in which case you will have to compress it) To do this, install a jack under the lower beam and lift the strut up (see photo 4) and tighten the upper nut that holds the shock absorber rod from above.
Note! When you lower the car to the ground after installing all the parts, rock it and tighten all the nuts that secure the strut more tightly, after you drive the car 100 kilometers, once again tighten all the nuts that secure the strut!
Additional video: If you are interested in more detail about how to remove the rear strut from a car, then study the video below, in it you will find answers to most of your questions and see how the strut is replaced visually.
How to change the rear ones on a VAZ 2109 with your own hands
Replacing the rear shock absorber strut on VAZ 2108, 2109, 21099 models involves sequentially performing a number of stages. To ensure proper operation of the shock absorber, the following instructions should be followed.
- Open the trunk of the car and remove the protective cap from the side where the rack is located. After this, hold the shock absorber rod firmly to prevent rotation, and use a spanner to unscrew the fastening nut.
- Use a jack to raise the vehicle to gain access to the rack.
- Using wrenches, unscrew the bottom bolt that secures the shock absorber. To do this, hold the fastening nut of the bolt with one key, and with the second, unscrew the lower rack clamp and remove it.
- Pull out the bottom of the strut and lower the shock absorber down. After this, remove the protective rubber pad and iron washer from the rod.
- Remove the faulty rack and install a new one in its place in the reverse order. When installing the iron cover onto the protective cover, it is important to check that the flange is tucked into the lip on the cover.
- After completing the installation of the strut, check whether the shock absorber rod is inserted into the specially designated glass, then put the rubber cushion back on and secure the metal washer.
Video: how to replace it with a VAZ 21099
Self-replacement of rear struts of VAZ-2109
Any breakdown in a car requires immediate repair, since in most cases the breakdown leads to a decrease in the level of safety during operation.
In this article we will tell you how to replace the rear struts of a VAZ-2109. You should know that, as a rule, a problem is indicated by a very characteristic noise coming from the rear suspension while driving the car.
If you do not have sufficient knowledge, then it would be better to seek help from an auto repair shop. But it is worth saying that with some effort you can make the replacement yourself.
Shock absorbers for VAZ 2108 – 2109
The shock absorbers on VAZ 2108 and VAZ 2109 cars are installed identically.
There are no differences depending on the vehicle configuration or year of manufacture. The manufacturer of factory shock absorbers for both cars is Russian SAAZ. From the assembly line, these VAZs were usually equipped with two-pipe oil struts from this manufacturer.
If we talk in general about the quality of the original shock absorbers, many drivers have seen a tendency for it to deteriorate over time. There are many cases where the racks on nines and eights of earlier releases lasted much longer.
Reasons for failure of the rear strut
There are quite a lot of them, but the most common ones are:
- abrasion by the rear wheel of the locker protecting the rack itself;
- fracture of the element in question in the area of the lower silent blocks.
The latter often occurs when the fixing bolt was tightened without load.
- The silent block has various types of damage - cracks or other defects;
- the rubber seal and boot have lost their elasticity;
- the compression buffer was deformed;
- There are cracks directly on the springs.
Replacement procedure
For such work you need the following devices and tools:
- screwdriver set;
- a set of keys;
- jack;
- container for draining shock-absorbing fluid.
The procedure is as follows:
- at the gearbox, switch the lever to first speed;
- lift the rear of the car with a jack (both wheels must be in the air);
- provide reliable support;
- take away the jack;
- dismantle the old racks.
If you need to completely replace them, then the disassembly process ends. When you need to repair any individual element, you should also perform the following steps:
- remove the anthers, bushings and buffer;
- make sure that there are no noticeable flaws;
- wash the shock absorber (it is its contamination that most often leads to breakdown);
- check the rear silent blocks;
- assemble the stand and install it in place.
It is very difficult for one person to complete all the actions on his own, so it is worth asking a friend for help. In particular, your partner will have to direct the rod into the glass. Further:
- install the spring;
- pull out the shock absorber rod completely;
- put on the lower ear and clamp everything with a bolt as tightly as possible.
How to check a shock absorber
To make sure it works, you will need to do the following:
- it is clamped in a vertical position;
- raise to the maximum;
- quickly lowered.
This procedure must be repeated several times.
The following signs indicate failure of this part:
- presence of sounds during the above procedure;
- jamming;
- failure.
This shock absorber is replaced with a new one. However, before doing this, it is better to make sure that any individual element is not damaged. If this is the case, then only what is broken is replaced.
The procedure is as follows:
- the rod is pulled out to the maximum;
- the nut is unscrewed;
- take out the fixing elements and the rod itself;
- remove the working cylinder;
- every detail is inspected.
If defects are found, they are replaced. Assembly is carried out in reverse order.
After installing the compression valve, you need to make sure that its discs move smoothly. Jamming is not acceptable.
Finally, it’s worth telling that on average in Russia a new rack will cost approximately 3 thousand rubles. As you can see, the price is quite serious, and therefore it makes sense to treat the car more carefully and regularly care for it.
To fully familiarize yourself with the process, we recommend watching the video below:
Replacing the rear pillar on a VAZ 2108, VAZ 2109, VAZ 21099
Welcome! Rear strut - it performs the function of holding the car on the road, does not allow it to roll too much in corners, and also keeps the car on the road when hitting a bump and thus it does not lose control from this, in addition, the struts cause either discomfort (If not high-quality rack), or, on the contrary, it gives pleasure from driving and makes the car smoother and more confident on the road.
Note! In order to change the rack, you will need to take with you: A set of wrenches, in which you will have large wrenches of approximately “17” and “19”, in addition to this you will also need a screwdriver, and you can also stock up on a wrench and to it with cap heads! (Also take an adjustable wrench or some healthy pliers with you)
Where is the rear pillar? From the title you can already assume that since it is the rear, then it is located in the rear of the car, but not everyone knows where exactly, so just below you can see a photo in which the wheel has been removed from the car and you can almost completely see the rack itself.
Note! Any car strut, no matter the front or rear, consists of two important things, namely the shock absorber itself (Indicated in the photo above by a red arrow) and, accordingly, a spring (Indicated by a blue arrow) that holds the car and does not allow it to drop to too low a height, Well, in some ways, the spring softens the blow when hitting a bump, but still the most basic unit thanks to which the shock is absorbed when hitting a bump is the shock absorber itself!
When do you need to change the rear strut? To find out when it has become unusable, you need to go to a specialized car service center and have them undergo a technical inspection of the car (They have a special device for this) which will tell you whether the struts need to be replaced or not, but you can always manage to go to a car service station (For example you live in a village where there is no service that specializes specifically in suspension), so in this case you need to check the racks for serviceability yourself, namely look at them, you already know where they are, and if you suddenly find traces of oil on them then it is necessary to replace it quickly (Applies only to shock absorbers), and there should be no deformation on all parts, including the spring itself, namely, the spring should not have cracks, and in conclusion, let’s note a couple of facts, if when hitting a bump recently you start to experience knocking noises, and also if the car behaves loosely in corners and easily tips over to its side, then this all indicates a malfunction of the struts, which in this case you will need to replace.
Note! Carry out a small experiment that will help identify the malfunction of the struts, to do this, put your hands on the outer part of the rear wing of the car and rock the car, and then when the wing is at the lowest point, immediately remove your hands from it and if the car then swings first up, then down and stop, then everything is fine with the racks, but if it floats without stopping or sways more than once, then you will have to replace the racks! (Do this operation on each side, that is, if, for example, the car floats on the rear left side, and sits rigidly in place on the right side, then only the left strut is faulty and needs to be replaced)
Front shock absorbers VAZ 2108 and 2109
The front shock absorbers of VAZ 2108, 2109 have right/left divisions. There is a misconception that their design is non-removable. In fact, even the official manuals describe brief instructions for disassembling them. To do this, you just need to knock out the compression buffer support with a hammer and chisel, and then unscrew the nut with a special wrench. Therefore, you can purchase either a solid front strut or just a separate liner in order to directly change the shock absorber itself. By installing not a standard, but a more advanced part with better technical characteristics.
If we judge the quality of the original, specifically the front shock absorbers, they are too soft (like all hydraulic struts from SAAZ). This is especially noticeable on the front wheels.
| Dimensions of front shock absorbers for VAZ 2108-2109 | |||||
| vendor code | Rod diameter, mm | Case diameter, mm | Body height (excluding stem), mm | Rod stroke, mm | price, rub. |
| 21080290540303 – left; 21080290540203 – right; | 22 | 52 | 360 | 192 | 2100 |
Since the shock absorbers are dismountable, instead of the assembled strut, you can buy separate inserts - cartridges. 21082905002 – left, 21082905003 – right.
Analogues of front shock absorbers for VAZ 2108-2109
Shock absorber replacements in Samara traditionally have higher demand. This is facilitated by the constant decline in the quality of the originals and their excessive softness.
| Manufacturer | vendor code | price, rub. |
| SS20 | SS20102 (set 2 pcs) | 5600 |
| Hola 3.7 | S426 – right; S425 – left; | 2000 |
| Phoenix 3.2 | A61547C1 – right; A61546C1 – left; | 1600 |
Analogues of the original inserts are also popular. The most popular ones are presented in the table below. They are not divided into right and left.
| Manufacturer | vendor code | price, rub. |
| KYB 4.2 | 665059 | 1900 |
| Bilstein 3.7 | 21-030550 | 1700 |
Rear shock absorbers VAZ 2108 and 2109
The rear shock absorber struts are not divided into right/left, and have only one original part number. The rear shock absorbers are non-separable. In terms of characteristics, the rear ones are similar to the front ones - the same problem with excessive softness and an uncomfortable ride over uneven surfaces.
| Dimensions of rear shock absorbers on VAZ 2108-2109 | |||||
| vendor code | Rod diameter, mm | Case diameter, mm | Body height (excluding stem), mm | Rod stroke, mm | price, rub. |
| 21082915004 | 14 | 45 | 367 | 226 | 1200 |
Analogues of rear shock absorbers 2108-2109
Replacement shock absorbers for the rear are slightly less popular than for the front ones. But they are also more often preferred than the original ones.
| Manufacturer | vendor code | price, rub. |
| SS20 | SS20122 (2 pcs.) | 3900 |
| KYB 4.2 | 441824 | 2400 |
| Hola 3.7 | S422 | 2400 |
Which shock absorbers should I choose for VAZ 218 and 2109 cars? As drivers' experience shows, the ideal option is Fenox for the front wheels, and Kayaba for the rear. If you can’t afford KYB stands, then Hola will do just fine. Moreover, it is worth noting that they most often install oil ones, since gas shock absorbers for these cars will be a little harsh. Although less popular, Russian SS20 shock absorbers are still worthy of attention. Their advantage is a good balance between rigidity and ride comfort over uneven surfaces at speeds above 50 km/h.
Shock absorbers on 2109 and 2108 should be changed according to their condition. On average, the mileage of original shock absorbers is up to a maximum of 50 thousand km (the manufacturer provides a guarantee of 30 thousand). On cars of earlier releases, there were often cases when factory shock absorbers traveled more than 100 thousand km.
Didn't find the information you are looking for? on our forum.
How to replace the rear shock absorber on a VAZ 2108-VAZ 21099?
Removal: 1) At the beginning of the operation, take care of your safety and the safety of the car, that is, first place bricks or anti-roll stops under the front wheels (Whatever is available), then lift the rear of the car using a jack, thereby hanging the wheel that, after lifting, you you will have to remove the stand as well. (If you don’t know how to remove a wheel, then read the article called: “Properly replacing wheels on a car.”
Note! Before all this hanging, be sure to open the trunk of the car and from the glass on which the stand you are going to change is located, remove the protective cap (If you have one, see photo 1), then using pliers or an adjustable wrench or a small wrench, clamp the shock absorber rod (see photo 2) so that it does not rotate and then completely unscrew the nut that secures the shock absorber rod with a spanner wrench! (By the way, when you unscrew the nut completely, pay attention to the place where the rod was attached, because under it there should be a metal washer and a rubber cushion, remove them too)
2) After the operations have been completed and after the wheel has been removed, take two keys in your hands and use them to unscrew the lower bolt that secures the shock absorber; to do this, hold the nut of this bolt with one key (Indicated by the red arrow), and with the other at this time (Indicated blue arrow), unscrew the lower shock absorber mounting bolt, and after unscrewing, remove it.
3) Then remove the lower part of the shock absorber and then lower it down (see photo 1), when you lower it down you will have access to the upper part of the shock absorber rod, so put your hands through the spring and remove another one from the rod, but this time it’s narrower the lower rubber cushion and the metal washer (see photo 2), remove the washers and cushion simply so as not to lose it, so when they are removed, lower the shock absorber lower and remove the spring and everything that will be in it by hand (see photo 3), and inside the spring there will be a compression buffer, a protective cover to prevent dirt from getting into the shock absorber, and on top of all this there will be a cover, and when everything is removed, you can then take it by hand and remove the shock absorber itself from the car.
Replacing racks
You can correctly replace the racks by sequentially performing the steps in the list:
- Place wheel chocks or ordinary bricks under the front wheels of the car.
- Hang the wheel whose stand needs to be changed using a jack.
- Remove the wheel from the car.
- Remove the protective cap from the glass on which the faulty rack is located.
- Clamp the shock absorber rod with pliers or an adjustable wrench and unscrew the nut that secures the car's shock absorber.
- Remove the metal washer and rubber pad that are located under the nut.
- Using two wrenches, unscrew the nuts at the bottom of the shock absorber.
- To do this, hold one nut and unscrew the other.
- Remove the bolt to which the two nuts were attached.
- Lower the shock absorber down.
- Manually remove the compression buffer from the shock absorber, as well as the protective cover.
- Remove the gasket from the shock absorber. It may also remain on the bottom of the glass.
Removing and replacing rear struts (shock absorbers) of VAZ-2109
Good afternoon Today we will tell you how to repair the rear suspension of your VAZ-2109 . namely, we will describe the process of removing and replacing rear struts (shock absorbers) on the VAZ-2108 and similar models.
The procedure is not too complicated, but labor-intensive, although if the threaded connections have not soured or become stuck, then it can be completed in one hour.
So, let's go: Lower the back of the rear seat and remove the protective cap of the upper pillar mounting located under the rear parcel shelf.
Then engage first gear and place something under the front wheels to prevent the car from rolling. Raise the rear of the car and secure it from falling. Remove the rear wheel.
Unscrew the nut of the lower rack mounting and remove the bolt.
5. Lower the strut down and remove the lower cushion with the support washer and spacer from the shock absorber rod through the spring coils.
6. Push the shock absorber rod down.
Then remove the spring and remove the strut (shock absorber) from the rear wheel well.
Place the compression buffer onto the shock absorber rod.
Secure the stand and put the protective case and cover on it. Pull out the shock absorber rod and install the lower cushion with the support washer and spacer on it. Note that the shock absorber rod can be easily pulled out if you screw a nut onto it.
Install an insulating pad on the upper coil of the spring and secure it from displacement with rope or electrical tape
Install the spring on the strut so that the beginning of the first turn falls into the stamping in the lower cup.
To compress the spring when installing the rack, place a jack under the beam. Gradually lifting the beam with a jack and thereby compressing the spring, insert the shock absorber rod into the hole in the body arch.
Install the upper cushion with a washer on the shock absorber rod and tighten the nut of the upper strut fastening, holding the rod from turning with a second wrench. After lowering the car to the ground, rock it vigorously several times. Tighten the entire connection and you're done! Now your car will not sway on bumps and uneven surfaces, it will hold the road better and become much more comfortable than with faulty struts. Not a nail or a rod! Visit our forum at the VAZ-2108, 2109 and 21099 club