Lada Vesta brake tuning options
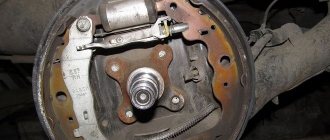
Rear drum brakes (hereinafter referred to as RDBT) are not as effective as disc brakes. Many car owners strive to modernize and tune the brakes of the Lada Vesta by installing disc brakes.
Required materials and tools:
- set of car keys, sockets, ratchet;
- additional lighting;
- liquid for removing rust and deposits WD - 40;
- non-standard disk mount;
- mount for ABS sensor;
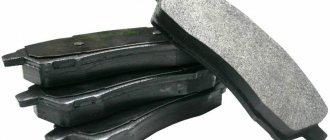
- new brake pads, caliper;
- support bearing as required.
Option from Brembo
Sequence of actions when independently modifying brakes on Lada Vesta
- It is advisable to install the machine on an inspection channel (pit) for ease of repair.
- We provide priority safety measures, activate the parking brake lever, support the front wheels with shoes to prevent the car from rolling away without permission.
- Jack up one side of the car, unscrew the bolts, and remove the wheel assembly.
- Head to “22”, unscrew the hub mechanism nut, remove the rear hub assembly. Release the handbrake cable and disconnect the ABS sensor.
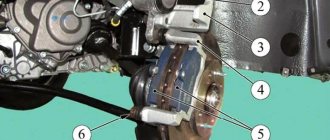
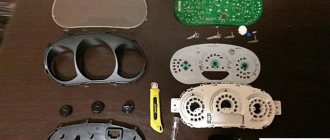
- After removing the hub, install the faceplate under the mount of the “future” caliper.
- Screw the mount for the ABS sensor.
- We fix the brake disc, caliper, and install the pads. All parts are standard, but from the Sport modification, as mentioned at the beginning of the article.
Note to the driver! Be sure to check that the disk is installed in the center, without displacement. Deviations to the left and to the right are unacceptable, as there will be beating and vibration in the steering wheel when braking.
- If necessary, we use spacers to adjust the gaps.
- By analogy, we carry out work on the opposite side.
Subject to the recommendations, the average service life of rear brake pads exceeds 65,000 km.
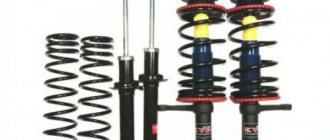
Front brakes
Replacing front pads on Lada Vesta
After you have purchased the pads, you can proceed directly to replacing them.
Replacing the pads is always accompanied by removing the front wheels, since there are simply no other ways to access them, so we prepare a jack and all the necessary keys. Do not rush to lift the car with a jack; first of all, loosen the wheel bolts; it will be much more difficult to do this in a raised state. After loosening the bolts, you can safely lift the car on a jack, but do not forget about safety measures, be sure to place some reliable support for the car, since there are often cases when the jack simply cannot support the car. This is dangerous not only due to damage to the car itself, but also to your health.
Having dismantled the wheel, you will see the brake disc and caliper; it is the caliper that must be unscrewed to gain access to the front brake pads. Also, before unscrewing the caliper, push the piston (indicated in the photo above) as deep as possible, otherwise it will interfere with the process of replacing the pads in the future. This can be done using a regular screwdriver or other flat object.
In order to remove the caliper, you need to unscrew the two bolts (see photo above) that hold it, this is done using a socket wrench, which directly unscrews the bolt itself, and a 15 wrench, with which you need to hold the nut. After the bolts have been unscrewed, we move the caliper to the side and get full access to the front brake pads; they are held on guides and can be easily removed from them.
Do not leave the caliper hanging on one hose; this approach can damage the system.
After removing the old pads, compare them with the new ones you just purchased; the difference will probably be noticeable to the naked eye. If the difference is small and only a few millimeters, it would be more advisable to install the existing pads again and put the new ones aside until the next maintenance.
Review of Manufacturer Prices
| Catalog article / OEM | Price, rub.) | Resource (thousand km) |
| Rear drum pads 7701208357 | From 2200 | 50 – 60 |
| analogue FCR30B062 | From 2900 | 75 – 80 |
| rear left 8450006850 | From 2100 – 2200 | 50 – 60 |
| rear right 8450006849 | —/— | 50 – 60 |
| rear brake drum 8450006851 | From 6930 | 85 – 95 |
| —/— with bearing with ABS LADA Vesta 8450009537 | From 7100 | 85 – 95 |
| Rear drum 432008333R | From 5900 | —/— |
| Brake pad assembly 8450006850 | From 3600 | 50 – 60 |
| Complete pads 8450006849 | From 3500 | 50 – 60 |
| Analogue from Ford 1433865 | From 3400 | 80 — 85 |
| Analogue from PILENGA BSP8454 | —/— | 80 — 90 |
*prices are current as of November 12, 2018.
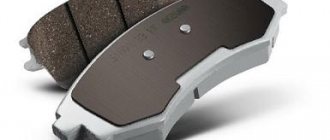
What pads should I put on Vesta?
We do not recommend buying the cheapest pads; they creak, brake poorly and wear out the disc a lot. Below in the table is a list of manufacturers and article numbers of pads that are best suitable for the Lada Vesta.
| Manufacturer | vendor code | price, rub. |
| Original | 8200 432 336 | 2000 |
| Hi-Q | SP1564 | 1250 |
| Brembo | P 56 086 | 2000 |
| TRW | GDB 3396 | 2300 |
| Bosch | 0 986 494 160 | 2600 |
Which front pads are better for Vesta?
In general, all the pads from the above list are good. Speaking specifically, most Vesta owners advise installing the original. Its disadvantage is the inflated price tag. But you can also supply a direct analogue from the manufacturer’s supplier - TRW. Their advantage is that they do not generate dust and are quite strong. It is also worth remembering that the original spare part and its direct analogue from the manufacturer may differ in quality.
Brembo pads are also a good option. They are slightly less strong than TRVs, but they also do not generate dust or creak, and also have many positive reviews.
Recommendations for the selection of parts and components
We recommend purchasing domestic spare parts for the Lada Vesta, since their cost is 10–15% cheaper than imported analogues. The workmanship is approximately the same.
Previously, at the time of the company’s formation, drivers gave preference to foreign parts. Thanks to the introduction of advanced technologies in the production process of components, domestic standards have increased and quality has become equal.
Despite the fact that you can purchase spare parts from Vesta Sport for production Vesta models, carry out the installation at a service station. Don't skimp on repairs when it comes to your security system.
Brake pads
Addresses of companies providing services for replacement and installation of disc brakes on Lada Vesta
| № | Name | Address |
| 1. | "TEKHINKOM" | Address: vl.24, building 3, st. Kulakova, Moscow, Russia, 123592 |
| 2. | "Zelenograd-Lada" | Address: Zelenograd, Moscow, Russia, 124489 |
| 3. | "Station Filter on Krasnobogatyrskaya" | Krasnobogatyrskaya st., 2 building 25, Moscow, Moscow region, Russia, 107564 |
| 4. | "Car service station-Lublino" | Sovkhoznaya st., 10A, building 7, Moscow, Russia, 109382 |
| 5. | "AUTOSERVICE PROFI-STO" | 4th Krasnogorsky proezd, 2/4, building 3, Moscow, Russia, 123182 |
| 6. | "Dias-service, service station" | Kotlyakovskaya st., 4, Moscow, Russia, 115201 |
List of online stores selling disc brakes for Lada Vesta
| № | Name | Address |
| 1. | "SHOP-TUNING" | https://www.shop-tuning.ru/ |
| 2. | "CLUBTURBO" | https://clubturbo.ru/ |
| 3. | "AVITO" | https://www.avito.ru/ |
| 4. | "MOTORRING" | https://motorring.ru/ |
| 5. | "PROSPORT" | https://www.prosport.ru/ |
| 6. | "REALXENON" | https://realxenon.ru/ |
Reviews of companies
| № | Positive |
| 1. | Vasily: six months ago I was serviced by TEKHINKOM, I liked it. The guys are smart, they know the structure of the machine, they know how to use digital equipment. My positive review. |
| 2. | Gennady: after buying a car, I chose a service station based on location so as not to have to travel far. Zelenograd-Lada employs qualified specialists who promptly fix the breakdown and take an integrated approach to solving the problem. |
| 3. | Dmitry: my comrades advised me to get service at the Filter Service Station on Krasnobogatyrskaya; before that there was another service station. I liked it, the quality is good, there are a lot of boxes, digital equipment is available. My recommendations. |
| 4. | Ivan: my positive review of the car service “Autoservice STO-Lublino”. Prompt work, comprehensive approach, parts and components always available. |
| 5. | Kirill: For car enthusiasts, I recommend the car repair shop “Dias-service, service station”. Convenient location, at the intersection of several districts of the city. I liked the quality of the work, modern equipment, objective approach to business. |
| 6. | Ignat: after purchasing the Lada Vesta, he preferred to be serviced at AUTOSERVICE PROFI-STO. The guys are smart, they know the structure of the technology, and their approach is objective. |
| 7. | Vladimir: my positive review of the TEKHINKOM service station. My friends advised me to get service from them. At first I was wary, but over time I changed my mind for the better. TECHINCOM are true professionals. |
| Negative | |
| 1. | Victor: last month I carried out diagnostics at the Auto Service Station-Lublino, I didn’t like it. There were no spare parts in stock, they suggested ordering them. The technician who was responsible for my car delayed the inspection for half an hour longer due to equipment failure. |
| 2. | Vasily: I previously had my car repaired at the Filter Service Station on Krasnobogatyrskaya, but I didn’t like it the last time. My technician was not there, and the “new guy” couldn’t identify the breakdown the first time. |
| 3. | Gennady: I’m looking for another service for maintenance, since I’m not satisfied with the quality of work at Zelenograd-Lada. There are no longer any spare parts in stock, the service station manager is constantly calling and offering promotional products. |
LADA VESTA. BRAKE SYSTEM - REMOVAL / INSTALLATION OF MAIN UNITS AND PARTS
1 GENERAL REQUIREMENTS
Carry out work in accordance with the requirements of the “Inter-industry rules on labor protection in road transport” POT RM-027-2003 and labor protection instructions for mechanics operating at the enterprise.
When performing work, it is allowed to use certified equipment and tools that are functionally similar to those specified in the technological instructions, the use of which ensures the required productivity, safety and quality of work.
When replacing and topping up brake fluid, it is allowed to use only the materials specified in the current “Codifier of main and auxiliary materials used in the maintenance and repair of LADA vehicles” K 3100.25100.00018.
2 DEVICE FEATURES
The brake system consists of front and rear brake mechanisms, a brake drive and a parking brake drive.
The front brake mechanism is disc, with a movable caliper and automatic adjustment of the gap between the disc and the pads.
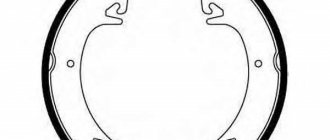
The rear brake mechanism is drum, with self-aligning pads and automatic adjustment of the gap between the pads and the drum.
The brake drive is foot-operated, hydraulic, dual-circuit with diagonally separated circuits, with a vacuum booster and an anti-lock braking system (ABS) with electronic distribution of braking forces along the vehicle axes.
The parking brake is manually driven, with a cable drive to the brake pads of the rear wheels.
3
LADA VESTA.
VACUUM BRAKE BOOSTER WITH MAIN CYLINDER AND RESERVOIR ASSEMBLY – REMOVAL / INSTALLATION
Removal
Place the vehicle in the work station, apply the parking brake and turn off the ignition.
Open the hood and disconnect the earth wire terminal from the battery (spanner 10).
Remove the resonator and air filter from the car in accordance with the requirements of TI 3100.25100.20582 “LADA VESTA car engine - removal / installation of main systems, components and parts.”
Disconnect block 1, Figure 3-1a, of the front left wiring harness from the brake fluid level sensor.
Pump out the brake fluid from reservoir 2, disconnect hose 3 of the clutch master cylinder from the reservoir fitting and install plugs in the hose hole and on the reservoir fitting (hand pump, process container, flat screwdriver, process plugs).
Figure 3-1 — Removing the vacuum brake booster: 1 — front left wiring harness block; 2 - tank; 3 — hose to the clutch master cylinder; 4 — brake master cylinder; 5 — brake pipe fittings; 6 — vacuum brake booster; 7 — vacuum brake booster hose fitting
Disconnect the brake pipe fittings 5, Figure 3-1b, from the brake master cylinder 4, move the pipes to the side and install technological plugs into the holes of the master cylinder and on the brake pipes (wrench 13 for brake pipes, technological plugs).
Disconnect hose fitting 7 from vacuum booster 6.
Remove the cover of the fuse box in the vehicle interior and disconnect the instrument panel wiring harness connectors from the trunk lock actuator switch and from the headlight range control unit.
Disconnect block 1, Figure 3-2, of the instrument panel wiring harness from the electronic accelerator pedal 4, unscrew the two nuts 3 securing the accelerator pedal bracket and remove bracket 2 with the accelerator pedal assembly (replaceable head 13, extension, ratchet).
Figure 3-2 — Removing the accelerator pedal bracket: 1 — instrument panel harness block; 2 — accelerator pedal bracket; 3 — nuts for fastening the accelerator pedal bracket; 4 — electronic accelerator pedal Disconnect block 1, Figure 3-3, from the brake signal switch.
Figure 3-3 — Disconnecting the brake booster rod:
1 — instrument panel harness block;
2 — brake signal switch;
3 — brake pedal;
4 — connecting axis of the brake booster rod fork and the brake pedal;
5 — fork of the vacuum brake booster rod;
6 — axle fixing bracket;
7 — brake pedal bracket
Turn brake light switch 2 to 0 counterclockwise and remove it from the hole in bracket 7 of the brake pedal.
Remove bracket 6 and remove axle 4 from the holes in fork 5 of the brake booster rod and brake pedal 3 (flat-head screwdriver).
Unscrew the four nuts 1, Figure 3-4, securing the vacuum booster to the front panel and remove the vacuum booster 3 with the brake master cylinder and reservoir assembly (replaceable head 13, extension, ratchet handle).
Figure 3-4 — Removing the vacuum brake booster:
1 — nut securing the vacuum brake booster;
2 — brake pedal bracket;
3 - vacuum brake booster
Installation
Install the vacuum brake booster on the front panel.
Install bracket 2, Figure 3-4, of the brake pedal on the studs of the vacuum brake booster, screw in and tighten the four nuts 1 securing the vacuum booster. Tightening torque of fastening nuts 18.24 N.m (1.8___2.4 kgf.m) (replaceable head 13, extension, knob
ratchet, torque wrench).
Install the connecting axle 4, Figure 3-3, into the holes of the fork 5 of the brake booster rod and the brake pedal 3 and secure it with bracket 6.
Pull the rod out of the brake signal switch, ensuring a size of 10 mm, as shown in Figure 3-5 (caliper ShTs-1-125-0.1 or Shts-1-150-0.1).
Figure 3-5 — Installing the brake light switch rod
Install the brake light switch into the hole in the brake pedal bracket and turn it clockwise until it stops.
Attention. When installing the brake light switch, the brake pedal must be in the up position.
Connect connector 1, Figure 3-3, of the instrument panel wiring harness to brake light switch 2.
Install bracket 2, Figure 3-2, accelerator pedal assembly with pedal 4, screw in and tighten two nuts 3 securing the bracket. The tightening torque of the nuts is 18_24 N.m (1.8...2.4 kgf.m) (replaceable head 13, extension, ratchet wrench, torque wrench).
Connect connector 1 of the instrument panel harness to the electronic accelerator pedal.
Connect the instrument panel wiring harness connectors to the trunk lock actuator switch and to the headlight range control unit and install the fuse box cover in the vehicle interior. Apply soap solution to fitting 7, Figure 3-1, of the hose and install the fitting into the hole of the vacuum booster.
Remove the plugs from the brake pipes and the holes of the brake master cylinder, attach the brake pipes to the master cylinder 4, Figure 3-1b, brakes and tighten the fittings 5. The tightening torque of the fittings is 14.20 N.m (1.4…2.0 kgf.m) ( wrench 13 for brake pipes, replaceable insert 13, torque wrench).
Connect block 1, Figure 3-1a, of the front left wiring harness to the brake fluid level sensor.
Remove the plugs from the reservoir fitting and the hole in the clutch master cylinder hose, install hose 3, Figure 3-1a, on reservoir fitting 2.
Install an air filter and resonator on the car in accordance with the requirements of TI 3100.25100.20582 “LADA Vesta car engine - removal / installation of main systems, components and parts.”
Connect the earth wire terminal to the battery.
Fill the reservoir with brake fluid to about 0 on the reservoir body and bleed the brake system and hydraulic clutch in accordance with the requirements of TI 3100.25100.08020.
Check the effectiveness of the service brake system in accordance with the requirements of TI 3100.25100.13062. Present the vehicle to the Quality Control Department. The quality control department checks the vehicle for compliance with the requirements of TU 017200-254-00232934, paragraphs. 1.19.9, 1.19.22 in the scope of work performed.
content .. 160 161 162 163 164 165 166 167 168 169 ..
Conclusion
Modification of the standard brakes of the Lada Vesta is a personal matter for each car owner. Provided the car is used moderately and the driving style is non-aggressive, the stock rear brakes are sufficient.
If you decide to install it, strictly follow the recommendations outlined in the article. If you have insufficient experience, contact service station specialists for help.
Note to the driver! If desired, tune the handbrake handle on the Lada Vesta. Motorists purchase a leather cover (seam with red stitching), as well as a pre-installed cup holder on the rear side. Cost from 800 rubles.
Components
In such a situation, there are 2 scenarios:
- Carry out modifications in accordance with the factory diagram;
- Purchase components from another manufacturer.
IMPORTANT! Unauthorized modifications to the design of the car's braking system, which includes the independent installation of rear disc brakes on the Lada Vesta, can be regarded as a violation of traffic rules.
And so, one of the owners of the Lada Vesta in the Exclusive configuration said that he was able to find out from an AvtoVAZ employee exactly what components were needed to replace drum brakes with disc brakes.
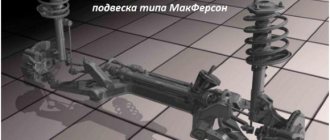
According to an employee of the plant, there is no need to replace the beam or reflash the ABS block, and this significantly speeds up and reduces the cost of the work.
In addition, the picture clearly shows that there is a standard spacer between the axle and the beam and it is to this spacer that the boot is fixed. From the factory, the hub and disc come separately, so after installing the rear disc brakes on the Lada Vesta yourself, there is no need to replace the bearings if you need to replace the disc.
All the components necessary to replace the brakes with your own hands are presented in the table along with the article numbers.
| Position | vendor code |
| Right brake hose mounting bracket | 8450031136 |
| Left brake hose mounting bracket | 8450031137 |
| Rear brake flexible hose assembly – 2 pcs. | 8450031129 |
| Rear brake pads (full set) | 11196-3502089-00 |
| Washer 10 | 00001-000516870 |
| Ball joint fixing bolt | 21080-2904194-00 |
| Washer 10 | 00001-000516870 |
| Ball joint fixing bolt | 21080-2904194-00 |
| Rear left brake (assembly) | 8450031163 |
| Rear right brake (assembly) | 8450031162 |
| Retainer fixing screw | 21080610526810 |
| Rear brake disc | 8450031131 |
| Rear wheel hub (assembly) | 8450031130 |
| Hex Head Screw | 00001-003836021 |
| Right rear brake guard | 8450031686 |
| Left rear brake guard | 8450031687 |
| Bolt M10-1.25-40 | 8450031161 |
| Left rear brake mount | 8450031132 |
| Right rear brake mount | 8450031133 |
The estimated cost of the entire kit for self-installation of rear disc brakes on a Lada Vesta is about 30,000 rubles.