Composition of a seat heating kit and how to install heaters on Granta with your own hands
The production of original seat heating systems has been established in Togliatti. The price of the set is about 2,000 rubles. The convenience of using just such a package is that all the component elements are adapted to Granta: the optimal size of the heaters is selected, there are off buttons, blocks for them, all the associated wiring and a fuse designed for high current.
Preparation for installation of heating elements
Before connecting the heated seats on the Grant, you need to secure the heaters under the upholstery of the seats. Of course, it is more convenient to do this on dismantled “seats”, previously disassembled into two parts: the back and the support. Creating acceptable conditions for installing heating elements is the goal of the preparatory stage. By the way, when determining the reasons for the knocking of hydraulic compensators, there is a slightly different logic.
Preliminary activities are carried out according to the following scenario:
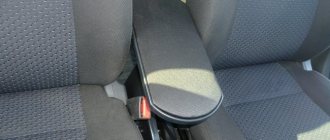
- Disconnect the power supply to the seat belt sensor located under the seat. In many trim levels, this option is available only to the driver.
- Using an E10 head mounted on the knob, unscrew the four bolts connecting the base of the seat frame to the body and remove the seat. For ease of access to fastening elements, move the seat to the farthest or closest position. Similarly, remove and pull out the second front “seat” from the passenger compartment.
- Remove the backrest angle adjustment knob by prying it off with two flat-head screwdrivers.
- At the junction of the backrest and seat, remove the plastic covers on the left and right sides by unscrewing one screw each.
- Unscrew 2 bolts on each side securing the backrest frame to the metal base.
- Detach the backrest from the seat.
- Repeat steps 3-6 for the second chair.
Factory covers are attached to the frame with four clips. On the reverse side, the fixing elements are clamped with wires. Having untwisted the latter, we tighten the fabric. Before removing the backrest cover, disconnect the plastic lock at the bottom of the structure. When assembling, it is advisable to replace the wire with plastic clamps.
Installation of heaters
The purpose of preliminary positioning is to achieve such an arrangement of the heaters that the wires exit into the joint of the backrest and seat. You won't be able to play with the longitudinal base - the standard kit is designed strictly according to the dimensions of the depressions. After removing the protective tape, glue the element to the frame. If necessary, the foam is trimmed to allow the wire to exit unnoticed.
Installing heated seats on Granta
The content of the article:
Installation of standard seat heating from VAZ 2115 in Lada Granta
Installation of heated seats on Granta heating elements. Implementation directly into the seats of the Lada Grant. This is a standard heater from a VAZ-2115 (Identified by serial number). It doesn’t quite fit, but I’ll tell you in detail exactly how to fit this kit to the Lada Granta.
To install heated seats we will need: 1. A key or socket with an E10 wrench. (as in the photo) 2. Double-sided fabric tape. Buy in advance so you don't have to go shopping later. 3. Plastic ties (clamps) with a length of at least 250 mm.
Must be prepared in advance
4. Insulating tape (electrical tape). 5. Wiring kit for connecting heating (I had one with heating pads) 6. A Phillips screwdriver and two flathead ones. 7. A key or socket with a 13 mm wrench.
If everything is prepared, you can start.
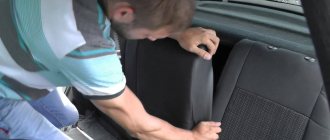
1. First of all, you need to remove the front seats. Everything is simple here. Just before unscrewing the driver's seat, look under it and pull out the seat belt indicator connector. To do this, press the connector latch and pull it towards you.
The seats are attached to the body in Grant with four bolts. The head of the bolts is a so-called “euro” head (E10). Unscrew these bolts and remove the seats. For convenience, we bring them home and start working with them.
Unscrew the front bolts
2. We begin to disassemble the seats in the Lada Granta interior. We need to remove the backrest. To do this, turn the chair on its side. Take two flat screwdrivers. We insert them on both sides under the backrest angle adjustment knob and remove it by prying it up.
Removing the backrest angle adjustment knob
Unscrew one self-tapping screw with a Phillips screwdriver.
After that, using a flat screwdriver, we separate the two halves of the plastic caps. We do this very carefully, because you can accidentally break the pins.
Pry it off with a flat screwdriver
Take a 13 mm wrench. and unscrew the two M8 mm bolts securing the seat back to the base.
After this, we do the same on the opposite side. Then we separate the halves of the chairs.
2. Now you need to remove the factory seat covers. Let's start with the lower frame of the chair. We turn it upside down. The cover is attached to the frame with factory fasteners made of rigid wire.
They are easily released with pliers. To unclamp, you need to pinch the edge of the wire with pliers and twist it in a circular motion. The photo shows the places where you need to disconnect these same clamps.
Places for attaching the cover to the frame in the interior of the Lada Granta
After all the latches marked in the photo are released, we move the cover to the side and see the foam casting.
Factory foam casting for Granta fret
2.Now you need to release the seat back cover. There is a plastic lock at the bottom of the backrest. We disconnect it along the perimeter and lift up part of the cover. Turn the back over to the back side up. Under the cover you will see the same latches. It is necessary to remove four pieces, as in the photo.
Fasteners for fastening the cover on the back of the Granta fret chair
3. After the foam casting is exposed, we take our warmers, try them on and fasten them. Let's start from the back. The backrest heating pad has a trapezoidal shape, just like the space on the backrest for heating our chair. But it matches the chair only upside down, with the wire facing up. I had to attach this heating pad with the wire facing down, otherwise there wouldn’t be enough wire. But that’s okay, because it doesn’t interfere with anything. Take fabric tape and tape the heating pad around the perimeter something like this:
Cover the backrest with fabric tape
We tear off the protective layer of tape and glue the heating pad onto the foam casting.
Now let's try on the bottom part. There are some pitfalls here too. Everything seems to fit, but the wires come out of the edge. And they should be in the middle in the section. Well, there's nothing wrong with that. To prevent the wires from sticking out through the upholstery, they need to be recessed a little. We take a sharp utility knife and make a groove for the wire in the foam, as in the photo:
We embed the wire in the foam casting
Now, just like on the back, we cover the heating pad with tape.
Cover the heating pad on the bottom of the chair
Next, glue the heating pad to the foam casting. There are a few things to note here. At the place where the heating pad is cut, you need to glue it with a fold. If you do not make this reserve, the wire that is in the case will pull on the heating element. And it may break over time due to this. And one more thing, you need to trim the two edges of the heating pad as in the photo.
We do this very carefully. We probe the heating element with our fingers and under no circumstances damage it with scissors. This is necessary in order for the two cover fastening clamps to fit at the edges. We pass the power input wire into the central hole of the foam molding, and pass the connection wire to the back through the back.
4. After gluing the heating, we begin to pull the seat covers back on. To secure the cover to the frame, we use plastic clamps instead of the factory wire fasteners. First we thread the clamp into the case. Then we thread the two ends of the clamp into the foam and close the clamp to the fastener.
We use plastic clamps instead of wire clamps
After securing the covers and connecting the two heating pads, we get approximately the following picture:
Assembled lower part of the chair
5. Next, twist everything in the reverse order.
Well, the introduction of heating elements into our chairs can be considered complete.
Connecting the heating elements of the wiring to the on-board network in the interior of the Lada Granta.
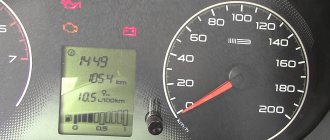
Many connect heating through one or two relays. I had a small diagram included with the wiring harness for connecting the heating. There were no relays marked on it, just as there were no relays in the wiring itself. And the power was taken from the alarm connector. It was also indicated there that it is necessary to replace the original 5 A fuse of this circuit with a more powerful one - 10 A. Let's check if such a connection is safe: After installing the heaters in the chairs, I connected them to a powerful 12 V power supply to check their functionality . At the same time, I decided to understand the connection in more detail and make sure that this circuit is reliable and correct. I connected an ammeter to the circuit and measured the amperage under load. You can see the results in the photo:
Power supply or how to connect the heated front seats on the Lada Granta correctly
The cost of installation work at an unofficial service station is at least 2,500 rubles. For this money, already purchased heating elements will be installed in the car seat and the circuit will be connected according to the manual. All that remains is to make an anti-freeze product according to a home recipe and hit the road. This is for the quick ones. Painful owners will probably not like the electrical part of the integration.
Disadvantages of the standard kit
The instructions indicate how to install heated seats on the Grant and connect it to the on-board network. According to what is written, the electrics connect and function like this:
- The permanent plus is taken from the hazard warning button.
- The ground is connected to the bracket for fastening the standard wires of the negative pole.
- The standard fuse is replaced with a more powerful one.
- The heating is turned on/off using the buttons directly.
Only one function is correctly implemented - turning off the heating when the ignition is turned off. Otherwise, the connection scheme is not entirely successful:
- The positive wire that goes to the emergency light is thin and will probably work at the limit.
- The contact group of buttons operates in a dangerous mode, since it is not intended for power loads.
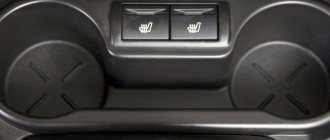
For your information. The kit offers simplified buttons for installation - they do not have a power indicator in the form of a yellow lamp (as on the rear window heating control).
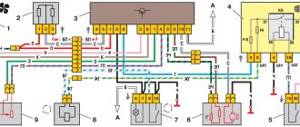
Competent connection diagram
An unfortunate result of the standard connection algorithm is a melted fuse. Such a reaction indicates that the circuit is operating at its limit. An alternative scheme for connecting heated seats will help to avoid this. It involves the use of two four-pin relays and powering them from switch K4, which supplies the output “+” after turning on the ignition.
Additional items
It is advisable to carry out installation work after purchasing an additional mounting block of reduced size. You will also need regular contacts for connecting two relays and two Lyra contact elements linking a 10A fuse. We also add additional wires with a cross-section of 4 and 1.5 mm2 to the shopping list.
Search "+"
So, in order to connect the heated front seats on the Grant, you need to find out the number of the output plus of relay K4, which appears after turning on the ignition. This can be either the 87th or the 30th contact.
Usually this is contact element No. 30, but it doesn’t hurt to make sure once again. We remove the relay and diagnose. The test is carried out by connecting a 12V lamp to the 30th contact of the mounting block and ground. After activating the ignition, the lamp should light up.
Connecting elements
It is convenient to disassemble the connection map of the key components of the circuit in the figure. The sequence of actions when assembling the chain is as follows:
- Pull out the “+” terminal, found during the K4 relay test, and connect two wires to it: one (4 mm2) - to the fuse and then to the 87th contact, the second - the control plus from the heating button (pin No. 1). Make a jumper and integrate it back.
- On the “+” route to the seat heating relay, install a 10A fuse by integrating the “Lira” contacts.
- At the second end of the received “+”, make branches for the second switch and control button, connect them to the 87th and 1st contacts.
- Make two ground wires with jumpers that will be attached to the 85th, A and C terminals.
- Route the control wiring and the backlight wire from the buttons to the mounting block. Connect 2nd contacts to 86th; B – with fuse fastening element F9 or F10.
- Connect your “+” heating elements to the 30th contacts of each relay.
It is convenient to make jumpers or branches using male-female contact pairs. It is better to avoid “twists” by connecting the wires directly in the block and making bends.
How to connect heated seats VAZ 2109
For quite some time now, people have ceased to regard the presence of various amenities in a car as a manifestation of luxury, and this fully applies to heated seats, the benefits of which you begin to appreciate especially in winter. Unfortunately, until recently, manufacturers of domestic car brands did not consider this option mandatory and on quite modern models, such as VAZ 2109, VAZ 2110, VAZ 2114, etc. interested motorists are forced to solve the problem of installing seat heating on their own. It should be noted that these days it is not difficult to buy factory-made heating system kits and installing seat heating on your own is quite possible for any car owner.
In general, seat heating can be distinguished by the type of heating element:
- With nichrome threads (not a very reliable option due to frequent breaks);
- Based on carbon fiber (such elements are traditionally considered more reliable).
By heating zones:
- Heating of the seat plane only;
- Heated seat and lumbar area.
According to the operating modes used:
- With manual on/off;
- With the ability to change power;
- With automatic activation after sitting on the seat;
- With automatic maintenance of the set temperature (usually used in standard systems).
- On top of a decorative cover (the simplest option);
- The heating elements are hidden under a cover.
It should be recognized that the standard heating system of the latest VAZ models is very reliable and, as a rule, is capable of operating without breakdowns for many years. The size of the heating elements for such standard systems is 5x30 cm and they are equipped with built-in thermostats that provide an average temperature ranging from 25°C to 31°C.
In recent years, you can find standard heating systems of a universal type, namely, those that allow you to heat both the seat and the lower back. Meanwhile, both the simplest and universal options are almost identical in their installation method, and in general, this procedure can be divided into two main stages:
Summary
The technology for installing heated front seats on the Lada Granta consists of two stages: installing heating elements under the factory seat covers and connecting them to the on-board electrical network. The proposed electrical circuit organization scheme raises doubts.
The manufacturer of the branded kit suggests connecting the heaters directly to the buttons, and powering them from the alarm control button. Since the circuit is quite loaded, it is better to organize the heating power through two relays with a separate fuse. It is also advisable to replace the buttons - they do not indicate the operating mode.