Preparing to set the headlights correctly
If you decide to adjust the headlights yourself at home, you must do this either at night or in cloudy weather. This will make it possible to significantly better determine the installation angles of the optics by eye. In addition, you will need to perform several preparatory steps:
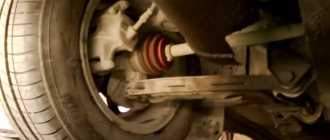
- carry out diagnostics of the suspension to make sure it is in good condition. It is better to correct all problems immediately in order to achieve the most accurate tuning results;
- check the pressure in the wheels and, if necessary, inflate them to the required level;
- place a load weighing 50-80 kilograms in the driver’s seat;
- dismantle the optics lining;
- fully refuel the car, and also secure the necessary cargo in specially designated places - a jack, a spare tire, tools used when traveling.
In the next step, you will need to mark up the screen.
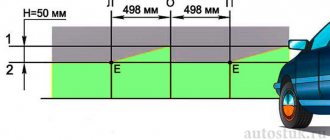
A pre-prepared sheet of plywood 1.7-2 meters long and 1 meter high can be used as it. You can also make adjustments in front of a solid wall or in front of a garage door. For the most accurate settings, it is advisable to mark the screen as shown in the diagram above. However, you can do without this, but in this case you are unlikely to be confident in the high accuracy of the procedure.
How to adjust headlights on a VAZ-2106
If you made markings according to the diagram, then it is necessary that the distance between the marks coinciding with the centers of the external optics is 118 centimeters. Having achieved this, perform the following steps:
- cover one of the headlights with cloth or cardboard and activate the low beam;
- using a Phillips screwdriver, turn the adjustment screw so that the horizontal border of the light beam coincides with the bottom line on the plywood or wall;
- using another adjusting screw, we ensure that the intersection point of the inclined and horizontal boundaries coincides with the vertical line of the center of the optical equipment;
- We repeat the procedure for another external headlight of the car, having previously covered the already adjusted optics with cardboard or thick cloth;
- turn on the high beams, close both external headlights and ensure that the light beams of the internal optics coincide with the corresponding lines on the screen.
As you can see, everything is quite simple. The adjusting screws make it possible to center the headlight beam, eliminating the situation in which the optics will illuminate the road surface or the space high above the car. A special screw located directly above the lights allows you to easily adjust the vertical position of the light beam.
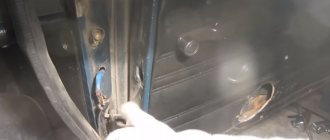
The adjusting screws are located in special seats located under the frame. That is why it is necessary to remove the cladding - this makes it possible to gain access to them.
If something doesn’t work out for you, then don’t be upset. At any time, you can use the services of professionals who, using special equipment, will adjust the headlights with the highest level of accuracy.
Adjusting headlights VAZ 2106
Wiring diagram for turning on the headlights of the VAZ 2106: 1 – headlights; 2 – fuse block; 3 – speedometer with high beam headlight indicator; 4 – relay for turning on low beam headlights; 5 – headlight switch; 6 – relay for turning on the high beam headlights; 7 – generator; 8 – external lighting switch; 9 – battery; 10 – ignition switch.
Headlight adjustment diagram for VAZ 2106
a – external headlights; b – internal headlights; 1 – horizontal line corresponding to the centers of the headlights; 2 – line passing through the centers of light spots; A and B – vertical lines corresponding to the centers of the external headlights; C and E – vertical lines corresponding to the centers of the internal headlights; O – center line; h – distance of the centers of the headlights from the floor.
VAZ 2106 headlight adjustment
We check the correct adjustment of the headlights of the VAZ 2106 by the location of the light spots on the screen. We check and adjust the headlights on a flat horizontal platform. The screen can be a sheet of plywood (approximately 1.0 m high and 1.7–2.0 m long), a light building wall, a gate, etc. We place a fully fueled car with a jack, tools and a spare wheel secured in their regular places perpendicular to the screen at a distance of 5 m between it and the headlights. We check and, if necessary, adjust the tire pressure to normal. We put the assistant in the driver's seat. To ensure that the body takes the correct position relative to the wheels, we swing the car by the wing. We begin the adjustment with the external headlights. We mark the screen with chalk, as shown in Figure a. The distance between the marks on the screen corresponding to the centers of the external headlights should be 1180 mm. Cover one of the external headlights with a piece of cardboard or fabric and turn on the low beam
Using a Phillips screwdriver, rotating the adjusting screw located above the headlight, align the horizontal border of the light beam with the bottom line on the screen. The headlight frames have special recesses for access to the adjustment screws. If one of the screws is closed, remove the frame
By rotating the second adjusting screw, located, when looking along the car, to the right of the right headlight (to the left of the left), we align the point where the light beam breaks (the intersection of the horizontal and inclined boundaries) with the vertical line of the center of the headlight on the screen. We also adjust the outer headlight on the other side of the car. We mark the screen as shown in Figure b. The distance between the marks on the screen corresponding to the centers of the internal headlights is 840 mm. Cover the outside headlights with cardboard or cloth and turn on the high beam headlights. By alternately closing the internal headlights and rotating the adjusting screws, we set the center of the light beams, as shown in the figure.
Adjustment procedure
The whole process can be divided into three parts:
- Lamp markings
- Markings on the wall
- Setting low beam lamps
From this article you will learn how to set up and adjust the headlights yourself. Before starting work, be sure to check the following components of your car: suspension springs, tire pressure, tire sizes, since the direction of light directly depends on their condition. If these parts are faulty, the angle and quality of adjustment may be affected.
What will you need?
- Chalk, glowing tape or something else for marking
- Flat wall
- At least 8 meters of vertical surface in front of the wall
First of all, you need to mark the adjustment screen. Since each car has its own body structure, the markings for each car are individual. However, in some cases, so-called universal machine marking methods are applicable.
Marking and adjustment process
Place the car close to a wall or vertical surface, and then mark the following data on it: the center of the car and the central axes of the lamps:
Now place the machine at a distance of 7.5 meters and draw a line on the wall connecting the centers of the lamps. Draw vertical lines through the center of the car and the center points of the lamps. It is also necessary to draw a horizontal line 7.62 cm below the line that connects the centers of the lamps:
If done correctly, your layout screen will look similar to the one shown in the image above. Now turn on the low beam headlights and set them as shown in this diagram:
There is nothing complicated in the adjustment process itself, you just need to turn the adjustment screws to achieve the best result. The adjustment screws are located on the back of the headlights. The above method works for headlights with combined low and high beam. This means that when adjusting the low beam lamps, the high beam will be adjusted automatically. For headlights with separate high beams, the settings and screen layout are slightly different:
When adjusting the low beam lamps, you can follow the diagram described above; the high beam lamps will have an even circle with center D:
By following these instructions, your car's headlights will be adjusted correctly, and you won't have to worry about dazzling oncoming drivers. It is also worth noting that it is impossible to achieve ideal placement of light beams without special equipment.
Headlight faults and repairs
An unpleasant feature of the headlights on a VAZ is the gradual decrease in the quality of light. In 70% of cases, drivers notice that the lamps have stopped shining normally when the glass on the headlight has already become cloudy by 30 - 40%. Clouding of the bulb on a halogen lamp is the second reason for the decrease in illumination. If the headlights and headlights in your car stop working, there may be several reasons:
- The light bulb itself burned out.
- The fuse or fuse box has failed.
- Burnout, rupture of the electrical wire.
- Oxidation of contact tips, current does not pass through the circuit.
- Loosening of the electrical wire fasteners.
- A breakdown of the switching relay or oxidation of a specific contact of the steering column switch is observed if there is no switching from high beam to low beam and vice versa.
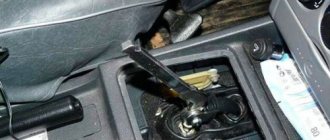
The six is equipped with a three-lever switch for adjusting the headlights. If the levers sink and do not lock, the part must be replaced.
How to disassemble a headlight
Analysis is carried out in 10 minutes. The glass is glued to the reflector, you need to heat the sealant that holds the block around the perimeter, then use a flat screwdriver or knife to pry the glass and remove the element. Installation of glass is carried out using soft glue in the reverse order.
Some drivers heat the headlight with a hairdryer, lamp, or steam bath. If you use a lamp, there is a possibility of overheating the glass. Acrylic parts may further become cloudy if the temperature exceeds 70 degrees.
Replacing light bulbs
Replacing low beam bulbs begins with dismantling the headlight trim. The plastic cover must be pryed off with a screwdriver and removed from its seat. The block is located closer to the edge of the car and is carried out in stages.
Before starting any work related to replacing lamps, checking electrical wiring, or repairing headlights, you must remove the negative terminal from the battery:
- Loosen the three mounting screws holding the headlight rim. Do not remove the screws completely.
- Take the headlight in your hand, turn the loose rim, the screws should come out of the grooves.
- Remove the rim, take out the diffuser; the element is held by the rim and falls out along with it.
- Pull the headlight with the block out of the niche, remove the plug of the power supply wire.
- Disconnect the fastener.
- Remove the used bulb from the headlight.
Install the new part and reassemble the headlight in the reverse order. After installing a new element, it is necessary to correct the geometry of the light beam.
It will be useful: What is the volume of the fuel tank on the Lada Vesta: characteristics
Headlight corrector and repair
A luminous flux corrector, or more simply a headlight corrector, will allow you to adjust the headlights if the vehicle's ground clearance has changed due to a loaded trunk. In this state, the car tilts backwards, the high beam headlights lose adjustment, blind oncoming drivers and do not illuminate the first 10 meters in front of the car. The light from nearby lamps poorly illuminates the roadside and is scattered.
The adjustment is carried out manually; the part will allow you to lower the light beam down when the trunk is loaded and align the beam for normal mode. For the VAZ 2106 there is an option to use electric correctors. The position of the reflector is adjusted through a servo drive, which changes the angle of inclination of the reflector through a worm gear.
Cleaning the optics
Despite the fact that the internal headlamp unit is protected by a waterproof housing, additional gaskets and hermetically sealed, the optics must be cleaned both outside and inside. External cleaning, polishing, and application of protective varnish are carried out quite often and do not require dismantling the diffuser.
Internal cleaning must be carried out at least once every 6 months, preferably when replacing a light bulb.
You can clean the internal parts from dust using non-abrasive products that do not contain alcohol. Micellar nail polish remover is most often used. It is necessary to remove the lamp, pour diluted liquid and plain water into the block in a 1:1 ratio and shake the block well. Rinse with clean water and dry.
If acrylic glass has lost its transparency, polishing and varnishing are used.
Headlight electrics
The electrical circuit for connecting lamps on the VAZ 2106 is simple and reliable. The circuit uses only the necessary circuit elements with a minimum of sensors and fuses. The power supply is checked by testing the electrical wire with a voltmeter if the light bulb, relays and fuses are working correctly, but there is no road lighting.
The electrical circuit of headlights for Zhiguli includes the following elements:
- headlight units;
- accumulator battery;
- generator;
- ignition;
- fuse box for each lighting element;
- indicator light on the dashboard;
- steering column switch for low/high beam;
- low/high beam relay;
- external lighting switch.
Understeering's shifter
The driver switches the low beam to the high beam independently, through the steering column switch. In this case, you must first turn on the outdoor lighting button. If the exterior lighting is inactive, the driver can use the high beam briefly by pulling the switch lever towards himself. The high beam headlights blink due to the fact that the switch contact is powered directly from the ignition switch.
The steering column switch is attached via a clamp to the steering column bracket and has three operating modes: low, wide, high. The main malfunction in the operation of the tube is considered to be melting, oxidation or burnout of contacts, or a crack in the housing.
During repairs, it is necessary to disassemble the steering column, check the wiring and examine the contacts.
Headlight relay
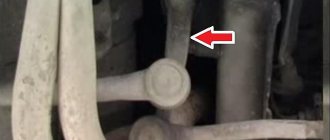
In the electrical network of Zhiguli, a relay of type 113.3747–10 is used; on earlier brands, GOST RS-527 relays are installed. The blocks are located in the engine compartment on the mudguard on the right. The low and high beam relays have the same parameters and characteristics:
- Voltage – 8 V.
- The distance between the contacts is 2 mm.
- The maximum winding resistance is 85 Ohms.
The contacts close when the optics are turned on. Relay repairs on the VAZ 2106 are not carried out; the element is simple and cheap; replacement is carried out independently and takes up to 15 minutes.
Adjusting headlights on VAZ 2103, VAZ 2106
Welcome! Headlights - sometimes you are driving along the highway and your eyes are very blinded by a car passing by, but the one who is driving this car is unlikely to think about whether other drivers will perceive his headlights turned up well, so to prevent this from happening, as they say, it is necessary always start with yourself first, and then move on to other people. So where we stopped: “Oh, yes, the headlights are pulled up,” but not every owner knows how to adjust the headlights on their car, so in most cases people have to drive with low-pubescent headlights, which makes it very difficult to see the road, or very raised headlights, so that in the future you can change the direction of light that the headlights give, then to do this, read this article, which describes in detail the entire adjustment process.
Note! To adjust the headlights, you will need to take with you: A screwdriver, as well as a dark rag to cover one headlight with it when adjusting the other, since all headlights are adjusted individually, and not entirely!
And also for adjustment you will need to stock up on: Regular chalk in order to apply markings to any structure, but this is at your discretion, since the headlights can also be adjusted by eye!
Summary:
How to Improve the Headlight Light on a VAZ 2106
Adjusting headlights on VAZ 2103, VAZ 2106
Welcome! Sometimes the lights are on the road, and the eyes are very dazzled by the passing car, but those who drive this car are unlikely to think about whether other drivers will perceive its inverted headlights, so it was not like they always say from the very start and then move on to other people. So we ended up with "Oh yeah, the headlights are on" and that's why not every owner knows how to adjust the headlights on their car, so most of the time people have to drive with low headlights, which is why the road is very difficult to see or is located on high headlight heights, so you can change the direction of the headlights in the future, then read this article for detailed information, which details the entire installation process.
The note! To adjust the headlights, you need to take a screwdriver and a dark cloth to cover one headlight while adjusting the other, because all the headlights are installed one after the other, not all of them!
As for adjustments, you will need to stock up on: regular chalk to mark the building, but this is not necessary as the headlights can also be adjusted by eye!
Result:
How to adjust headlights on a VAZ 2103, VAZ 2106?
The note! Before starting tuning, be sure to wait until it is dark or, if this is not possible, adjust the headlights in any dark room, say, in a garage, but the car should be neat, not driver-friendly. seat, a person weighing about 75 should sit. kg, and when adjusting the pressure on the wheels, you also need to fix it!
Adjustment: 1) To adjust the headlights, first consider whether you are adjusting the headlights on the inside (bottom up) or outside (bottom down).
2) Say the light sources you found, and then draw on a certain structure with regular chalk here: This is the diagram for adjusting the external headlights:
Or here to configure the interior lights:
The note! The coordinates of these diagrams are: Figure 1 shows a horizontal line corresponding to the center of the headlight. 2, 3. Line passing through the centers of light spots. A and B, C and E are also vertical lines corresponding to the centers of the headlights. And the letter O. This is the center line!
How to adjust the headlights on a VAZ 2103, VAZ 2106?
Note! Before you start adjusting, be sure to wait until it is dark, or if this is not possible, then adjust the headlights in some dark room, for example in a garage, but in this case the car will only have to stand level and sit in the driver’s seat. a person whose weight is about 75 kg and when adjusting the pressure in the wheels should also be brought back to normal!
Adjustment: 1) In order to adjust the headlights, first think about which headlights you will start your adjustment with, from the internal ones (lower-upper figure) or from the outer ones (lower-lower figure).
2) Let’s say you’ve figured out the headlights, then on some structure, draw with regular chalk the following diagram for adjusting the external headlights:
Or this one for adjusting the interior headlights:
Note! Coordinates on these diagrams: number 1 is a horizontal line that corresponds to the center of the headlights. 2, 3 is a line that passes through the centers of the light spots. A and B, C and E are also vertical lines that correspond to the centers of light of the headlights. And the letter O is the center line!
Adjustment procedure
The whole process can be divided into three parts:
- Lamp markings
- Markings on the wall
- Setting low beam lamps
From this article you will learn how to set up and adjust the headlights yourself. Before starting work, be sure to check the following components of your car: suspension springs, tire pressure, tire sizes, since the direction of light directly depends on their condition. If these parts are faulty, the angle and quality of adjustment may be affected.
What will you need?
- Chalk, glowing tape or something else for marking
- Flat wall
- At least 8 meters of vertical surface in front of the wall
First of all, you need to mark the adjustment screen. Since each car has its own body structure, the markings for each car are individual. However, in some cases, so-called universal machine marking methods are applicable.
Marking and adjustment process
Place the car close to a wall or vertical surface, and then mark the following data on it: the center of the car and the central axes of the lamps:
Now place the machine at a distance of 7.5 meters and draw a line on the wall connecting the centers of the lamps. Draw vertical lines through the center of the car and the center points of the lamps. It is also necessary to draw a horizontal line 7.62 cm below the line that connects the centers of the lamps:
If done correctly, your layout screen will look similar to the one shown in the image above. Now turn on the low beam headlights and set them as shown in this diagram:
There is nothing complicated in the adjustment process itself, you just need to turn the adjustment screws to achieve the best result. The adjustment screws are located on the back of the headlights. The above method works for headlights with combined low and high beam. This means that when adjusting the low beam lamps, the high beam will be adjusted automatically. For headlights with separate high beams, the settings and screen layout are slightly different:
When adjusting the low beam lamps, you can follow the diagram described above; the high beam lamps will have an even circle with center D:
By following these instructions, your car's headlights will be adjusted correctly, and you won't have to worry about dazzling oncoming drivers. It is also worth noting that it is impossible to achieve ideal placement of light beams without special equipment.