What are injectors? How it works?
Most modern cars have a special fuel supply system - injection. In fact, the injector is a much simpler element than the carburetor, but for the uninitiated and inexperienced person, little will be clear if it breaks or partially ceases to perform its functions. This part of the car is connected to complex electronics, which allows you to dose the supply of fuel fluid. That is why there can be much more problems with the injector than with the carburetor.
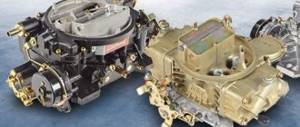
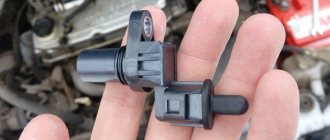
Fuel injector device
One of the elements of the entire injector system is the fuel injector. There is a small needle valve inside it. It is held closed using a special spring. If a signal is received from the electronic control unit, the valve can open - this is how fuel is supplied by the atomization process. Next, the fuel is burned in the combustion chamber.
Cleaning injector nozzles
The main causes of clogged injectors
The nozzle, like any other element through which any substance is supplied, can become clogged. From the inside, accumulations of carbonaceous substances form on its surfaces, which can subsequently clog the fuel outlet channel itself. As a result, the injector valve begins to work poorly and opens for too long, resulting in a large volume of fuel being injected at once.
Why is injector cleaning necessary?
As a result of such a disrupted process, the fuel mixture entering the combustion chamber becomes oversaturated. Ignition begins to occur incorrectly, and such a characteristic symptom as misfire appears. Next, unburned fuel penetrates the exhaust system and begins to burn inside the catalyst, which in turn also becomes clogged. The result of all these processes is a noticeable and obvious decrease in power, an increase in fuel consumption, and emissions become more toxic.
Causes of injector contamination
On a note! Poor fuel and impurities in it, short trips, as well as difficult operating conditions of the entire vehicle can cause deterioration in the condition of the injectors. And, of course, the lack of proper vehicle maintenance.
Injector flushing
Winns flushing fluid must be passed through the nozzle; to do this, the valve must be opened and closed. This operation must be done until liquid begins to spray from the nozzle. If you were unable to achieve this result, then most likely the element has already failed and needs to be replaced with a new one.
If you see large deposits inside the nozzles, you should leave the nozzles in the washing liquid for 15-20 minutes.
Only after this will it be possible to begin active washing. At this point, the flushing is completed; as a result, we get that the car’s fuel consumption will soon decrease and it will operate more stably.
We hope that the article was useful to you, now you know how to flush the injector with your own hands. We wish you success and that your car always runs smoothly!
When is it time to clean the injectors?
Understanding that injectors need cleaning is quite simple. The car begins to behave completely differently than it should. The main signs of the need for a “hygienic” procedure are as follows:
Signs of dirty injectors
- this will be indicated by the appearance of an error on the car’s on-board computer;
- problems with starting the car, especially noticeable in winter;
- slow speed increase;
- increased fuel consumption;
- reduction in power, the car does not “pull”;
- interruptions during idle operation;
- a clear feeling of the pedal sinking when you press the gas;
- exhausts become more “smoky”;
- the appearance of so-called detonation pops during acceleration.
Dirty fuel injectors
Advice! Vehicle manufacturers recommend cleaning injectors regularly - approximately every few thousand kilometers driven. And preventative work on the entire injector should be done every 5-10 thousand kilometers.
Table. Stages of nozzle clogging.
| Stage name | Explanation |
| First stage | The injectors still work tolerably, performance is reduced by only 5-7%. The car owner may not notice any obvious symptoms. The exception is an increase in gasoline consumption to 1-3 liters per 100 km. If bad gasoline is used, then detonation is present. |
| Second stage | The quality of injector operation becomes lower by 10-15%. The engine runs unevenly, “triple”. The release of exhaust gases may be accompanied by popping noises. Fuel consumption is very noticeable, the car accelerates worse and worse. Detonation is observed almost constantly. |
| Third stage | The injectors work terribly, their performance is reduced by up to 50%. The engine runs poorly; at idle, one of the cylinders may even fail. If you press the gas sharply, you can clearly hear a loud, characteristic pop in the air filter. All the other listed symptoms are obvious. |
Consequences of dirty injectors
If you want to make sure that the injectors require washing, you can contact a car service center to diagnose the condition. Now this service is available in almost all workshops. It is best to diagnose only the fuel equipment, but you can also undergo a complete diagnosis of the vehicle.
Do-it-yourself injector cleaning
It is important to understand that failure to promptly eliminate the identified causes may lead to the fact that the injector will have to be replaced completely, and not just cleaned or replaced the injectors themselves. This means that there will be large expenses. Getting your injectors in order will be much cheaper, or even free, if you know how to do it.
Why flush the injector?
But now I will express my opinion on this matter in more detail.
Let’s start with the fact that I don’t quite understand the expression “wash the injector”, wash the nozzles on the injector”, “injector-injected car” and the like. What is an injector? Injector in translation ( injector ) is a nozzle. Just a nozzle.
Now let’s write these expressions in translation - “rinse the injector” (one??? Maybe it would be more correct to rinse the injectors?), “rinse the injectors on the injector”, “injector car”. Sounds like complete nonsense to me. And the meaning is even crazier
It is more correct, in my opinion, to put it this way: “wash the injectors on a car with an engine management system”
But washing the injectors without removing them from the car is an ineffective measure. Therefore, I only wash the injectors when removing them from the engine. This way you can visually evaluate the spray pattern of the injectors and check their shut-off properties. Look them in the eye, so to speak.
You can read about this in the article How to clean injectors
So why “wash the injector without removing the injectors”?
The fact is that this procedure is necessary not only on injection engines (engine with a control system), but also on carburetor engines (without an engine control system)
Do you get the point? This flush is also intended for carburetor engines, although there are no injectors. So what is there to rinse? And during this procedure the valves and combustion chamber are washed.
This is what we will be doing next, and not flushing the injector, as many people think. After all the procedures, I, dear Friends, will show you the result in numbers, so to speak.
Okay, it’s clear that we will wash the valves and combustion chambers. But why? What's so scary about it?
It's all about the design and operating principle of most injector engines.
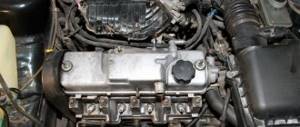
Injectors replaced carburetors primarily for environmental reasons. By using the engine management system, emissions of harmful substances can be reduced. The injectors also made it possible to make the intake manifold dry and provide a more uniform fuel supply to each combustion chamber, which was not possible to achieve with a carburetor.
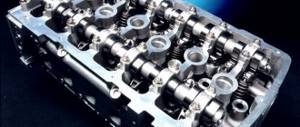
So here it is. The injector delivers fuel on our engines not directly into the combustion chamber, but into the intake manifold next to the intake valve. This is a very smart solution, since it is not gasoline that burns in the combustion chamber, but gasoline vapors with air. This is where “valve injection” plays a very important role, since the valve is hot, the fuel hitting it very quickly evaporates and mixes with air. This is very good.
But there is also another side to the coin. You always have to win something and lose something. So it is in this case.
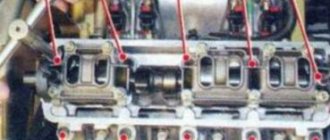
When fuel hits a hot valve, it inevitably leaves traces of scale, all kinds of sediment, deposits, etc. on it.
Over time, the valve becomes more and more overgrown with this muck. And this muck, in turn, interferes with the evaporation of fuel. As a result, mixture formation is difficult, engine starting takes longer, and the opening time of the injectors at idle increases from 2.5 ms to 3, or even 4 ms. Hence the increased consumption, loss of throttle response at low speeds and other delights.
Carbon deposits in the combustion chamber also do not bring anything good. In particularly advanced cases, it can even lead to detonation, which is a direct threat to the engine.
So think about it - do the engine good now or continue to doubt the usefulness of this procedure
In order to more realistically demonstrate to you the result of flushing the valves, I washed the injectors in advance by removing them from the engine, and also did diagnostics of the engine before flushing, during flushing and after flushing. I also unscrewed one candle for a clear picture of what was happening. You don't need to do this.
So, let's go.
Types and methods of washing injectors
If, after independent or service diagnostics, it becomes clear that the reason for the car’s “bad behavior” is precisely the contamination of the injectors, then they need to either be replaced completely, or cleaned and returned to their functionality. Depending on the condition of the injectors, as well as a number of other reasons, cleaning can be done either without removing the engine or with its complete dismantling . In general, there are three main cleaning methods, which, depending on the method of application, can have several subtypes.
Methods for cleaning injectors
Flushing with additives
This is the simplest method, which does not require any knowledge from the motorist, except that you need to know where the gas tank is. To clean injectors using additives, just buy a product specially designed for this and pour it into the gas tank before filling it with fuel. After filling, you should drive a little along the highway, and not turn off the engine or stand in traffic jams. This method is very mild and is suitable only in uncomplicated cases.
Flushing injectors with additives
On a note! Most motorists do not consider the method with additives as an option for cleaning injectors at all and use it, rather, as a prevention of problems.
Cleaning injectors using additives
An additive added to fuel can eliminate various deposits on almost all elements of the fuel system. The gas tank, the injectors themselves, and other parts become cleaner . Using additives is as easy as shelling pears, but they also have a drawback - if the car has a high mileage, then a lot of dirt has accumulated inside the fuel system. And in this case, all the dissolved dirt from the gas tank will go straight to the injectors, clogging them even more. Otherwise, this is probably the cheapest cleaning method, although not ideal. There is no need to contact a car service.
Negative consequences of using additives
Ultrasonic cleaning
Another option for cleaning injectors is the ultrasonic method. It is not difficult to guess that it is based on exposure to ultrasound. In this case, the procedure is carried out in a service center - it is unlikely that you have special equipment in your garage to carry it out.
Ultrasonic cleaning of injectors
During ultrasonic cleaning, the nozzles will need to be removed. It makes no sense to discuss this process in detail in the article, since it occurs differently for all brands and models of cars. Next, the removed nozzles are placed in a special ultrasonic bath. Flushing occurs as a result of the cavitation effect.
Ultrasonic cleaning device for injectors
Washing takes place in several cycles. The first is the most gentle and is produced at low capacity. Then the injectors need to be installed on a special stand, where their ability to atomize fuel and performance will be tested. These cycles will alternate until the difference in performance is low at 1-3%. After this, if necessary, O-rings and fresh filters are also installed on the injectors.
On a note! In this way, it is sometimes possible to “reanimate” even completely “tired” injectors and return them to functionality.
Washing injectors in an ultrasonic bath
It is very important to understand that the ultrasonic method is not always good. It is ideal for old cars, in which all elements are made to last. New injectors are often so fragile that exposure to ultrasound can lead to their irreparable destruction. As a rule, a lot will depend on how experienced the technicians are in the service. They will be able to select the optimal ultrasound mode for a particular car and will ensure that ultrasonic cleaning goes smoothly.
Ultrasonic cleaning of fuel injectors
Flushing using special fluids
There are also other options for cleaning injectors, either by removing them from the engine or without this cleaning step. In the second case, a special washing installation is connected to the system. At this time, the normal gasoline supply system will be turned off, and only a special flushing liquid will flow through the nozzles. The quality of the flush will depend on the type of liquid used, as well as the duration of the procedure.
How to clean injectors with a special liquid
Important! Flushing must not get into the fuel tank! Otherwise, it will dissolve all the deposits inside it, which will then “safely” clog the filters and mesh inside the tank. As a result, you will have to change the fuel pump.
Table. Flushing liquids.
| Name | Characteristic |
| Wynn's | This is one of the best liquids. It does an excellent job, however, the candles will have to be changed after using it. But all the soot will go away. Suitable for cleaning injectors in old cars, but it is not advisable to use it on new ones. |
| Lavr | Very expensive, but good cleaning. It is used very rarely precisely because of the price. Its characteristics are very similar to the first one. |
| Liqui Moly | This washing liquid is considered gentler than the first one in the table. However, unlike Wynn's, it will not remove carbon deposits on the valves. But it is suitable for use on absolutely any car - there is no need to be afraid that it will spoil something. |
| Carbon Clean | The golden mean is a good washing liquid with average characteristics when compared to Liqui Moly and Wynn's. |
Liquid for washing injectors
Washing injectors with liquids is unlikely to cause harm to the injectors if the liquid itself is chosen correctly. This is where you need to approach with all your attention. Otherwise, there is no need to worry. The procedure will clean not only the injectors, but also the engine and the fuel combustion chamber.
Chemical cleaning of the injector
Methods for chemically cleaning an injector include not only the use of the liquids described above. There are, for example, special fuel additives that to some extent clean the injectors and remove carbon deposits from the valves. But this is more of a preventive remedy; in case of severe contamination, it is not very effective.
Washing injectors without removing them from the engine consists of a number of steps.
- First of all, you need to turn off the fuel pump. To do this, it is enough to wait until the engine stalls on its own while the engine is running. The pressure in the fuel system will be relieved, you can begin to perform the main stages of work.
- Next, you need to connect the homemade installation hose and tighten the connection with a clamp. The clamp should fit securely enough so that there is no rupture during operation. The pressure in the system will reach approximately three atmospheres, so you should be careful.
- Return overlap. If this is not done, injector cleaning fluid may enter the tank, which is undesirable.
- Filling the flushing liquid into the container intended for it.
- Connecting the liquid pump to the power supply.
- Main stage. Before flushing the injectors, you should once again make sure that all connections are secure. At this stage, an assistant is needed to start the engine. Now you should start the liquid pump, bringing the pressure to three atmospheres. That's it, the cleaning process has begun. Depending on the amount of flushing fluid used, cleaning the injectors will last from ten to twenty minutes. The standard amount of Vince per car is 500 milliliters. You just need to wait for it to end.
- Visually check the exhaust. If cleaning is effective, there should be no smoke at the end of the injector flushing process.
- Replace spark plugs if necessary.
- Finally, you need to turn off the homemade injector washing device and restore the system, that is, connect all the hoses, connect the fuel pump fuse, and the like.
- Check engine operation after flushing. If previously detected problems no longer appear in any way, then the flushing was carried out effectively.
Experts say that high-quality injector flushing can significantly reduce fuel consumption. It would probably be more correct to consider bringing fuel consumption back to normal. In any case, there is the possibility of significant savings on gasoline or diesel fuel.
Self-cleaning of diesel injectors is carried out in exactly the same way as flushing gasoline injectors. The homemade installation described above is quite suitable, and so is the operating algorithm. Of course, cleaning diesel injectors requires careful selection of flushing fluid and a certain amount of accuracy in work.
You can also wash the injectors yourself by removing them from the engine. There is a special spray for this, and the cleaning installation is different from the one described above.
You can wash the injector with your own hands this way, and quite effectively, but it is a longer and more complex process.
Self-cleaning of injectors, video:
Cleaning injectors with your own hands without removing them
In most cases, you can clean the injectors yourself; you do not always need to contact a car service to solve this problem. Plus, the service often costs unreasonably a lot of money. Let's consider the option when the injectors are washed without removing them from the engine, using the Passat B5 as an example. To do this, you will need to purchase 1 liter of flushing fluid, 2 nipples, a drill, a hose with a diameter of 12 mm and a length of 1 m, a couple of clamps, ordinary plastic bottles of 1.5-2 liters and a compressor-pump.
Cleaning injectors without removing them
Step 1 . First you need to take the bottle and make two holes at the bottom and in the neck using a drill. One of the nipples must be installed in the bottom of the bottle.
Drill holes in the bottle
Install nipple
Step 2 . Next, the nipple needs to be placed in the neck. Only the valve should be removed immediately, otherwise it will not allow the rinse to flow out of the bottle normally.
Place the nipple in the neck of the bottle
Don't forget to remove the valve
Step 3 . The “system” for flushing is almost ready. The bottle now looks like this.
This is what the finished system looks like
Step 4 . Then you need to attach the hose to the nipple installed in the neck of the bottle, and be sure to secure it with a clamp. The flushing system is ready.
Connect the hose to the nipple
Secure the hose with a clamp
Step 5 . Now you need to disconnect the fuel supply and return (shown in the figure). But first you need to turn off the fuel pump by removing the pump fuse.
Remove the fuel pump fuse
Disconnect the return line
Step 6 . Next, you need to connect the hose from the bottle to the supply.
Find the supply hose
Connect the bottle to the feed
Step 7 . You need to connect a regular compressor to the back of the bottle and pump the structure up to 2 atmospheres. This needs to be done in order to make sure that nothing is “poisoning” anywhere.
Connect the compressor to the bottle
Step 8 . You need to connect another bottle to the return line through a hose.
Connect the second bottle to the return line
Step 9 . Now you need to open the package with rinse and pour it into the first bottle. You need to pour in a small amount - about 1/3 of the volume of the bottle.
Pour the rinse into the first bottle
Step 10 . After this, you need to connect a compressor to the bottle, and screw the bottle to the hose.
Connect the bottle to the compressor
Step 11 . The bottle needs to be hung on the open hood of the car, and then you need to pump 2-3 atmospheres into the bottle using a compressor.
Hang the bottle on the open hood
Step 12 . Next you need to start the car. If it works strangely, and before that 2 atmospheres were pumped into the bottle, then you need to add pressure to 3 atmospheres. The car should idle for 15 minutes. Then you need to turn it off for another 15 minutes, and then you need to finish off all the liquid remaining in the bottle. Then the car needs to be turned off again.
Increase pressure if necessary
Step 13 . The procedure must be repeated several times in several passes.
Repeat the procedure several times
Step 14 . After finishing washing, you need to return all hoses and the fuse to their place.
Reinstall all hoses
How to clean removed injectors?
This is a fairly simple procedure, but you will need to carry out a number of preparatory work and remove the injectors. We will not consider the removal process, because it happens differently for each car.
Step 1. First you need to make a stand on which the removed injectors will be mounted. It can be made from a board or a door removed from an old set.
Prepare a board for your stand
Step 2. Considering the size of the injectors, you need to make a small stand on which they can be fixed in a suspended state.
Make the necessary notes
Cut out the parts for the stand
Make a small injector stand
Step 3. This is what the stand should look like. The nozzles are already installed on it and are almost ready for washing.
This is what the finished stand looks like
Install flushing nozzles
Step 4. Under each nozzle you need to install narrow containers such as test tubes.
Place test tubes under the injectors
Step 5. Next you will need to make a flushing system. First you need to take a container into which it will be poured. By analogy with the previous instructions, you need to install two nipples in the lid and bottom of the bottle.
Take a bottle for the flushing system
Install nipples
Step 6. The bottle must be brought to the nozzles using a piece of hose. The injectors also require a 12-volt, 8-amp power supply to be connected.
Bring the bottle to the nozzles
Connect the power supply
This is what the finished diagram should look like
Step 7. Regular pharmaceutical Dimexide will be used as a rinse. The bottle is filled with it, and a compressor is connected to its second nipple.
Fill the bottle with Dimexide and connect it to the compressor
Step 8. Next, you just need to turn on the system and observe the process of cleaning the injectors. By the way, if you have test tubes, you can also evaluate how the injectors themselves work.
Turn on the flushing system
Watch the cleaning process