The safety of the driver and passengers directly depends on the serviceability and quality of lighting. In addition, tuning headlights for a VAZ 21099 car affects the appearance of the car, so drivers do optics tuning. The article is useful both for those who have encountered lighting problems and for those who have decided to make a tuned car.
Typical optical malfunctions and their elimination
The quality of lighting provides comfortable travel conditions. If the emergency lights work intermittently or the driver turns on the turn and the turn signals do not work, road users will not be able to find their way and an emergency situation on the road is possible. To avoid unpleasant surprises, you need to know the main lighting faults and how to fix them.
Replacing turn signals on a car
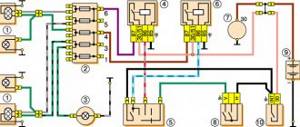
Some lights or lamps do not light - the bulbs are burnt out, the lamp socket is faulty, the fuses are blown due to a short circuit, or the wiring is damaged. The lamp, fuses are changed, the wiring is restored. Similar repair if the rear light does not light.
If the low or high beam headlights do not switch, it is possible that the switch contacts have oxidized or the relay has broken. In this case, the three-lever switch or relay must be replaced. If the emergency lights do not work - the VAZ emergency light fuse has blown or the relay is faulty, you need to install a new fuse or relay.
How to adjust the headlights on a VAZ 2108-VAZ 21099?
Note! The adjustment is best done in the dark or in the garage with the lights off and always on a flat surface without potholes or so-called bumps. And also if you want to make an adjustment, so to speak, purely according to GOST, then we recommend that in this case you stock up on chalk and, using it, paint the wall on which you will make the adjustment, like this:
By the way, regarding this photo above, it is added only once, so in order for us not to add the same photo to each place, we decided that you will (When necessary) be directed to it, in general, read the article below carefully and you will understand everything!
And in conclusion, you need to be warned that before you start adjusting, be sure to check the pressure in the wheels, and if you need it, then bring it to normal!
1) At the very beginning of the operation, stand from a flat wall in your car, strictly five meters away, and if you have the opportunity, then place a person weighing about 75 kilograms (or any kind of load) in the driver’s seat, this is necessary in order for the adjustment to be more successful.
2) Then, with chalk, paint the wall according to the photo above, if you need it, if you are not going to draw anything, then at least visually imagine on the wall on which you are making adjustments, this diagram shown in the photo.
Note! By the way, pay attention to the letter “h” in the photo above, this letter indicates the distance of the center of the headlights from the floor!
3) Then sit in the car and turn the lever of the hydraulic headlight leveler and place it so that it is in the “driver and front passenger” position and then turn on the low beam of the car’s headlights.
4) Next, look in your car for a dark rag through which the headlights will not pass through, so cover one of the car’s headlights with this rag, because adjustments must be made for each headlight separately.
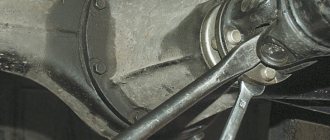
5) Now go to the engine compartment and there on the back of the headlight you will see two adjusting screws, one of them under number 1 regulates the light in the horizontal plane (that is, to the left and to the right), and the other screw under number 2 adjusts the light in vertical plane (that is, up and down).
Features of headlight adjustment
In order not to dazzle oncoming drivers, after replacing or repairing headlights, it is necessary to adjust the headlights. For this purpose, the car is installed on a flat horizontal surface five meters from a white wall or stand. A weight of about 75 kg should be placed on the driver's seat to replace the driver's weight. Markings are applied to the wall.
Markings on the wall for adjustment
The hydraulic corrector handle should be set to the “driver and front passenger” position. At the same time, the low beam turns on.
Each headlight needs to be adjusted. An unused headlight must be covered with a dense material that does not transmit light.
The headlights are adjusted using screws. Light spots need to be adjusted to the markings on the wall. The adjusted light must meet the following requirements: the upper boundary of the light spots must be on straight line N, lines A and B, located in the vertical plane, must pass at the intersection points of light spots C1 and C2 (video author - Vladimir Sharkhun).
Adjusting headlights, VAZ 2108, 2109, 21099 cars
It is recommended that precise adjustment of headlight beams be carried out at specialized service stations. But even in “garage” conditions, you can independently set the direction of the light beams quite accurately so that the headlights shine correctly and do not blind oncoming drivers. On VAZ 2108, 2109, 21099 cars, adjusting the headlights is as easy as shelling pears.
The headlights have two adjusting screws that move the headlight up and down, left and right. By rotating them, you can independently adjust the correct direction of the light beams of the headlights.
Preparatory work
We carry out the adjustment in the dark.
To carry it out you will need:
- a car with a filled fuel tank and inflated wheels;
— a flat area (preferably near a wall or fence);
— a sheet of plywood measuring 2m/1m with applied adjustment markings;
— a tape measure and a sheet of cardboard for covering the headlights one by one.
How to adjust headlights
— Place the car on a level surface.
— At a distance of 5 meters from his headlights, we place a sheet with markings.
— We seat a passenger or put cargo in the front seat.
— We press the car’s wings from above several times to self-install the suspension.
— If you have a hydraulic headlight leveler, set it to minimum.
— Turn on the low beam headlights and cover the right headlight with a sheet of cardboard.
— Rotate screw “1” on the headlight (adjusting the light up and down).
We bring the upper corner of the light border to the horizontal line “C”.
— Rotate screw “2” on the headlight unit (adjustment left and right).
We combine the bend of the light beam boundary with line “B”.
We cover the left headlight with cardboard and make a similar adjustment for it.
Adjusting screws for the front headlight VAZ 2108, 2109, 21099
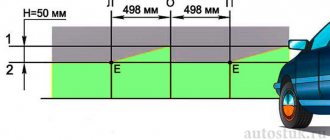
Screen parameters for adjusting the headlights of VAZ 2108, 2109, 21099 cars
Screen for adjusting headlights
“A” - a vertical line indicating the location of the low-high beam lamp of the left headlight.
“B” is a vertical line indicating the location of the low-high beam lamp of the right headlight.
“C” is a horizontal line indicating the location of the low-beam headlights.
“D” is a line indicating the height of the rise of the horizontal border of the headlight beams.
"O" is the center line.
“L” — the distance between the low- and high-beam headlight lamps is 950 mm.
“H” is the distance from the surface of the platform on which the car is installed to the low-high beam headlights.
Notes and additions
— Markings on a sheet of plywood (adjustment screen) can be made using a tape measure. In this case, you must first measure the dimension “H” from the low-high beam lamp in the headlight to the horizontal surface on which the car is installed.
TWOKARBURATORS VK -More information on the topic in our VKontakte group
More articles on VAZ 2108, 2109, 21099 cars
— Wires for headlights VAZ 2108, 2109, 21099
— Adjusting valves on the engines of VAZ 2108, 2109, 21099 cars
— “Bleeding” the brakes of VAZ 2108, 2109, 21099 cars
— Adjustment of the clutch drive of VAZ 2108, 2109, 21099 cars
— How to remove the headlight of a VAZ 2108, 2109, 21099 car
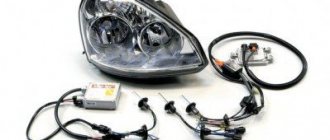
Optics tuning methods
Replacing the headlight glass of a VAZ 2109, tuning the headlights can be done by yourself if you have experience in such work and an electrical diagram of the equipment.
Black optics
To tune VAZ headlights black, matte paint is used. The optics are dismantled and the glass is separated. The inside of the headlights is coated with black paint. The turn signals are painted the same way. If they have glasses with a reddish tint, they are replaced with transparent ones. The glass is secured using sealant.
Tuning headlights VAZ 2109
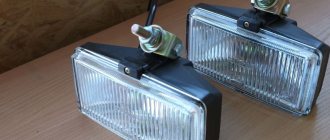
If necessary, fog lights are installed on the VAZ 21099.
Installation of fog lights includes:
- installing a button, first removing the grille and speaker;
- connection to the mounting block;
- attaching fog lights to the bumper.
Experts recommend installing tuning taillights, which should have seals in those places where the body comes into contact with the body. To install a tuning tail light, you need to remove the plastic panel, disconnect the connector, unscrew the nuts and install the headlight. The joints should be treated with sealant.
Car with "angel eyes"
For VAZ 21099, tuning can be done for headlights in the form of “angel eyes”. To make them, neon tubes are used, which are mounted on the headlights. The mechanism has a special ignition unit. It is possible to choose the color of the glow. The rings are fixed with sealant.
The LEDs will glow especially beautifully. Rings are made from plastic tubes, which can be shaped into any shape using a hair dryer and closed into rings. Connections of legs and wires are made with a soldering iron. In addition, you can make eyelashes on the headlights.
If the VAZ 2109 turn signals do not work or the turn signals work, but not all of them, there are other faults in the lighting, you want to tune your car or adjust the headlights, you don’t have to go to a car service center, you can do all the work yourself.
Sorry, there are no surveys available at this time.
How to properly adjust headlights
You have to make sure that even during rain or fog, the headlights remain clear and do not create a curtain. This will allow you to use the car more comfortably and not disturb other road users.
Correct operation of headlights on a VAZ-2109 is achieved as follows:
- Sit in the driver's seat and set the headlight adjustment control to the "driver and passenger" position. It is located immediately behind the steering wheel on the left.
- Turn on the low beam. Take an opaque material or thick cardboard and curtain one side.
- Open the hood. Locate the headlight protective housing. To the left and right of it are adjustment screws. Where and which screw you turn will change the direction of the light. Please note that below are the screws for the fog lights. In low beam mode, the upper limit of the light spots should reach the lower horizontal line. The inclined and horizontal intersection of the light spots must coincide with the point corresponding to the center of the lamps.
- Repeat this procedure for the second headlight. Look at their joint work, the beams of light rays should go parallel to each other, and the boundaries of the spots should not be at different levels.
To adjust the fog lights, you need to make additional markings on the shield. To do this, locate the centers of the lights used in the fog and draw horizontal and vertical lines through them. From the horizontal line passing through the central points, set aside 10 centimeters and draw a parallel line.
Adjustment of fog lighting is carried out according to the same principles as for conventional low beam lighting. The border of their light spots should reach the lowest line. It is also important to observe the correspondence of centers.
Home headlight adjustments are not accurate and should only be used as a temporary measure. Try to find time to go to a service center equipped with a special stand for adjusting the optics. Only an adjustment made by a specialist can be accurate, because when creating the diagram you could have placed the lines incorrectly.