In what cases may it be necessary to remove the rear bumper?
Replacing a bumper as a result of an accident
Considering the popularity of the Lada Granta car in our country, as well as in neighboring countries, you can notice that more and more copies of this car are appearing on the roads. This means that they “injure” their bumpers very often. So, it may be necessary to remove the bumper in order to replace it with a new one.
Removing the bumper is also appropriate when you want to replace it with another model, creating a new image for your car.
Replacing the rear fret bumper of the Grant liftback
Replacing the rear fret bumper of a Granta liftback. the extinguished boys are replacing the broken bumper for the first time, dismantling it.
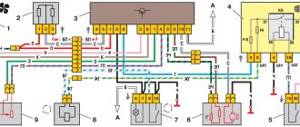
- Bolt diagram for flaps and bumper mounting to rear fender
- Three bolts securing the headlight to the car body
- The headlight is mounted on these latches
- Two screws securing the bumper under the headlights
- 8 rear bumper mounting points (4 freely accessible, 2 under the left headlight and 2 under the right headlight)
- The removed bumper lies neatly to the side
- Naturally, the installation of the Lada Granta bumper is carried out in the reverse order with strict adherence to all points.
Results
Replacing the rear bumper of a Lada Granta is a fairly simple task. You just need to take into account that the plastic from which the bumper is made can be easily broken. The same applies to fastenings. The fact is that screws made of metal can exert excessive pressure on the surface of the plastic, causing it to simply burst. To avoid this, you need to tighten the bolts with a certain force set on the handle.
But, in general, you shouldn’t have any problems with removing and then installing the bumper.
source
Tool
- The most necessary thing can be considered a regular screwdriver with a Phillips-type Phillips blade;
- also a wrench with a “10” head and a corresponding ratchet. The key can be open-end or cap.
- In addition, wrenches like TORX T-20 and TORX T-30 will be useful to us.
New Lada: Replacing the air filter on a Lada Granta with your own hands
Among other things, it would be a good idea to lift the car on a hydraulic lift, as this will give you access to the lower part of the mounts. If there is no such lift, then you will need to drive the car into a “pit” or overpass.
As a last resort, have a rag ready to lay on the ground.
How to remove the rear bumper on a Lada Granta: photos and videos
Domestic cars have finally become truly modern vehicles, the quality of which meets all the latest standards. However, breakdowns also occur on modern cars.
For example, you may need to remove the rear bumper on a Lada Granta as a result of its breakdown. To avoid hitting curbs, you can increase the vehicle's ground clearance. To do this, you don’t have to go to a workshop; you can do everything yourself in your garage.
Replacing the rear bumper of a Lada Granta with your own hands: video instructions
Every modern car model, regardless of brand, has a rear bumper that absorbs energy. It helps to avoid deformation of the body in case of minor “injuries”, taking most of the impact force upon itself as a kind of buffer. That’s why he himself always suffers first. Usually, a special amplifier is hidden behind the rear bumper, which is made of directionally located metal, which programs the initially designed deformation of the body upon impact in order to protect passengers in severe collisions.
How to remove the rear bumper on a Lada Granta?
- The first thing to do is remove the tail lights. This is done as follows. Remove the decorative cover under which the fasteners are located. Unscrew the three nuts with an “8” key. On the side, the flashlight is held on a rubber holder. We pull the lantern and remove it. We do the same in relation to the second lantern.
- After removing the lantern, you will see two 10mm bolts, unscrew them.
- Next, use the same key to unscrew two more bolts located in the center of the bumper.
- Under the rubber stop of the cover there are two more key screws at “13”; we also unscrew them.
- Using a “10” wrench, unscrew the three bolts that are located under the bumper.
- Next, take a screwdriver and free the bumper from the mudguards, unscrew the screws that secure them. We do the same with the screws that connect the bumper to the wing.
Now, in theory, nothing prevents us from removing the bumper...
How to remove the Lada Granta bumper, rear bumper of the Lada Granta Repair and service
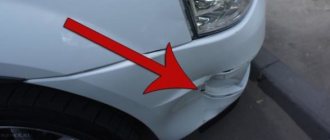
It is the bumper that is most often exposed to external influences than other structural elements: scratches from branches, high curbs, cracks from stones, damage in the event of an accident, etc. To repair or completely replace the Granta bumper, you will need skills in dismantling this part.
To dismantle the front bumper of the Lada Granta, you will need a small number of tools: a wrench No. 8, a Phillips screwdriver, a TORX T20 wrench and a socket head No. 10. All dismantling work is carried out only with the negative terminal of the battery removed. Before removing the bumper, you must first remove the license plate to gain access to the two bolts that hold the front bumper to its reinforcement structure.
Then, using a Phillips screwdriver, unscrew two side bolts in the arch above the right and left wheels, which secure the front parts of the fender liners to the bumper. Next, by opening the hood, four central and two side bolts are unscrewed in the engine compartment, attaching the bumper to the car body on top. From below, the bumper is attached to the fender liners and body using two screws and four bolts; they also need to be unscrewed.
On both sides of the bumper there are latches connecting it to the fender. By carefully pulling the edges of the bumper with a little force, you need to release the latches from their fixation sockets. After this, you should disconnect the wire connectors and completely remove the bumper from the Lada Granta.
The rear bumper is dismantled using the same tools, only instead of a T20 key you will need a TORX T30 key. Before starting work, you must first remove the rear fender liners on both sides, and then unscrew the two screws that secure the bumper to the wheel arches. The bumper is secured on the underside of the body with three bolts; they are unscrewed using a key.
In order to detach the rear bumper from the fixing elements along the perimeter of the body, you need to remove the rear lights. Access to the lamp mounts opens after removing the car trunk door trim. Having unscrewed the eight bolts securing the part to the body, you need to remove the side latches from engagement with the brackets, slightly move the bumper to the side and, having disconnected the wire connectors, finally remove the rear bumper from the Lada Granta car.
Direct dismantling process
It is important to remember that the mounting features of the front and rear bumpers are significantly different. So you need to focus only on suitable guides.
New Lada: Technical characteristics and equipment Lada Granta 2014-2017 5-door hatchback 1.6 8 cl. (87 hp) (Norma Comfort2)) manual transmission
To begin with, you will need to prepare an open-end or socket wrench with a “10” head and a ratchet, as well as a cross-shaped head. Try not to put TORX T-20 too far away. All these tools will be useful to you.
But TORX T-30 is not always needed, but only in some batches of the Lada Granta. Be extremely careful as careless movements may cause the latches to break.
Repairing plastic parts is very difficult.
- The first dismantling point says to remove the license plate of the car.
- Now remove the two mounting screws that you will find directly behind the license plate. For this purpose, you need to use a key with a “10” head.
- After this, twist the steering wheel as much as possible to get to the bolts above the wheels. They press the bumper on the arches. The steering wheel will need to be rotated alternately in one direction and the other to unscrew two bolts on each arch. This is where TORX T-20 type wrenches come in handy. Just remember that the bolts are not nearby. One of them can be found at the top, and the other almost at the very bottom.
- Next, you need to unscrew two more bolts that secure the front element to the fender liner on its lower part.
- There will be three more bolts at the bottom. When unscrewing them, you need to pay special attention to what type of crankcase protection is made. If it was not done at the factory, it can make removing the front bumper much more difficult. In this situation, you will have to disconnect the protection, placing any suitable object under it, so as not to render the rear fastenings unusable.
- Now try to pull the part out of the latches as carefully as possible. That's it, the bumper is completely removed.
If everything is relatively clear regarding the issues of dismantling the front bumper, then why such a procedure may be required still needs to be figured out.
Most often, the bumper needs to be dismantled in order to repair it.
The fact is that it is made of plastic, so it will be very easy to damage it. And, given some difficulties in welding plastic, the best choice would be to completely dismantle the bumper. In addition, if it is no longer possible to repair it, then you may need to completely replace this part with a new one.
New Lada: Do-it-yourself oil change in the Lada Granta automatic transmission
But, in addition to the real need to replace the bumper, its dismantling is also required in situations where you install a new tuned radiator grille or new “horns”.
In addition, the bumper will significantly interfere with the installation of fog lights. In any case, working with the body will be much more convenient without a bumper.
➤ How to remove the rear and front bumper of a grant liftback
Content:
Long-term operation of the vehicle over rough terrain, extreme temperature conditions, and aggressive driving style contribute to premature wear of the paintwork and peeling.
Ultimately, cosmetic repairs and a number of restorative procedures are required. Obviously, we are not talking about deformation, damage after an accident, collision, or traffic accident. In practice, based on the results of an inspection by a service station technician, a decision is made to replace the plastic “protection.” The cost of purchasing a new one is approximately comparable to partial repairs.
Characteristic differences between sedan and liftback bumpers
The front/rear “plastic” of both modifications is completely identical in terms of the mounting method. The main difference is in the exterior, color, and shape of the radiator grille. You can visually distinguish the first generation from the second by the color of the front grille of the cooling system.
In the first generation, she is in her original color - the natural color of plastic. In the second - to match the main color of the car. This rule also applies to the Grant liftback model, the so-called “bolt on” landing. This is such slang among motorists.
Typical bumper mounting locations:
- front: four bolts in the upper perimeter, two in the middle, four at the bottom, on each side;
- rear: two side fasteners, four upper and the same number of lower.
What is needed for a successful renovation
To remove the Grant liftback bumper you will need: a set of automotive tools, a Phillips-head screwdriver, rags, rust remover WD-40, restoration components.
The decision on the type of repair is made by the workshop specialist based on the results of a comprehensive diagnostic. If the impact occurred “head-on” at a speed of over 60 km/h, then replacement with a new one is guaranteed. When the scale of the damage is not large, the structure of the plastic fasteners is not damaged - restoration of the standard element is allowed.
Do-it-yourself front bumper removal
- We install the car on a flat platform, an inspection channel. In this case, it is not at all necessary to use an electric lifting mechanism;
- open the hood;
Unscrew the top row of mounting bolts (4 in total), two in the middle, four at the bottom.
First turn the steering wheel to the side for ease of work. We remove the front bumper of the Grant liftback, the dismantling process is completed. Subsequently, the master (car owner) carries out preventive maintenance, replaces the plastic product, and installs additional equipment as necessary.
Algorithm for step-by-step installation of the front bumper
- after diagnostics, prevention of fastening points, we install a new “plastic”, it must be painted in the original color of the car;
- we hang the upper perimeter, then the lower one, followed by snapping the plastic clips;
- Having made sure that the fit is tight, we proceed to fastening it with bolts.
DIY installation is complete.
Removing the rear bumper
The process is the same as above, except for the placement of the fasteners.
So, how to remove the rear bumper of a grant liftback:
- Place the car on a level platform, open the trunk lid;
- remove the plastic latch, remove the lamps, unscrew the three nuts, remove the left/right lamp one by one;
- Having done the work described above, we proceed to unscrewing eight bolts in the upper perimeter and four in the lower. First remove the mudguards in the wheel arches;
- Carefully tear off the plastic clips and remove the bumper.
We carry out planned work, preventive maintenance, cleaning, etc.
DIY rear bumper installation
Replacing the Grant liftback bumper, hanging the upper perimeter, snapping the side and bottom, tightening the bolts. At this stage it is important to maintain the integrity of the plastic clips. In case of damage or deformation, tightness to the surface is not guaranteed.
If you accidentally damage the clip, consult a specialist. Restoring without experience does not always lead to guaranteed success. Self-replacement of the rear bumper on a Lada Granta liftback is completed.
In what cases is it necessary to replace the bumper?
- the consequence of a frontal collision, an accident, when the structure of the plastic is deformed, standard fasteners are destroyed, subsequent use is not rational;
- manufacturing defects at the assembly line stage;
- negative consequences of operation in critical negative / positive temperatures;
- mechanical damage caused by the driver;
- combustion, melting;
- installation of tuning elements, local upgrade, insertion of non-standard designs.
Regardless of the type of damage, carry out preliminary diagnostics in order to assess the general technical condition of the machine, components, and assemblies. Based on the results, choose the recovery method.
Assess the condition of the machine either independently or by turning to service station specialists for help.
The concept and purpose of the front bumper amplifier on the Lada Granta
Many motorists practice strengthening the frontal structure of the car in order to minimize possible risks. One way is to install a metal amplifier. It is fixed on standard fasteners in the middle, covering the radiator and fan. A plastic bumper is placed on top of the metal tire. The location of the tire is secretive, invisible to the eye.
In the event of an accident or collision, the metal protection will take the blow, minimizing damage to the engine compartment. In the event of a frontal collision at a speed of no more than 50 km/h, the protection will maintain the integrity of the plastic. The maximum that can happen is damage to the paintwork.
| Catalog article / OEM number | Price, rub.) |
| 21900280313100 | 430 — 460 |
| 21900280313118 | from 450 |
| 21900280313279 | from 450 |
| (21911428459) rear bumper Grant liftback article number | from 4500 |
Subtleties that everyone should know about
If the plastic clips are damaged, tightness is not guaranteed. The gap at the joint will increase and waviness will form on the surface.
As soon as this is discovered, be sure that the clip is damaged. It is better to replace it with a new one yourself or contact a service center.
Reviews from car owner forums
flint334 (https://www.drive2.ru/l/8196664/): a new liftback from Grant is installed on the first generation. The car takes on a new look, streamlined, aerodynamic;
serov-ak: the side mirrors are especially attractive, they are larger, with an increased viewing angle;
Lucifer174: installation takes place within 10 minutes, fixation method is “bolt on”;
vellsvel (https://www.drive2.ru/l/6123257/): new bumper, electrically driven, heated mirrors, repeaters - this is luxury.
Procedure for work
Placing the vehicle within the perimeter of the repair area;
- Open the hood/trunk lid;
- Unscrew the mounting bolts one by one. In the case of the rear bumper, first remove the rear lights to provide access to the bolts;
- Remove the plastic bumper and carry out maintenance;
- Put on a new one and secure it with clips.
DIY installation is complete.
Bottom line The process of replacing the front / rear bumper yourself is not at all difficult. If you have tools, equipment, and spare parts, prevention will take no more than 15 minutes.
When it comes to the negative consequences of an accident, impact, collision, the time interval is impossible to predict.
Before removing the Grant liftback bumper, be sure to conduct preliminary diagnostics using digital scanners to determine the geometry of the body.
Video - Lada Granta rear bumper removal
Video - How to remove the rear bumper on a Lada Granta
Video - Result of replacing the bumper on Grant
Source: https://remont-avtovaz.ru/zamena-bampera-lada-granta-liftbek/
Procedure for dismantling the rear bumper
Once all the tools are selected and are in close proximity to you, you can begin to work. To do this, you will need to take a TORX T-30 wrench with a 10mm head, as well as a Phillips head screwdriver.
- Carefully remove the mudguards, if present.
- After this, you will reach a part, on both sides of which you can find a screw. They secure the bumper to the wheel arches. As you might guess, you need to unscrew the screws on both wheels.
- Now you need to remove three bolts at once that hold the bumper to the car body.
- After this, you will have access to the rear lights, which will need to be carefully removed. They are practically not held back by anything, so this should not be a problem.
- Unscrew the two screws under the headlights.
- Now comes the turn of the eight screws that secure the bumper to the top of the body. They are all located in one row. Just keep in mind that there are screws under the headlights. And, if you don’t unscrew them, the bumper will remain motionless.
- There are special latches on the sides of the bumper that secure the part to the car. You need to be very careful with them, as they are extremely easy to break. This is especially easy to do if the car has already been sitting outside for several winters.
- And only now can you carefully move the part away from the car body a short distance. But it should not exceed the size of the wiring harness that is located there.
- This tourniquet is carefully pryed off with a screwdriver or any other suitable object. It is important to carefully remove the harness from the rubber, as it is tightly packed into the body holes. If you cannot cope on your own, then you should call another person for help.
- Once the harness is within your reach, you can carefully unplug the wire blocks. This will turn off the license plate light and make it possible to remove the bumper completely.
Naturally, the installation of the Lada Granta bumper is carried out in the reverse order with strict adherence to all points.
DIY instructions for dismantling the rear bumper
For everything you need free time, skillful hands and a banal set of tools:
- TORX key T30 or T20 for a sedan - a star-shaped screwdriver;
- key to 10;
- Phillips screwdriver.
It is better to work with handyman gloves, since disassembling the car does not always happen immediately after washing.
Removing the rear bumper of the Lada Granta:
- Remove the rear fenders.
- There are a pair of screws underneath them on each side that help secure the bumper to the arches. We need to get rid of them.
- There is also a fastening to the body below – three bolts. They will have to be unscrewed.
- Remove lighting devices (lanterns). Their fastenings extend into the luggage compartment and are hidden under the trim.
- Additionally, the bumper is attached to the body with 6 or 8 bolts along the entire perimeter. They also need to be unscrewed.
- There are latches on the sides of the protective element. It is easy to disengage them by simply pulling correctly on the edge of the bumper.
- Move the part to be removed aside until the wiring harness is sufficient.
- The rubber seal of the above-mentioned harness must be pryed out of the body hole with a screwdriver. Then you will be able to pull the tourniquet out of it.
- Disconnect the connectors of the wires that lead to the license plate lights.
- Only now can you carefully remove the bumper itself from its rightful place.
- Sometimes it is necessary to remove the license plate light unit. To do this, you will need to unscrew the 3 screws with which it is attached to the protective element.
Installing a new or old bumper occurs in the reverse order.
You see - nothing complicated.
This described the option of removing the bumper from the Lada Granta liftback. The sedan is simpler in this regard and everything will go much faster.
The process seems intricate and dreary, but this is only at first glance. Almost everything is intuitive: you need to have knowledge of the theory, which is what we helped you with.