Transmission vibrations
This definition does not exist in mechanics, let it be a “popular name”. These vibrations can be divided into two large groups.
- First order. These are poorly balanced or broken cardans, shafts and, of course, wheels. We will not consider this group as a completely “children's version”.
- Second order. This is something that we cannot “notice” when installing a spare part on a car. The most striking example is the flanges of the transfer case and gearboxes, as well as the output flange of the gearbox (helicopter). But these vibrations are noticed by our vestibular apparatus; this is the case when you get out of the car, and your head “floats” as if after a sea motion.
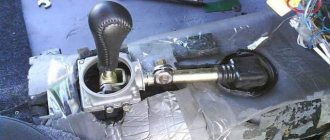
Installation of an industrial shaft on a field 21213
Transfer case installation diagram
| 1 – stud for fastening the flanges of the intermediate cardan shaft and the drive shaft of the transfer case; 2– adjusting shims; | 3– nuts securing the transfer case to the body; 4– nuts securing the transfer case suspension brackets to the axles |
EXECUTION ORDER
1. Make sure that the engine mount mounts are correctly installed in the brackets (the centering washers of the front engine mount mounts must fit into the corresponding holes in the side brackets) and that the transfer case supports fit snugly to the bottom of the body. If necessary, straighten the surface of the body under the supports. 2. Install the transfer case on the vehicle without fully tightening bolts 4 and 5 of the transfer case suspension brackets (see Fig. Transfer case installation diagram). 3. Moving the transfer case lengthwise and crosswise, as well as in the vertical direction, find a position in which the flanges of the transfer case drive shaft and the intermediate driveshaft are at the same level, parallel, and the gap between them is minimal. The transfer case shafts must be located parallel to the bottom of the body. 4. Having installed the previously removed adjusting shims under the suspension brackets (supports), fully tighten the nuts securing the transfer case suspension brackets. 5. Attach the front and rear propeller shafts to the transfer case shafts; Connect the flexible shaft to the speedometer drive and the wires to the differential lock warning lamp sensor. 6. When replacing the transfer case, as well as when the rear engine mount “settles”, causing vibration of the transfer case, it is necessary to select and install a new thickness of gaskets 5 (see figure from paragraph 8).
Procedure for selecting shims
1. Make sure that the engine mounts are installed correctly in the brackets (see subsection 2.2). 2. Separate the flanges of the transfer case drive shaft and the driveshaft intermediate shaft. 3. Loosen the nuts securing the transfer case supports to the body, remove the adjusting shims and, moving the transfer case along and across the body, as well as in the vertical direction, find its position in which the disconnected flanges are at the same level, parallel and the gap between them is minimal , and the transfer case shafts are located parallel to the bottom of the body. 4. Fill the resulting gap between the body floor and the supports with the required number of gaskets. 5. Align the centering flanges without creating tension in the transfer case and engine supports and, holding the transfer case in this position, tighten the previously loosened nuts securing the transfer case supports. 6. Insert and secure the transfer case and intermediate shaft flange bolts; if the bolts pass freely into the flange holes, then the alignment is carried out correctly, otherwise repeat the operations to align the flanges.
When operating your car, practice has shown that per 100 thousand km. mileage on the Niva 21213 car, there were two ruptures of the flexible coupling and once the destruction of the CV joint. At the same time, the car was standard.
Nowadays, people often increase engine power by “boring” or installing turbines and compressors or replacing them with a diesel unit, thus the load on the shaft, due to an increase in torque, increases significantly. And often car owners pay attention to its cardan shafts, installing reinforced ones, forgetting that if the blower shaft fails, then it doesn’t matter what powerful cardan shafts this car will have.
In our workshop, we have modified this unit and offer off-road enthusiasts to install a reinforced exhaust shaft.
We present to your attention a new modification to strengthen the exhaust shaft for the Niva 2121-14t.
– installed powerful flexible couplings from the BMW cardan
– this design of the industrial shaft does not use CV joints and crosspieces, which significantly increases the service life of this product and does not require service at all (refilling the crosspieces and putting new lubricant into the CV joint)
Promval Niva Chevrolet, theory
As a rule, when transmission vibrations occur in fields and shnivy, everyone rushes to look at the cardan shafts. There is, of course, some truth in this, except for one remark. In the theory of machines and mechanisms, there is a recommendation: start looking for the cause of vibration either directly from the source of rotation (that is, the engine itself) or from bodies of rotation that have a high angular velocity. Let's go down the chain. The first is the flywheel with clutch. Nothing can happen to it after capitalization or installation, except that when replacing the crankshaft cuff, it could be put in a different position. Next comes the clutch disc, clutch basket, gearbox, centering rubber-metal bushing and finally the Chevrolet Niva flush. The clutch kit consists of metal rotating parts, and, if the manufacturer is of a good level, as a rule it does not produce vibrations. But the hero of this article contains ball joints, a rubber coupling and a spline connection. When the slightest play occurs, vibrations have room to roam. In the vast majority of cases, the rubber coupling is to blame. Yes, it is sold separately, BUT the assembly requires balancing after assembly. There's a dead end here. Even in my native St. Petersburg, there are no companies where this can be done in good quality. The best option is to take a new assembly.
Video instructions for replacing the shnivy industrial shaft
Remove the transfer case assembly with the intermediate shaft (see Removing the transfer case).
While holding the shaft from turning with a screwdriver, use a 13mm wrench to unscrew the four nuts securing the intermediate shaft to the transfer case flange.
2. Remove the intermediate shaft.
Install the intermediate shaft on the transfer case in reverse order.
3. Before installing the intermediate shaft assembly with the transfer case, we check the condition of the rubber centering sleeve located on the flange of the secondary shaft of the gearbox.
We disassemble the intermediate shaft to replace the elastic (rubber) coupling or constant velocity joint.
1. Mark the location of the coupling relative to the flange, as well as the number and location of balancing washers relative to the coupling.
2. While holding the bolts from turning with a 19mm wrench, use a head of the same size to unscrew the three nuts.
3. Disconnect the coupling and flange.
4. By turning the hinge, remove the bolts from the holes in the elastic coupling flange.
5. Using a screwdriver, remove the plastic plug.
6. Squeeze the clamp with sliding pliers and remove it.
7. Use a screwdriver to move the plastic casing
8. Remove the rubber protective cover from the constant velocity joint housing
9. We place the hinge body on the open jaws of the vice and, striking through a soft metal drift at the end of the elastic coupling flange, knock out the flange.
10. Separate the hinge and flange.
11. Pull the plastic casing off the rubber boot.
12. Having pulled out the rubber boot, squeeze the clamp with sliding pliers and remove it
13. Remove the rubber protective cover
14. Using a screwdriver, remove the hinge retaining ring
Disassembling and assessing the condition of the hinge parts are similar to the corresponding operations described in the article - “Repair of front wheel drives”.
We assemble the intermediate shaft in the reverse order.
Also interesting: FROST car air conditioners // Online store // Prices // Air conditioners for Lada VAZ, VolksWagen Polo, Daewoo Matiz cars
In the rebuilt or new hinge we put 20 cm 3 of CV joint-4 lubricant.
Before connecting the hinge to the flange of the elastic coupling, install a small clamp of the rubber protective cover.
15. Press the hinge onto the flange, striking through a piece of pipe onto the hinge holder
16. Before installing the rubber coupling, compress it with a clamp
We place the used coupling according to the marks relative to the flange.
We place the previous balancing washers according to the marks relative to the coupling.
When installing a new coupling, the shaft assembly may need to be balanced.
Intermediate shaft tightening torques
Nut of the bolt securing the elastic coupling to the flanges M12×1.25 - 57.8-71.5 Nm (5.9-7.3 kgf m)
Nut securing the hinge housing to the drive shaft flange of the transfer case M8 - 27.4-34.3 Nm (2.8-3.5 kgf m)
The work is carried out using an inspection pit, overpass or lift. To replace the washer you will need the following tool:
- one socket wrench for 13 and two for 19;
- flat screwdriver;
- small hammer;
- scrap;
- chisel;
- goatee
You will also need to stock up on the following items:
- centering sleeve;
- four self-locking nuts;
- O-ring for flange mounting;
- worm clamp with a diameter of 150 mm.
To remove the intermediate shaft, you must:
- Using a 13mm wrench, unscrew the 4 nuts that secure the shaft joint housing to the transfer case flange.
- Place a 150mm diameter worm clamp onto the rubber coupling and tighten it.
- Make marks on the CV joint and the transfer case flange housing to remember their relative positions.
- Loosen the nuts holding the power unit and move it forward 15-20 mm (a crowbar will come in handy here).
- Using 19mm spanners, unscrew the nut and remove the bolt securing the coupling to the gearbox flange.
- Unscrew and remove the other three bolts.
- Move the intermediate shaft towards the gearbox and remove the hinge housing studs from the holes on the transfer case flange.
- Do the same operation with the hinge.
- Remove the intermediate shaft from the vehicle.
In most cases, the leak can be repaired. You can replace the boot or joint, flexible coupling or spline seal. After this, you need to install the intermediate shaft in place. Don't forget to install new self-locking nuts. These parts cannot be reused - they may come loose due to vibration.
Promval Niva Chevrolet, specifics
balancing washers on the conveyor shaft
- Original. The popular name is "chandelier". On the plus side, good mileage. Next we go into the negative. Yes, you can buy a rubber coupling and hinges separately. But you will not balance this node anywhere. The main problem is pricing. The supplier of this spare part is a monopolist, and then “our Russia” begins. In 2020, the wholesale price for this part increased by more than 30%, and we continue to grow with each delivery. Therefore, on my website, this part is delivered to order by prior agreement.
soft and hard shaft for shnivy
- Hard washout, city of Saratov. I have specifics when working with these machines. I spend very little time working with standard engines. And at some point I noticed that when the clutch is “operated quickly,” there is a failure. It turned out that it was the rubber coupling that was “twisting”. At standard 75 horsepower, it more or less lives, but with increased engine power and quick operation of the gearbox, it quickly breaks down. Now I generally recommend installing a “hard” flush. Another plus is the elimination of the standard gearbox (helicopter) shank; it, like flanges, can be completely crooked and requires alignment and additional machining. The hard flush of the Chevrolet Niva hides only one small trick related to the year of manufacture of the car. Before 2008, the gearbox shank had 6 splines, after which it had 21 splines. There are already “Chinese counterfeits” for this product, but since I work directly with the factory, this issue does not really concern me.
- Promval Niva Chevrolet, the Volgaavtoprom brand and a couple of “Chinese options” that I happened to see. Wasted money doesn't last long.
Important. When you install the washer, you will see a centering rubber-metal bushing on the shank of the box. When it is sold counterfeit, it is simply made of rubber. In the factory version, this is a metal sleeve that is rubberized on the outer surface. There should be no loose fit on the shaft. This part, like the clutch fork with boot, changes when replacing the clutch. In the case of a hard hole, this part is structurally absent.
Did you like the article? Share with your friends!
17