Running in the engine after repair
How to properly break in an engine after overhaul? Break-in is necessary after any intervention in the engine. If the intervention was:
1. minimal (for example, replacing a chain or camshaft), running-in can be a minimum of 500 km.
2. With normal, high-quality capital, the running-in period is 1500-2000 km.
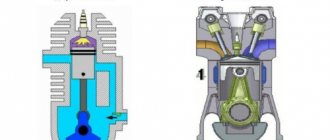
3. the block was relined and the piston rings were replaced, but the pistons themselves remained old - with such a repair, the running-in should be much more (perhaps 3-4 thousand) and in the most gentle mode, i.e. never faster than 50-60 km/h, only a very smooth start and no force of the engine at too low or high speeds, i.e. Set yourself a range of 1800-2500 and stay within it. The problem in this case lies in the fact that new, unworn rings are placed in broken piston grooves. If the pistons have lived a hard life and the grooves are badly broken (the breaking of the groove can be assessed by the old ring - if its lower supporting surface is glossy, slightly play with waviness in reflected light and when you run your finger along it from the conditional center to the outer diameter, a step of wear will be felt, then In this situation, the pistons definitely need to be replaced), there is a chance of breaking the rings even when starting the engine. The fact is that the groove in the piston is broken in such a way that its lower plane seems to tilt down. The old ring also wore out along the supporting surface with the same slope, but the new one will begin to twist and has a chance of breaking either immediately or after accumulating a certain amount of fatigue. In general, for pistons, the wear criterion is determined precisely by the breaking of the groove of the upper compression ring; everything else practically does not wear out.
Run-in - 800 km/oil change, 2000 km/oil change. Break-in oil 10W-30, further according to the manual.
Here's another, more correct one:
It is necessary to break in the engine in two cases: when the car has just left the assembly line or after a major overhaul. Run-in is carried out so that all parts and systems of the car “get used to”, thereby increasing the service life of the engine.
In case of incorrect break-in, not very pleasant surprises await you, for example: oil in the air cleaner, high fuel consumption, problems with starting the engine, and so on. Therefore, at first, after buying a new car or major repairs, you will have to follow several boring but necessary rules.
The first and most important rule is not to load the engine, that is: do not drive at high speeds, do not load the car with a large number of passengers and cargo, do not suddenly slow down, drive less in low gears. The first rule applies until the car has traveled about 1,500 kilometers. The second rule is watch your speed. Until the car has covered its first two hundred to three hundred kilometers, the maximum speed should not exceed 80 km per hour. You should (as far as possible) drive at a constant speed, no acceleration, and try not to downshift. To do this, you need to choose a route with minimal congestion and, preferably, without sharp turns. It is best to go for a run-in late in the evening, when there are few cars on the roads, this will allow you to fulfill the second rule.
After the car has traveled over three hundred kilometers, you can gradually increase the speed, within reasonable limits, of course. But still try to drive at a constant speed.
The third rule is don’t skimp on the butter. It is advisable to change the oil at least four times during the entire break-in period. The first replacement must be made when the car has traveled at least five hundred kilometers. Then after 1000 kilometers and at this time the engine should be flushed. The next replacement is after 1500 kilometers, and the last one after 2000 km. Use only natural, high quality oils recommended by the car manufacturer.
After the break-in is completed, change the oil again and flush the engine. Now you can fill in synthetic oil, this will no longer harm the engine. The next replacement can be made after 5000 - 6000 km. A machine accustomed to gentle operation should not be heavily loaded immediately. Any machine is susceptible to sudden overloads, so take care of its “health”, this will save your nerves, money and time. A properly run-in car is less likely to end up in a service center with breakdowns, saves fuel, and picks up speed faster.
When is it needed?
First, let's figure out when it is required. Naturally, the answer will be - after replacing the piston rings, but not everything is so simple here. People often argue that not in all cases it is necessary to break in the engine. For example, there is a fairly stable idea that if no grinding has been done, then running in is not required. Unfortunately, it is not. Let's look at why this is a false statement.
In any case, if you removed the piston, it means you did some work to replace parts. In our case, the piston rings were changed. Accordingly, no matter how correctly and carefully you install them, at first they will be a foreign body in the engine. This will happen until the rings rub against the piston and cylinder. You need to understand that break-in is necessary in any case when new components are installed in the engine.
Types of running-in
There are usually two types of running-in. They need to be distinguished. After all, correct use of this procedure can increase the resource by up to 20%. This is a very good indicator that will allow you to save on further engine maintenance.
Typically, break-in is understood as a procedure that is performed after a major overhaul of the engine. As a rule, in this case, all the main components are completely replaced, usually only the block and its head are left. In this case, you get an almost new motor. But in order for the parts to get used to each other, a thorough running-in is required. Large services use special stands for the initial procedure. This is impossible in a garage, so you just need to carefully monitor the operating mode of the engine while traveling.
Another point is a partial overhaul of the engine.
. This includes the break-in we analyze after changing the piston rings. Here you need to monitor the process a little less, but there are some nuances that simply need to be taken into account. Also, usually in this case, the mileage for grinding in is shorter, which speeds up the process. Below we will consider in more detail all the listed varieties, so you are guaranteed to avoid mistakes after repair.
How to do it correctly?
Before starting the process, you need to carry out a number of actions that are mandatory for any type of work. They are standard and apply in any case. At the very beginning, the following procedures are done:
- Be sure to fully charge the battery;
- Before leaving, you need to carry out the next cycle. We start the engine, heat it to 80°C, then turn it off. As soon as it cools down to 40°C, warm it up again. In total you will need to do 7-10 cycles. During which thermal expansion of parts will occur, as well as their initial preparation;
- After all the above steps, be sure to inspect the engine for leaks of oil, antifreeze and other technical fluids. If we find such a phenomenon, we will definitely eliminate it;
- Regardless of the reason for which the procedure is performed, movement with height differences should be avoided;
- At the last stages of lapping, strictly follow the manufacturer’s recommendations regarding optimal engine operation during travel.
These rules apply to all types of engine running-in, regardless of what you did in the car.
The next 700-800 kilometers
You can drive in the same mode, but not at once. That is, you can freely use the car for business trips, but just do not load it. The last 500 kilometers adhere to the manufacturer's recommended operating mode, but at the same time avoid stressing the engine. After this, the oil and filter must be changed. Then you can safely operate the car in your usual mode.
Decarbonization and its meaning
During engine operation, a layer of carbon deposits forms on the piston grooves. It reduces the elasticity of the rings. This leads to even more wear.
There are several options for cleaning these places:
- Incomplete decarbonization. A mixture of kerosene and acetone is prepared in equal proportions. The spark plugs are unscrewed from the engine, then this mixture is poured into the holes. Then it takes 9 hours for the carbon deposits to dissolve. After the time has passed, the spark plugs are screwed in and the engine starts. You need to drive 15 km as usual. The oil and filter are being replaced. This procedure allows you to clean only the internal surfaces of the piston group.
- Hard decarbonization. This cleaning requires special means: First, the engine warms up to operating temperature.
- The candles are unscrewed. By turning the crankshaft, the pistons are set to the middle position.
- A special product is poured through the holes, the candles are screwed in, and rest is given until the next day.
- The candles are taken out again. The starter rotates the crankshaft to remove hard pieces of plaque.
- The candles are put in place. The engine should run for 1 hour at idle speed.
- The oil and filter are being replaced.
This is interesting: Possible reasons why the car does not engage in gear
Decoking mixtures contain special oxidizing agents that soften carbon deposits and remove them along with the exhaust.
Why does the engine eat oil?
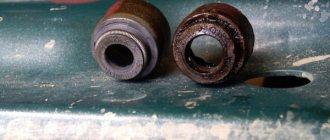
Sometimes, after replacing the oil scraper rings, grease continues to be wasted unnecessarily. In this case, the reason is probably not only in the rings. This usually happens when there are problems with valve stem seals.
This part can be found on the valves. They remove excess lubricant from them and prevent it from entering the combustion chamber. It is recommended to immediately replace the caps during any engine overhaul so as not to disassemble the engine twice.
Conclusion
. Sooner or later the engine has to be repaired. In this case, running in the engine after replacing the piston rings is simply necessary. This work must be done correctly in order to significantly increase the service life of the repaired unit.
Step-by-step instructions for replacing rings and valve stem seals
The decarbonization process removes small deposits. In case of severe wear, a complete replacement of all piston rings and valve stem seals is required:
- The necessary parts are selected in accordance with the make of the machine. You should give preference to original spare parts so as not to bother again later.
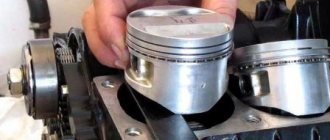
- The spark plugs are unscrewed, the cover is removed, and then the entire cylinder head (cylinder head). The oil is drained and the oil pan is unscrewed. Next, the connecting rod caps are unscrewed and the pistons are pulled out.
- Use a puller or a screwdriver to remove the old rings. Using old pistons, the landing grooves are cleaned. It is done carefully with an unnecessary ring. Their installation should be carried out only after connecting the piston to the connecting rod.
- Of all the piston rings, the oil scraper rings are installed first. All operations must be done by hand. On box-shaped ones with a spiral spring, the expander lock rotates 180° relative to the ring lock. For composite ones, the spring is installed first, then the lower plate and the upper one. The plate locks rotate 180° relative to each other.
- After installing the remaining rings, it is necessary to evaluate the appearance of the cylinders. In case of severe wear, boring and honing are performed.
- Place the pistons in their places, screw on the connecting rod caps and the oil pan.
Valve seals also play an important role in retaining oil. They remove excess from the valves. The caps are replaced either with or without removing the cylinder head.
- In the first case, the crankshaft is turned with a wrench until the first pair of pistons is set to the top dead center (TDC) position. This is done to keep the valve from falling into the cylinder.
- The axles of the intake and exhaust rocker arms with hydraulic compensators are removed. In many models they can fall out - nylon clamps are useful for this.
- Using a special puller, you must simultaneously compress the valve springs and remove the crackers with tweezers. They are needed to compress the spring relative to the valve axis. An assistant will come in handy here.
- After removing the worn cap, install a new one in its place. It should be remembered that they are divided into inlet and outlet.
- The crackers are installed in reverse order. Next, you should rotate the crankshaft to the TDC position of the other pair of pistons. Everything is done the same way. If you replace the caps and remove the cylinder head, you can pull out the valves and assess their condition. The resulting carbon deposits must be cleaned off.
- After installing the valves and springs in place, reinstall the rocker arm axles.
- Along the way, you can check the tension of the timing belt, and also use the marks to establish the correct ignition. This will protect the CPG from wear.
- Install the cylinder head cover. It will require a new gasket.
- Install a new filter and fill with oil.
- Connect all devices, start the engine.
Starting operation of the unit with new parts will require their grinding in. Unnatural sounds and whistles are possible. Smoke may pour out of the exhaust pipe, and the engine may stall. For the first 500 - 1000 km, you should not increase the speed much.
Replacing rings: where to start?
So, new parts have already been purchased, then you can proceed directly to the process of replacing them. The first thing that needs to be done next is dismantling all components, as well as mechanisms. This will provide full access to the necessary parts, or rather, will allow you to easily replace the oil scraper piston rings.
What is included in the dismantling work package?
- The air filter should be removed, followed by the fuel pump.
- Don't forget about the distributor in the ignition system. In order to dismantle the drive housing, it is necessary to disassemble the bolted connection.
- After this, you should remove the negative terminal from the battery, as well as the pulley (toothed) from the camshaft. At this point, part of the work can be considered successfully completed.
- Next, in order to better get to the cover located on the head of the block, it is necessary to remove the mass drive.
- The last thing you can do is unscrew the nuts that secure the camshaft bearing housings.
This is interesting: How to reset the service interval for cars
Second stage of dismantling work
In order for the replacement of rings and valve stem seals to lead to proper engine operation, general diagnostics of the vehicle is necessary. As a rule, at this moment the wear of other parts and their good fit are checked. Under no circumstances should the position of the camshaft keys be ignored. If during the dismantling process it is noticed that they are not seated too tightly, then they should also be removed. This must be done to avoid loss of the part while the vehicle is moving.
After everything was done, access to the camshaft was completely opened, which must be pulled out along with the oil seal. Next, in order to remove the oil scraper rings, you should install the spare part in a position where the piston will be at TDC. Having pulled out the candle, you need to insert a rod into the resulting hole. If this is not done, the valve will easily fail.
Next, you need to use a special tool to compress the springs located on the valve and pull out the two crackers. You can get them out using tweezers. After this, using a special tool, you should press out the rings. This completes the dismantling work.
Installation process
Now let's talk about how to properly complete the installation process. This work will consist of several stages:
- First, the springs should be removed from the new parts. This must be done extremely carefully to avoid damage.
- Next, you need to coat all elements with engine oil. After this, you can press the engine itself and return the springs to their intended place.
Important: oil scraper rings are replaced in strict accordance with the sequence. The detailed removal process is described above. Be careful that the sides are where they should be. Otherwise, this may cause a sharp increase in the amount of oil consumed.
When to perform break-in after replacing piston rings
Installing new components into an engine always requires a break-in period. This applies not only to piston rings. It is well known that break-in is required after a major overhaul of the engine, or if the engine is completely new.
The break-in procedure itself implies that the components “grind in” to each other. When replacing piston rings, running-in is required so that they get used to the piston or cylinder. Despite the fact that the dimensions of the parts are standard, they wear out during operation due to a number of technological features. Accordingly, by installing new rings into an engine where old parts remain, complete size matching cannot be achieved. That is, it takes some time to break in the engine so that the parts fit together perfectly.
Signs of piston ring wear
Blue or black smoke from the exhaust pipe indicates that wear has reached a critical stage. This indicates that excess oil entered the combustion chamber past the oil scraper ring and burned there along with the fuel. Black smoke coming out of the crankcase ventilation tube indicates that the compression rings, due to wear, allow gases to escape from the combustion chamber into its cavity.
Critical wear is accompanied by a decrease in compression (the ability to maintain pressure) in the engine cylinders. This means that some of the gases formed during the combustion of the fuel mixture, which was supposed to push the piston, broke into the crankcase without performing useful work. This is what will lead to a drop in pressure in the cylinder, therefore, the engine will lose some power. Increased oil consumption is observed.
Compression is checked with a special device - a compression meter. When the nominal pressure values are unknown (there are no operating instructions), it is first measured in a dry cylinder, then a little engine oil is poured through the spark plug hole, and the measurement is made again. If the compression increases, then the rings need to be replaced. Similar signs can be observed in the case of their “occurrence”.
“Sticking” occurs when carbon deposits formed in the piston grooves prevent the piston rings from springing, resulting in a decrease in the tightness of their contact with the cylinder surface.
This problem, if the case is not very advanced, can be corrected with the help of special fuel additives. For an engine with a carburetor system, you can try cleaning it with a carbon remover spray that is injected directly into the carburetor. If removing carbon deposits from the combustion chamber has no effect, then there is only one way out - replacing the piston rings and cleaning the grooves.
This is interesting: First and subsequent maintenance of Lada Granta: maintenance, features
What types of engine running-in are there?
Proper engine running-in is an important component of success. It is important to understand that there are several types of break-in:
- After major renovation. Run-in after a major overhaul assumes that all engine components need to be ground in, since most of them are changed (usually, after a major overhaul, only the cylinder block and its head remain). That is, in fact, a new engine appears before the driver. It is better to run it in at a service center using special equipment;
- After a partial overhaul of the engine and replacement of some components. This includes running in after replacing the piston rings. This run-in is performed directly on the road. There are rules that need to be followed and these will be discussed below.
It is worth noting that when overhauling an engine in a “garage,” drivers often perform a run-in “in combat conditions,” that is, on the road, without using special equipment. This is not entirely correct and can lead to a decrease in the service life of the motor.