Maybe I'm exaggerating, but it seems to me that every classic encountered such a problem. In the heat, when the car was moving (in my case it was a VAZ 2106), the car began to twitch or completely stall in the most inconvenient places (crossroads, on the highway, etc.). If you open the hood and look at the fuel filter at this time, you could notice that it is empty or there is very little gasoline there; when you try to manually pump gasoline from the fuel pump, you can understand that the fuel pump does not pump gasoline. Everyone solves this problem in their own way, I let the engines cool by 10-15 degrees, then moistened a rag, threw it on the gas pump, successfully started the engine and drove home. (I want to make a reservation right away, I always had a new fuel pump repair kit in the car, I have a DAAZ fuel pump. Pekar g * but there were two of them, the same problems with them.) In general, I removed the fuel pump, took it home, disassembled it, to my To my surprise, everything was fine with it, the diaphragms were not torn, the valves were normal, but since I had a repair kit, I replaced everything with a new one and installed it on the car. The problem has not gone away. Air jams still formed. Then I went to an auto store, bought a fuel pump pusher, it was 8.25 cm long, took off the old one, measured it, its length was 8.2, the difference in principle is not big, I installed a new pusher, drove it, and still the problem did not disappear. I no longer knew what the reason could be, I also went to the auto store, bought a rod with a pusher, removing the old rod with a pusher, I noticed that the rod was cracked, + in addition to all this, there is a 1mm thick gasket between the block and the rod, not order! There should be a gasket with a thickness of 0.27-0.3 mm... Next, installing a new rod + a new pusher that came with the rod, I adjusted the protrusion of the pusher to 1.1 mm (0.8-1.3 seems to be allowed). I installed a new fuel pump (because I had ruined the old one) and that was it, my problems disappeared. I still think that the problem was in the rod and an incorrectly installed gasket, but what’s most interesting is that we drove like this for almost 3 years, with an incorrectly installed gasket. But at the same time, every summer I had to buy a new fuel pump, because this only solved the problem of an air lock...
That's all, if someone solved this problem differently, please leave a comment, I will be very grateful to you
When operating the “seven”, one of the problematic components is the fuel pump. Sometimes its malfunctions have to be fixed urgently, “on the road”. Therefore, it will be useful for every owner of the “Seven” to know how the VAZ 2107 fuel pump (carburetor) works, what its main malfunctions are and how to repair it.
Functions and structure of the VAZ 2107 fuel pump (carburetor)
The fuel pump is a key component of the engine power supply system. The function of the pump is to supply gasoline from the fuel tank to the carburetor float chamber. The fuel pump on carburetor VAZ models is installed on the side of the cylinder block, inside the engine compartment.
The specific design of the pump makes the fuel pump one of the weak points of the power system. Contamination and poor quality gasoline, constant loads leading to natural wear of parts often cause unit failure. As a result, the gasoline supply stops and the engine stops working.
The VAZ 2107 fuel pump consists of the following parts:
- pusher;
- spring;
- balance;
- lid;
- cover screw;
- screw;
- mesh filter;
- membranes (working and safety);
- lower and upper plates;
- stock;
- valves (inlet and outlet);
- manual pumping lever.
The VAZ 2107 fuel pump works like this:
- The reciprocating movements of the pusher are ensured by the joint work of the drive cam and the return spring.
- working membranes move, creating alternately pressure and vacuum in the working chamber;
- when the pressure decreases, the exhaust valve closes, gasoline begins to flow from the gas line through the opening inlet valve;
- as the pressure increases, the inlet valve closes, and gasoline is pumped through the outlet valve into the hose leading to the carburetor.
Electric fuel pump for VAZ 2107
Increasingly, owners of “classics”, including the VAZ 2107, are installing modern devices on their cars. So, the mechanical fuel pump is replaced with an electric one. The main goal of introducing an electric fuel pump is to get rid of the problems that arise with standard pumps. However, you need to understand that if on injection “sevens” such a mechanism is installed directly in the gas tank, then on carburetor cars it is placed under the hood.
Which one can be installed
As an electric fuel pump, you can install any device designed to work on fuel-injected cars on the “classic”. Based on reviews from Zhiguli car owners, Chinese-made pumps, as well as Magneti Marelli and Bosch, are often used. It is important to know that the product must provide low pressure . A standard mechanical pump produces about 0.05 atm. If the indicator is higher, then the needle valve in the carburetor will simply let fuel through, which will lead to it leaking out.
Installation of an electric fuel pump
To install an electric fuel supply pump on a carburetor “seven”, you will need a certain list of materials:
- tee 8x6x8 mm;
- fuel line for VAZ 2107;
- check valve from the "eight";
- 8 mm threaded fitting;
- clamps, blocks from Kalina for a four-pin relay (3 pcs.) with a fuse holder;
- the four-pin relay itself (3 pcs.);
- fuel jet (150);
- fuel return hose from the V8;
- wires;
- non-latching button.
We carry out the work in the following sequence:
- We lay the fuel pipe (return) parallel to the standard fuel line, securing it in the factory locations.
Video: installing an electric fuel pump on a VAZ 2107
Once the installation of the mechanism is complete, it will function according to the following algorithm:
- after turning on the ignition and pressing the pumping button, the pump is activated and pumps up gasoline;
- when the starter starts, the fuel pump turns on;
- while the engine is running, the pump is powered by a generator;
- after the engine stops, the operation of the unit stops.
Installation benefits
Owners of Zhiguli cars who have installed an electric fuel pump on their cars note the following advantages:
- an engine with such a device operates more stable at idle speed;
- when accelerating sharply, the car responds well to the pedal, there are no dips, which is not the case with a mechanical pump;
- when switching gears there is a smooth ride, and when the gas is abruptly released there is no twitching;
- at high speeds the engine spins better;
- there are no jerks at low speeds when starting the car after a long trip.
The VAZ 2107 fuel pump sometimes has to be repaired or replaced. Doing this is not as difficult as it might first seem. Repair and adjustment work is carried out with a minimum set of tools in accordance with step-by-step instructions.
source
Reasons for the malfunction of the VAZ 2107 fuel pump
- Depressurization of the working chamber due to wear of the sealing gasket. This causes fuel to leak out of the pump or air to be sucked in instead of gasoline.
- Clogged valve channels (intake and exhaust), as a result of which the valves cease to perform their functions. The problem can be prevented by installing a fine filter in the fuel line in front of the fuel pump.
- Wear and distortion of valve parts. The result of the misalignment is the same as when the valves are clogged, but identifying and eliminating the problem is quite difficult.
- Rupture of the working membrane. Pressure drops cease to form in the working chamber, and the pump loses its functionality.
- Damage to the safety chamber. Gasoline begins to enter the engine crankcase, where it dilutes the engine oil. If the problem is not noticed in time, the engine may seize.
Troubleshooting the VAZ 2107 fuel pump
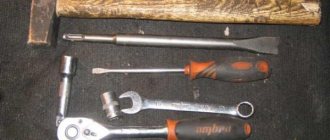
Before checking the fuel pump, it is advisable to stock up on M8 bolts or other products of a similar diameter that can serve as plugs for fuel hoses.
To check the VAZ 2107 fuel pump, you must perform the following steps:
- Loosen the hose clamp that supplies gasoline to the carburetor and remove the hose from the fitting.
- Plug the fuel hose to prevent fuel from spilling out.
- Pump the fuel pump manual drive lever several times. If a stream of gasoline comes out of the outlet fitting, the fuel pump is working. If not, the check should continue.
- Loosen the inlet hose clamp, remove the hose and plug it in the same way as before.
- Close the inlet fitting with your finger and pump the hand drive lever several times. If there is a noticeable vacuum, the problem is not in the fuel pump. If the finger does not “stick”, it is necessary to remove and repair or replace the fuel pump.
Replacing the fuel pump VAZ 2107
The easiest way to restore engine operation if the fuel pump breaks down is to replace the latter. Replacing the VAZ 2107 fuel pump is done as follows:
- clean the area where the fuel pump meets the cylinder block using white spirit or WD-40;
- loosen the fuel hose clamps;
- remove the hoses and plug them with M8 bolts or something similar, for example. plastic choppers;
- Using a 13mm wrench, unscrew the two nuts securing the fuel pump to the engine;
- remove the old fuel pump from the studs and install a new one;
- secure the new fuel pump with nuts;
- connect the fuel hoses and tighten the clamps.
Replacing the fuel pump in a VAZ 2106 car
We carry out preparatory work, concentrate in one place the necessary plumbing tools and the new product to be installed. The fuel pump is replaced in the following order:
- We loosen the fastening clamps with a figured screwdriver or wrench.
- We disconnect the ends of the fuel line from the fittings of the product and then plug them to prevent fuel leakage.
- We dismantle the fuel pump using a wrench.
- We dismantle the thermal insulation spacer and the installation gasket.
- The installation gasket should be changed, and the thermal spacer should be cleaned and placed in its original mounting location.
- If repair of the fuel pump is required, it must be disassembled and worn components replaced.
- If the product assembly needs to be replaced, then we place the gasket on the mounting studs, then install the “six” fuel pump.
The final installation of the fuel pump on the VAZ 2106 is carried out in the reverse order.
Repair of fuel pump VAZ 2107
Repairing the VAZ 2107 fuel pump instead of replacing it is a much more rational decision from a financial point of view. To do this, you need to remove the unit. The procedure for removing the fuel pump is described in the previous section “Replacing the VAZ 2107 fuel pump”.
After the fuel pump is removed, you can begin to disassemble it and check the parts for damage or wear.
It's worth starting with gaskets. The thickness of the gasket between the fuel pump and the thermal insulating plastic spacer must be more than 0.3 millimeters. The gasket between the spacer and the cylinder block must be thicker than 0.8 millimeters.
The most common failure of a fuel pump is a rupture of the working diaphragm. To replace it, you need to unscrew the cover bolt and pull out the diaphragm assembly (rod with attached diaphragms). To replace them, simply unscrew the nut on the rod. You should also check the serviceability of the return spring and replace it if necessary.
When the cover is removed, the strainer becomes accessible and should be cleaned of dirt and inspected for damage before reinstalling.
The fuel pump valve channels should be cleaned and checked to see if they are loose in their seats. If play is noticeable, the valve should be replaced. If the cause of the play is a broken seat, the malfunction cannot be eliminated. You only need to replace the fuel pump.
In some cases, the tightness of the working chamber of the fuel pump is broken due to deformation of the cover. In this case, you can try to select and install a whole cover from an old fuel pump.
The fuel systems of classic VAZ models, such as 2106 and 2107, differ in the type of supply of the combustible mixture to the cylinders. For some, the carburetor is responsible for this, for others, the injector. However, the coordinated operation of the power unit for both depends not on the design of the system, but on the serviceability of its elements, and primarily the fuel pump. Every car enthusiast should, if necessary, be able to repair and replace this element with his own hands.
Determining the causes of fuel pump failure
To determine the cause of a fuel pump failure, you can use several operations related to checking its functionality without removing it from the car.
The fuel pump does not supply fuel to the vehicle systems:
- We check the presence of fuel in the gas tank. It is recommended to operate the car with at least half a tank and with the obligatory use of the entire set of filters that reduce the impact of small particles on fuel pump parts.
- We check the performance of the fuel filters and, if necessary, replace them with new ones.
- We blow out and clean the pipeline system, removing deposits of small particles.
Check fuel filters
The main reasons for fuel pump failure may be:
- Damage to the diaphragm with leaks.
- Loss of spring stiffness and performance.
- Valves clogged due to dirt accumulation.
- Loss of filter capacity due to the accumulation of contaminants.
- Violation of the tightness of the pump circuit with leakage of gasoline and oil.
- Failure to operate due to exhaustion of the pump components.
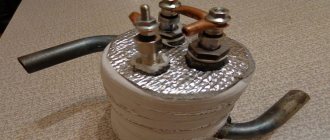
You can see how the DAAZ fuel pump works in the following diagram:
Internal structure of the fuel pump
To determine the pump's performance, it is necessary to conduct an external inspection. The top cover must be installed without distortion and fit tightly to the body. The mesh filter must be installed evenly and ensure the tightness of the device, preventing leakage at the joints and fastenings with bolts.
Next, you need to install the pusher in the working position; to do this, use the handle to turn the engine 1 revolution. The rod and eccentric will take a position that allows you to use manual fuel pumping.
What fuel pumps were equipped with classic VAZ models?
Classic VAZs include all models of the Zhiguli family, produced from 1970 to 2012 and their modifications:
- VAZ 2101;
- VAZ 2102;
- VAZ 2103;
- VAZ 2104;
- VAZ 2105;
- VAZ 2106;
- VAZ 2107.
Depending on the year of manufacture, the engines of these vehicles were equipped with different fuel systems. In all the first Zhiguli models, the fuel mixture was injected into the cylinders using a carburetor, and the fuel was supplied by a mechanical fuel pump. The latest modifications of the VAZ 2104, 2105 and 2107 had an injection system and an electric fuel pump.
Carburetor cars of the Zhiguli family were equipped from the factory with mechanical fuel pumps of the diaphragm type DAAZ 2101 (catalog number 1106010) produced by the Dimitrovgrad Automotive Unit Plant. Thanks to their simple design, reliability and maintainability, they have proven themselves well not only on the “classics”, but also on cars of the Sputnik and Samara families, which were equipped with their modified versions.
Carburetor VAZ 2101–2107 were equipped with DAAZ mechanical fuel pumps
Injection Zhiguli models were equipped with domestically produced electric fuel pumps. They were produced by the Pekar and Utes enterprises under catalog number 21073–1139009. The latest modifications of the Zhiguli were equipped with products (catalog number 2112–1139009). The same devices were installed on all models of the Samara and Lada families.
Injection models of classic VAZs were equipped with electric fuel pumps “Pekar”, “Utes”, “Bosch”
Checking, repairing and replacing a mechanical fuel pump
Methods for diagnosing fuel pumps for carburetor and injection engines of Zhiguli are also different. Checking a mechanical pump consists of determining its performance, as well as assessing the condition and performance of its component elements.
How to check the performance of a mechanical fuel pump
The productivity of the DAAZ mechanical pump is 1 liter per minute. To check the amount of pumped fuel you will need:
- a piece of gas-resistant hose (50–80 cm);
- 2 clean containers with a volume of at least 2 liters (plastic bottles are acceptable);
- 1.5 liters of gasoline;
- watch with stopwatch;
- crosshead screwdriver;
- assistant.
- Using a screwdriver, unscrew the screw on the clamp of the pump outlet fitting. We remove the hose from it.
Remove the fuel hose from the outlet fitting
We estimate the amount of fuel pumped by the pump per minute
If the amount of gasoline is less than 1 liter, the fuel pump is faulty.
Assessment of the condition and performance of component parts
The following pump elements must be checked:
- intake and exhaust valves;
- mesh filter;
- diaphragms;
- pusher (rod).
Design of the DAAZ fuel pump
- crosshead screwdriver;
- slotted screwdriver;
- key to 10;
- key to 13;
- caliper or ruler.
- Loosen the screws of the clamps of the inlet and outlet fittings of the pump, remove the hoses from them. We place a finger on the outlet fitting, and with the other hand we press the manual pumping lever several times. You should feel the air escaping under pressure with your finger. Next, plug the inlet fitting with your finger and pump it up manually again. A vacuum should be felt at the pump inlet, i.e. the finger should be sucked inside the fitting. If nothing like this happens, the valves of the device are faulty and must be replaced.
Checking the valves consists of determining the air pressure at the outlet fitting and the vacuum at the intake
The mesh filter should not show signs of damage or deformation
If the pump diaphragms are damaged or deformed, they must be replaced.
Removing the pump thermal spacer
The length of the pusher should be 82.5 mm
Do-it-yourself repair of a mechanical fuel pump
It is not advisable to purchase faulty fuel pump parts separately. It is much more profitable to purchase a repair kit, which includes elements that may fail, namely:
- valves;
- set of diaphragms;
- pusher;
- thermal spacer;
- gaskets and washers.
Fuel pump repair kit
Repairing a fuel pump involves dismantling and disassembling it. They are produced according to the same algorithm that was described earlier in the diagnostics section. If, after disassembling the fuel pump body, you find that there is dirty deposits or debris on its walls or on the inner surfaces of the fittings, clean them with carburetor cleaning fluid and a piece of coarse cloth. When removing plaque, use a small wooden spatula and toothpicks. It is highly undesirable to use metal objects for these purposes.
To replace the pump valves, they will need to be removed from their seats. To do this, using a thin slotted screwdriver or knife, you need to knock out three cored areas in each of the sockets, after which the valves will come out of them freely. Having installed new parts in place of the faulty ones, the sockets must be cored again by hitting the edge with a core (screwdriver) in three places.
Replacing fuel pump valves
Important: when replacing valves, do not confuse the intake and exhaust!
In order to replace the diaphragms, you need to unscrew the nut in the upper part of the rod on which they are mounted with a 10mm wrench, then remove them and install new ones in their place in a certain order. The lowest diaphragm is the safety diaphragm. This is followed by a small and large spacer, and on top of them are two other (working) membranes.
As for the thermal spacer, it rarely fails. More often there is a manufacturing defect, which manifests itself in the unevenness of the mating plane to which the pump housing is attached. This may cause oil leakage. To replace the spacer, remove the old one from its seat, remove the old gasket from under it, and install a new spacer with the corresponding gasket from the repair kit.
Installing pump gaskets
The DAAZ fuel pump repair kit includes three gaskets of different thicknesses:
Gasket “A” is installed between the cylinder block and the thermal spacer, and the other two are used to adjust the protrusion of the pusher (rod) above the mating plane of the spacer.
Determination of the protrusion of the pusher
We install the new rod in place, and slowly turn the engine crankshaft (using the wrench on the pulley nut), select the position when the rod is extended to its minimum length. We place gasket “B” on the mating plane of the spacer and measure the amount of rod overhang above it with a caliper. It should be 0.8–1.3 mm. If the offset is greater, instead of spacer “B” you need to install spacer “C”, and if it is less, swap the first and second positions. Having achieved the result, we put the fuel pump in place and secure it with nuts. For greater tightness of the joint, the gaskets can be lubricated with a thin layer of automotive sealant.
Removal and installation
The process of removing and installing the fuel pump is performed in several operations. The fuel pump is secured using two studs and nuts with the simultaneous installation of gaskets.
To remove the fuel pump, it is necessary to disconnect the discharge and supply pipelines and unscrew the fastening nuts.
When removing the pump, it is necessary to carefully disconnect the heat-insulating and sealing gaskets without damaging them.
After the repair, it is necessary to perform an installation, which has a number of features. First of all, gaskets are installed: sealing gaskets with a thickness of 0.7–0.8 mm, then heat-protective and insulating gaskets 0.27–0.33 mm. It is necessary to comply with the condition that the pusher is slightly higher than 0.8 mm; if it does not peek out, then replace the gasket 0.7–0.8 mm with 0.27–0.33 mm.
If the pusher protrudes above the gaskets by more than 1.3 mm, replace the 0.7–0.8 mm gasket with a thicker one, 1.2–1.3 mm thick. It is also necessary to follow the procedure when a 0.27–0.33 mm gasket should be installed between the heat-insulating gasket and the body.
The set of gaskets between the pump and the cylinder block should allow the pusher to extend to a distance of 0.8–1.3 mm. After installing the fuel pump, it is secured and the fuel lines are connected.
The engine is started and the condition and functionality of the fuel pump and pipelines are checked for the presence of gasoline leaks.
Each part has its own expiration date, and even the fuel pump on the VAZ 2106 is not durable, everything has its time. If it fails unexpectedly for you, do not rush to panic; with the help of our guide, you can replace the fuel pump on a VAZ 2106 yourself.
DIY fuel pump replacement
1. First of all, you need to take a Phillips screwdriver and loosen the clamps of the fuel inlet/outlet hose.
2. Now you need to remove the hoses from the fuel pump fittings. I recommend preparing M8 bolts in advance to seal the hoses from gasoline leakage.
3. Then you need to unscrew the two nuts securing the fuel pump using a size 13 wrench.
4. Remove the pump from the studs.
5. You need to remove the outer adjusting shim from the studs.
It is worth noting that on our website there are already publications about replacing the fuel pump on a VAZ 2110 and VAZ 2107 with your own hands.
6. Then remove the heat-insulating spacer with the pusher.
7. And finally, we take out the second gasket, which needs to be marked so that when reinstalling the fuel pump, it will not be confused with the first.
8. Install the new pump in the reverse order of removal. In this case, we install each gasket in its place. To ensure reliable operation of the fuel pump, we periodically check and, if necessary, select the thickness of the external adjusting shim. To do this, turn the engine crankshaft so that the pusher protrudes to a minimum amount.
9. After installing the heat-insulating spacer with both gaskets, the fuel pump drive pusher should protrude by 0.8–1.3 mm.
10. A gasket with a thickness of 0.27–0.33 mm must be installed between the cylinder block and the heat-insulating spacer. The external gasket (between the spacer and the pump) is selected to match the required amount of protrusion of the pusher. You can make this gasket yourself by cutting it out of a paronite sheet of suitable thickness.
Diagnostics and replacement of the electric fuel pump on cars of the Zhiguli family
In injection engines of classic VAZs, the fuel pump may lose its functionality both due to problems with the power supply to it and due to a malfunction of its electric motor. In the first case, the situation can be corrected by diagnosing and repairing the electrical circuit of the device. But if the electric motor of the pump fails, only replacing it will help.
Checking the protection devices for the electrical circuit of the fuel pump on injection VAZs of the Zhiguli family
If there is a problem with the electrical equipment of the fuel pump circuit, it usually does not turn on at all. Turn on the car's ignition without starting the engine and listen. First, you should hear a click from the relay, and then a characteristic “squeal” emitted by the pump’s electric motor. If you don’t hear anything like this, start diagnosing with the electrical circuit of the device.
The pump circuit is connected to the on-board network via a separate relay, and its protection is provided by a fuse. Both of these devices are located in the vehicle's optional mounting block. You will find it under the glove box. It contains 3 relays and 3 fuses. The fuel pump relay (indicated R2 in the diagram) is located in the middle, and the fuse (F3) is to the left of it. We pull the fuse out of its seat and check it by “ringing” it with a tester. If a malfunction is detected, we replace it, not forgetting to comply with the rating (15 A).
You can check the functionality of the relay by installing a known working device in its place. Instead, replace it with the relay located to the right of the one being diagnosed, which is responsible for the radiator fan circuit. If this option does not suit you, turn on the ignition and measure the voltage between the pink wire going to the relay and the vehicle ground. The device should show 12 V. This means that the device is powered. After this, you need to connect the pink wire with the gray one at the relay terminals. So we will connect the fuel pump directly to the battery. If it works (that same “squealing” sound will be heard), simply replace the relay.
The fuel pump relay is located in the middle (R2), and the fuse is located to the left of it (F3)
Checking the fuel pressure in the system
The main indicator of the operation of a fuel pump is the pressure it creates in the system. If the device turns on, pumps fuel, but the engine runs intermittently, take the time to check the pressure. To do this, you will need a pressure gauge with a measuring range of 5–7, equipped with a gas-resistant hose and a threaded fitting (if there is no special one, you can use a regular tire pressure gauge). The sequence of actions is as follows:
- On the fuel rail we find a fitting closed with a plastic cap. Unscrew the cap and connect the pressure gauge hose to the fitting. If your device is not equipped with a special threaded fitting, the hose can be secured to the “nipple” using a small clamp.
Pressure connection
The pressure in the ramp should be 2.8–3.2 atmospheres
When removing the vacuum hose from the regulator, the pressure should drop by 0.2–0.7 atmospheres
Replacing the fuel pump on injection Zhiguli cars
You can replace the fuel pump either as an assembly (install a new fuel module) or separately (change only the pump). The cost of a new domestically produced module with a fuel level sensor is 2800–3000 rubles. The production pump itself will cost 500 rubles less.
Replacement Tools:
- slotted and Phillips screwdrivers;
- key to 10;
- key to 7.
Work order:
- Disconnect the negative terminal from the battery.
- Open the gas tank cap.
- Using a slotted screwdriver, remove the rubber apron from the neck of the tank. Disconnect the safety valve tube from it.
Use a slotted screwdriver to pry off the apron
Unscrew the screws securing the gas tank trim
Unscrew the tank clamp bolt
Disconnect the electrical wiring, fuel line hoses, unscrew the nuts securing the fuel module cover
Removing the fuel module from the gas tank
Disconnect the fuel filter
Disconnect the pump power cables
Use a screwdriver to move the clamps and remove the pump from the casing.
Disconnect the tube from the outlet fitting
After installing the pump, it is advisable to check the pressure in the system as described above.
Replacing the fuel pump in cars of the Zhiguli family does not require the car owner to have extensive knowledge in the field of auto repair, and does not take a lot of time and money. It can be done without any problems in a garage, or right on the street. However, if you do not have the necessary tools or the desire to do this yourself, it is better to turn to specialists.