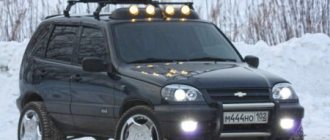
PTF for chevrolet lacetti
All motorists know the importance of fog lights. There are no analogues to this equipment.
Neither xenon nor bi-xenon lighting can properly illuminate the road surface in fog, snowfall, or rainy weather.
This is due to the high location of the xenon/bi-xenon headlights and the large thickness of the light beam they create.
Currently, for the Chevrolet Lacetti you can purchase one of the following types of fog lights (PTF):
TypePurposeCost (RUB)
| CVLAT04-072 | intended for sedan | 2012 (for right and left) |
| CVLAT04-070 | headlights are used in hatchbacks | 1658 |
| CVLAT04-073 | used in hatchbacks | 1358 |
| AK-CH50-0200 | fog lights | 1474 |
| AK-CH45-0200 | PTF | 1404 |
| CVLAT04-071 | intended for Chevrolet Lacetti sedan class | 1026 |
| CVLAT04-074 | used in sedans | 1240 |
How to change the light bulb in the fog light of a Chevrolet Lacetti
Fog lights on Chevrolet Lachetti: installation and configuration features
Every car owner sometimes needs to interfere with conventional PTFs. For example, install new fog lights on a Chevrolet Lacetti or replace cracked glass with stone.
But when sellers offer more powerful lamps in the store instead of the requested lamps, not all car owners think about their compatibility with existing lighting devices.
Chevrolet Lacetti fog lights are not always standard
The note! An interesting feature of a Chevrolet car is that when the luggage compartment of a car with PTF is loaded, they begin to “blind” drivers in different ways. For example, hatchback hatchbacks are smaller than station wagons and sedans because their trunks are heavier.
What are these lighting fixtures for?
Worsening weather is not uncommon in our latitudes. And fog not only occurs in the morning, but can also interfere with daytime and evening traffic. This improves driving safety in low visibility conditions and was developed by PTF.
On the picture. daytime fog
Difference between PTF and other car headlights
The peculiarity of any operation of PTF from other external lighting devices is that it works at the very bottom of the roadway.
Those. Fog lights for Chevrolet Lachetti are installed by the manufacturer in such a way that at maximum load:
- Their luminous flux did not rise above the permissible angle of inclination and did not “blind” oncoming drivers;
- The length of the light beam did not exceed 50-70 meters.
READ How to Change the Steering Gearbox on a VAZ 2107
In other words, PTF shines “under the fog.” Accordingly, installing more powerful lamps in the fog lamp housing inevitably changes these parameters. (See also the article Features of fog lights in the gazelle business)
For full operation of the PTF, a standard 37.5 W lamp is sufficient.
The note! Unlike the headlights, which are equipped with a concealer that allows you to change the angle of light when the car is fully loaded, the fog lights on the Lachetti sedan do not have this function. Initially, they are configured for safe driving under different loads.
Existing GOST standards only determine the location of the PTF on the car, but do not regulate either the angle or length of the luminous flux
. This confuses many car owners.
Car without PTF
Owners of Chevrolet vehicles that do not have fog lights will most likely fall into this risk group, but the desire to install them is great. Unfortunately, the factory manual is not listed in their main search list. Most car owners prefer to hear about additional lighting from auto parts sellers. (See also How to install fog lights on Kalina)
The easiest way to replace the PTF lamp Chevrolet Hatchback Lacetti
flask
Of course, I changed the right one, an error occurred in the video, the left headlight sounded. Well, now there's nothing to be done.
Chevrolet Lackett Fog Light Replacement
Lackett Live Repair Team
. The site contains: Total.
READ How to Open Priora If the Locks Are Frozen
In the car, the PTF mounting points are closed with plastic plugs, which are often lost
It is more correct to buy keychains recommended by the manufacturer for several reasons:
- They have been tested on the job;
- Specify the settings recommended by the manufacturer;
- Easy to install by yourself;
- Have dimensions that fit regular spaces;
- Their price is justified.
For reference: PTF catalog numbers for Lachetti are listed in company showrooms. Particularly the left one. 96551093, and correct. 96551094.
How to install
Consider the option when the car does not have standard PTF in its kit.
However, Chevrolet always provides the option to install them in the future, so:
- He will equip cars in the field with PTF on the front bumper;
- There are places for connections in the connection diagram;
- Vehicle controls with and without PTF are interchangeable.
Each regular place has the ability to connect the PTF to the vehicle ground
In particular, if you want to install fog lights on a car, the owner will need to purchase a stitch switch with a control unit for PTF modes.
It's easy to replace:
- Turn off the ignition;
- Remove the cover from the steering column;
- Disconnect the terminal block from the switch;
- Remove the 4 screws using a Phillips screwdriver;
- Remove the gear shift lever;
- Instead, install a new PTF control unit;
- Secure it with screws;
- Connection to the vehicle's electrical system;
- Check your work.
READ How to Change the Clutch on a Chevrolet Cruze
An additional ring for the Chevrolet steering column switch is provided for PTF
How to set it up correctly
In the lives of active car owners, there are often situations when the regulation of certain units is violated.
And he can't even talk about PTF. Their low seating position and careless handling will inevitably result in the headlights not being illuminated properly:
- Drivers for blind counters;
- Blind in the fog of the carrier (mirror effect).
On fog lights the adjusting screw is removed from the front
It is enough to restore their parameters:
- Place the car on a flat platform near the wall of the house or garage;
- Measure the distance from the center of the PTF to the ground;
- Draw a horizontal line on the wall at the measured height;
- Turn on the fog lights;
- Adjust the light flux so that its border does not go beyond the elongated line.
Correctly configured PTFs have a clear horizontal cut and luminous flux
In most cases, this will be enough to restore proper operation of the fog lights. (See also the article Features of connecting fog lights to viburnum)
Tip: Making stickers for your headlights will protect your glass from stones and extend their lifespan.
Finally
We hope that we were able to clarify the situation with the features of fog lights for Chevrolet cars. And in the video presented in this article, you will find more information on this topic.
Replacing a fog lamp on a Chevrolet Lacetti: photos and videos - Behind the wheel
During operation it is impossible to avoid breakdowns. As for the electrical part, car lamps often burn. The fog light on the Chevrolet Lacetti is no exception. How to replace a part with your own hands? – Let’s look at a detailed photo report and visual video materials in this article.
about replacing the lamp in the PTF with a Lacetti below:
PTF replacement process
The lamp in the fog lamp is not lit.
The process of replacing a Chevrolet Lacetti fog light bulb with your own hands is not as simple as it seems at first glance. So, you will have to additionally dismantle the parts so as not to remove the front bumper.
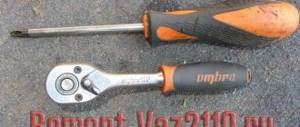
So, let’s stock up on tools, in this case you will only need head 10, and you can proceed directly to the process itself:
- Be sure to remove the negative terminal so as not to short-circuit anything.
- We unscrew the headlight mount from the side where the lamp will be replaced. Unscrew the headlight mount. Unscrewed fastenings of the headlight block. Partially removed radiator grille.
- Of course, in order to completely unscrew the headlight mounts, you will have to remove the radiator grille.
Lateral mounting of the headlight unit on the radiator side. - We take out the headlight block.
It is not necessary to disconnect the wire connectors. To complete the process, it is enough to move the part to the side so that it does not interfere. After the headlight is unscrewed, move it to the side. - Find the rear part of the fog lamp.
Fog lamp, top view. - Disconnect the power supply wire connector to the fog lamp.
Remove the wire block from the headlight. - Turn the lamp counterclockwise and remove it from the mounting mount.
We remove the lamp from the PTF housing. - Installation is carried out in reverse order.
Burnt out fog lamp.
leave a comment
The ends of the purple wire must be connected to the male contacts. We take two pieces of black wire - 20 cm for the right headlight, 30 cm for the left one.
We clean, crimp the ends of the wires onto the contacts, I still insulated the ends with heat shrink: We put on the corrugation, plug the contacts into the connector, repeat everything a second time, we get two adapters: That’s it, you can go laying. If anyone is interested in what Narva lamps look like, install the PTF and lay out the wiring.
Unscrew the plug - 3 self-tapping screws. To do this you need a short screwdriver; I unscrewed everything while lying under the car. We take the fog light and find that there is no way to push it in from below - the crankcase protection is in the way. We'll break the workflow down into two steps to make it easier for you to understand the process.
The connection diagram for the front fog lights and rear lights is in every car maintenance book. Connecting the necessary components Installation is as follows: First of all, you need to remove the old switch and install a new one, to do this, turn the steering wheel 90 degrees to the left, unscrew one screw, then 90 degrees to the right - the second lock is unscrewed.
After this, the cover is removed, two latches are pressed, and the structure is carefully removed, after which the two connectors are disconnected.
Assembly occurs in reverse order. This is what the connector with the PTF switch looks like. Next, you need to install the relay and fuse.
Tags: 112, engine, Mercedes, characteristics
- Related Posts
- Chevrolet COBALT standard radios in Russia. Compare prices, buy consumer goods on diabloarea.ru
- Chevrolet Lanos exterior mirrors – chevrolet-lanos – AUTOPITER
- Installed iridium spark plugs – Chevrolet Lacetti/Gentra/Cruze Fans Club
« Previous entry
Fog lights on a Chevrolet Lacetti: replacement - AutoExpert
14.01.2020
Forum for questions and answers
Task 1:
install this switch (the part number is visible on the packaging): We initially have this switch:
We take a standard screwdriver, turn the steering wheel 90 degrees to the left, then to the right, unscrew 2 screws, and remove the cover. Let's look:
We press the clamps on the top and bottom of the old switch and carefully pull it out to the left:
We pull out 2 connectors:
Take a new switch and plug it in in reverse order:
We put everything in place, tighten it, and get beauty: By the way, at the beginning of this whole procedure, the steering wheel can be lowered all the way down - it will be more convenient.
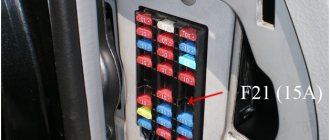
Task 2:
Install the relay and fuse Now let's go under the hood. We climb into the fuse block with prepared relays (catalog number visible) and a 15A fuse:
Let's put everything in place:
Let's go check the operation of the switch. First, we check the operation of all previous operating modes (turn signals, flashing, dimensions, low beam). Then we turn on the fog lights (together with the headlights or low beam). The indicator lights up - everything is done well:
Task 3:
Make adapters for the headlights and prepare connectors. Connectors with pieces of wire (sealed, with a seal) that were perfect for lamps were found and purchased:
We take out the “mother” contacts from the connector, prepare a piece of corrugation (I didn’t bother with any additional insulation of the wires near the connectors, because everywhere under the hood the ends near the connectors are not insulated).
We clean and crimp the ends of the wires onto the contacts (I still insulated the ends with heat shrink):
We put on the corrugation, plug the contacts into the connector, repeat everything a second time, we get two adapters:
We connect the ends of the purple wire to the male contacts.
Looking ahead, I will say that I had 5 meters (4 meters was more than enough) of this wire, I crimped the 2 ends onto the male contacts, passed the wire through the corrugation, quickly laid the corrugation from the right headlight, estimated the length and cut it off: so I ended up with a piece of wire for the left headlight.
We take 2 pieces of black wire - 20 cm (for the right headlight) and 30 cm (for the left one) - we crimp one end of each onto the male contacts, the other onto the bolt terminal. That's it, you can go laying.
If anyone is interested in what Narva 37.5 W lamps look like, here it is:
Self-installation of fog lights on a Chevrolet Lacetti
Today we will try to install fog lights on a Chevrolet Lacetti ourselves. First you need to install the switch for the fog lights:
Initial view of the switch:
Take any screwdriver and use it to turn the steering wheel 90 degrees to the left, then to the right. Next, unscrew the two screws and remove the cover.
We press the latches on the bottom and top of the old switch and carefully pull it out to the left:
Next, you need to take a new switch and attach everything in the reverse order:
Now we install everything in its original place. We tighten all the screws. In the end we get this beauty:
Before starting this procedure, it is preferable to lower the steering wheel all the way down - this will be much more convenient.