Article number and cost of the original cabin filter and its analogues
The Chevrolet Lacetti, regardless of the size of the power unit, is equipped with the same cabin filter, article number 96554421. The price of General Motors branded products ranges from 600 to 1200 rubles.
ATTENTION! A completely simple way to reduce fuel consumption has been found! Don't believe me? An auto mechanic with 15 years of experience also didn’t believe it until he tried it. And now he saves 35,000 rubles a year on gasoline! Read more"
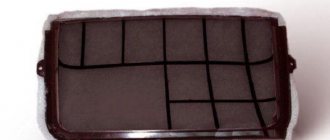
The GM filter element has a plastic frame along the contour and has a special protrusion that facilitates installation and removal of the product from its seat. Many drivers note that this feature has a drawback. Due to the protrusion over the edge of the filter, debris sometimes spills out. For this reason, drivers are forced to seal part of the filter with foam rubber.
The General Motors signature filter is made from a specially developed synthetic fiber. It has antibacterial impregnation. It does not allow microorganisms to colonize the surface of the filter element. Thanks to this, the filter reliably serves the entire period prescribed for it and no foreign odors appear from it.
Despite all the advantages of the original GM filter, many car owners prefer its analogues. This is due to the fact that General Motors consumables are too expensive.
The table below shows the catalog numbers and costs of good non-original filters, which are in no way inferior in performance to a GM product.
Table - List of analogues of the Lacetti branded cabin filter.
| Manufacturer | Article number | Price, ruble |
| TSN | 9718 | 110-125 |
| AMD | AMDFC22 | 115-125 |
| Nipparts | J1340910 | 180-200 |
| Parts-Mall | PMC003 | 185-205 |
| Profit | 15212102 | 190-210 |
| Meyle | 29123190007 | 280-300 |
| Sakura | CA65170 | 300-310 |
| WIX | WP9238 | 560-600 |
Replacement frequency
According to General Motors recommendations, replacing the cabin filter on a Chevrolet Lacetti is required after 15 thousand kilometers. Car owners recommend reducing the interval to 5-8 thousand km, or installing a new filter element annually before the summer season.
Reasons to reduce the interval between replacements:
- in places where the car is operated, there is sand or other small foreign particles in the air;
- frequent trips in dense city traffic and stuck in traffic jams;
- the route runs along places where plants bloom;
- frequent travel near production with the release of harmful or fine particles;
- operating the machine on unpaved country roads.
Description of replacing the cabin filter on a Chevrolet Lacetti
In order to replace the cabin filter on a Lacetti with your own hands, it is recommended to use the instructions below.
- Disconnect the negative terminal of the battery.
- Jumper F must be removed from the interior fuse box. If this is not done, there is a risk of a short circuit. A blown fuse will not only de-energize the glove compartment light circuit, but will also turn off the warning lights on the dashboard and the side lights.
- Remove the glove compartment. To do this, unscrew three fasteners at the top and two at the bottom.
- Support the glove compartment from below and open the lid latch.
- Turn off the glove compartment light by disconnecting the terminal block.
- Unscrew the steel cross member securing the glove box.
- Remove the four screws that hold the filter cover in place.
- Before removing the filter, it is recommended to lay down a film to prevent debris from falling onto the floor.
- Remove the cabin filter. To do this, you need to pull it at a slight angle to the body using a special protrusion. If difficulties arise, you should break the filter element along the break line.
- Blow out dust and debris from the seat and air ducts.
- Reassemble everything in reverse order.
Replacing the cabin filter in a Chevrolet Lacetti is a standard procedure during a routine inspection. To save time and money, many drivers prefer to replace this part themselves. How to change the cabin filter with your own hands, read below.
Replacing the Lacetti cabin filter with your own hands
There's a lot of fuss about the glove box on the internet. Some people remove it for convenience, while others, foaming at the mouth, argue that there is no need to remove the glove compartment. What can I say about this? I'll say two things:
- If the car does not have a shelf under the glove compartment, then there is no need to remove it.
- You don’t have to remove the glove compartment even if a shelf is installed, but why bother? The glove compartment can be removed in a minute and a half without any problems. It's much more convenient!
In general, decide for yourself what to do.
I show you how I do it.
The first step is to remove the glove box (glove compartment). To do this, you first need to turn off the power to the glove compartment lighting, since there is every chance of causing a short circuit. This can be done either by removing the fuse or removing terminal 31 (negative) from the battery
Next, you need to unscrew only five screws. Two below, above the shelf...
After this, carefully remove the glove compartment so as not to tear off the wires and place it on the floor. Disconnect the two connectors.
This is what the whole thing looks like with the glove box removed
Unscrew the four screws
We remove the plank that these screws secured
Now use the small protrusion (tab) to pull the filter itself down. After it rests on the floor, we bend it to the side and carefully, so as not to tear it, pull out the remaining part.
This is what the dismantled filter element of the Lacetti's cabin looks like
Now you need to remove the accumulated debris in the well. To do this, stick your fingers in and clean out leaves and other possible debris.
Don't rush to install a new filter right away. Take the time to shine a flashlight on the air conditioner evaporator. It is located immediately after the filter. The fact is that during operation of the air conditioner, moisture condenses on the evaporator and it is constantly wet. Therefore, everything possible sticks to it, because the filter does not provide 100% protection from everything.
If you have a shelf installed under the glove compartment and you did not remove it, then it will be more difficult to visually evaluate the evaporator, but if you removed it, then there will be no problems.
The evaporator must be absolutely clean
Now we install the new Lacetti cabin filter in the reverse order. Here I also want to write a few words.
Before installing a new filter, you usually have to cut its frame (break it, cut it) in order to bend it in half to make installation easier, since the polyethylene gets in the way quite seriously. Some manufacturers make cuts in these places in advance.
It will be useful: Replacing the belt tensioner of the Passat B5 alternator
But as always, there will be those who will “make a big discovery” and insert the filter without breaking it in half. Then, naturally, it will be trumpeted and newcomers also begin to stuff their filters in this way at all costs. Some people succeed, some don't. This absolutely does not mean that someone is handy, but someone was born with golden hands. There are different situations. And there are different filters.
Let's say the last time I took a flexible filter and it installed without any problems at all.
Therefore, if you have difficulties installing the filter, then break it. And if it installs without problems, then install it intact, without breaking it.
Don’t try to do as someone else did, but do as you feel comfortable.
Here is a video about the nuances of replacing the cabin filter in a Chevrolet Lacetti
After replacing the cabin filter, you immediately feel that the air conditioning fan is much quieter and the windows sweat less.
By the way, if your car windows sweat a lot. then I advise you to read the article Car windows sweat
How to extend the life of the cabin filter?
Modern cars are equipped with various devices for cleaning the air in the cabin. The main task of filter elements is to extend the service life of the ventilation system and ensure the flow of clean O2 into the car.
Without an air filter, dirt, dust, and exhaust would enter the vehicle cabin, which would undoubtedly affect the health of the driver and his passengers.
Like any other filter element, the SF needs regular replacement. Failure to replace a part in a timely manner can result in serious health problems. The surface of the SF is most often wet, which is a favorable environment for the development of pathogenic bacteria, which provokes diseases of the upper respiratory tract. Moreover, a persistent unpleasant odor will appear in the vehicle cabin, which will make driving impossible.
According to recommendations from the Chevrolet Lacette car manufacturer, it is recommended to replace the cabin air filter every 20 thousand kilometers. In some cases, a part change is required more often, especially if the vehicle is operated off-road and in particularly dusty areas (in a village, desert).
On average, the SF is changed twice a year - in winter and summer.
You can determine when it is necessary to replace the cabin air filter by the appearance of the part. If the surface is slightly contaminated, the SF can be blown off with hot air and reinstalled. Such an air filter will still last about 5 thousand kilometers.
Fabric SF can be washed. This will require a large amount of water and any cleaning agent. The part is placed in a tank of water in a vertical position for 15 - 20 minutes. After this, the filter is blown with a hairdryer and inserted into the box. This way you can extend the service life of the cabin filter by 8 - 10 thousand km.
Signs that you need to replace the cabin filter in a Chevrolet Lacetti:
- poor air flow in ventilation;
- noise when the stove is turned on;
- frequent fogging of car windows;
- persistent unpleasant odor in the cabin.
Step-by-step instructions for changing the cabin filter
The driver can replace the cabin filter in a Chevrolet Lacette himself. To do this you will need a screwdriver, a clean sponge and a new air filter part.
How to replace the cabin filter:
- Empty the glove compartment from unnecessary things;
- Remove the glove compartment. To do this, you need to press the fasteners on both sides and move them;
- Afterwards, using a screwdriver, unscrew the bolts securing the cover of the protective box, inside of which the SF is located;
- Carefully remove the part and wash the seat with a clean rag;
- Install a new SF.
Choosing a cabin filter
Chevrolet Lacette car manufacturers recommend purchasing only original GM 96554421 consumable parts. If these are not available in the store, you can use high-quality analogues:
- fabric SF - FC22 from AMD. The surface of such parts is covered with coal, which prevents the development of microbes, mold and mildew;
- antibacterial SF PMC-003 from Parts-Mall are also often installed in Chevrolet cars;
- Russian SF TSN 9.7.18 from the manufacturer Citron. The price of the cabin filter is 350 rubles;
- paper SF - AG 628 CF from Goodwill.
Replacing the cabin filter in a Chevrolet Lacetti
Frequently asked questions when replacing the Lacetti cabin filter
Read more.
lachetti
/.
Top screws
You can immediately give up the idea of trying to get to the Chevrolet Lachetti cabin filter without touching the glove compartment.
Removing the glove box
To do this job, you need to use the tools and follow the recommendations of manufacturers and specialists:
- Using screwdrivers, carefully unscrew the fasteners on the screws;
- it is necessary to unscrew the right and left hinges of the glove box;
- After removing all the screws, you can remove the glove box;
- it is necessary to disconnect special contact parts;
- The last step is to remove the small metal rod (held in place by four screws).
Remove the metal plate
Signs of a clogged filter
The biggest indicator that the cabin filter is clogged and needs to be replaced with a new one is the minimum throughput. Even at maximum speed, when the fan is turned on, virtually no O2 will enter the cabin, and dust and dirt will appear on the surface of the windshield.
On a Chevrolet Lacetti car, the heating and air conditioning system filter is replaced every 15,000 km. If you often drive in dusty areas, the replacement interval should be reduced to 1.5-2 times. If you notice that the filter is deformed, then it must be replaced, regardless of mileage.
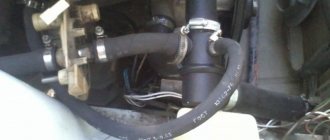
Where is the filter located and what will you need?
Access to the filter is located inside the car. It is located behind the glove compartment, at the feet of the front passenger. To replace, we will need a new filter element, a 7mm wrench or socket, or a Phillips screwdriver. Some car enthusiasts perform this procedure by removing the glove box, but today we will analyze the process without dismantling it.
Replacement procedure
- We look under the instrument panel, from the side of the front passenger's feet, where we see the filter cover of the air conditioning and heating system. It is attached to 4 bolts, which we need to unscrew.
- After we unscrew them, remove the cover and put it aside
- take out the filter element. It has special technological cuts, approximately in the middle, which are convenient because when pulled out of the grooves, it can be bent.
- After you have removed the filter, turn on the ventilation and heating system at full speed in order to simply blow out large debris and dust from the system. Also, when blowing, change the distribution of air flows.
- Installation is carried out in reverse order. You can also bend the new filter along the technological cut for easy installation of its grooves.
If your mileage per year is small, you can perform this operation once a year, for example, after the winter season.
When to change or signs of a clogged filter
Replacing the Chevrolet Lacetti cabin filter is a necessary procedure that can be performed after the service interval has expired.
The manufacturer recommends replacing the cabin filter every 15,000 kilometers. This interval is optimal if the car is operated under normal conditions.
Read more: Traffic rules of the Russian Federation speed
Factors that greatly reduce the time between part replacements:
- Country driving . There is a lot of dust on dirt roads. Dirt reduces the service interval by 3–4 times.
- Poor quality item . There are fakes on store shelves. Operation of such a part can be dangerous for the driver and passengers. Poor quality materials may release toxins or interfere with flow.
- Heater malfunctions . If there is a problem with the heating system, antifreeze or oil can get into the air ducts. This leads to clogging of the filter in a very short time.
Operating a vehicle with a clogged or faulty cabin filter is not recommended. The element can develop pathogenic microorganisms that are harmful to health. Disruption of the circulation of fresh air masses leads to an acceleration of the corrosion process.
Signs of a malfunction may include the following factors:
- Musty air in the car interior. The cause of mustiness is often a clogged air duct. Air is not flowing through the system in the correct quantity. This leads to stagnation.
- Fogging of windows while people are inside the car. The problem of increased humidity in the interior space is associated with a violation of the circulation of air masses. This is an indirect consequence of filter malfunctions.
- Noises when ventilation is turned on. Reduced system flow increases the load on the fan. This results in noise or vibration.
- The appearance of an unpleasant odor in the cabin. This indicates wear or severe contamination of the air supply channels.
Cabin filter Chevrolet Lacetti
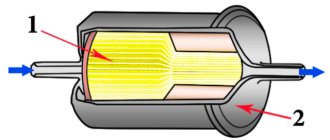
In addition, it must still allow clean and fresh air to pass through. The design of the cabin filter is quite simple. The first layer, usually made of paper, traps large particles with a diameter of over 10 microns.
Behind this is an electrostatic layer that stops smaller particles. As an additional option, leading manufacturers install a third layer, which contains activated carbon.
chevrolet lacetti cabin filter replacement This substance, due to its high adsorption, can absorb even unpleasant odors. In addition, if you check the cabin filter yourself, you can be sure that the replacement will happen in a timely manner. However, if you prefer to drive on dusty or dirty roads, or on polluted streets, then the service life of the cabin filter is reduced.
In addition, replacement of the filter is recommended if any part of it is damaged. After purging the system, the battery must be disconnected again. We install a new filter element and reassemble in the reverse order.
New cabin filter installed. When to change?
The manufacturer indicates that it should be changed at least once every 15 thousand km. However, sometimes you have to change the filter more often, this will be persistently hinted at by unpleasant musty air from the air ducts. Original article number The original cabin filter has catalog number J. If it is not replaced in time, in addition to the smell in the cabin, we will get dust, and above all, chevrolet lacetti cabin filter replacement conditions for the breeding of bacteria and microorganisms.
Non-original cabin filters for Lacetti. The price of an original filter element is within - rubles, a non-original one can be bought for - rubles, and a filter with a carbon chevrolet lacetti, replacing the cabin filter with an element can cost - rubles. Good luck to everyone and clean air in the cabin!
Only new, out with old! Out with the old filter.
How to replace the cabin filter on a Chevrolet Lacetti
Do not clean it or put it back under any circumstances! I would also like to warn against reusing an old filter.
Thrifty car enthusiasts simply clean the filter corrugation, and sometimes take it out too, leaving only the protective mesh. Support the glove compartment from below and open the lid latch. Turn off the glove compartment light by disconnecting the terminal block.
How to replace the cabin filter on a Chevrolet Lacetti
Unscrew the steel cross member securing the glove compartment. Remove the four screws that hold the filter cover in place. Before removing the filter, it is recommended to lay down a film to prevent debris from falling onto the floor. Remove the cabin filter.
To do this, you need to pull it at a slight angle to the body using a special protrusion. If difficulties arise, you should break the filter element along the break line.
Article number and cost of the original cabin filter and its analogues
The Chevrolet Lacetti, regardless of the size of the power unit, is equipped with the same cabin filter, article number 96554421. The price of General Motors branded products ranges from 600 to 1200 rubles.
The GM filter element has a plastic frame along the contour and has a special protrusion that facilitates installation and removal of the product from its seat. Many drivers note that this feature has a drawback. Due to the protrusion over the edge of the filter, debris sometimes spills out. For this reason, drivers are forced to seal part of the filter with foam rubber.
The General Motors signature filter is made from a specially developed synthetic fiber. It has antibacterial impregnation. It does not allow microorganisms to colonize the surface of the filter element. Thanks to this, the filter reliably serves the entire period prescribed for it and no foreign odors appear from it.
Despite all the advantages of the original GM filter, many car owners prefer its analogues. This is due to the fact that General Motors consumables are too expensive.
The table below shows the catalog numbers and costs of good non-original filters, which are in no way inferior in performance to a GM product.
Table - List of analogues of the Lacetti branded cabin filter.
| Manufacturer | Article number | Price, ruble |
| TSN | 9718 | 110-125 |
| AMD | AMDFC22 | 115-125 |
| Nipparts | J1340910 | 180-200 |
| Parts-Mall | PMC003 | 185-205 |
| Profit | 15212102 | 190-210 |
| Meyle | 29123190007 | 280-300 |
| Sakura | CA65170 | 300-310 |
| WIX | WP9238 | 560-600 |
Replacement frequency
According to General Motors recommendations, replacing the cabin filter on a Chevrolet Lacetti is required after 15 thousand kilometers. Car owners recommend reducing the interval to 5-8 thousand km, or installing a new filter element annually before the summer season.
Reasons to reduce the interval between replacements:
- in places where the car is operated, there is sand or other small foreign particles in the air;
- frequent trips in dense city traffic and stuck in traffic jams;
- the route runs along places where plants bloom;
- frequent travel near production with the release of harmful or fine particles;
- operating the machine on unpaved country roads.
When is it time to change the cabin filter?
Replacing your cabin filter yourself will save you money and, more importantly, time. In addition, by carrying out this procedure independently, the owner will be convinced that the replacement was completed in a timely manner, and also, subsequently, the owner will be able to control the level of contamination.
According to the recommendations of the Chevrolet Lacetti manufacturer, the old filter should be changed after reaching the mileage mark of 15 thousand km. However, it is necessary to take into account the conditions of use of the vehicle.
After all, if the car has to be constantly used in non-ecological areas, in conditions of high street pollution, with dust and dirt constantly getting inside, it will have to be replaced earlier.
The same cannot be said about ecological areas with high humidity or, for example, with a large concentration of trees (taiga), where it can last even for several years. Please note that the cabin filter should also be replaced if one of its components is damaged.
And now in more detail about how to replace it. In the Chevrolet Lacetti model, the wiper unit cover is located in front of the passenger seat. It will be more convenient to get to the mounting location after removing the glove compartment. It is secured with five self-tapping screws; all of them will need to be carefully unscrewed.
Description of replacing the cabin filter on a Chevrolet Lacetti
In order to replace the cabin filter on a Lacetti with your own hands, it is recommended to use the instructions below.
- Disconnect the negative terminal of the battery.
- Jumper F must be removed from the interior fuse box. If this is not done, there is a risk of a short circuit. A blown fuse will not only de-energize the glove compartment light circuit, but will also turn off the warning lights on the dashboard and the side lights.
- Remove the glove compartment. To do this, unscrew three fasteners at the top and two at the bottom.
- Support the glove compartment from below and open the lid latch.
- Turn off the glove compartment light by disconnecting the terminal block.
- Unscrew the steel cross member securing the glove box.
- Remove the four screws that hold the filter cover in place.
- Before removing the filter, it is recommended to lay down a film to prevent debris from falling onto the floor.
- Remove the cabin filter. To do this, you need to pull it at a slight angle to the body using a special protrusion. If difficulties arise, you should break the filter element along the break line.
- Blow out dust and debris from the seat and air ducts.
- Install a new filter.
- Reassemble everything in reverse order.
Replacing the cabin filter on a Chevrolet Lacetti
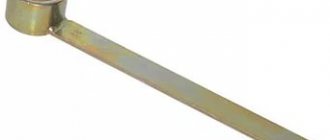
To replace, you will need a set of screwdrivers, a set of bits and a small ratchet.
We remove this fan.
Before starting work, it is imperative to turn off the power to the car ; in extreme cases, remove the fuse from the passenger compartment marked F21 a rating of 15 A. If this is not done, there is a high probability of getting a short circuit in the circuit and blowing out this fuse, and it is also responsible for the indicator lamps on the dashboard and side lights.
To replace the cabin filter, it is not necessary, but it is advisable to remove the glove compartment, since it will be much more convenient to work.
Replacement algorithm
The cabin filter is removed in the following sequence:
- We remove the glove compartment. To do this, you need to unscrew the three screws on top and two on the bottom using a Phillips screwdriver.
The upper screws of the glove compartment are marked with an arrow.
Carefully lower the box.
It will be useful: Which shock absorbers for nissan primera p11 and p12 to choose?
The plug is secured with 4 self-tapping screws.
Removed the cabin filter.
It is necessary to clean the seat of the cabin filter from visible dirt.
New cabin filter installed.