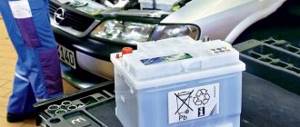
When operating a car, its owner is invariably faced with the need to maintain and replace the battery. Such a battery is subject to increased load, so over time the battery begins to hold a charge worse, requiring appropriate replacement. The efficiency of such a car battery is directly influenced by the density of the electrolyte. It is necessary to regularly check the density of the electrolyte, which will ensure trouble-free engine starting, and the battery itself will last as long as possible without causing any trouble. In this article we will tell you how to check the battery density.
Battery device
Before talking directly about how to check the density of the electrolyte in a battery, let's talk about the structure of standard car batteries. This battery consists of:
- A body consisting of six cans.
- Plus and minus lead plates located inside each can.
- The positive and negative buses that connect each sealed compartment.
- Serial connection, which allows you to obtain the required charging power at the output.
The battery owes its ability to release and accumulate electrical charge precisely to the electrochemical properties of the electrolyte. This electrolyte is poured into each of the sealed jars and has certain density indicators. During the operation of the car, the density indicator may change, so the car owner needs to know how to check the battery density at home and, if necessary, increase or decrease this indicator.
Battery problems
Most drivers are familiar with the hysterical howl of the starter or the clicking, or even complete silence, under the hood of the car when starting the engine. This unpleasant moment is associated with the following malfunctions.
- Faulty vehicle wiring. Perhaps there is a contact lost somewhere, most often this is explained by the partial absence of “mass”.
- The starter solenoid relay is faulty.
- Ultimate wear of starter bushings.
- Defective starter windings.
- Low voltage in the circuit due to a discharged battery.
The last reason is usually the most likely. The most logical move would be to check the density of the electrolyte in the battery. What does it depend on?
- From the climate zone.
- Depending on the time of year.
In order to correctly check the density of the electrolyte in the battery, you need to know its value and have a device called a hydrometer.
You may be interested in an article by our specialist, in which he tells how to choose a battery for a car.
We also additionally recommend reading interesting material that tells how to find out the year of manufacture of the battery.
Finding out the correct density is easy - there are special standards. Their average is 1.24 - 1.29 kg/dm3. More precisely:
- cold regions - 1.27 - 1.29 g/dm3, summer and winter;
- middle band - 1.25 - 1.27 g/dm 3;
- warm areas - 1.23 - 1.25 g/dm 3.
You should check the battery density at least once every three months. Even a slight deviation from the norm requires immediate recharging of the battery.
You need to carefully monitor the indicators so that the battery lasts as long as possible and does not let the owner down at the most crucial moment. She especially “does not forgive” neglectful treatment of herself in the winter. The fact is that in the cold its capacity is lost, and sometimes even one unsuccessful engine start leads to battery discharge.
Having a simple device, checking the battery density at home is not difficult.
Density is density, but the electrolyte level must be monitored with no less attention, especially in the summer, when the battery boils away more intensely.
There are a lot of opinions regarding the electrolyte level in the battery:
- Some believe that it is enough to cover the separator meshes with this liquid.
- Others believe that the higher the electrolyte level, the better.
- Still others do not look under the battery plugs at all - until the very moment when the starter stops turning, which often causes genuine surprise among such would-be owners.
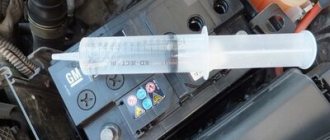
There are batteries that have a mark on the case indicating the electrolyte level. It’s not very convenient to use, and you can’t hope for accurate indicators. The proven “old-fashioned” method will help here: a glass tube with an outer diameter of 5 - 6 mm. Marks should be placed on its body in the lower part indicating the correct electrolyte level (according to the battery’s datasheet). The tube is lowered into each jar one by one, until it stops at the separator mesh. Next, plug the upper side of the tube with your finger, and the device is removed from the jar without releasing your finger. The liquid will remain in the tube and its exact level will be visible.
If the level is low, you should gradually pour distilled water into the jar, taking a control measurement after each addition. If the level is too high, which is also not a correct indicator, then the excess liquid is pumped out using a hydrometer. This method is the most reliable.
How to properly maintain your battery
The trouble-free operation of such a car battery depends on the timeliness and correct maintenance of the battery. Such work includes:
- Visual inspection.
- Electrolyte level analysis.
- Checking battery density.
- Voltage level measurement.
- Checking the battery with a load fork.
This battery check must be performed twice a year - in spring and autumn. This will ensure high-quality battery operation both in summer and in cold winter. Maintenance and proper care of the battery is not particularly difficult. If the density of the electrolyte is higher than normal, it is necessary to add distilled water. If low density is noted, then you should simply charge the battery.
Why is it necessary to check the density of the electrolytic fluid?
Any electrolyte is nothing more than a chemical mixture consisting of distilled water and sulfuric acid in a certain proportion: water 65%, 35% acid. It is this percentage ratio that allows the electrolyte to accumulate an electrical charge without causing damage to the sensitive lead plates of the battery.
During constant operation of the battery, constant changes in the density of the electrolyte occur, which in a certain way can affect its operating functions. The very concept of density, by the way, means nothing more than the percentage ratio of sulfuric acid to distillate.
This is interesting: Optimal density of a car battery in winter and summer
If the level of sulfuric acid inside a battery gets too high, it can end badly for the battery's plates. There are situations when the acid simply corrodes the lead and the plates are destroyed.
If there is too little acid, this means that the battery is discharged or is close to being completely discharged. The battery cannot operate at the capacity specified in its technical specifications. For example, there may simply not be enough energy during a cold start of an internal combustion engine.
Also, if a driver tries to drive for a long time on a discharged battery, the process of sulfates settling on the plates is inevitable. A dense white coating forms on them, which can sometimes be very difficult to remove. At a critical level of sulfates, either destruction of the plates or a short circuit will occur. The battery will need to be desulfated.
Battery operating principle
The battery in a car works cyclically, that is, the battery first accumulates a charge, and then releases it when you need to start the engine. During such cycles, a chemical reaction occurs inside the battery, when various salts fall out of the sulfuric acid, which settle on the lead plates, and water is released from the electrolyte in the jars. Over time, the concentration and density of the electrolyte changes, which leads to improper operation of the battery. Periodic density measurements will help avoid battery discharge, which will last as long as possible. Let's talk in more detail about how to check the density of a battery with a hydrometer.
Attention. If the density indicator is below normal, then electrolyte should not be added to the battery. It is necessary to recharge the battery, which will ensure the required density.
Battery operating principle
To know how to correctly measure the electrolyte level, it is important to remember that any battery operates on a cyclic principle. First, it accumulates charge inside, and then, when the engine starts, it gradually begins to release it to the car, setting it in motion. When the battery releases a charge, the acid releases the same sulfates (salts) that settle on the plates of the “cans”. And in the “banks” water is formed. This causes the electrolyte level to drop significantly.
What you need to do in this case:
- when the density level is higher than required, you need to dilute the electrolyte with distilled water;
- when the density decreases, the battery urgently needs to be fully charged for at least 10-12 hours.
Read also: Transistor kt819gm parameters analogues
How and why is the density of an electrolyte measured?
Many car owners simply do not know why they should measure the density of the electrolyte in the battery. As you know, the electrolyte consists of 35% sulfuric acid and 65% distillate. This ratio makes it easy to accumulate a charge without causing any harm to the lead plates. During operation, the density of the electrolyte may change, which is explained by the evaporation of distilled water and chemical reactions during battery operation. As a result, the content of sulfuric acid increases, which in turn degrades the charge and can harm the lead plates, up to the complete deterioration of the battery.
Digital indicators to focus on
Since the chemical component of the battery directly depends on temperature factors, there are generally accepted digital indicators indicating the level of optimal electrolyte concentration. In the south of the Russian Federation it is 1.25 , in the middle zone - 1.27 , and in the northern regions - 1.29 g/cm3 .
So, how to check the electrolyte level in the battery and its density? Take the battery to a room at room temperature, remove any dirt from it, open the jars and use a glass tube and a hydrometer. Don't forget to wear gloves. The battery should be checked regularly to ensure it performs at its best.
I decided to measure the density of the electrolyte.
Hydrometer (Greek) - in physics, this is the name of a device that serves to determine the density, and therefore the specific gravity of bodies.
The device of the Hydrometer is based on the hydrostatic law, according to which each body floats in a liquid so deeply immersed in it that the weight of the liquid displaced by it is equal to the weight of the entire floating body (in this case, the body means a hydrometer).
For motorists, a car hydrometer is of practical importance for measuring the density of electrolyte and antifreeze. The electrolyte density hydrometer went into obscurity for some time, due to the fashion for maintenance-free car batteries. However, recently, battery manufacturers have returned to a partially serviced scheme (batteries with caps for monitoring and topping up electrolyte) because are forced to admit the great practicality of such a scheme. Along with partially serviceable batteries, electrolyte hydrometers have also returned.
The hydrometer is a float, in the upper part of which there is a paper scale, graduated in density units kg/m3 for electrolyte and in degrees Celsius (°C) for antifreeze. Using a balloon in the upper part of the hydrometer, electrolyte or antifreeze is sucked into the pipette through the tip of the plug in such an amount that the hydrometer floats freely in a vertical position.
Read also: Gun for applying foam to walls
Maintenance-free batteries have been popular in the automotive market for some time. Today, manufacturers are increasingly returning to more practical models that have holes for monitoring electrolyte levels and replenishment.
For such a battery, diagnostics and maintenance can be organized at home. For this purpose, you will need a special device - a hydrometer.
Checking the electrolyte level
Before checking the battery density without a hydrometer, you need to set its level. If the battery itself is made of translucent plastic, then checking the electrolyte level is not difficult. If the battery is made of opaque dark plastic, then to check the electrolyte level you will need a special glass tube with a diameter of about 5 millimeters. Such a tube is lowered into the jar until it stops, after which its upper hole is closed with a finger. The tube is carefully removed from the battery. Electrolyte will remain in it, which is poured into the flask and the level is checked. It is believed that the amount of liquid in the flask will be 10-15 millimeters. If the level is higher or lower, it is necessary to level it, and then measure the density of the electrolyte.
Hydrometer for checking density
Checking the battery density with a hydrometer is carried out in several stages. The device has a simple design that allows you to determine the density of a liquid according to the principle of Archimedes' law. In appearance, the device resembles a hermetically sealed ampoule with a division scale applied. Fraction and mercury are used to calibrate the hydrometer. The device is sold as a set with a rubber bulb and a glass measuring flask, which allows you to measure the solution without risk to the equipment.
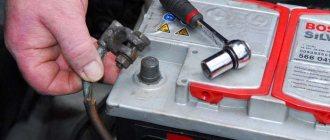
When working with electrolyte, it is necessary to observe personal protective measures, use rubber gloves and a rubberized apron . Instructions on how to check battery density include the following procedure:
- The battery is cleaned of dust and dirt;
- Place the unit on a flat surface;
- Remove the lids from the jars;
- Use a “pear” to collect the electrolyte and pour it into the flask;
- Lower the hydrometer into the liquid.
We recommend: How to choose a battery for the Kia Ceed
An important condition for the procedure is to fully charge the battery before checking the electrolyte density . The car owner should take into account that the process of charging the battery is accompanied by the release of chemically active substances from the cans: hydrogen and oxygen, the combination of which can lead to an explosion. Forced ventilation of the room will help to avoid an unpleasant situation. Charging time can last up to 6 hours.
How to measure electrolyte density
If you are wondering how to properly check the density of a battery, we can say that such work is not particularly difficult. Just remember that the banks inside the battery are not connected to each other, so you should check the density in each of the containers. It is prohibited to turn the battery over and mix electrolyte with each other to equalize the density. The battery cover and plugs must be clean and free of any contamination. The density check is performed exclusively on a charged battery, otherwise the measurements will be incorrect.
Before checking the density of a maintenance-free battery, it must be removed from the car and kept for several hours at room temperature. The optimal temperature range when measuring density is 20-30 degrees.
To measure density, you will need to use a hydrometer, also called a densimeter. On sale you can find a variety of hydrometers that have a similar design, but at the same time differ in their cost. When choosing such a device for measurement, it must be tested on a calibration liquid, which will allow you to be completely confident in the accuracy of such measurements.
Most hydrometers have the same design and provide the required accuracy. And yet you should not purchase the cheapest Chinese samples, since their quality and measurement accuracy will correspond to the cost.
Measuring the density of an electrolyte using a hydrometer is not difficult. The following must be done:
- The tip of the hydrometer is being wiped.
- It is lowered into a flask for measurement.
- Using a pear, collect the electrolyte and fill the flask with it.
- They wait a few minutes and then check the readings.
- Drain the electrolyte back.
- Similar work is carried out with each of the cans in the battery.
Optimal electrolyte density
When operating the battery and measuring the density of the electrolyte, you should remember that the indicators may fluctuate depending on the climate in the region.
- For southern Russia, the optimal density indicator is 1.25.
- For the middle band - 1.27.
- For the north - 1.29.
When making batteries, a standard electrolyte is poured into the battery, which freezes at temperatures below 60 degrees and has a density of about 1.26-1.27 grams per cubic centimeter.
If the measurement showed an increased density of the electrolyte, distilled water must be added to the battery. You can purchase such a distillate at gas stations or in specialized stores. Do not use regular tap water. Add distillate by eye, and then check the density of the electrolyte again.
Important. The lead plates of the battery must be completely immersed in the liquid. Based on this, you should add distillate or additionally charge the battery.
Changes in the density of the electrolyte inside the battery occur for natural reasons. However, if you notice that the battery quickly loses charge, and the density readings change literally a week after they are leveled and topped up with distillate, this indicates serious problems with the battery, which will soon require replacement.
Correct density indicators
Now it is natural to ask what density then should be in a car battery.
Typically, there is no provision for a significant change in the density of the electrolyte in batteries in winter and summer, focusing only on the period of cold weather.
There are special tables with parameters for the density of electrolyte in batteries, depending on the climate zone. That is, the ambient temperature is directly related to what concentration of the mixture of acid and water should be in the battery.
If we talk about using a battery under the hood of a car in winter, then the density and its norm must correspond to the following values:
- When operating the battery in winter, at subzero temperatures, the density of the electrolyte being poured should be 1.27 g/cm3.
- If this is the far north with a temperature of -30 to -50 degrees, when filling it should be 1.27, and when the battery is fully charged it should be 1.29.
- For the northern region with temperatures from -15 to -30, these are 1.26 and 1.28 g/cm3 for the electrolyte being poured in and with a fully charged battery, respectively.
- When the temperature is in the range from -4 to -15 degrees, then the table on the density of the electrolyte in a car battery suggests maintaining the values at 1.24-1.26.
- If this is a southern region, when the temperature rarely drops below -10 degrees, 1.22-1.24 g/cm3 will be enough.
- In tropical regions with positive temperatures, even in winter, electrolytes with a density of 1.2-1.22 g/cm3 are used.
Yes, the density of the electrolyte used in the battery in winter or summer directly depends on weather conditions.
It is necessary to slightly adjust the density of the electrolyte in a car battery in the summer if there is extreme heat. The concentration decreases slightly.
The main condition for maintaining battery performance is not the density of the electrolyte, but the battery charge level.
Therefore, try to always monitor the degree of charge, while simultaneously using a hydrometer to check the density.
How to measure density in maintenance-free batteries?
If checking the density and level of electrolyte in maintained batteries is not difficult, then how to check the density of the electrolyte in a maintenance-free battery. Such batteries have a small peephole in the top cover, which can be unscrewed and through the hole that appears, the density of the car battery can be checked. Just remember that in maintenance-free batteries it will be possible to measure the density of the electrolyte in one jar, so you will get an average reading. You will not be able to take accurate measurements for each of the cans.
How and how to check the density of the electrolyte in the battery
In addition to a hydrometer and a multimeter, you can check the electrolyte level in the working solution with a homemade device.
A special device for measuring density (hydrometer) is a regular glass tube, the upper part of which is narrowed and has a graduated scale. The lower part of the tube is wide; it contains shot or mercury, which is poured in a strictly defined amount during calibration of the hydrometer. In car dealerships, such a device is sold as a set with a rubber “bulb” for collecting electrolyte and a measuring flask in which the hydrometer itself is located.
The principle of operation of the device is based on Archimedes' law, and the density of the electrolyte is determined by the immersion depth of the hydrometer (the volume of liquid displaced by it) and the weight of the device.
Hydrometer for measuring electrolyte
Before checking the electrolyte level in a car battery, you must consider the following rules:
- the battery must be placed on a flat surface;
- The battery temperature should be about 20-25 degrees Celsius;
- the density level is measured not in one, but in all banks;
- the operating value is checked no earlier than ten hours after the last trip or three hours after recharging;
- The battery must be charged first.
Hydrometer measurement
Learn more about how to use a hydrometer to measure density levels:
- With the battery disconnected, all banks are unscrewed.
- A hydrometer is inserted into one end of the jar, a bulb is placed at the other end, and liquid is taken with its help. There should be enough of it in the device so that its float dangles freely in the container.
- The density level is determined in accordance with the readings on the tester scale. The received parameters are recorded.
- Diagnostics of the density parameter is repeated for each jar. All obtained parameters are compared with the normalized values indicated in the table.
It is recommended to check the battery density at least every 15-20 thousand kilometers.
Photo gallery: diagnostics of electrolyte level and density in jars
Table: correction to hydrometer readings
| Temperature of the working fluid when measuring its density, ºС | Correction to the readings obtained during testing with a hydrometer, g/cm3 |
| -55 to -41 | -0,05 |
| -40 to -26 | -0,04 |
| -25 to -11 | -0,03 |
| -10 to +4 | -0,02 |
| From +5 to +19 | -0,01 |
| +20 to +30 | 0,00 |
| From +31 to +45 | +0,01 |
| From +46 to +60 | +0,02 |
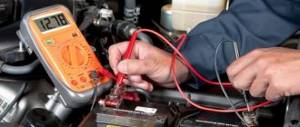
How to test a car battery with a multimeter
Step-by-step instructions that will allow you to correctly measure and find out the battery density look like this:
- The meter is being assembled. To do this, wires with alligator clips are connected to the multimeter body. Before taking measurements, the tester itself is switched to “voltmeter” mode.
- The rotary switch on the device is moved to the 20 V position. As a result, the tester will show any parameters below this threshold.
- Then the cables are connected to the terminal outputs of the battery - the black contact goes to the negative terminal, the red one to the positive terminal. If the color of the wires is the same, then you should check the markings directly on the multimeter body. There should be “-” and “+” signs on the contacts where the cables exit the tester.
- The voltage parameter is monitored and the obtained data are compared with the normalized ones. If the battery is fully charged, the operating parameter will be 12.7 volts, therefore, charging the device will not be required. If the resulting parameter is in the range from 12.1 to 12.4 V, then the device is half discharged, which means its density does not meet the norm. In other cases, detailed diagnostics of the battery and its recharging or replacement are required.
Table: electrolyte density when checked with a multimeter
| Charge percentage | Electrolyte density, g/cm3 | Battery voltage, V |
| 100% | 1,28 | 12,7 |
| 80% | 1,245 | 12,5 |
| 60% | 1,21 | 12,3 |
| 40% | 1,175 | 12,1 |
| 20% | 1,14 | 11,9 |
| 0% | 1,10 | 11,7 |
Measuring electrolyte density with a homemade device
The principle of measuring in winter or summer using a homemade device is similar, and such a tester can be built independently, taking into account the following nuances:
- The main element of the hydrometer is the float, which is used to make measurements.
- A glass test tube or other similar container can be used as a reservoir.
- Millet or other bulk substance is poured into a test tube; you can also use a piece of lead or another weight.
- Then the container is lowered into the water. In the place where the water is level, you need to mark the number 1, this is due to the fact that this liquid has a density of 1 g/cm3. Then the values are calibrated for other solutions with higher densities.
How to check the electrolyte and measure its density
Before checking the electrolyte in the battery, clean its surface from dirt and dust so that when removing the covers from the battery compartments, they do not get inside . Take a thin glass tube, its diameter can be from 4 to 5 millimeters. Now you need to lower the tube into the compartment all the way, so that it touches its bottom. The hole can be closed using your finger (remember to protect yourself first by wearing technical gloves!).
Remove the tube from the jar: a small amount of electrolytic liquid should fall into it. Focus on its height - how much space it takes up in the tube. If the height of the liquid is 10-15 millimeters, the density is within normal limits, and when the level is higher or lower, the density must be adjusted.
This is interesting: Technical characteristics and analogues of the LR44 battery
Before you begin adjusting the density, you need to make accurate measurements of it - in each battery compartment separately, since they do not communicate with each other. Be sure to charge the battery before taking measurements, otherwise the results may be incorrect. In addition, shortly before the process, the battery should be left for 3-4 hours in a room at room temperature (from 20°C, maybe a little higher). After all, a chemical liquid is directly dependent on the temperature factor.
To measure the level of electrolyte density, a simple instrument such as a hydrometer is used. It is also sometimes called a more complex word - densimeter. But essentially it's the same thing. The hydrometer consists of a tip, which is alternately lowered into the battery compartments, a flask, a rubber bulb for sucking out liquid and a measurement scale, which is located inside the flask.
The verification algorithm will be as follows:
- wipe the tip dry with a clean cloth;
- lower it into the battery compartment;
- Use a rubber bulb to scoop out a small amount of liquid;
- monitor the “behavior” of the electrolyte: when it stops moving, measure the density on the scale;
- pour the liquid back into the “jar”.
As you can see, the technique for taking readings is very simple. The main thing is to remember to protect your hands with gloves.