07/30/2020 1,649 Alarms
Author: Victor
The A6 Starline anti-theft system is no longer available today. Despite this, the security complex has advanced functionality, including two-way communication and the ability to automatically start the engine.
[Hide]
Twage a6
Page 3
- Image
- Text
3
Twage A6
Content
Car alarm operating instructions Components included in the car alarm kit……………………………. 4 Technical characteristics of car alarms ……………………………………………………… 4 Car alarm capabilities ……………………………………………………… 5 Car alarm control key fobs … ……………………………………………………………… 7 Car alarm management ……………………………………………………….. 16 Protective functions of car alarms … ……………………………………………… 22 Service functions of car alarms …………………………………………….. 26 LED indication of car alarm status ……… ………………… 32 Personal code for emergency deactivation of car alarms ……………… 33 Programming functions and operating parameters of car alarms …….. 34 Recording key fob codes ………………………………………… ……………………………. 36
Instructions for installing a car alarm Recommendations for the placement and installation of components……………………….. 37 Recommendations for laying and connecting wires………………………… 38 Car alarm connection diagrams……………………… …………………………. 45 Warranty obligations……………………………………………………………….. 46
Revision No. 2 dated 01/01/2003
Equipment and cost of A6
The alarm kit includes:
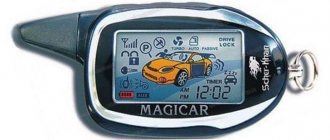
- keychain with LCD display;
- additional key fob without screen;
- shock sensor with two levels of response;
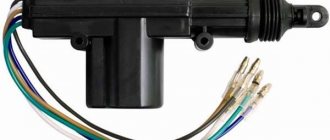
- central block processor in a plastic case;
- antenna module;
- led indicator;
- service (emergency) button;
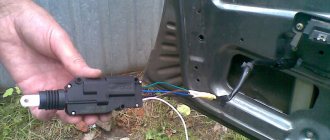
- hood (trunk) switch;
- instruction manual with connection diagrams;
- wires, terminals and plugs for installation.
The A6 kit does not include a siren, so you will have to buy it separately. You can also use the bell from the previous alarm if it is installed on the car.
At this time, the manufacturer has discontinued the Starline A6 twage car alarm, replacing it with new, more modern modifications. During the period of active sales, its price fluctuated between 50-55 dollars.
Twage a6 car alarm capabilities
Page 5
- Image
- Text
5
Twage A6
Car alarm capabilities
Protected areas of the car and methods of protecting them
· Engine – from starting (locking relay) · Doors, hood, trunk – from opening (push-button switches) · Body, wheels, windows – from shocks and shocks (two-level shock sensor) · Ignition – from switching on
Car alarm security
· Dynamic control code, protected from selection and interception · Limitation of the number of alarm cycles · Interruption of alarms without disabling the security mode · Memorizing the state when the power is turned off and returning to the same state
when power is restored Personal emergency shutdown code
Protective functions of car alarms
· Turn on sound and light alarms when sensors are triggered
in security mode · Submission of alarm signals to the key fob with LCD display · Remote activation of the "panic" mode · Immobilizer mode · Anti-robbery mode, activated remotely by the key fob · Anti-robbery mode, activated by a special button · Engine blocking and its preservation when dismantling the alarm
Self-diagnosis and indication of operating modes
· Indication of alarm status by LED and on the key fob display · Indication of the reason for the last alarm activation for 6 security zones · Indication of a faulty zone when the security mode is turned on · Sound indication of the fact that the alarm was triggered · Automatic control of security sensors with disabling of faulty ones
and a message about it · Indication of open doors when the security mode is turned off · LED indication of the serviceability of limit switches when
ignition on
Manual
For initial system setup, it is recommended to use the main key fob equipped with a display. This will allow you to correctly configure all operating parameters.
Setting up the control panel
Before setting up the system in accordance with the instructions, you must bind the communicator.
Without this, managing basic functions will be impossible. In total, the user can bind no more than four key fobs to the control unit.
Purpose of key fob buttons
Description of the functions performed by the pager keys:
- Button number 1 is used to program options when pressed briefly. If you hold down the key for three seconds, this will enable or disable the protection mode with sound.
- A short press on the second button will select a command that corresponds to the cursor position on the screen. If you press this element, it will open the lock installed in the trunk door.
- A quick click on the first and second keys will allow you to monitor the condition of the vehicle and control the temperature level in the cabin. When you press the buttons for a long time, the car search option is activated.
- Quickly pressing key 3 allows you to control the position of the cursor on the pager screen, as well as stop the alert signals. By pressing the button for three seconds, the user can configure the clock, timer, alarm, and energy saving mode. If you hold down the key for 6 seconds, this will enter the programming mode of the first button.
- Clicking on the third and first buttons will activate the notification mode menu of the communicator.
- Pressing keys 3 and 2 allows you to set the timer.
Identification of buttons on the key fob
Key fob programming
To bind the communicator, you need to configure the operation of the first key:
- Button 3 is pressed several times, the user must move the cursor on the key fob screen to the position of the required command. If the key will be used to control the protection mode, it must be set to the corresponding indicator position. To change the direction of cursor movement, you need to pause briefly between clicks.
- After selecting an option, the button must be pressed for 6 seconds. You need to wait for a double and then a triple beep.
- To enable the function, press the first key.
Setting up the second key is done in the same way:
- By clicking on the third button, the cursor is moved on the display to the desired position.
- After selecting the option, the second button is clicked.
After binding, the clock parameters are configured:
- To complete the task, the third key is clicked. It must be pressed until the key fob emits two short beeps.
- The clock indicator on the display will start flashing. To increase parameters, use the first key, to decrease - the second. To change values quickly, this button must be held down.
- After changing the settings, the minute parameters are adjusted identically. To do this, click on the third button.
- To exit the settings mode, press the third key. It must be held until the communicator beeps.
Programming alarm clock parameters:
- To complete the task, the third key is pressed. It must be held until the communicator plays a double signal.
- The third button is pressed to move the cursor on the screen to the alarm position. The clock indicator will flash. The first button is used to increase the parameters, and the second button is used to decrease them.
- After setting the hours, the minutes are adjusted. To do this, click on the third button.
- When the parameters are set, you need to click on the third button, so the system will go to the menu for activating or disabling the option. Turning on is done by clicking on the first key, and turning off is done by clicking on the second. To exit the setup menu, use button 3; the communicator should emit a beep.
Recording codes
Programming new remote control codes is done as follows:
- The key is inserted into the lock and turned to turn the ignition on.
- The service key is pressed for six seconds. You can release the button after the siren sounds four times.
- The first and second keys of the main communicator with a screen are pressed until the siren plays a sound signal. This indicates that information about the first remote control has been added to the system. To bind a spare communicator, click buttons 3 and 4.
- The previous action is repeated for each added communicator. The siren will play signals to confirm the recording. You need to have time to bind each key fob within six seconds after recording the last device. Otherwise, the alarm will exit the programming menu, which will be indicated by five headlight flashes.
- When the procedure is completed, the ignition is turned off.
User Viieer Aleks talked about independently recording key fob codes into the memory of the Starline A6 microprocessor module.
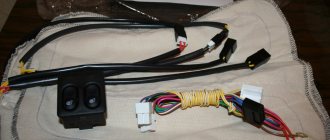
Setting up autorun
This model does not provide the option of automatic engine start, but the consumer can implement it independently. To do this, he needs to additionally purchase and install the Starline 02-12 module.
Description of the contact elements on the main block of the device:
- the red contact is intended for connection to output 30 on the ignition switch;
- yellow is used to connect to the ignition line tap;
- green is for connection to terminal 15/2 if the vehicle is equipped with two ignition lines;
- The blue contact is used to connect to the ACC output on the lock;
- a thinner yellow-black wire is needed to connect to contact element 50 on the switch;
- a thick cable in a similar sheath is designed to power the starter mechanism.
A 12-volt voltage is generated at output 50 of the ignition switch. A relay installed inside the autostart module begins to power the starter mechanism. It closes contact elements numbered 30 and 50. It is not allowed to connect the module without breaking the electrical circuit of the starter device.
Pinout of low current block:
- the black contact is used as a negative one to power the unit;
- the wire in a gray-black sheath is the input for monitoring the operation of the power unit; it must be connected to the battery charge indicator or tachometer;
- The lilac-orange output must be connected to the limit switch of the parking brake lever;
- the pink contact must be connected to the control output of the anti-theft system;
- the red-black contact is an output on the immobilizer bypass device, it is activated only during automatic start;
- the wire in the gray-orange sheath can be left untouched;
- The black and yellow contact is an output that is activated when the ignition is turned on and the starter mechanism is turned off.
Autostart module Starline 02-12
Inside the autostart module body there is a set of toggle switches and switches, each of which must be set to a specific position:
- Operating time of the starter mechanism. If the toggle switch is set to Off, then this indicator will be 0.8 seconds, if in On, then 1.8 seconds.
- Method of controlling the power unit. If in the Off position, then according to the tachometer, if in On, then according to the contact elements, to which 12-volt voltage is supplied after the engine starts.
- Power activation algorithm for terminal 15/2. If in the Off position, then when the starter mechanism operates, power will remain on the device. If it is On, then the power supply stops. The second option is the most common.
- Transmission type. Initially, this toggle switch is set to Off; this is an automatic transmission. It should be left like that.
- Ignition delay time before starting the power unit. If the toggle switch is set to Off, this indicator will be less than one second, if On, then several seconds.
- The service switch must be left in the Off position.
Activation of security mode
In the Twage model, the user himself assigns buttons to enable the protection function. Therefore, activation is carried out taking into account which key was selected to control this mode.
If your communicator is broken or lost, you can enable protection using the service key:
- The key is inserted into the lock and the ignition is activated. The button to enter the service mode is clicked 4 times.
- Then the ignition is turned off. The siren should play one signal, after which the car's lights will blink.
- Within 20 seconds, the driver must leave the vehicle and lock all doors with the key. The siren will sound once, and the communicator will play a melodic signal.
- 20 seconds after the actions are completed, the protection mode is activated. The car headlights will blink once and the status indicator LED will flash.
Disabling security mode
One of the control buttons can be used to turn off the protection function. The purpose of this option is selected by the user. If the remote control is lost or broken, the Valet service button can be used to disable the security mode.
The deactivation procedure is carried out as follows:
- The car doors must be unlocked with a key. The security complex will start the siren. An icon in the form of an open lock will appear on the key fob display.
- The key is installed in the lock and turned. Once the ignition is activated, there is no need to start the engine.
- To disable the protection mode, the user needs to know their personal PIN code. To enter the first digit of the password, the Valet button is pressed several times. The number of clicks corresponds to the first character.
- The key is turned to turn off the ignition. Then it turns on again.
- The steps to enter the PIN code are repeated, only now you need to enter the second digit.
- The ignition is turned off. If the password is correct, the siren will stop working. Protection mode will be disabled.
The AVTOservis Nikitin channel talked about deactivating the protective function using the service key.
Car alarm service functions
Page 6
- Image
- Text
6
Operating and installation instructions
Car alarm service functions
· Silent security mode · Security mode with the engine running · Activation of the security mode without a key fob · Automatic return to the security mode in case of accidental switching off (switching on) · Automatic activation of the security mode · Delay in turning on the security mode for the time the interior light goes out · Self-diagnosis when turning the mode on/off security · Silent activation of the security mode with the shock sensor disabled · Remote shutdown / activation of the shock sensor by levels
in security mode · Silent deactivation of the security mode · Remote control of the central locking · Control of the central locking from the ignition switch · Two-step unlocking of door locks · Two-pulse unlocking of door locks · Possibility of implementing the "comfort" function · Valet service mode · Emergency disabling of the security mode with a personal code · 4 additional channels for controlling vehicle devices · Control of car interior lighting · Car search mode · Remote programming mode for new key fobs and erasing lost ones · Possibility of resetting the values of programmable functions to factory presets · Call mode from the car · Indication of temperature in the car interior · Time display, timer, alarm clock · Battery discharge control of the main key fob via LCD display · Fluorescent backlight of the main key fob display
Twage a6, Control keys
Page 7
- Image
- Text
7
Twage A6
Control key fobs
The car alarm performs its intended functions either automatically or
or by signals from the key fob when pressing buttons. Part of the provided functions
and some system operating parameters can be changed by
programming. The StarLine Twage car alarm has a 3-button control key fob with
liquid crystal display. Purpose of button 1 of the key fob
programmable. The purpose of button 2 is quickly selected by moving
cursor on the key fob display using button 3. When pressing the key fob buttons
The fluorescent backlight of the display turns on for a few seconds. When the alarm executes a command from the key fob, the relevant information
appears on the display and a melodic sound signal sounds. When the alarm performs any actions automatically
the relevant information is also displayed on the key fob display and
accompanied by sound signals or vibration. If more than one key fob is used to control the alarm, then
the status of the car and car alarm will only be displayed on
display of the key fob from which the last command was issued. In case of malfunction or loss of the main double-sided key fob
communication and LCD display, the system comes complete with
additional 4-button control key fob. Most functions and
alarm operating modes can be activated from this key fob as well,
but below the operating instructions are written for the use case
main key fob with LCD display.
How to set up the key fob?
For proper operation, you need to configure the remote control. The first button is programmed first.
The setup is done like this:
- Key number 3 is clicked quickly several times so that the cursor on the display moves counterclockwise or clockwise. To change the direction of movement, you need to pause for one second between clicks.
- Move the cursor on the screen using key 3 to a position that will correspond to a specific command, for example, activation or deactivation of the security mode.
- Having selected a function, press key 3 for six seconds until two and then three beeps are heard.
- To activate, click on button 1.
With this setting, by pressing key 1, you can activate or disable the protective mode. When you click, an indicator will appear that corresponds to the installed option. To reconfigure the button assignment, repeat the above steps again.
Programming button number 2 is carried out as follows:
- Perform a few quick presses on button 3, this will allow the cursor to start moving around the screen.
- By pressing the same button, move the cursor to the position that will correspond to a specific function.
- When the option is selected, press key 2.
If you plan to use the autorun function, you need to set the clock to do this:
- To configure, click on key 3 and hold it down until two short beeps are heard. After this, the indicator on the watch will blink. To increase the values, press key 1; to decrease, press key 2. To ensure a quick increase or decrease in values, keys 1 and 2 can be held down.
- When the clock parameters are configured, the minutes are set in the same way, only to go to this menu you need to click on key 3.
- To exit the clock setting menu, press button 3 until a beep sounds.
On the main remote control you can configure the alarm clock:
- To program, click on key 3 and hold it down until the key fob emits two beeps.
- Then successively click on key 3 until an alarm clock icon appears on the screen. The clock symbol will blink. To increase the readings, press button 1, to decrease the readings, press button 2.
- First, the hours are set to trigger the alarm, and then the minutes; to set the latter, you need to press key 3.
When the alarm clock is set, you need to quickly click on key 3, this will allow you to go to the menu for enabling or disabling the function. Activation is done by pressing button 1, deactivation is done by pressing key 2. To leave the alarm clock settings menu, hold down the third key. There should be one beep and the remote control will automatically exit the menu. When the alarm goes off, the remote control will emit one melodic signal. To turn off the feature, press the third key on the pager.
If the alarm option is activated, the corresponding indicator will appear on the key fob display.
Alexander Shkurevskikh spoke about the procedure for linking the Starline A6 signaling key fob.
To set the timer, click the third button on the key fob and hold it in this position until the remote control emits two beeps. Using the same button, you need to move the cursor to the position of the hourglass indicator. The procedure for setting the timer is the same as with an alarm clock. The security complex allows you to set the timer to a maximum of 19 hours 59 minutes. When the function is activated, the status will be displayed on the remote control screen and the hourglass icon will begin to blink. Once the time has been set, the countdown will begin. After the set time period has elapsed, the key fob will emit eight beeps and the hourglass icon will disappear from the screen.
Twage a6, Purpose of additional key fob buttons
Page 9
- Image
- Text
9
Twage A6
Button 1 • On/off security with confirmation sounds Button 2 • Search mode (0.5 sec) • Panic mode (3 sec) Button 3 • Channel 3 (0.5 sec) • Trunk unlocking (3 sec) Button 4 • On/off silent security (0.5 sec) • Channel 2 (3 sec) Buttons 1+3 • Disabling the sensor by levels Buttons 1+4 • Valet service mode Buttons 3+4 • Anti-robbery mode (ignition on) • Recording key fob in programming mode
The four-button open-loop key fob uses a lithium cell
power supply CR2032, 3B. Battery operating time depends on frequency
use of the key fob and the type of battery installed. To replace the battery, unscrew the screw on the back of the key fob and open the cover.
Remove the old battery and install a new one in its place, observing the polarity.
Then close the key fob cover and tighten the fixing screw.
Replacing the main key fob battery is performed in the following order: 1. Open the cover on the back of the key fob and remove the old battery. 2. Briefly press button 1 of the key fob. 3. Install the new battery, observing the correct polarity, and close the cover.
(The correct position of the battery is indicated on the key fob body under the cover). 4. After replacing the battery, adjust the clock and alarm readings.
Re-programming of button 1 of the key fob is not required.
Purpose of the additional key fob buttons
Button 1
Button 2
Button 3
Button 4