Removal
1. We prepare the car for repair work.
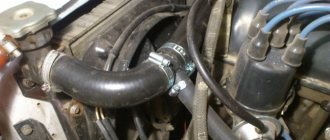
2. Using a 10 mm socket wrench with a deep head, unscrew the five self-locking nuts (1) of the front fastening of the protection.
3. Using an 8 mm socket wrench, unscrew the four self-tapping screws (2) securing the engine protection to the mudguards of the engine compartment.
4. Using a 10 mm socket wrench, unscrew the two bolts (3) of the rear protection fastening.
5. We disengage the engine protection from the mudguards and remove it from the car.
Installation
We install the engine protection and all previously removed parts on the car in reverse order.
Attaching the engine protection to the car.
Hello, today we will tell you how to remove and replace the engine protection on a VAZ 2110, 2111, 2112. When you change the oil in the engine, gearbox, or you have severely bent this protection, or perform any other operation from below the car, you will need to remove the engine protection.
Many owners of domestic cars are concerned about the issue of protecting the engine of their car. And all because the plant does not provide for the installation of anything significant.
No, there seems to be protection there. But it is a plastic splash guard. The maximum that it is capable of is protection from minor contacts with the road surface on potholes. Basically, it protects the pan from water and dirt.
Therefore, updating the protection is a mandatory measure, without which there is a high probability that your engine or other hidden components will soon be damaged. And repairs can cost a lot of money. Don't forget the quality of roads most drivers have to deal with.
Installation instructions
Installing a protective sheet on a Lada Kalina is quite simple and any car enthusiast can handle it independently within half an hour. Since you will have to work with the lower part of the car, you will need a hole or overpass.
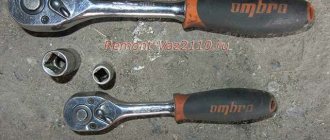
Tools
To install or replace a sheet on a Lada Kalina, we will need the simplest tools that any car enthusiast has:
- ratchet wrench;
- extension;
- set of heads.
Ratchet with heads and extension
Stages
Sequence of unscrewing bolts
- Having reached the bottom of the car, if there is an old factory protection (the so-called boot), then the first thing you need to do is remove it.
- We begin dismantling by unscrewing the front bolts, then the side bolts and then the rear. When removing the protection, think about how to support it or invite a partner, since after unscrewing the last bolt, the sheet may fall on you.
- Now we need to install a new one. To do this, apply a sheet and begin to tighten the bolts.
- Don't tighten them too much right away.
- First bait them, and then walk around in a circle and tighten everything until it stops.
- It is worth noting that some types of protection may require different fastenings and therefore may require other tools.
Tightening bolts with a ratchet and extension
Why are impacts to the bottom dangerous?
Damaging the crankcase for a VAZ 2110 is not a difficult matter. For most owners of this model, it is more a matter of time or simple luck.
In this case, the engine can be seriously damaged due to imperfections in the design of the engine suspension. Essentially, the power unit hangs as you do.
- The engine oil pan is too low to the ground.
- When moving, the motor moves slightly, but moves on the mounting brackets. This is especially true for situations with sudden braking.
- Even a small stone hitting a pan at speed can cause serious damage. Then the repair will cost much more than installing protection.
Why is crankcase protection needed?
The main purpose of the engine crankcase protection is implied in its name - a plate installed in the lower part of the car covers the main components of the internal combustion engine (there is also gearbox protection) and protects them from damage. Damage can occur as a result of driving on an uneven unpaved road, hitting a bump, getting a wheel into a hole, as well as due to stones, debris, pebbles, dirt and water flying from the road.
In some cases, crankcase protection will allow you to completely avoid damage or reduce it to a minimum.
Possible problems
There are several situations when the crankcase hits the road surface. Their consequences can be very different.
Therefore, let's look at the most common situations and determine what you, as the driver and owner of the car, should do.
A dent has formed, but the breakdown is not visible
There is a high probability that as a result of such damage the breather, that is, the oil receiver, has broken.
You should not rejoice prematurely if no traces of oil leaks are found after the impact.
The breather for the “ten” is often made of plastic or aluminum. Its design includes an oil pickup tube. It is located slightly above the tray - about 5 centimeters. Therefore, the place where the tube breaks may be higher than the existing oil level.
If such an impact occurs, immediately turn off the car and stop.
Next, you should check the breather for a break:
- Start the engine by performing a test run. If the oil sensor light does not go out, there is a high probability that the breather will break;
- Turn off the power unit;
- Add oil to the crankcase, then start the engine;
- If at the same time an oil stain appeared under the car, the breather still broke. You will have to call the evacuation service;
- If the oil pressure sensor light goes off, you can hope that nothing happened to the breather after the impact. You can continue moving on your own. Only to a service station.
In such a situation, often the repair consists of simply replacing the breather. This is not so easy to do, but it is still easier compared to overhauling the engine.
The dent on the block is insignificant, there are no signs of breakdown
With such impacts, the breather breaks off extremely rarely. But the gap between it and the pallet may decrease. Because of this, the performance characteristics of the car are reduced, and the car may not withstand heavy loads.
Choice of protection
To ensure proper protection for your own engine on a VAZ 2110, you must first decide which element will be installed on the bottom of the car.
Today, manufacturers offer many options. Let’s identify the most popular solutions in the case of the domestic “ten” and discuss their features. This will help you make the final decision specifically for your situation.
Type of protection
Peculiarities
Aluminum alloy guard
Lightweight, quite reliable and durable. No special mounting brackets are required for installation. Typically, the available fasteners are excellent for fixing
Steel protection with powder paint
Such elements are durable and have good corrosion resistance. However, they are characterized by a significant drawback - the metal is too thin, so do not expect reliable protection
Protection of KAMAZ production
This is the thickest protection option, where metal is used with a thickness of about 4 millimeters. They are distinguished by reliability and heavy weight. Due to the mass, a serious drawback arises - the fasteners can simply break out with all the consequences. Therefore, for installation it is imperative to use special high-strength brackets
Be sure to choose steel that is at least 2 millimeters thick. At the same time, the presence of stamped stiffeners is also strongly recommended.
When purchasing protection, be sure to pay attention to the presence of special technological holes through which oil is drained from the crankcase and airflow is provided to the power unit. Fasteners only in full compliance with the holes provided on the VAZ 2110.
Replacement
The first thing you need to decide before replacing the protection is whether to keep the factory mudguard or not.
Dismantling works
Some believe that it is better to leave it, since this will provide double protection. Others are of the opinion that such layers of protection do not provide additional protective measures, but only collect dirt and accumulate snow and ice in the winter. The choice is yours.
But just in case, we will tell you how to correctly and quickly remove the factory mudguard from the pan of your car:
- The best option for working conditions is a lift. But if it is not there, you can use an overpass, or an ordinary pit in your own garage;
- Five self-locking nuts are used to secure the front of the factory mudguard. To dismantle them, you will need a regular 10 mm wrench;
- The protection is attached to the mudguards using four self-tapping screws. To remove them, a key of 8 millimeters is useful;
- There are two more mounting bolts at the rear. Here again we pick up a 10 mm key;
- After dismantling all the fasteners, all that remains is to pull the mudguard out of the engagement into which it fits with the mudguards.
Final assembly
That's it, the mudguard has been dismantled, so you can safely proceed directly to installing the newly purchased, new, full-fledged protection.
- A pit, overpass or lift is suitable for work. Someone here already has what.
- Place the guard against the surface of the engine sump to ensure it fits into the existing holes.
- Screw the front mudguards to the protection.
- Next, self-tapping screws are attached to the side member brackets.
- The next step is to attach the protection to the mudguards.
- On the front bumper, all that remains is to tighten the five nuts that will finally hold the new metal plate in place.
Working under the bottom
Expert advice. If you want to make driving your own car more comfortable and enjoyable, consider installing a powertrain mounting bracket. It is mounted regardless of what type of protection you have chosen for your VAZ 2110.
Installing engine crankcase protection on a VAZ 2110
When installing protection, the car owner is often faced with the choice of removing the old protection, or screwing a new one directly onto it. Double protection probably won’t make things worse, but dirt will get stuck in the gap between these two plates. Therefore, everyone decides for themselves whether to remove the old protection. To install the new protection, you need to screw five bolts in the front and two in the back.
Installation of protection is carried out as follows:
- we drive the car into the pit;
- remove the old plastic protection;
- we apply new protection and see that it fits the holes in the car;
- screw the mudguards to the protection;
- we attach screws to the side member brackets;
- we attach the protection to the mudguards;
- tighten the front nuts holding the protection (5 pieces)