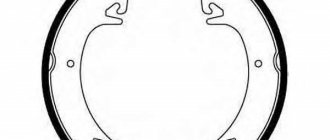
One experienced person, with a quick glance under the hood of my car, immediately pointed out to me that the upper engine mount was worn out and needed to be replaced (many thanks to him for the advice!). You don't need a lot of experience to replace the top support. There is no need to jack the car. So I decided to do everything myself. Everything turned out to be not as easy and simple as it was written in the Murzilka, but 40 minutes of quiet swearing and perseverance did their job - the support was replaced. I’ll say right away that when starting off, significant vibrations were previously felt (the car seemed to be shaking violently), after installing the new support, 90% of those vibrations went away. I'm sure the other supports need to be replaced too, but that's still to come.
I bought a “cooperative” (that’s what the seller said) upper support in the store for 490 rubles. I compared the new “cooperative” one with the new “native” one in the store - the quality of the rubber bands is better, the metal is galvanized, it looks more solid or something... but 180 rubles more expensive.
The installation has begun. It turned out that I did not have 15 and 16mm keys. I had to go buy it. The old support in its place looked tired...
I sprayed the fastening points of the nuts with WD40 to make it easier to unscrew. After 10 minutes I sprayed again.
Removing the left support
We install an adjustable stop under the gearbox.
Using a 15mm socket with an extension, loosen the tightening of the upper tension nut of the support cushion.
From the bottom of the car, using a 17" socket with an extension, unscrew the nut securing the left power unit support to the gearbox bracket (for clarity, the left mudguard of the engine compartment has been removed)... ...and remove the washer.
Using a 13mm socket with an extension, unscrew the two bolts securing the support to the body.
Remove the left support. To disassemble the support, finally unscrew the upper coupling nut of the support cushion.
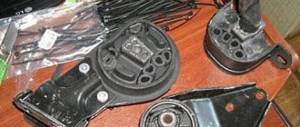
Left support parts
: 1 - upper nut; 2 - upper limiter; 3 - pillow; 4 - lower limiter; 5 — hairpin; 6 — washer; 7 — lower nut The upper support stop has two flats. When installing the support...
...the flanges of the cushion clip should face up. We assemble the left support without fully tightening the upper coupling nut, after which we install the left support in the reverse order. In this case, the flats on the stud, preventing it from turning, should be located in the groove of the gearbox bracket. When final tightening the upper coupling nut, it is necessary to ensure that the flats of the upper stop are located parallel to the axis of the support mounting holes.
Read more: Cook oatmeal porridge with milk
Replacement on a 16-valve engine
The right support changes as follows:
- We dismantle the crankcase protection (if any).
The protection needs to be removed.
- Now the engine needs to be jacked into the crankcase. The emphasis is carried out using a wooden board.
- Next, you need to unscrew the nut that secures the pad to the engine bracket.
Unscrew.
- We unscrew the fasteners at the junction of the support with the body.
- To make it easier to remove the unscrewed support, you need to slightly lower the engine with a jack.
- We remove the pad and install a new one in its space, performing the steps in reverse order.
The left support is changed according to the above scheme, only the jack is installed under the checkpoint (Checkpoint - a point designed to control passage (visit) and access to the territory of any facility)
. We also use wood backing for support.
Substitution of "guitars"
- Let's take it key for 15 and unscrew the bolt that secures the pad to the car body. Then we extract it.
The difficulty is that there is a square nut inside that can turn. In this case, it needs to be supported with something. An ideal mounting option for bicycle wheels, only iron ones. You can also test it with a screwdriver.
- Using the same key, we unscrew the bolt installed in the place where the “guitar” is attached to the engine bracket. Now you can remove the pad.
- We are installing the newest support.
Read: LED license plate illumination – Auto diagram – DIY car crafts
The measurement of the bottom pad of the “guitar” is carried out similarly to the above method. Please note that the final tightening of the newest “guitars” is done with the engine running.
Removing the right support
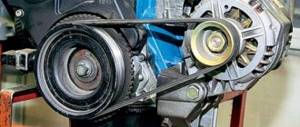
Remove the generator drive belt (see “Replacing the generator drive belt”). We install an adjustable stop under the engine oil pan.
We put a “17” socket on the nut securing the right support to the engine bracket, and then...
...insert the extension into the head... ...and unscrew the nut.
Using a 15mm socket, unscrew the three bolts securing the support bracket to the body side member. Having lowered the bracket with the support down, we remove the threaded part of the support bolt from the hole in the engine bracket and, moving the assembly forward...
...take out the right support with the bracket. Use a Torx E-10 head to unscrew...
...two screws securing the support to the bracket... ...and remove the support from the bracket. To disassemble the support...
... use a 15mm wrench to unscrew the cushion coupling nut, holding the bolt head with a wrench of the same size.
Right support parts
: 1 - nut; 2 - upper limiter; 3 - pillow; 4 - lower limiter; 5 — bolt The cushions of the left and right supports are interchangeable. When assembling the right support, the flanging rings (see the left support) should be facing upward, and the flats of the upper and lower stops, as well as the cushion coupling nut, should be parallel to the axis of the support mounting holes. We assemble the support with the bracket by tightening two screws. We install the right support with the bracket in the reverse order, while...
...the coupling nut 2 of the cushion must be placed in the rectangular socket 1 of the engine bracket.
Removing the power unit supports of the Lada Priora car
We remove the supports for replacement when the rubber breaks or peels off from the metal parts of the supports, which can cause knocking when starting the engine and when driving over uneven surfaces. We also remove the supports when dismantling the power unit, and remove the rear support also when dismantling the cylinder head.
Removing the left support
Remove the power unit mudguard (see “Removing the power unit mudguard”).
We install an adjustable stop under the gearbox.
Using a 15mm socket with an extension, loosen the tightening of the upper tension nut of the support cushion.
From the bottom of the car, using a 17" socket with an extension, unscrew the nut securing the left power unit support to the gearbox bracket (for clarity, the left mudguard of the engine compartment has been removed)... ...and remove the washer.
Using a 13mm socket with an extension, unscrew the two bolts securing the support to the body.
Remove the left support. To disassemble the support, finally unscrew the upper coupling nut of the support cushion.
Parts of the left support : 1 - upper nut; 2 - upper limiter; 3 - pillow; 4 - lower limiter; 5 — hairpin; 6 — washer; 7 — lower nut The upper support stop has two flats. When installing the support...
...the flanges of the cushion clip should face up. We assemble the left support without fully tightening the upper coupling nut, after which we install the left support in the reverse order. In this case, the flats on the stud, preventing it from turning, should be located in the groove of the gearbox bracket. When final tightening the upper coupling nut, it is necessary to ensure that the flats of the upper stop are located parallel to the axis of the support mounting holes.
Removing the right support
Remove the generator drive belt (see “Replacing the generator drive belt”). We install an adjustable stop under the engine oil pan.
We put a “17” socket on the nut securing the right support to the engine bracket, and then...
...insert the extension into the head... ...and unscrew the nut.
Using a 15mm socket, unscrew the three bolts securing the support bracket to the body side member. Having lowered the bracket with the support down, we remove the threaded part of the support bolt from the hole in the engine bracket and, moving the assembly forward...
...take out the right support with the bracket. Use a Torx E-10 head to unscrew...
...two screws securing the support to the bracket... ...and remove the support from the bracket. To disassemble the support...
... use a 15mm wrench to unscrew the cushion coupling nut, holding the bolt head with a wrench of the same size.
Parts of the right support : 1 - nut; 2 - upper limiter; 3 - pillow; 4 - lower limiter; 5 — bolt The cushions of the left and right supports are interchangeable. When assembling the right support, the flanging rings (see the left support) should be facing upward, and the flats of the upper and lower stops, as well as the cushion coupling nut, should be parallel to the axis of the support mounting holes. We assemble the support with the bracket by tightening two screws. We install the right support with the bracket in the reverse order, while...
...the coupling nut 2 of the cushion must be placed in the rectangular socket 1 of the engine bracket.
Removing the front support
Remove the power unit mudguard (see “Removing the power unit mudguard”).
Using a 15mm socket, unscrew the nut of the bolt securing the support to the generator bracket and the front support, holding the bolt with a spanner of the same size. We take out the bolt.
Using a 15mm socket, unscrew the bolt securing the front support to the front suspension cross member bracket...
...and remove the front support. A split spacer sleeve is installed in the hole in the left cheek of the bracket (shown by the arrow). Install the front support in reverse order.
Removing the rear support
Using a 15mm spanner, unscrew the nut of the bolt securing the rear support to the engine bracket, holding the bolt with a wrench of the same size (for clarity, the rough road sensor with bracket and the solenoid valve for purge the canister have been removed). We take out the bolt.
Using a 15mm socket, unscrew the bolt securing the rear support to the body (the bolt is screwed into a cage nut installed in a closed body box)…
...and remove the support. It is more convenient to start the assembly by installing the bolt securing the support to the body, since it is more convenient to center the cage nut while the support can move. Do not tighten the bolt. Then, aligning the holes in the support and in the engine bracket, insert the bolt. Tighten the nut of the bolt securing the support to the engine bracket and the bolt securing the support to the body.
Removing the rear support
Using a 15mm spanner, unscrew the nut of the bolt securing the rear support to the engine bracket, holding the bolt with a wrench of the same size (for clarity, the rough road sensor with bracket and the solenoid valve for purge the canister have been removed). We take out the bolt.
Using a 15mm socket, unscrew the bolt securing the rear support to the body (the bolt is screwed into a cage nut installed in a closed body box).
...and remove the support. It is more convenient to start the assembly by installing the bolt securing the support to the body, since it is more convenient to center the cage nut while the support can move. Do not tighten the bolt. Then, aligning the holes in the support and in the engine bracket, insert the bolt. Tighten the nut of the bolt securing the support to the engine bracket and the bolt securing the support to the body.
Read more: Launch autodiag x431 idiag
Welcome! The engine mounting cushions are located differently on all cars and the number of them is also different, on some there are only two, and on some there are up to 4 pieces (We are talking about VAZ models, on jeeps with large engines, the number of cushions is they mount the engine, much more or the same number, but they are simply larger in size), thanks to these cushions the engine does not vibrate much and, most importantly, the vibration is not transmitted to the car body, as is felt in some old Zhiguli cars in which the rubber of the cushions has already hardened and Instead of dampening vibrations, they rock the car itself and its engine.
Note! To carry out repair work, to replace the cushions, the smallest set of tools from the tool kit will be useful, in which you will need: A jack will be needed, a wrench and sockets for it, as well as an extension cord, we recommend stocking up!
Summary:
Where are the engine mounts located? There are four of them in 16 valve engines (the largest number, by the way, 8 valves are mainly equipped with three cushions or just two lower ones), the two most basic ones that are present in any engine (These are the same lower cushions on which the engine sits) and more one (Additional) is located on top and one more (Also additional) below, we will not show photos of all the pillows, because you won’t be able to get one photo, you will have to take several at once, so as you read the article, you will get acquainted with all the pillows and find out where which one is located.
When do you need to change engine mounts? They change rarely and only because of their aging (rubber gets old and it begins to hold the engine poorly and therefore it shakes), there are isolated cases when the cushion has to be changed due to deformation, and this happens when you hit the engine hard on the road or when hitting a deep hole, due to which, in addition to the airbags, the windshields also burst.
How to replace engine mounts on a VAZ 2170-VAZ 2172?
Note! In this article we will only consider the process of replacing additional pillows, if you are going to change the main ones (And the lower ones are usually the main ones), then study the article entitled: “Replacing the lower engine mountings on dozens”, it describes the entire replacement process !
Replacing the optional bottom cushion:
This support can be removed very simply, first you will need to remove the crankcase protection from under the bottom of the car, after which you will have full access to the lower support (Cushion), it is on just one bolt and is attached to the bolt that comes with a nut; to unscrew a regular bolt, you need It will be easy to take a wrench and then unscrew it completely, but in order to unscrew the bolt that goes with the nut, you will need to stock up on two wrenches and hold the nut with one wrench (Or vice versa, the bolt), and with the other, unscrew the bolt (Or, conversely, the nut) and after doing this operations, the support can be removed from the vehicle.
Read more: Chevrolet Niva stalls when releasing gas
Note! The same bolt that comes with the nut is indicated by an arrow and is located in the right corner in the photo just above. The new support (Cushion) is installed in the reverse order of removal. When installing, you will need to press on the engine by hand so that the holes come together and the bolts can be screwed in and thereby securing the pillow!
Replacing the optional top cushion:
This cushion is also not difficult to remove, it is attached in the same way to one bolt with a cage nut (This nut is indicated by a green arrow in the small photo and most importantly, when you unscrew the bolt, do not lose this nut, be sure to hold it) and to another bolt , but only at the end of which a regular nut is screwed in (the approximate location of this nut is indicated by a blue arrow, and its bolt is shown in red), when these two bolts are removed, you can remove the upper support and put a new one in its place.
Additional video clip: If you suddenly want to understand what kind of airbags are generally installed on 16 valve cars of the tenth family and the Priora family, and also if you suddenly wonder how they can be distinguished from each other, then in this case, watch the video clip just below :
Note! Always remember one thing, we do not recommend removing several cushions that secure the engine at once (Only if you do not remove it), otherwise, when all the cushions are removed, the engine simply will not be attached to the body with anything other than Moreover, if one pillow has been removed and you decide to also remove the second one so that you can install both of them later, we don’t recommend doing this either, because it will be difficult to combine the pillows with the bolt holes, it’s best to change one at a time and after replacing, move on to the others immediately , if true and they must be replaced!