What is LDWS and what is it for?
This is a system that uses special sensors to monitor conditions on the road. If the driver intentionally or unintentionally (for example, having fallen asleep) moves from one lane to another, the LDWS function will notify him with a loud sound signal. The main purpose of this function is to warn drivers who have fallen asleep or are distracted while driving about the risk of colliding with vehicles moving opposite (without deliberately driving into the oncoming lane or side of the road).
Is this feature needed?
Of course? needed! Yes, even if you are not a truck driver
Agree, each of us “sinned” while driving, switching our attention to calls and correspondence (which is more than dangerous). This is precisely why this system was created, to notify you, as a distracted driver, that it is time to pay attention to the road!
How it works
There are two options: an on-board computer and a camera - they are the ones who monitor the correct movement. In any case, the device signals about changing lanes while driving with an audible signal (but only if the turn signal was not turned on first).
Are there any disadvantages
Despite all the advantages of this system, it still has a rather big drawback - hypersensitivity and, as a result, intrusiveness). Reminder! As mentioned above, this system is ideal for people planning a long trip, but not for those who often move exclusively around the city. In simple terms, thanks to LDWS, novice drivers will not be delighted due to the system's constant alerts about changes in the direction of travel. BUT! Drivers with “experience” will only say “yes” to this system because of its ability to control the vehicle’s movements in one line! Another big plus lies in the fact that it allows the driver to control the situation even in cases where this is impossible (snowfalls, fog, minimal visibility, etc.).
Advantages
- High power camera;
- Powerful processor;
- Wide angle lens.
Naturally, every vehicle owner must understand that all responsibility for his life, as well as the lives of passengers, primarily falls on him (and not on any new auxiliary systems and functions). Only your experience, attentiveness, calmness, and speed in response are the main “storeroom” for trouble-free movement around the city and beyond.
Note to drivers
Although this feature is easy to set up, it is best used when going out on the trail. In the city, it will work too often (due to changes in the line of travel), which, of course, will not be to the “taste” of the car owner. It is also worth noting that this function is more than useful for beginners who have trouble understanding the dimensions of their vehicle!
Everything requires compliance with the rules of technology
The main mistake of many motorists is that after installation, they forget to check the exposure of the device, and as a result it does not produce a normal picture. And the fact that the manufacturer says that the DVR is ready for use often does not correspond to reality and it is better for the owner of the gadget to check and configure it.
So what is the exposure in the DVR, the setting of which is so important? The answer can be expressed in one sentence - this is the speed at which the electronic shutter operates, which depends on the time of day, or more precisely, on the degree of visibility. The darker it is, the slower it works so that energy can be accumulated in the matrix, and in good lighting it works quickly. You can recognize the fact of poor settings based on analysis of the recording: in the dark, the image is too dark, and when a light element hits it, it is difficult to distinguish due to the fact that the picture is overexposed. There is one conclusion and one practical step to take from this:
- do not always believe what the manufacturer promises, but check everything in practice;
- configure the DVR so that in any visibility and weather you have a fairly clear image of what is happening on the road.
Exposure in the DVR
What is loop recording in a car DVR?
DVR NaviteL R200.
Best offer up to 3 thousand Car recorders usually support two video recording modes: continuous and cyclic. Continuous mode allows you to record video in one large file. This size can only be limited by the available memory of the device (internal or external). When the free memory is full, continuous video recording ends.
The advantage of this type of video recording is the absence of gaps in the video even for short periods of time. The obvious disadvantage of continuous recording is that it stops when the memory is full. In some cases, the driver is even deprived of the opportunity to quickly reconfigure the DVR to continue filming.
Against this background, the cyclic video recording mode looks much more functional. It has two significant features:
- Recording is carried out not as a continuous file, but in fragments that are small in volume and duration.
- As soon as the device’s memory is full, the oldest (by recording time) files begin to be deleted. A new video is recorded in the free space, and the whole cycle is repeated again.
The cyclic video recording method also has its positive and negative sides. The positive aspects include the independence of the fact of shooting from the availability of free space in memory. Video recording will be carried out in any case, even if the memory is full.
A negative aspect of cyclic recording is the inability to save videos of long duration and volume. Only the most recent small files will be saved.
Some DVRs (especially older models) are not able to provide continuous video when recording cyclically. This refers to gaps in the picture at the junctions of fragments adjacent in time to recording. Modern DVRs, as a rule, do not have this drawback. Fragments are recorded in such a way that the recording of each subsequent file begins when the recording of the previous one has not yet finished. It is this overlay of video files that ensures that there are no gaps.
The duration of fragments during cyclic recording, as a rule, does not exceed ten minutes. There are no standard values for the duration of video fragments, and each recorder manufacturer sets them independently. Setting the time during which one fragment will be recorded occurs in the DVR settings. The user can choose the duration that he deems necessary.
Operating the DVR in cyclic recording mode allows you to implement another important and useful function for safety. We are talking about protecting video files from being destroyed or overwritten as a result of the operation of the G-sensor (or shock sensor). This sensor monitors the position of the vehicle in space and the smoothness of its movement. With any sudden changes in these parameters, the sensor marks the video files that are being filmed at the moment, thereby protecting them from possible destruction. The driver does not have to worry about the safety of video files and at the same time he has full access to them.
When saving fragments in the DVR memory, they are assigned names containing numerals in the order in which they were recorded. This ensures a quick search for the desired location in the video if you need to watch it.
The cyclic recording method is most popular among car owners. It provides uninterrupted recording of events into memory of any size. In addition, the safety of video files received in emergency traffic situations is ensured.
In this video you will see a live example of this function on the device.
How to set the time and date on the DVR
The calendar and clock must be set to synchronize the recorded chronicle of events with real time. It is advisable to periodically check the accuracy of the parameters to eliminate errors.
Setting the date and time values may differ in some nuances, depending on the recorder manufacturer, but the basic points are the same:
- Remove the Flash drive from the device and connect it to the PC using a card reader or adapter.
- Wait for a synchronization message from the computer system.
- Format the memory card using the built-in OS tools.
- Create a new text file called “date and time” in the SD root directory.
- Open the file, write down the current data in the format DD.MM.YY and HH.MM.
- Save file.
- Return the drive to the device.
- Once turned on, the system will update the time data and begin to base calculations on the entered values.
How to set up a radar detector in a DVR There are many functions in the radar detector menu that can be configured individually. For accurate notification, it is recommended to pay attention to the following points: - Operation radius. The ratio of speed and distance to the traffic police camera is established. Thus, the driver will be able to react in time and reduce the speed to the required values.
- Frequency seine. You need to select the frequencies at which data is transmitted from the radar in your location region. Local ranges can be found online.
Speedometer limit. When the vehicle is traveling faster than the set maximum, a warning tone will sound.
Important setting in car DVR Exposure
What parameters and how to choose a good DVR for a car?
One of the most important settings on a car DVR that allows you to get a high-quality picture is exposure. Incorrect exposure can ruin video frames, regardless of the ambient lighting conditions in which they were taken. The video may be darkened or, on the contrary, overexposed; problems may appear both throughout the entire frame and in a separate section of it, and so on.
What is exposure in a DVR, and how does it affect video quality? Exposure is a setting that allows you to change the amount of light that falls on the camera matrix and actually forms an image on it.
In clear sunny weather, a lot of light enters the camera lens, and if the amount of this light is not reduced, the picture will most likely be too light, even faded. At night, unadjusted exposure will result in overly dark frames. There are several ways in which you can adjust the flow of light.
- Changing the amount of time light is exposed to the camera sensor. This is the so-called shutter speed, that is, the time during which the electronic shutter of the DVR camera is open to form one video frame. It is clear that the less time the shutter is open, the less light will fall on the matrix and vice versa. Therefore, the brighter it is outside when shooting, the shorter the shutter speed should be.
- Changing the size of the aperture, that is, the gap in the lens through which the light flux hits the matrix. A larger aperture also provides more light passing through the camera lens.
As a rule, in car video recorders, exposure adjustment does not imply separate adjustment of shutter speed and aperture. The exposure itself is adjusted, and the parameters of both shutter speed and aperture change accordingly. The exposure level can vary from the minimum value, which is recommended to be set in sunny weather, to the maximum value, used in low light conditions.
An important factor affecting video quality is the characteristics of the camera matrix on which the image is formed. These are its dimensions, number of pixels, sensitivity to light flux. Naturally, these parameters cannot be adjusted during operation of the DVR; each matrix has its own characteristics.
High-quality matrices from well-known manufacturers have high sensitivity and consist of a large number of dots (pixels). This ensures the possibility of high-quality shooting in any conditions, both in low and excessive lighting.
Recently, some models of DVRs are equipped with the WDR function, which does not directly affect exposure, but improves video quality by changing the exposure time when shooting one frame. When the WDR function is activated, the DVR makes two copies of each individual recording frame: one version of the frame with a short shutter speed, the second version with a long shutter speed. In the final video, both of these options are combined, and the resulting picture will be practically devoid of the shortcomings of individual frames.
Setting the exposure is very important to get truly high-quality video. The driver should make the necessary changes to its adjustment for any changes in external lighting. It is quite possible that to obtain high-quality video you will have to experiment with exposure settings for a particular DVR.
Setting video quality and resolution
The DVR settings also include such an item as setting the required video quality and resolution. Many modern models allow you to set the optimal mode - Full HD quality, but for a good picture you will only need to set the quality to 1080p - all the necessary details can be seen in this mode.
Please note that the recorder needs to adjust the exposure. This greatly affects how light or dark the picture will be. The answer to the question of what is exposure, namely, what is exposure in a DVR, you can find on the Internet. This is the amount of light that hits the recording device mirror.
Sometimes referred to as light level, exposure allows you to switch between day and night photography. The higher this indicator, the brighter the picture will be. Avoid overexposure or underexposure - it will be difficult to see anything in the picture. The best option for purchase would be models with automatic settings for this item - in this case, the recorder will be able to independently switch from day to night mode.
Next, I set up audio recording. The sound on the car recorder is often recorded - this is especially important if there is a showdown with road service employees or inappropriate drivers. Sound recordings help not only to see how the incident happened, but also to hear the necessary arguments that can prove you are right.
How to properly configure the DVR yourself date and time
How to properly install a DVR, choosing a location and connecting to the cigarette lighter
- Setting the setting language. We exhibit - Russian;
- Recording permission. Here you can configure, in addition to the resolution itself, the number of frames per second. The ideal option is Full HD 1920×1080 30p. In some cases, the manufacturer may recommend setting other indicators; Set the camera rotation. Here you can select the options rotation, top-bottom. With a standard camera installation, the “top-bottom” indicator is selected;
- Adjusting the length of the recording cycle. Most models have the ability to set time periods for one file from 1 to 45 minutes. For greater convenience, it is recommended to select a period of 5 minutes. In this case, after taking up all the space on the memory card, new segments will be recorded over the oldest recordings;
- Be sure to turn on the time function. This may be necessary if there is a need to dispute with the insurance company or another participant in the accident in court. Find the time tab, usually there is a “time stamp” mode. It should be switched to the ON position. Next, set the date and time. Some models allow you to synchronize time via satellite;
- The light frequency allows you to adjust the lighting flicker filter. In our country, lighting is used with a frequency of 50Hz, we set this value;
- Auto-record. This function allows you to turn on the camera when moving within the field of view of the sensors. This way you can control what is happening to your car while it is parked. Don't forget to set the shutdown time. It is recommended to do 30 seconds after the end of the object's movement;
- Setting up a GPS receiver. This allows you to display movement speed and coordinates on video. Please note that not all DVRs have this capability;
- Setting up the G-sensor. This is necessary to protect the recording in case of an accident or when driving on bumpy roads. When driving on poor surfaces, it is recommended to disable the function completely;
- For use in winter, it is advisable to delay the start time by 10-20 seconds. This will allow the camera to turn on only after a certain period of time after the engine starts. The function is also useful in case of ignition problems;
- Setting the exposure. It is better to choose automatic;
- We set the contrast to the “normal” position, and also do the same with sharpness and brightness;
- Day and night exposure. Automatic mode is suitable for daytime operation. Night exposure can be turned off.
- If you leave it on, the camera will independently select the exposure mode depending on the time of day.
How to Adjust Exposure on a DVR
When the device operates in the configured lighting range, each frame of video recording will be high-quality and informative.
When choosing recording characteristics, you need to take into account that the volume of light rays allows you to see small details at any time of the day. In this regard, individual adjustment to environmental conditions is necessary. To correctly adjust the exposure, do the following:
- select the duration of exposure to light on the lens mirror;
- set the aperture properties depending on the sensitivity of the lens matrix.
Note: if you set the properties to lower values, the picture will turn out darker. But the fine grain of the image will allow, if necessary, to reveal the details of the picture.
If the driver does not want to constantly adjust the viewfinder settings, you can use the automatic recording setup. It should be remembered that the system will select the optimal shooting values. Thus, the chance of getting a high-quality recording of what is happening becomes less than when entering parameters manually.
Interesting on the topic: The best quadcopters with a camera - what to consider when choosing
New opportunities
The DVR is no longer the same... It can no longer only watch the movement... Now it can do much more! For example, thanks to the FCWS system, the driver will be warned by an audible signal that he is too close to the car in front. That is, this system allows you to maintain the “correct” distance in order to prevent a collision. And the LDWS system, which is synonymous with safety, will not allow the driver to violate the limits of his trajectory (if the driver falls asleep at the wheel, the system will wake him up with an audible signal, thereby notifying him that he has moved from his line to another).
What is the G-shock sensor in a car DVR?
The shock sensor (sometimes also called g-shock, from the English word “shock”, which actually translates as impact) has long become an integral attribute of car DVRs. It is a component not only of expensive devices, but also of purely budget gadgets with a minimal set of additional functions.
The main task facing this sensor is to ensure the safety of video files that are obtained during sudden changes in vehicle movement.
The concept of a “sudden change in movement” does not necessarily imply a blow to the car body as a result of an accident. This could be sudden braking, a strong shake on a bad road, a skid, a rollover, and so on.
But for any driver it is important that the video is saved specifically in emergency road situations, since in many cases only it can serve as proof of innocence
The need for automatic video protection is also explained by the fact that usually immediately after an accident, the driver, being in a state of emotional shock, may forget to do it manually. And continuing loop video recording will destroy the necessary files.
The g-shock sensor constantly monitors the vehicle's position in space. Every sudden change in movement in any plane is recorded by it. At the same time, a special electronic mark is applied to the video file currently being recorded, which prevents the DVR from deleting it when re-recording.
In the DVR settings, you can set the time before and after the event, and the video that was recorded during these time intervals will also be protected from destruction. As a rule, all video files received when the shock sensor is triggered are placed in a special folder (the name of the folder can be different “Event”, “Sobytie”, “Event” and so on). When recording video in loop mode, files in this folder will not be overwritten.
The driver can also adjust the sensitivity of the g-shock sensor. Typically, three levels of sensitivity are available: high, medium and low. The degree is selected by the driver in the DVR settings menu.
For greater reliability, all video obtained when the shock sensor is triggered is automatically provided with a date and time stamp. This will happen even if this was not set in the DVR settings.
Some video recorders have the function of recording the nature of movement in each of the three planes. This data can be viewed on a PC or laptop in the form of graphs. A graphical representation of the information will help you determine exactly which side of the car the body was hit from.
Another task facing the shock sensor is to activate video recording in emergency situations in parking lots or parking lots. If the car is at rest, then any impact (and when high sensitivity is activated, even a simple touch of the body) will trigger the sensor and start video recording accordingly.
The presence of a g-shock sensor has long ceased to be an additional option in car DVRs. This sensor is an essential element of a vehicle's safety system. Protection against accidental destruction of important video files, carried out using a shock sensor, helps to establish the true causes of an incident, and in some cases, prove the driver’s innocence.
LANGUAGE SELECTION
Right-click anywhere on the screen.
Select the Main Menu item.
(Default DVR settings usually use English).
Next, an authorization window will open.
The default user is admin, the password can be empty or something like “1111”, “0000”.
By the way, if there is a description, this is indicated in it. If not, try empty first. If it doesn’t work, you’ll have to pick it up.
Click OK.
In the system settings of the recorder, select the General item.
In the window that opens, find the Language item.
From the drop-down list, select the required language, I think the majority will prefer Russian, and confirm the selected setting.
After this, we reboot the DVR and work in a familiar language environment.
Manufacturer
Today's range of DVRs is quite strange. You can see a whole bunch of different models on display. However, there are not many truly famous manufacturers. Products from manufacturers DOD, Neoline, Mio, Lexand, KarKam inspire trust. Personally, I did not become attached to the manufacturer when purchasing, but simply chose a DVR with those parameters that are critical for me.
A nice addition will be the presence of a sound recording function in the DVR. Using this feature, you can dictate the car number and subsequently hear the audio recording, even if the number is not visible in the material. Also, often before an incident, the driver discusses the behavior of the future culprit with the passenger, which is also recorded on the audio track.
Also pay attention to the presence of a USB connector, since it is not always possible to find a computer that can read Flash drives used in DVRs (although in general they are standard). Having even the cheapest car DVR can pay off
The most important parameters are the presence of date and time on the recorder, and a decent picture
Having even the cheapest car DVR can pay off. The most important parameters are the presence of date and time on the recorder, and a decent picture.
A very big problem of the DVR market is that it is quite easy to buy either simply a low-quality device, or a counterfeit of famous devices, which also will not be of good quality. This is why I recommend purchasing DVRs from reputable stores that have proven themselves well.
Recommended Models
When in doubt, choose a cheap car recorder. When you understand what to demand from him, take another one. To make your choice easier, I will give you a list of DVRs that are popular among car enthusiasts and have all the necessary functions:
Before choosing a recorder, watch a video from the selected model among YouTube videos. Reviews of the DVR provide information about the reliability of the device. The reviews reveal all aspects of the DVR. If the video and reviews suit you, take it without hesitation. It is worth mentioning that on YouTube the quality of videos from a car recorder is slightly worse than when viewing the original from a computer.
If you don't have a DVR in your car, buy one quickly. If in doubt, buy either a cheap one or a proven one. After all, as they say, a bird in the hand is better than a pie in the sky.
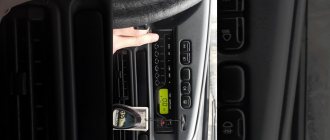
SETTING UP A CAR DECORDER IN PICTURES
EQUIPMENT AND SECURITY SYSTEMS
OPS CCTV ARTICLES MORE…
Video surveillance » Video recorders » Car recorders » Car recorder setup » Setup in pictures
This page is an addition to the article “setting up a car DVR”
and illustrates the main points of setup without using instructions. When preparing this material, I used my existing DIGMA DVR. Since I periodically set up various recorders for my friends and acquaintances, mostly “economy” class ones, I can assure you that the instructions are not particularly needed, and sometimes they are simply useless (lately a good manual is a rarity).
This is what the DVR monitor looks like in recording mode. You can't enter the menu from here.
Having selected this mode with the MODE button, you can press MENU.
The car DVR may have several menu pages that can be scrolled through by pressing the MENU button again.
Here we are on another menu page. Please note that the presence of an arrow (triangle) at the bottom left of the screen indicates that the list of items in the current menu continues in the indicated direction. In this case, down.
And here - up. Moving is carried out using the DOWN and UP buttons or buttons with triangles (arrows). Look, the “SETTINGS” tab may say “next menu”. This indicates the presence of a submenu (submenu) that you can access by pressing REC/SNAP or OK (depending on the recorder model).
In this case, the date and time can be set (adjusted) . Select by pressing DOWN or UP “INSTALL”, confirm the selection by pressing REC/SNAP (OK)
Using the navigation buttons, we select the date display format, after which we habitually press OK and exit this menu, as the inscription on the monitor honestly warns about. We freak out, repeat several times, and make sure that we cannot adjust the date/time values. This is such a cartoon from the manufacturer. Press MENU instead of OK.
Who would have thought - it worked! We select the date by pressing DOWN and UP, through MENU we go to the month and so on - until the bitter end.
Settings for other modes are made in the same way, I gave the algorithm.
In conclusion, I want to say that you may encounter other absurdities inherent in some recorder models. For example, I had the pleasure of setting up a recorder in which the date display format was configured on one menu page, and the values of these parameters were configured on another. However, attentiveness, patience, and lack of fear of experimenting will allow you to overcome any device.
The worst thing that can happen is that you click on the “FORMAT” item. This will erase all video recordings on the memory card; everything else is reversible.
After completing the settings, install the video recorder on the car and turn on the recording mode.
© 2010-2020. All rights reserved. The materials presented on the site are for informational purposes only and cannot be used as guidance documents.
Other DVR settings
The disk is formatted, the video resolution is set to maximum, the date and time are correct, the language is also set. Now let's see which additional functions should be configured and which ones should be completely disabled.
Most DVRs allow you to set a specific file size for continuous video recording. Most often, this value can range from 2, 3, 4...15 minutes. This setting can be accessed through the menu or by pressing the button labeled “Record Time” or “Recycle”. Set the settings to medium (about 7 minutes). Although this setting is not particularly critical, it is still better not to set the minimum 2 minutes.
Some DVR models are capable of recording not only video, but also sound. Sound recording often helps to quickly resolve disputes with inadequate traffic police inspectors. Therefore, select the “Audio Record” item in the menu and make sure that audio recording is turned “ON” or “ON”.
If the video recording device has a flash, then set it in the “LIGHT FREQ” menu to 50 Hz. There will be plenty of such an indicator. This flash will eliminate possible flicker in the frame.
It is also worth adjusting the frame rate of the DVR. “FPS” is responsible for this. Set this parameter to the maximum allowed value.
There is a modern recorder that records video when there is movement in front of the camera. Here you can simply disable this function. In fact, it is needed in rare cases. But still, if you decide to leave it, then set up the recording in such a way that the camera only triggers when you move directly 2-3 meters before the car. When setting up this function, check the camera's response distance by periodically leaving the car.
Read the instructions
Setting up the recorder does not end with all of the above. Modern device models have other functions. Therefore, before using the gadget, carefully read the instructions, study them, and only then proceed with the settings. There it will be easier for you to make the DVR work efficiently, and at the same time you will spend less time on this procedure.
Setting up a DVR via the Internet
Some DVR models allow you to connect to them via the Internet. Typically, such models are classified as security systems and they have several cameras and, accordingly, channels. The cameras can be mounted where the car is parked, and the signal from them can be received via the Internet to your home/office computer. In this case, you will need a separate static IP address. The connection type is any that your recorder supports, but the channel width is at least 512 kbit/s (enough to transmit a picture).
Having concluded an agreement with the provider and received all the necessary data from him, you begin setting up the DVR via the Internet. If access is direct, you only need to save the data transmitted by the provider in the “Network” submenu. When using an ADSL connection, you will need to specify the connection path in the modem when authorizing the port. The next step is to save its internal IP in the DVR and register the gateway through which the information will be downloaded (all in the same “Network Settings” menu items). We do not consider other types of Internet connection (mobile and satellite), since they are expensive (satellite) or unreliable and rarely supported (mobile).
When connecting the DVR to the Internet, it is recommended to use Internet Explorer. You can experiment with other browsers, but often it's just a waste of time. Go to “Internet Options” and add our DVR IP to “Trusted Sites”. Having saved the data, we can try to connect. To do this, enter the IP address allocated by your provider in the browser (when using an ADSL connection, you need to add the port number through a colon) and press “enter”. A splash screen for authorization should appear on the screen, enter your login and password (they were saved in the DVR in the “Users” menu item).
If everything is done correctly, screens will appear on the screen (according to the number of channels). Sometimes the image transfer begins immediately, sometimes it is necessary to attach a camera to each square. Actually, setting up the DVR via the Internet is complete. It’s easy to figure out how to view the archive and recent entries.
Any car owner who wants his car to always be safe, and also to prove his innocence in the event of an accident, purchases a DVR. And with the help of this device, your life becomes much easier. But sometimes some difficulties arise in setting certain parameters and the question arises: “how to set the date and time on the DVR?”
What types of recording equipment are there? Digital Video Recorder
In order for the user to understand what is the best DVR video recorder to equip a video surveillance system, you need to know that there are two main types of such devices:
- PC-based;
- Stand Alone.
The DVR recorder, which is of the PC-based type, operates on a personal computer. The main mechanism is the video capture card. The operation of a computerized recorder is ensured by using special software. Such devices have a convenient and intuitive interface. The disadvantage of using such equipment is the inability to use the serving computer for other user purposes (for example, watching movies or playing games).
Stand-Alone video recording devices use specialized software and certain hardware modules. As practice shows, many users prefer just such DVRs. These devices are distinguished by reliable and efficient operation, as well as simple operation. They have a reasonable price. For full-scale operation, in addition to the video recording device, the purchase of a hard drive is required.
Main technical parameters of video recording devices Digital Video Recorder
The main technical parameter of video recording equipment such as Digital Video Recorder is the number of channels. Channel indicates the maximum number of connected video cameras. Today there are the following number of channels in video recording devices:
- One;
- Four;
- Eight;
- Nine;
- Sixteen;
- Thirty two.
Basically, devices with 4, 8 and 16 channels are in great demand. Typically, a BNC connector is used to connect video cameras. A necessary parameter of a video recording device is the number of audio outputs. With their help, audio recordings of ongoing events are performed. As practice shows, the number of microphone connectors does not exceed the number of video inputs. The number of frames during recording is a characteristic that determines the speed of video recording. The optimal value is 25 frames (based on one second). Modern models also have a higher recording speed.
Another important parameter is resolution. Today, manufacturers offer HD DVRs. In this case, the HD marking reflects the acceptable resolution. Also quite common are the D1, D1/2, CIF and 2CIF formats. The higher the resolution, the clearer the image received by the video camera will be transmitted. With increasing resolution, the use of compression codecs was required, since high-quality information takes up more space on the hard drive. Modern video recording devices use the H. 264 compression codec. Earlier models used MPEG4 and MJEPEG codecs.
In the video – DVR video recorder:
Choosing a location for the registrar
If possible, choose a central location for the car recorder. I couldn’t have chosen a better place for myself than behind the interior rearview mirror. But it really all depends on the car you put the dash cam in. For ideal placement, sit behind the wheel and see which areas of the windshield are least needed.
- Directly behind the rearview mirror
- Directly below the rearview mirror
- In the center of the windshield (although this does block the view and capture more of the sky)
- In the part of the windshield away from the driver, in the area where the wipers operate
- In place of the central lighting lamp (convenient for a small viewing angle)
By the way, when placing the DVR, do not forget to think in advance about connecting the device to the vehicle’s on-board network to ensure that the DVR operates in offline mode. The cigarette lighter is not the most reliable power source, and constantly turning on the equipment manually is not rewarding work.
Car recorder video resolution
A modern video recorder must have a recording resolution of at least 1080 pixels per line. Another designation, 1080p. It's FullHD. Very often the permission parameter is added to the name of the registrar
It is worth noting that sometimes the picture resolution corresponds to the resolution of the DVR matrix
Recorder Frame Rate
The second most important parameter is the frame rate of the recording. Today the standard is 30 frames per second. However, it is worth noting that some manufacturers claim 30 frames per second, but in fact, either the DVR does not produce the specified frames, or it does, but every second picture duplicates the previous one. Also note that at maximum resolution the frame rate may be lower
When choosing a DVR, pay attention to the smoothness of the video. The recording must be stable and continuous.