Will be useful: Diesel engine oil change interval
The experience, which is still small, has shown the correct installation of the column. The guide became much nicer. Some inconvenience is caused by the location of the ignition switch when entering and turning the key when pressing the clutch pedal (starting the engine). The wedge lining had to be redone due to the old one breaking down. I made new 2mm steel and hardened it.
UAZ service. Car repair, tuning, maintenance of UAZ Patriot, Hunter, loaf , Cargo transportation.
Auto parts online store. Spare parts for Chevrolet Rezzo. Chevrolet spare parts
Front axle repair on UAZ Bukhanka
If you are unsure of your choice or have doubts, our specialists will advise you free of charge on any issues related to our proposals.
You can always ask questions by phone:
UAZ steering column picture
— DOWNLOAD MESSAGE BELOW:. https://ahapuxim.260416.ru/1/45/uaz-buhanka-rulevaya-kolonka-chertezh. PURPOSE FOR UAZ AUTHORS steering column with the price of a UAZ car. Discounts and promotions for the entire UAZ line. UAZ is profitable to buy. One of the common complaints about the controls of the UAZ Loaf is that the steering column is too long and the steering wheel rim is too long. After installing and checking the passability of the low-speed loaf. Also for extending cartridges, consumables, steering column, handbrake. March 29, 2015. UAZ. Repair of the steering column (steering mechanism). but everyone had a VAZ, and here I bought a loaf and the steering play, generally speaking, is yours. WASBUCK, almost everything about UAZ cars. Updating the steering column on the UAZ-3909 (3741). Bracket for attaching the stand to the body (picture). UAZ, UAZ Ruda, GUR UAZ. You can unscrew the mounting nut, disconnect the shaft and loosen the bearing. steering column . A complete list of components, as well as drawings and descriptions of the power steering. Power steering, steering wheel. Steering gear - diagnostics and repair. Many car enthusiasts are interested in the topic of independent work with the steering mechanism and its analysis. January 14, 2014 I purchased a UAZ two weeks ago and discovered that it has a large gap in the steering wheel, almost 45. How to adjust the steering column from a VAZ. June 22, 2010. Povdomdomlen: 10. author: 4 UAZ bakery tie rods.DIY drawings Filters clean the air air filters to UAZ earlier. After installing and checking the passability of the low-speed loaf. Also for extending cartridges, consumables, steering column, handbrake. December 5, 2012. UAZ bread. Fastening for power cylinder GAZ-66. some changes to the rods, steering column, brake hoses. I just said what I needed, showed me a picture and said where they would be. https://imgur.com/syE4pxb https://imgur.com/j1q3KRe https://imgur.com/EuFpzUN https://imgur.com/xab0OSy https://imgur.com/JLGXHdK http://imgur .com/vfUB1Rj https://imgur.com/pgbRVTG https://imgur.com/kCpusjW https://imgur.com/PVcHbfX https://imgur.com/CAcxEAT https://imgur.com/e2orhS4 http : //imgur.com/4hTL4Tl https://imgur.com/SvJjgUx https://imgur.com/aAuNT7Y https://imgur.com/b4hlRhT
Copy and paste the below HTML code into your website:
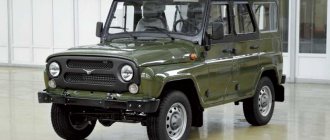
The design of the UAZ 469 steering gear
The steering gear of the UAZ 469 car is a unit that serves to turn the front wheels of the car. The design of the UAZ steering gear provides for reducing the effort exerted by the driver on the steering wheel when the vehicle is moving.
The UAZ steering gear housing is installed on the vehicle frame. The knot is fixed on the left side in the direction of travel. Torque from the steering column to the gearbox is transmitted using a cardan shaft.
The working pair of the steering gear of the UAZ-469 car consists of a globoidal worm and a double-ridge type roller. The worm is connected to a shaft to which the steering wheel force is transmitted. The roller is installed on the same shaft with the bipod of the steering mechanism. Thus, when the worm rotates, the roller together with the bipod shifts in a certain direction. To prevent shaft slippage, the bipod is installed on small splines.
When the wheels are positioned to move in a straight line, the roller must be in the center of the worm. To ensure correct installation of the bipod, the spline connection is equipped with double units. This eliminates the possibility of incorrect installation of the part.
Photo 2: Diagram of the UAZ 469 steering gear (Source: Yandex.Pictures)
Our steering gearbox
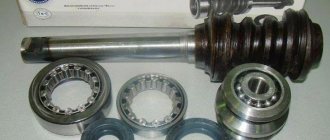
The UAZ steering gear, as it turned out, costs as much as 7,500. The toad became hysterical. Market monitoring revealed that gearbox repair kits, as such, do not exist, but almost all of its spare parts can be purchased separately. Having twirled the new bipod shaft with a roller and bearing in my hands, scratched myself on the “high-class surface treatment” and looked at the price tag of 2000 rubles, I decided that the toad would not sign - with such a quality of the part, I’d rather polish the shank on the old shaft, since the bearings are in good condition normal. Also, the toad did not sign for the worm and shaft assembly for 900 rubles - she said that it was better to have one worm for 300, and the toad and I would repress the shaft ourselves. What will happen to him, Val? For sets of gaskets for 20 rubles. and oil seals for 50 rubles. the toad looked favorably, and even to celebrate, she approved a new cardan assembly for 350, and not a crosspiece for 120 - however, because the crosspiece was not available anyway.
In total, everything came out to 750 rubles, which, you see, is by no means 7,500. And I went to glorify the toad with physical labor, replacing the lack of finances with it.
To begin with, I deployed a garage information center in order to refresh my memory of the device and the gearbox adjustment sequence:
(I prefer digital technologies to greasy books with grease stains).
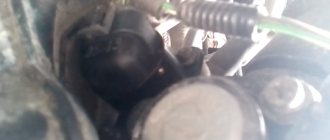
The first problem was damage to the seat of the bipod shaft oil seal - someone once hit it, and it became somewhat out of round... To restore it, I selected a piece of iron that was suitable in diameter, and with light blows of a sledgehammer I restored the roundness of the hole:
The oil seal settled into place easily and gracefully:
Pavda, before that I spent a long time polishing the bronze bushing underneath with fine emery:
Alas, such bushings are not supplied as spare parts at all, and the sellers were only surprised at my questions...
At the same time, I polished the bipod shaft itself:
Everything, mind you, was done by hand, with sandpaper...
Then it was time to say an unkind word about the toad - it was she who convinced me not to buy the worm and shaft assembly, but to repress it, saving 600 rubles. It turned out that he was planted so firmly that blows with a sledgehammer were like a light morning kiss on the cheek of his beloved - airy and gentle, so as not to wake him up... I had to bring in heavy artillery in the form of a twenty-kilogram weight. Having built such a device, I walked around it with this steel round:
The modest but irresistible charm of twenty kilograms, multiplied by the speed of the swinging impact, had its usual effect - the shaft was pressed out:
This is a very powerful witchcraft, keep in mind! It almost always helps...
Using the same tool, I pressed the shaft into a new worm:
And then it’s a matter of perseverance and accuracy - correctly, having maintained all the gaps, carefully selecting the thickness of the spacers (they set the tension in the steering shaft bearings), assemble the steering gear:
However, as you probably already guessed, it’s impossible to do without problems. “ This is a UAZ, baby!” (That’s probably what my book about UAZs will be called if I ever write it...). The steering shaft oil seal turned out to be the wrong size:
Instead of an outer diameter of 35, we need 30, all other things being equal. No, the seller is not to blame - he honestly selected the oil seal from the catalog... Another thing is that there are no two identical UAZs in nature, and there are an unknown number of modifications of the same steering gears, even if they differ only in the diameter of the oil seal. I'll go to the market today to look for an oil seal, just selecting it by diameter. There is still one little guy at the entrance with bearings - well, few people know, but he also has a pretty good assortment of seals. Maybe he'll pick something up. And as a last resort, I’ll find an old felt boot, a strip of felt, soak it in graphite and make a homemade stuffing box. This shaft sticks up, so that even with a primitive oil seal, oil will not flow through it. Moreover, UAZ is no stranger to stuffed oil seals...
Repair of UAZ-469 steering gear
In some cases, steering gear repair may be required. In order to carry out repair work, it is not necessary to have a specialized education. A person with minimal technical knowledge can handle the task. Disassembly of the steering gear is carried out in the following sequence.
- Remove the gearbox from its seat. To do this, you need to unscrew and knock out the bolt that secures the worm shaft in the eye of the cross. After this, unscrew the three bolts securing the steering gear to the car frame.
- Drain the oil. The steering gear parts are lubricated with oil. It is poured into the crankcase. To prevent oil leakage, oil seals are installed in the housing. To drain the spent fluid, you need to unscrew the specialized plug located on the crankcase.
- Remove the bipod. The part is rigidly mounted on the shaft and secured with a nut. For removal, you can use a specialized puller. If it is missing, you can knock the bipod off the shaft with a hammer. It is important not to damage the shaft threads.
- Unscrew the side cover. To do this, you need to unscrew the 4 bolts that secure the cover to the body.
- Remove the bipod shaft. The part is removed from the gearbox housing along with the roller. In order to dismantle the shaft, strike it several times with a soft metal hammer. The use of a conventional hammer is only possible in conjunction with an aluminum or copper attachment. Some motorists use a wooden plank. She is pointed at the shaft and struck. In this way, it is possible to protect the threads from damage.
- Unscrew the bolts securing the bottom cover and remove the part. Adjusting shims are installed under the cover. They must be carefully dismantled.
- Remove the worm shaft.
After disassembly, all parts are cleaned of lubricant and metal shavings formed as a result of friction. Parts are being damaged. Failed parts must be replaced with new ones. Assembly and installation of the unit is carried out in the reverse order. After assembly, it is necessary to adjust the steering gear.
Adjusting the UAZ 469 steering gear
If there is play in the steering system that exceeds the norm, it is necessary first of all to check the functionality of the steering driveshaft crosspiece and steering rod joints. Severe wear of steering parts can lead to play. If the tie rod joints and the crosspiece are not worn, the unit will need to be adjusted.
Adjusting the tightening torque of the worm bearings
To adjust the tightening torque of the worm bearings, it is necessary to remove the assembly from the vehicle. After removing the steering gear, it is necessary to fix it motionless. A vice is used for this. After this, adjustment is carried out in the following sequence:
- Drain the lubricant from the crankcase.
- Unscrew the cap nut covering the adjusting screw.
- Remove the lock washer that prevents spontaneous movement of the adjusting screw.
- Using a specialized puller, remove the bipod from the shaft. When removing a part without a tool, it may need to be heated.
- Unscrew the bolts securing the side cover.
- Using a soft metal hammer, knock out the bipod with light blows.
- Remove the bottom cover.
- Remove the thin gasket installed at the place where the cover is attached.
- Install the lower steering gear cover.
- If there is a displacement of the worm along its axis, you should dismantle the cover and remove the second gasket, and install the first one in its place. This will reduce the gap between the bottom cover and the gear housing.
- After adjusting the tightening torque of the bearings, it is necessary to assemble and install the unit on the car.
Adjusting the engagement of the worm with the roller
When a roller or worm wears out, play appears in the steering. To eliminate it, it is not necessary to remove the unit from the vehicle. The adjustment is carried out with the gearbox installed on the vehicle. To eliminate the backlash you need to:
- Place the wheels in a position where the vehicle will move in a straight line.
- Remove the tie rod pin from the bipod hole. To facilitate the dismantling process, you can use a specialized puller.
- Unscrew the nut blocking access to the adjusting screw.
- Remove the lock washer.
- Tighten the adjusting screw until there is no play in the engagement of the worm and roller.
- Install the lock washer into the seat.
- Install the nut covering the adjusting screw.
After adjusting the gap in the engagement of the worm with the roller, you should check the force applied to the steering wheel. Tightening the adjusting screw too tightly will lead to increased friction of the steering gear parts and rapid wear.
Before disassembling and adjusting the gearbox, you should check the functionality of other parts of the steering. Disassembly and assembly of the unit can be carried out without the use of specialized equipment.
After correct adjustment of the steering gearbox on a UAZ 469 vehicle, the permissible maximum play should be no more than 10°. Exceeding this indicator indicates disturbances in the operation of other parts of the steering.
Operating mechanism and gearbox design
The structure of the UAZ steering gearbox
This text will be devoted to the general principle of operation of the gearbox, and analysis of this mechanism using a specific example, namely the famous car “UAZ 469” or, as it is also called, “loaf”.
Let's start with the fact that the vast majority of gearboxes, if not all, are made of solid cast iron and welded with steel. The use of these particular materials gives the necessary parameters of rigidity and strength to this mechanism, due to the specifics of its design. Beneath the sealed cast iron are fairly simple transmission elements: gears, shafts, bearings, belts, gears, etc. It is also possible to have configurations that provide for the location of the lubricating element inside the mechanism. This allows you to lubricate the gears and bearings inside the UAZ Bukhanka gearbox.
Today there are many different configurations in which the steering gear is made, but the worm gear mechanism remains the most common.
It is included in the complete set of absolutely all modern cars with a gearbox system on the steering wheel, including the UAZ 469 (loaf). These systems involve transmitting torque using a worm gear, consisting mainly of a special worm screw and a toothed worm wheel.
The so-called “worm” installed in the UAZ 469 gearbox is made as a cast part from the strongest alloy. Outwardly, it looks like the core of a well-known meat grinder, but speaking in terms, the thread on the worm is made in a trapezoidal shape. As for the worm wheel, it is not much different from an ordinary gear wheel, but the carving on this element is made especially carefully and is literally finely adjusted to the shape of the worm thread.
Gear wheels for gearboxes of such power as in the UAZ 469 loaf are made of durable materials, usually either cast iron, which does not break under great force, or a durable steel alloy, of which the core is made. The teeth are made from special anti-friction materials of increased strength. Worm gears are most effective in machines where we expect high torque combined with low angular velocity.