Niva 2121 #5 Manufacturing of power thresholds.
The process moves from uprooting rot to renewing iron.
First of all, we return rigidity to the body.
We start with the manufacture of power thresholds.
We prepare the installation site - remove the unnecessary, modify the useful. We carefully review what we will treat and what we will change.
Since the car is for tourism and not for sports, we use a 40x80 profile. We dampen the ends of the profile. Since the part is located in the active sandblasting zone, all seams are sealed. From the outside it looks like this:
And inside it's like this:
The water won't pass 
After cutting the seam, we try the part in place:
When installed, the threshold will go even deeper into the body and will protrude by about 20mm.
We refine the threshold until it is fully compatible with the surrounding reality:
And depending on the degree of destruction of the surrounding panels, we make transition plates and corners.
We mark the holes for installation, remove rust from parts and cover them with a phosphating compound:
Be careful, hot acid!
When the reaction is over, we temporarily assemble the parts and install them in place to clarify the markings
We make markings, disassemble the parts and prepare the new threshold amplifier for installation:
After cutting, the parts are reassembled for intermediate installation in place, and the new threshold amplifier takes its place:
You can compare it to how it was:
There is some difference, right?
After cutting the seams and anti-corrosion treatment of the welding site, we install the outer part of the threshold in place:
A little special welding magic and this thing sits in place without any outside help:
Now all that remains is to complete the installation by making the connection to the external body panel:
You can proceed to manufacturing the inner part of the threshold. True, in this case you will first have to make a new floor in the cabin
To be continued
chugunder.livejournal.com
Protection of boxes, thresholds for the field with your own hands — Lada 4×4 3D, 1.8 l., 2002 on DRIVE2
It’s more common for me to say protection of boxes, since what I have in mind does not act as a threshold in any way. And in my opinion, the Niva doesn’t need a threshold, it will only stain your trousers, and it certainly doesn’t make the landing comfortable.
After the second trip to Khurla Kol, I jammed the box. It was dented because it was pulled right onto the stone. Upon arrival in the city, the box was successfully pulled out, fortunately it was not dented too much. And I thought about protection...
The idea is simple, to make something inconspicuous, not heavy, and not staining your trousers when landing.
I took a pipe with a wall thickness of 3 mm as a basis, selected the diameter by eye, I don’t know how much)) And I selected solid squares so that they fit tightly into the factory places for the jack.
Full size
Full size
Then the tedious work, installed, measured, cut, measured again - welded
Full size
Full size
And one is almost ready:
Full size
I made the second threshold in the same way, welded it, and ground the plugs for the metal pipe
Full size
Treated with rust converter before painting
Full size
Since I wanted to do it with a minimum of parts, I organized the fastening in this way:
Full size
As I already said, I took the squares a little larger than the hole for the jack, so the thresholds fit very tightly, and they are secured by a pin with a nut welded on the back side.
Full size
I got what I wanted, neat small thresholds, made only so as not to damage the box.
Full size
Full size
Full size
Full size
And they didn’t harm the overall appearance of the car, what do you think about this?
And they have already passed the test of mud and stones:
Full size
But more on that in the next post...
Thank you everyone, have a nice week!
www.drive2.ru
Suggested options
There should be no problems with where to buy such elements. Go to Avito, browse the Internet, or just go to auto parts stores. The assortment is now huge, and the price is reasonable.
The question is what is your goal when setting thresholds. The type of elements directly depends on this.
In total, 3 categories of thresholds are offered for the Niva.
- Decorative. These are plastic covers that are mounted on the sides of the car. They are somewhat similar to car moldings in that they are easy to install and inexpensive. They have certain protective properties, since plastic prevents damage to the car from small stones, dirt, etc. You shouldn’t expect help from them off-road. Moreover, there is a risk of damaging and breaking them, since plastic is cheap and fragile;
I can’t say specifically how much these or those thresholds cost. There are a lot of options, including a Boomer design and some unique designs, the prices of which are prohibitive.
But you can start with painted plastic parts. Installation is extremely simple; replacement is completed in a matter of minutes if the previous ones were damaged. If you prefer the repair option, that is, there are thresholds that can be restored but provide increased protection, take steel or chrome-plated products. The plastic is purely for decoration, so they will only get in the way when driving off-road.
Installation methods
If you purchased a set of thresholds for the Niva, you should first find out what installation method they are designed for before purchasing.
There are two connection methods in total.
- Removable. These are often plastic or metal products. To install them on the car body, appropriate metal screws are used. Their advantage is that the thresholds can be quickly removed and replaced with new ones, if necessary. The mount is not the most reliable, but in fact the most practical;
- Welding. As you understand, welding machines are used here. This method is important to use if you have metal or chrome thresholds. I don’t recommend using the device without experience and skills. An option for those who are confident in their decision and are ready for long-term use of thresholds on the body of their Niva.
How to select and secure thresholds for Niva 2121 with your own hands.
Tuning a domestic SUV is an almost endless topic. Someone creates monstrous machines on which they hang everything that is on the market. Other Owners focus on the functionality and protection of the car. One of the elements of the second style was the thresholds for the Niva 2121.
What are thresholds for?
The installation of these elements definitely has an aesthetic effect. This way the appearance of the car gets a more complete picture. However, the protective function is much more important. Moreover, these elements do not affect the driving and dynamic characteristics of the car. Threshold functionality:
- Protects the body and glass from stones and debris flying from under the wheels (combines well with arch extensions).
- Additional protection for the bottom edge and door area. When driving off-road, through potholes and riffles, the threshold will take on part of the impact or load from soil pressure.
- Makes it easier for children and passengers with limited mobility to get into the car.
- Aesthetic decoration of appearance.
Door sill covers for Niva 21214 are strongly recommended, but not mandatory. However, in the presence of a guardrail, increased ground clearance and the rest of the body kit, installing threshold protection would be a logical conclusion to the external tuning.
Options for offered models
When deciding to install threshold protection on his Niva, the owner can look online at what the car will look like later. Some sites offer not just photos, but three-dimensional models of cars, on which you can try on different elements and choose the ones that suit you. The type of part that will be installed on the Niva directly depends on the functionality that the owner expects. Main types of thresholds:
- Decorative. More like small moldings, trims are cheap and easy to install. The part has minimal protective properties. In serious off-road conditions, such elements are the first to get lost and break. In this case, the advantage is the low cost, which allows you to buy new ones regularly.
- Power. Threshold protection made of steel, aluminum, stainless steel and even profile pipe when manufactured independently. They look brutal and reliable. You need to choose parts with a good anti-corrosion coating, as they will be constantly exposed to natural influences.
- Chrome plated. A separate category that combines power and decorative functions.
The cost of specific thresholds varies greatly. Chrome ones belong to the most expensive segment, although there are exclusive models that cost a third of the car. Is it worth it for the Niva owner to spend so much money - a question for the owner.
Mounting methods
Thresholds are mounted in two ways: manually or by welding. It depends solely on the type of part. Methods for connecting elements to the body:
- Removable method. For the most part, plastic and some metal structures are attached this way. For installation you will only need metal screws. Can be quickly replaced with a new or different model. The disadvantages include poor reliability of fasteners. It should also be noted that new holes must be treated with anti-corrosion compounds.
- Welding method. This is a radical fixation of metal and chrome models to the car body. This installation should be done by professionals. Once installed, you can safely step on the part; they can withstand the weight of a large adult person.
Useful video
The choice of elements depends solely on the wishes of the owner and the conditions of use of the car. Homemade threshold protection for Niva 21214 also exists, but, as experienced Niva owners say, production costs and time do not outweigh the purchase of factory parts.
djeeprus.ru
Complete replacement
Thresholds on Niva Urban and other models are completely replaced in case of severe wear. Sequencing:
- Cut off the old structure, inspect it, assess the condition of the unit.
- Trim the reinforcement in the central parts of the holes.
- Cut off the old element that is used to connect to the floor covering.
- Prime the internal parts of the system.
- Cut the profile to the required length, weld the ends, weld them to the amplifier.
- Make an insert without removing the stand, and weld the joints.
- Take the original threshold, cut off about 2 cm along the bottom, make holes with a drill and weld everything in place.
- Raise the car to weld a new connecting element.
- Weld part of the front fender.
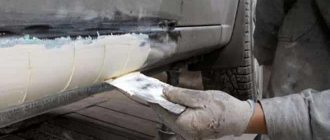
- Fill and prime the joints.
If everything is done correctly, the homemade elements will look like originals and will harmoniously complement the exterior of the vehicle. A machine is used for welding with the spar.
Instead of an overlay on the Niva, a channel is sometimes used - also a convenient option.
Power rapids on Niva. — Lada 4×4 3D, 1.7 l., 1997 on DRIVE2
After selling the bumpers of the old modification, I began building a new body kit by making power thresholds, I had been preparing them for installation for a long time, tried them on many times, in general, work on them proceeded in bursts and lasted about 2 months.
POWER THRESHOLDS
I had prepared a place for their fastening in advance, even during the welding process of the car. It was necessary to make a profile for these fasteners, since there is no standard size of this size... I took the profile 50/50.2mm
Use a grinder to cut out the required sector.
We throw away the excess.
We weld the halves and get the desired profile.
Let's try it on.
Let's try on the pipe.
Next we make fastening of the embedded “fangs”.
Each will be secured with 2 bolts. Be sure to sign that you belong to a certain profile on the body...
We use bushings from small reaction rods of the rear axle. Wheel nuts from Niva.
We get such a bushing.
We drill out the hole for welding and leave the gap necessary for penetration.
Boil it.
We try on the pipe, trim the “fangs” until we obtain the required distance from the car body and grab it.
Carefully take it out and scald it on the table.
I ended up with a pipe extension like this. At first I thought that this was a lot, but during operation it turned out that more was possible.
We try on the required diameter bends and grab them.
It was never possible to find spherical plugs for the ends. I made these glasses
As a result, when everything is scalded and painted, it takes on this look:
www.drive2.ru
Complete replacement
Thresholds on Niva Urban and other models are completely replaced in case of severe wear. Sequencing:
- Cut off the old structure, inspect it, assess the condition of the unit.
- Trim the reinforcement in the central parts of the holes.
- Cut off the old element that is used to connect to the floor covering.
- Prime the internal parts of the system.
- Cut the profile to the required length, weld the ends, weld them to the amplifier.
- Make an insert without removing the stand, and weld the joints.
- Take the original threshold, cut off about 2 cm along the bottom, make holes with a drill and weld everything in place.
- Raise the car to weld a new connecting element.
- Weld part of the front fender.
- Fill and prime the joints.
If everything is done correctly, the homemade elements will look like originals and will harmoniously complement the exterior of the vehicle. A machine is used for welding with the spar.
Instead of an overlay on the Niva, a channel is sometimes used - also a convenient option.
Do-it-yourself thresholds for the field, photo drawings
Lada 4×4 2131 Niva 2012
- After installing mud tires on the original 5.5J/et +58 wheels, the rear shock absorber mounting points began to wear out at maximum axle strokes. I took it and changed the disks to 6.5J/et+40 and everything seemed to stop. Happiness, as always, did not last long. Once I put a lot of people in the back and loaded the car quite a bit, as a result the bridge sank smoothly without a break, and when driving at high speed and catching bumps, it began to stupidly cut off shavings of rubber with the edge of the fender liner near the threshold below in the rear arches, which was like a sickle in the balls on new tires. If I were a boger, I wouldn’t forgive myself for this at all. Therefore, I firmly decided to cut off all four arches and up to the tomatoes. Then attach and secure a 7 cm rubber arch extension to them so that they don’t get covered in mud. The task was clear, so all that remained was to implement the plan in the realities of Vladivostok, which turned out to be oh so difficult. Here, according to the Russo custom, the craftsmen do not want to deal with machines, and when it comes to arches, they generally shy away from the plague, or the price tag is simply inhumane.
In the end, I turned to the guys who roll out the arches for drifters and, I must say, they were adequate guys. We discussed everything, decided what and how, and got to work. They tormented me for a long time, for about a week they only sawed the arches, well, okay, the main thing is that they immediately said that the fields had never been sawed before and it would take a long time.
The arches were cut out, bent outward and the gussets were boiled. Then we had to take the car away for a ride, where it became clear that the newly-made arches lacked enough rigidity, because there was no frame, and the body held all the rigidity due to its shape and side bars. I had to make an arc-shaped strip of metal from the inside and weld it into the edge of the arch from below; the result was a rather rigid structure. A rubber expander was subsequently screwed to this strip with self-tapping screws. Everything was taken out, primed, sanded. The outwardly curved arches could have been left without fenders, but the dirt still reached the body, so they were screwed on. Afterwards we blew everything thoroughly with anti-gravel and at the same time the sides along the curved strip. It turned out a little convex, but now it doesn’t rub anywhere and in the future you can roll up the wheels to 32”.
Next it was necessary to do such a thing as strong rapids. What we managed to dig up from the mass-produced ones is some kind of nonsense, to put it mildly, and the fact that they will fit hole to hole is also doubtful. Having talked with the gourami of combing fields for off-road use, it was clear that in reality the power sills need to be welded into pipes, and the sills themselves should be pierced with pipes and tightly welded to the side members along the way, welding where they touch. This option is clearly cruel and is needed for sport, but I just need to leave my original thresholds intact so that sliding on them on rocks and soil won’t tear or dent them, because In this case, they will quickly rot.
Therefore, dimensions were taken, a sketch was made and sent for detailing. As the play progressed, the assortment of pipes was studied, what was available, etc. I decided to make custom nuts with a long sleeve and regular ones. With a long sleeve, the nut is screwed onto the stud and plays the role of a lock nut, and the sleeve covers the rest of the thread from clogging. After much debate, a 45mm pipe with a 3mm wall was taken. A rectangular profile 20x17 was made, threaded to 16, welded into the pipe on both sides and hermetically sealed so that the pin did not turn out. The ends of the pipes are also welded with metal caps to prevent water and dirt from getting inside the pipe. Afterwards, all this was painted with fashionable zinc paint, which was then repainted by “special forces”. When installed in the standard places for the jack, one threshold stood up like a native one under a sledgehammer, and the second turned out to be much smaller in holes than necessary. When we figured it out, it turned out that they took the dimensions with one tape measure and made them with another. As a result, about 6mm escaped over 1450mm of length, which is a lot. I had to overcook the pin a little and repaint it. Afterwards everything went as expected. The weight of one such assembled threshold is about 8 kg. I have attached drawings of both sides and a rear view. If someone sculpts according to the drawing, I highly recommend paying attention to the actual dimensions along the axes of the seats, since mine are different on both sides =). That's all for now. Photos as usual.
chugunder
The process moves from uprooting rot to renewing iron.
First of all, we return rigidity to the body.
We start with the manufacture of power thresholds.
We prepare the installation site - remove the unnecessary, modify the useful. We carefully review what we will treat and what we will change.
Since the car is for tourism and not for sports, we use a 40x80 profile. We dampen the ends of the profile. Since the part is located in the active sandblasting zone, all seams are sealed. From the outside it looks like this:
The water won't pass