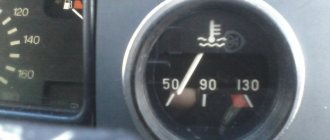
The relay and fuse box is also called the mounting block or black box. In the event of a car breakdown related to electrical equipment, the fuses and relays are first checked. If a fuse is blown, you must first determine the cause of its blown before replacing it.
Requirements for installing fog lights
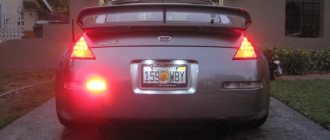
It is permissible to locate fog lamps directly in the headlights.
The rules for installing headlights are regulated by two regulations:
- GOST 8769-75 or SEV standard 4122-83;
- state standard of the Russian Federation GOST R 41.48-2004, corresponding to UNECE Rules No. 48.
Location of fog lights on a car
The general requirements are as follows:
- The installation location is located at a distance of no more than 400 mm from the side surface of the vehicle body. The distance is measured between the side plane and the outside of the headlight.
- It is permissible to install only two fog lights. The standards separately stipulate the mandatory installation of fog lights on tourist buses, as well as on vehicles operated on mountain roads.
- The lower edge of the fog lighting device is located at a distance of at least 250 mm from the road surface.
- Fog lights should have a horizontal viewing angle ranging from +15º to -10º, and a vertical viewing angle from +45º to -10º. It is unacceptable to block the headlights with vehicle parts within the specified angles.
- Fog lights must be connected in parallel with side lights.
- The lenses of the fog lamps must produce a beam of light located below the flow given by the low beam lamps.
- It is acceptable to use transparent filters or selective yellow color. It is unacceptable to use glass of different colors on the same car.
The standards do not have special requirements for installing fog lights on a car, so the owner can install the kit himself.
Errors when connecting fog lights
When installing a PTF for the first time, it is easy to make a mistake. It is better to familiarize yourself with them in advance so as not to allow them to happen by your own example.
Also interesting: Construction and repair of the VAZ 2121 Niva transfer case
The main problem is connecting the side lighting lamps to the wiring. The switch, like the wires used in this system, are not rated for the current drawn by the equipment. As a result, the wiring overheats and the protective insulation melts from the high temperature. Yes, the PTF will be activated when the side lighting is turned on at the same time. But the problem is that the equipment will not last long.
The second problem is the discrepancy between the installation parameters and those specified in the traffic rules. Traffic police officers have the right to check on site that the fog lights are working correctly. If the parameters are not met, the driver will have to pay a fine.
https://www.youtube.com/video/3fNE0lkwZVw
The third problem is the wrong choice of location for installing the button. The switch should be located no further than arm's length. Otherwise, you will have to reach for it, which risks getting into a traffic accident.
We hope our tips will help you connect and install fog lighting correctly!
What will you need to install fog lights?
To install fog lights yourself, a minimum set of tools is required. The car owner must have knowledge and skills in working with electrical wiring, since the safe operation of the car as a whole depends on the correct installation.
Set of tools:
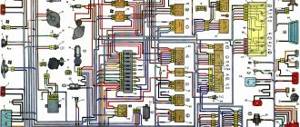
- color electrical diagram of the car;
- nippers or side cutters;
- wire cleaning knife;
- terminal crimping pliers (terminal block);
- soldering iron
Set of materials required for installation:
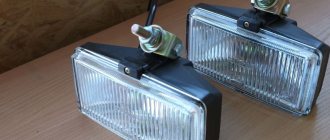
- a set of fog lights suitable for installation in standard holes in the bumper or universal ones that are mounted on the surface of the bumper;
- stranded copper wire with a cross-section of 1.5-2 mm² with insulation capable of operating at low temperatures and resistant to gasoline and oil vapors;
- relay for turning on (standard headlight turn-on relays from front-wheel drive VAZ models are usually used);
- remote housing for installing a blade fuse;
- 30 A blade fuse;
- a control key that matches the interior design (preferably with a backlight);
- connectors and terminals for connecting wires to circuit elements;
- heat shrink tube of suitable diameter;
- electrical tape on a polyethylene or fabric basis;
- plastic ties;
- automotive corrugated hose for laying wires.
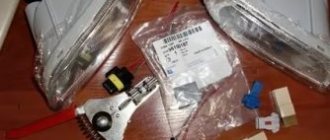
Set of fog lights for Ford Focus 3
Methods for connecting fog lights
Connecting fog lights can be done in several ways. The simplest and most reliable thing is to connect to the car’s existing wiring intended for powering the PTF. In this case, the factory electrical circuit already contains all the necessary elements (lead wires, connectors for connection, relay, fuse, switch) - all that remains is to install the headlights and connect them to the existing connectors. This method is implemented only on fully equipped vehicles, when new PTFs are purchased to replace installed ones or to complete the vehicle. When purchasing headlights, you should make sure that they fit the car model, both in terms of plug connection and installation parameters.
If the car does not have an electrical circuit to connect the PTF, then you will have to install it yourself. This will require insulated copper wires, a switch, relay, fuse and the headlights themselves.
A common mistake is connecting the PTF to the side lights. The wires and switch of these devices are not designed for the current consumed by the headlights!
A fuse in the PTF power circuit is not a luxury. This device will save you from a possible fire in the event of a wiring short circuit. Its rating is calculated based on the power of the headlights. If the lamps in them are, for example, 60 W, then the calculation of the current in the supply circuit for two PTFs is as follows.
60 W * 2 / 12 V = 10 A.
The fuse is always chosen with a small margin - in this case it is required at 15 A.
Connection diagram
For installation, two connection schemes for fog lights are possible:
- parallel;
- sequential.
When connected in parallel, the positive wire goes to each headlight from the relay contact. Power to the relay is supplied through a fuse link with a rating of 15 A, which is enough for most models of fog lights. It is advisable to place the fuse as close to the battery terminal as possible.
The +12V signal voltage should appear only when the ignition is active. This measure prevents the headlights from working when the engine is off. If desired, you can automatically ignite the headlights after turning on the ignition. To do this, the signal wire is connected to the battery charging indicator lamp installed in the instrument cluster. The button must be on.
Parallel connection
Serial connection reduces current consumption and lamp brightness. A similar scheme is used to use fog lights instead of standard headlights.
Serial connection
Connecting additional headlights via a relay is demonstrated in the video tutorial from the “AUTO ELECTRICAL — Steel Horse” channel.
Video instructions for installing standard PTF on Lada Kalina
Connecting fog lights via a relay: diagram and instructions First, let's prepare the necessary tools and materials.
These norms are clearly described in the Rules, so we will not dwell on them. If the wires are short, take longer ones, strip their contacts at the ends and connect them. It is small, so you can not even attach it, but hide it behind the dashboard.
About the wires Now you need to deal with the fog lights themselves. The optical structure of the drop is such that it simply reflects ordinary light from ordinary light, like a mirror.
PTF light lamps must be installed below the upper part of the light-transmitting opening of the low beam lamps. Preparing to connect the fog lights relay Tools required to connect the relay: Knife; Pliers; Terminal block. Popularity: 13 views
That is why, whenever possible, it is better to use low-power light sources, and here, more than anywhere else, LED lamps look best. You will need: a set of wires for connecting fog lights; insulating tape;. It should be noted that the electrical circuit must in any case be equipped with a fuse, this is very important.
How to install and connect with your own hands?
Installing fog lights on your own begins with developing a connection diagram. A properly designed circuit avoids unnecessary wires and ensures reliable operation of the electrical circuit. It is recommended to carry out installation work in the garage, although many owners install it outdoors.
Installing PTF in the front bumper and setting it up
There are three installation methods:
- into standard openings;
- on the outer bracket;
- into a blank bumper not intended for installing headlights.
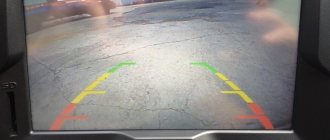
The setup is done using the homemade template presented below. The template is installed perpendicularly at a distance of 5 m from the car headlights. The adjustment is made until the top edge of the light spot coincides. The matching line is located 100 mm below the height of the center of the lamps.
Approximate view of the template for customization
Adjusting your fog lights increases driver visibility and reduces the risk of blinding oncoming drivers.
Installing PTF in a blind bumper
The most difficult and time-consuming option is to install fog lights in a solid bumper (i.e., one that does not have factory holes for this):
- Remove the bumper from the vehicle in accordance with the repair and operating instructions.
- Determine the optimal location for installing headlights in terms of housing shape and compliance with regulations.
- Make a hole for the headlights. The best way is to drill holes around the perimeter and saw through the gaps with a file. The hole must be adjusted to ensure proper fit between the body and the decorative frame. Small fragments of the bumper are carefully cut off with a construction or stationery knife.
- Drill holes for the fog lamp housing, which is secured with suitable bolts.
- Install the headlight into the housing and mount the protective cover. It clings to the plastic of the bumper.
- You can adjust the headlight using a special key included in the kit.
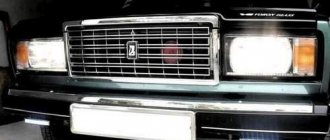
View of the bumper without fog lights
Bumper removed for work
The method of obtaining the window is clearly visible
Frame installation and adjustment
Beginning of reinstallation and connection
The car is assembled
Installing PTF on the external bracket
Option for mounting foglights on a steel bracket:
- Mark the mounting points of the bracket on the bumper in accordance with the requirements for installing fog lights. As a rule, additional headlights are installed on the bracket.
- Screw the bracket to the bumper with self-tapping screws or bolts.
- Install the fog lights on the mounting points and connect the wiring.
Example of installing headlights on a bracket
Installation of PTF in standard openings
In order to install headlights in a bumper that has standard plugs, you must:
- Raise the front of the car by placing a wooden block 150-200 mm high under the wheels. For greater convenience, you can place the car on a lift.
- Remove the protective shields covering the lower part of the bumper.
- Unscrew the clips of the standard bumper plugs.
- Insert the fog lamp into the guides and secure with standard screws. When using non-original headlights, there may be discrepancies in dimensions and mounting points. In this case, you have to adjust the parts to each other. Below is a photo gallery of installing Chinese fog lights in the Hyundai Elantra HD bumper.
Raising the front of the car
Headlights and plugs
Plug removed
Hole plug
Removing the mudguard
Reinstalled headlight
Wiring
When pulling and installing wiring, you must follow the following safety rules:
- disconnect the battery;
- the cross-section of the wire must correspond to the current carried;
- connection points must have reliable contact;
- Only wires of the same material can be connected (to reduce electrochemical corrosion);
- It is advisable to shed the twists with solder;
- the junctions of the wires are insulated with heat-shrinkable tubing or electrical tape;
- Avoid placing wiring connections in areas prone to flooding;
- to protect them from bending and chafing, it is recommended to protect them with a split corrugated tube;
- the wires are laid parallel to the standard harnesses and fixed to them with plastic ties;
- The power supply circuit for the fog lights must be protected by an individual fuse;
- When laying the wire, you should ensure that there are no hot or moving elements in the path, as well as sharp edges.
Neglecting the rules for safe installation of electrical wiring leads to overheating of the circuits and a fire, which can destroy the car.
Before starting installation, it is recommended to assemble the future electrical circuit and test the operation. This event allows you to find and eliminate errors made during development.
Wiring and headlight testing
Approximate wiring sequence:
- Carry out preliminary installation of wires to the fog lamp connectors.
- Pass the wires inside the bumper through the corrugated tube.
- Remove the negative leads from the fog lights and attach them to the body. It is advisable to use the standard weight bolts found on the front side members.
- Remove the front wheel and fender liner (one at a time).
- Decide on the location of the relay. A relay must be used without fail, since direct switching of lamps with a switch will lead to rapid burnout of the contacts. The relay can be placed in free space in the standard mounting block or anywhere on the instrument panel.
- Since the fog lights must work together with the side lights, the connection is made from the side marker block. Below are photographs of the wiring process on a Volkswagen Polo Sedan.
Relay installation location
Connecting wiring under the hood
Entering wires into the interior
Light switch
Installation of PTF switch
The most common method of turning on the fog lights is a button installed in a regular place or at any other point within the driver’s reach. The regular places for the buttons are covered with removable plugs, and occasionally they are covered with instrument panel material. In this case, it is necessary to cut a hole corresponding to the dimensions of the button body.
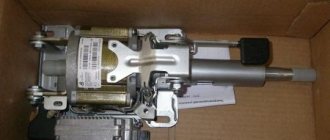
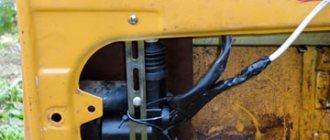
A separate item worth considering is the installation of a steering column switch unit equipped with a rotary switch for fog lights. To perform the work, you may need a special tool - screwdrivers with Torx heads and a special wrench for the central bolt of the steering wheel.
To connect the steering column switch follow these steps:
- Unscrew the fastenings of the two halves of the decorative steering column cover.
- Separate the parts, overcoming the resistance of the clamps. When disassembling, you need to be careful not to break the plastic latches.
- Next, you need to remove the steering column switch, which can be removed without removing the steering wheel or with removal. In the first case, it is enough to bend the spring clip, remove the lever and disconnect the connector. After this, another switch is installed and the removed parts are replaced. In the second case, the steering wheel and airbag (if equipped) must be removed. The method for removing the cushion is different for each model. The part being removed must be held, as it can jump off the fasteners and break the wiring harness.
- After removing the airbag, you need to unscrew the central bolt securing the steering wheel.
- Remove the steering wheel, disconnect the connectors from the steering column switch.
- Unscrew several screws securing the switch and remove it from the column.
- Install a new unit and reassemble. When installing the steering wheel, you must ensure that the steering wheel spokes and front wheels are in the correct position. The center bolt must be tightened to the recommended torque.
- Connect power and check the operation of the switch block.
An example of installing a new steering column switch on a Hyundai Solaris.
Removing the cover
The lower part of the casing has been removed
The switch mount is clearly visible
Old and new switches
On some European cars, fog lights are switched using a rotary switch located on the instrument panel. When installing headlights on such a car, you need to connect the wires from the lamps to the plug and install a light switch with the function of controlling the fog lights.