What are the reasons for the charging failure, how to fix the problem on the road or in the garage - this is discussed in this manual. The electrical circuit of the LADA Niva 4×4 is built according to a classic layout and has undergone virtually no changes since the start of production. Why, knowing its weak points and moving from the obvious to the complex. You will quickly find the root cause.
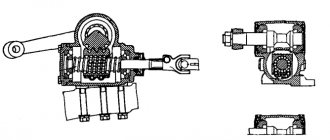
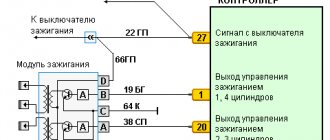
Generator connection principle, drawing:
Basic information about the state of the charger can be obtained from the behavior of the instrument cluster - flashing of the indicator, emergency operation of electrical equipment (headlights, interior lighting, heater) and the engine.
The battery charge indicator light is constantly on.
The phenomenon indicates that the generator has stopped its normal operation; at this moment, the BS is powered by the battery. With a normally charged battery, you have 30-40 km of mileage left to get to the repair site. Disconnect consumers as much as possible, arm yourself with a multimeter and a set of keys.
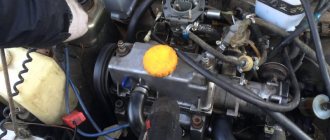
A) Belt break.
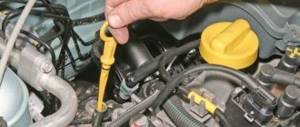
Pay attention to the presence of a belt on the pulleys of the water pump and generator. To return it to its place, you will need 17 or 13 socket wrenches, depending on the year of manufacture of the car, as well as a strong flat-head screwdriver.
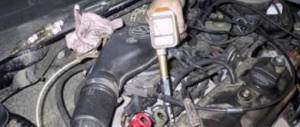
Disconnect the HF position sensor (for example, on 21213,21214).
Loosen the nuts securing the tension bar and slide it to the side towards the cylinder block.
Place the belt on your seat.
Upon completion of installation, adjust the tension, controlling the deflection when pressing with your thumb on the belt gap between the generator and pump pulleys - 10-15 mm, pump and crankshaft - 12-17 mm. Failure to comply with this requirement may result in the belt slipping with further damage and rupture.
B) Burnout of wires, poor contact in the circuit.
If the circuit opens at terminals B, V and Ш, tighten the nuts or replace the terminals with new ones.
C) The charging relay-voltage regulator has failed.
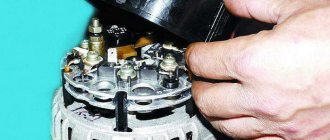
To initially check the performance of the LV, use a multimeter (voltmeter), which allows you to record the voltage directly at the battery terminals. Normal voltage is considered to be in the range of 13.85±0.35V . If it is different from this, we diagnose the element. The location where the charging relay is located near the Niva is determined by the age of the car. Thus, a remote relay can be found on the right fender liner of a car with a classic engine compartment layout; more modern modifications of generators are equipped with a LV combined with a brush assembly.
The element is not repaired, but replaced completely. To assess the condition, you will need power supplies of 12-14 V, followed by replacement with 16-22 V, and also an incandescent lamp of 1-3 W. According to the diagram drawing, apply current to the voltage regulator in series. If the first test is characterized by the operation of the lamp, and the second - by the absence of glow, then the LV is working.
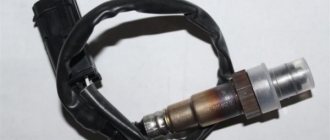
If there is a break, the lamp will not light up at all; if there is a breakdown, it will glow constantly. In addition, weak charging, as well as its absolute absence, is often explained by abrasion of the brushes (residual height less than 5 mm) and slip rings of the generator. If the first part is changed along with the brush holder, then the second is restored by grinding, grooving or removing the remains of the old rings and pressing in new ones. It is recommended to supplement the disassembly of the unit with a total cleaning.
D) Diodes or rectifier unit are faulty
To assess the condition of the mentioned components (negative, positive and additional diodes), arm yourself with a low-power lamp and battery. Diodes are indicated by numbers in the diagram: 1. Positive
Performance is determined by connecting “+” to terminal 30 of the generator (for positive), bolts of the rectifier block (for negative) or to 61 (for additional), and “-” to its body (for negative) or to any of the bolts of the rectifier block ( for positive and additional). The glow of the lamp indicates that the diodes have been shorted, which leads to the conclusion that the diode bridge will have to be replaced. Be attentive to the indications on the instrument panel. Often the icon lights up half-heartedly and is not noticeable in bright light.
Replacing the power supply with your own hands
If any electrical circuit fails, the first thing you need to do is check the condition of the fuses and relays. This simple operation can be performed independently. The driver needs to know where the Niva Chevrolet fuse box is located and the purpose of the fuse links installed in it.
To protect electrical circuits on cars, fuses are used, located in a special mounting block. On a Chevrolet Niva VAZ 2123, this block is located inside the instrument panel, to the left of the plastic steering column cover.
In addition to the main unit, the Chevrolet Niva has an additional unit that is responsible for the operation of the car’s engine. This safety element is located in the passenger compartment and is located on the right side of the instrument panel behind the glove box.
The placement of blocks in the cabin is the same for cars of all years of manufacture.
The main blocks of machines are divided into two types - before 2009 and after. These devices are not interchangeable. The blocks behind the glove box are identical in design.
On a 2005 car, you can easily install a block from a 2011 car. The designation of the fuse rating is marked on the body; on the assembly itself there is a number of the fuse link and a pictogram of the purpose.
There are no fuse markings on the main unit cover.
If any electrical circuit in the vehicle fails, the condition of the fuse must be checked.
If it is necessary to replace parts, it should be taken into account that the VAZ 21214 fuses on the Niva injector belong to two different types:
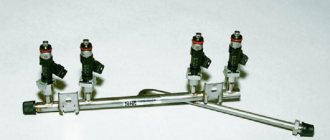
- in the main block there are cylindrical inserts (inherited from the Zhiguli);
- and in the injection system blocks - modern, knife type.
Therefore, when you go on a trip, you need to take with you spare inserts of different types.
If, for example, a cigarette lighter fails on the road, you must:
- Turn off the ignition.
- Open the cover of the additional unit.
- Visually check the condition of the PR14 16 ampere fuse, which is responsible for the cigarette lighter circuit.
- Remove the burnt insert with your fingers and replace it with a spare one taken from the reserve socket PR15. It is prohibited to use homemade inserts, as they are not able to protect the circuit from overloads. The consequence of this may be overheating of the elements and fire.
- Check the functionality of the circuit. If the insert immediately burns out again, then the reason lies in damage to the wiring, which must be carefully checked.
The remaining fuses and relays on the VAZ 21214 are changed using a similar scheme.
In case of burnout or mechanical damage, it is necessary to repair the unit by replacing its components or the entire assembly.
To replace the main unit, follow these steps:
- Disconnect the battery from the on-board network.
- Remove the box cover and unscrew the two 8 mm nuts securing the block. Then you need to pull the box towards you and remove it from the fastening studs.
- Write down the markings and position of the wires on the old unit.
- Disconnect the cables from the plugs of the old unit and connect them in the same sequence on the new one.
- Check fuse ratings and wire installation.
- Secure the replaced block with nuts.
- Connect power to the on-board network and check the functionality of the circuits.
The photo shows some stages of dismantling the block.
Unscrewing fasteners
Removal from studs
Disconnecting the wiring plugs
Other fuse or relay blocks on the VAZ 21214 are replaced in the same way.
Below we will look at the process of replacing the power supply with your own hands. To replace, you will need a new power supply and a socket head set to “8”.
- First, open the hood and disconnect the battery.
- Now, under the instrument panel, find your power supplies. Using an “8” socket wrench, unscrew the two main nuts.
- Having done this, pry up the power supply and remove them from the studs.
- If you are replacing an old component with a new one, you must mark all the wires before doing so. Or take a new power supply unit and insert the wires from the old unit into it one by one. To remove the idle wires, pull them by their plugs.
- To check the functionality of the new power supply, reconnect the battery.
In addition to the main unit, the Chevrolet Niva has an additional unit that is responsible for the operation of the car’s engine. This safety element is located in the passenger compartment and is located on the right side of the instrument panel behind the glove box.
The placement of blocks in the cabin is the same for cars of all years of manufacture.
On a 2005 car, you can easily install a block from a 2011 car. The designation of the fuse rating is marked on the body; on the assembly itself there is a number of the fuse link and a pictogram of the purpose.
https://www.youtube.com/watch?v=SqqIBAU8osQ
There are no fuse markings on the main unit cover.
Read news about the new Niva
- Diagram and location of the fuse box Niva VAZ-21213 and 21214
- About engines for VAZ 2121 Niva
- Chevrolet Niva idle speed sensor
- Fuses and relays Lada 2121
- Front axle. VAZ 21213, 21214 (Niva)
- How to bleed the clutch on a Niva? Algorithm of actions
- Replacing the drive gear oil seal of the front axle VAZ 2121 Niva 2131
- Installation and reviews of Euro handles for Niva 4x4 (VAZ 2121, 2131) » Lada.Online - all the most interesting and useful about LADA cars
The charging lamp does not light up.
Since the indicator on the instrument panel is a link in the generator excitation circuit, the absence of flashing when the ignition is turned on leads to loss of its functionality. Whether the lamp is to blame or the reason lies elsewhere (voltage regulator relay, lock contact group), can be understood by disconnecting terminal 61 from the generator with the ignition on, followed by shorting the wire from the instrument panel to the car body. If it catches fire, check the serviceability of the rotor winding, brushes and “chocolate”. If the circumstances are otherwise, examine the performance of fuse No. 2 (8A) and the light bulb by replacing the ones mentioned with known good ones.
The signal lamp is blinking
Blinking of the battery indicator, as a rule, indicates problems in the brush assembly, as well as the occurrence of a short circuit in the “W” and “-” terminals of the voltage regulator. The brushes, in turn, can “freeze”, not reaching the rotor slip rings at low and medium speeds. You have already read how to fix them in our instructions. However, the reason why charging on the Niva 2121, 2131, 21214 and 4×4 Urban disappeared is not always the above-mentioned components under the hood. In particular, the culprit of weak charging or its complete absence is an unmaintained battery with an insufficient volume of electrolyte or closed banks, loose and oxidized terminals, broken and melted wires. Additional difficulties arise when dirt, dust, traces of fuel and lubricants, etc. accumulate on suspended equipment.
The real favorite among SUVs in the modern automobile market of the country is the Chevrolet Niva. It combines the excellent qualities of both a touring SUV and a car for family trips. Thanks to its light weight and short overhangs, the Chevrolet Niva can drive off-road and ford. It can handle steep climbs with ease.
But the electronics system is one of the most vulnerable parts of a car. With regular inspection of electrical elements and timely removal of dirt and moisture from them, repairs will not be required even throughout the entire operation of the vehicle.
What is a generator
A generator is an alternating current device that produces electromagnetic excitation during operation. The generator design has a built-in rectifier unit, equipped with diodes made of silicon, as well as an electronic voltage regulator.
Thus, the unit creates electrical energy from mechanical energy and energizes the car’s battery, and also provides energy to its devices and systems. The connection diagram for the generator on Niva-2121, 21213, 21214 is shown in the figure.
Generator operation
The Niva Chevrolet generator is responsible for the reliable and high-quality operation of the electronics system. The owner should identify possible malfunctions in a timely manner and carry out high-quality repairs, since the functioning of all lighting devices depends on its good condition. This also affects the battery charge. A continuous supply of current is provided by a generator.
Although it has small dimensions, the generator is very durable. To prevent damage and failure of the car regulator, the owner must follow the rules for operating the car.
Particular attention should be paid to how the Chevrolet Niva generator works. Malfunctions that led to a malfunction in its operation can be determined using automotive diagnostics. And the repair depends entirely on the degree of complexity of the breakdown.
Malfunctions that occur in the operation of the generator
The Chevrolet Niva generator, the photo of which is provided in our article, may have the following malfunctions:
- the pulley is damaged or completely worn out;
- current collecting brushes are worn out;
- rectifier failure;
- voltage regulator failure;
- the collector is worn out;
- the bearing is worn out or completely destroyed;
- The charging circuit wires are damaged.
The car owner needs to become familiar with the main reasons why generator malfunctions occur. In addition, you need to know how to fix these breakdowns, as well as preventive measures to prevent them.
Generator "Niva Chevrolet"
Depending on the type of current, generators can be either direct or alternating current. Owners of the named car sometimes do not know what generators are used for this model? The Chevrolet Niva was provided with an electromechanical alternating current device. There is a built-in diode bridge - rectifier. To provide work to electrical consumers, it converts alternating current into direct current. The diode bridge with the generator is one mechanism; they can be located both in the housing and in the cover of the generator.
The operation of the latter is affected by the speed of the vehicle and its engine speed, since the generator is connected by a belt to its crankshaft. To regulate the output current, a voltage regulator relay is installed. In addition, modern generators have built-in integrated voltage regulators.
The Niva Chevrolet generator may be subject to the following malfunctions:
If the malfunction is of a mechanical type, then it includes a breakdown of the fastening, housing, faulty condition of the pressure springs, bearings, belt drive or other breakdowns that are not related to the electrical system.
With the first type of malfunction, the winding may break, the brush may burn out or wear out, the rotor may break through, and a short circuit may occur between the turns. The diode bridge and the relay regulator may be faulty.
Sometimes signs appear indicating that the Chevrolet Niva generator is faulty, but this problem can be caused by completely different breakdowns.
Generator problem
Report on repairs and increasing the voltage of the generator. First, a little background. One very frosty morning the battery said Woof and stopped showing signs of life. I returned home, chose a suitable spare battery, installed it and started it normally. While I was wandering around the city during the day, I was simultaneously thinking about what could have happened. The battery was new, the charging lamp was not on and nothing foreshadowed such a problem. After thinking about it, I settled on the option: that this was the first working day after vacation, I didn’t really drive the car, so for beer and fish at a distance of about 500 m and in as a result, frequent starts, short runs, and the pressing frost did its bad job. But everything turned out to be much more interesting, having done the tricks around 2 am, I stopped at a gas station, refueled and started... again the same story. Thanks to the gas station attendant and the driver of the Gazelle who helped me start the car with pusher. Already near the house, having taken a closer look, I noticed that the charging lamp was barely smoldering, which was absolutely not noticeable, not during the day, not with the lights on. In the morning I installed another battery and took measurements: XX without load - 13.5; 2000 without load - 13.9, 12.1 and 12.3 under load. Having replaced the gene with a backup one, I gutted the removed one - the result was pleasing. The horseshoe burned out, the diodes of the half-bridge were broken. The stator leads were burnt and the terminals were unsoldered. In addition, a leak was discovered in the stator twist. In general, having replaced the horseshoe and put it in order and varnished the stator, I assembled the gene. Here I remembered the idea and a fragment of an article I once spied on UAZBUK INFA for those who are confused: “1. The voltage level of the relay regulator is suitable for calcium batteries. The ideal voltage of the relay regulator for a car equipped with a calcium battery is 14.8 Volts (for 25°C). As a rule, relay regulators are set to this value (or at least 14.5 Volts) only on foreign cars of recent years of production. On the vast majority of old imported cars, as well as on all domestic (even new) brands, the relay-regulator settings have values in the range from 13.5 to 14.2 Volts, which is unsatisfactory for the proper operation of calcium batteries and negatively affects their service life. A value of 14.2-14.4 Volts can be considered more or less satisfactory, at which calcium batteries, at least, will no longer experience major problems with charging. The charging voltage level of 13.8-14.4 Volts recommended by many battery manufacturers is not entirely adequate for calcium batteries. The reason why calcium batteries require higher charging voltages compared to antimony batteries is the need for higher charging current densities. Lower charging current densities lead to a gradual decrease in the degree of utilization of the active masses, and as a result to a decrease in the actual capacity of the battery and an increase in its internal resistance (a decrease in the ability of the battery to produce starting currents). ... 3. New voltage regulators in generators INFORMATION LETTER No. 88-2004-G On generators with a new voltage regulator Since April 2004, OJSC "ZiT" Samara began installing voltage regulators 7931.3702I4 based on the element base (photo 1, 2) produced plant in Molodechno (Belarus) and a rectifier unit without three additional diodes for generators 2112 with number 9402.3701-03 (photo 3). This voltage regulator provides a charging voltage of 14.75 V ± 0.15 V (at an ambient temperature of plus 25 ± 10? C) with temperature compensation based on ambient temperature. The parameters of the regulated voltage taking into account thermal compensation are shown in Fig. 1. Simultaneously with the installation of this generator, cars of the 2110, 2111, 2112 family are equipped with an instrument cluster that does not have an additional 50 Ohm resistor connecting terminal “D” to ground. Otherwise, during normal operation of the generator, the battery charge indicator lamp will indicate its malfunction. ..." I decided to put together such a scheme. To prepare, we take a new sample PP. and solder the ground contact to the body and install a KD202 diode (another one is possible). We make a jumper from the removed contact and the diode petal. We solder a wire to the standard PP contact and bring it out to the front side (don’t pay attention to the quality of my soldering, I was picking at a faulty PP). Next, we connect the wires according to the photo. A switch has been added to the circuit to enable the mode to be turned off. It can be installed on the ventilation neck of the genes or by extending bring the wires out to where it is convenient. We put the gene in place and enjoy adequate charging and revived equipment. We put the gene in place and enjoy adequate charging and revived equipment. Measurement results: 1200 rpm without load after starting at -25, I couldn’t get the voltage to the battery. As it warms up, the voltage drops. XX under load Battery under load Battery without load Battery XX under load The degree of voltage rise can be changed by installing another diode suitable for current and voltage. The KD202 series gives +0.8 V, KD219b +0.45 V. Everything can be selected experimentally or by reference book. The magnitude of the voltage drop across the diode = the magnitude of the voltage rise across the generator. The photos are heavy, so in order not to overload the forum, I sent everything to a photo email. https://foto.mail.ru/mail/animal_1976/247
Replacing the alternator belt
To change the Chevrolet Niva alternator belt, you need to use the following tools:
In a Chevrolet Niva car, replacing the alternator belt is as follows:
- You need to remove the connector from the crankshaft position sensor.
- Unscrew and remove the bolt that secures the sensor.
- The nut securing the generator needs to be loosened slightly and moved towards the block. If the generator is displaced, its belt will loosen and can be removed without problems.
- Using a jack installed on the side where the generator is located, raise the car by engaging first gear.
- Pull the belt until it moves away from the pump pulley. Rotate the wheel so that the place of the guy moves onto the pulley.
- Then remove the belt from the other pulleys.
- The new one must first be put on the generator pulley and the crankshaft pulley, and only then put on the pump pulley.
- Turn the wheel until the belt is on the pulley.
- Put the generator in place, and tighten the belt, attach it to the bracket with a nut.
- Replace the crankshaft position sensor.
How to replace the tension roller
The design of the generator roller is quite simple. The bearing is its main part. If the belt loosens or slows down, you need to check the bearing itself by turning it by hand. A serviceable roller rotates quietly, without jerking or biting. If the roller is faulty, it is necessary to replace it, which is possible even in the garage, with a minimum set of tools.
Install a pry bar or other tool that can prevent the crankshaft from moving so that the clutch disc is blocked. By loosening the bolt that secures the roller, relieve the tension on the belt. Having completely unscrewed the axial bolt, the tension roller is removed. Then a new roller is installed and the belt tension is adjusted.
After replacing the roller, you need to re-inspect and check its operation. The instruction manual contains detailed instructions regarding the problem described.
Generator brushes
Worn brushes on the Chevrolet Niva generator can lead to a voltage drop in the vehicle's electrical system. This is considered one of the main and common causes of this type of malfunction. But since the generator has a simple design and is easy to access, even an inexperienced car enthusiast can replace its brushes.
The main signs of brush failure are:
- voltage drops occur;
- the battery does not hold a charge;
- weak headlights at night, blinking;
- The radio turns off, etc.
Usually, when passing a technical inspection, small elements of the generator are rarely checked. Therefore, worn brushes can make themselves known unexpectedly. But before you decide that replacing the Niva Chevrolet generator brushes is necessary, you need to find out if there are other faults that can cause similar symptoms. And only after making sure, you can disassemble the generator housing.
Generator faults
During the operation of any car, unpleasant situations often arise in the form of failure of one or another element. Niva is no exception, and most often the generator suffers.
If the generator seems to be faulty, it is recommended to check its functionality using a multimeter. To do this, you will need to start the engine and check the voltage at the battery terminals. The standard value that a multimeter should read is 13.6 V.
If the readings during measurement are higher, it means that a break or short circuit in the windings has occurred in the structure. The same can be said about the case when the voltage is below the specified number. This procedure is carried out regardless of the engine: injector or carburetor.
Also, if the breakdown is caused by another reason, you can replace the generator itself. Usually, for replacement, they turn to special service stations, but if necessary, the work can be done with your own hands.
- If the value is higher or lower than the set value, the lamp lights up or blinks. Indication details may vary between models, so please read the operating instructions carefully.
- The headlights are not as bright as during normal operation. When the starter is cranked, the voltage “drops” so much that it is noticeable by the blinking of the lamps.
- The sound of the engine changes, and extraneous noises are heard.
- Engine power is lost (provided that other systems are working properly).
- There is a smell of burnt insulation coming from the generator.
- There is less than 13 volts at the battery terminals when the engine is running.
Also interesting: Refinement of the Chevrolet Niva stove - Auto magazine MyDucato
Replacing the generator brush
When replacing brushes, the voltage regulator is removed together with them as an assembly. In this case, the negative terminal of the battery is removed and the wires that come from the generator casing are disconnected.
Then the wiring block is disconnected. From their tips with a positive terminal, it is necessary to remove the rubber cap, which performs protective functions. Then from these wires you need to unscrew the nut with which they were attached to the generator block and remove them.
After disconnecting the spring clamps of the generator, you should remove its black casing, made of plastic. Using a Phillips screwdriver, unscrew the voltage regulator fasteners. Get it complete with brushes. Then disconnect the wire block from it.
Replace the generator brushes and install them back, following the reverse order.
If the length of the brush rods is less than 0.5 mm, they must be replaced. But if the brushes are in working order, and the Chevrolet Niva generator does not supply a charge, it is necessary to check the operation of the voltage regulator and the circuit from the regulator to the brushes.
Generator replacement
To repair or replace the generator, the car owner will have to remove the unit completely from the car or turn to professionals for work. If you still want to carry out the replacement yourself, then first you will need to prepare all the necessary tools:
- hammer;
- extension;
- keys to "10" and "19".
Also interesting: Generator Niva 2121, 21213, 21214: which one is installed, replacement
The procedure consists of the following sequence of actions:
- First, you will need to park the car in a place designated for inspection and repair. The car will also need to be secured using special wheel chocks. Finally, in order for the work to be carried out safely, you should disconnect the battery by disconnecting the terminals from it.
- After this, you need to remove the engine protection. It is attached to several bolts, and they must be unscrewed to get to the lowest bolt of the generator.
- After this, you will need to knock out the mounting bolt using a hammer. It is recommended to knock carefully so as not to damage the thread and to prevent the bolt from coming out in the opposite direction. A hammer is necessary, since a wrench or any other tool simply cannot handle a bolt.
- Next, you need to remove the bolt, swinging the generator from side to side. It is necessary to bolt in any case, as this makes it easier to remove the rod.
- The fourth step involves disconnecting the wiring. To do this, the power wires connected to the housing are disconnected from the unit. In this case, you can first disconnect the plug from the wires.
- Wires are also attached to the generator, tightened with a nut or bracket. In this case, the nuts must be unscrewed with a wrench, and then the loose wires must be pulled out.
- Finally, after disconnecting the wires, you can begin to unscrew the upper fastening element with the belt tensioner. For this you will also need a wrench, as well as a small extension cord.
- Disconnecting the fastener will allow you to remove the belt and alternator. Then you can start cleaning the vacated space with a brush and installing a new unit.
The structure is assembled in the reverse order; the entire procedure will take about two hours if you have all the necessary tools.
Additionally, it is worth noting that when everything is assembled, you will need to adjust the position of the generator using the tensioner. To do this, you need to unscrew the tensioner nut and tighten or loosen the belt, while observing the battery charge.
Also interesting: Niva Chevrolet where is the starter relay located?
If the indicator returns to normal, then the selected tension is sufficient. There is no need to tighten the structure, as the generator bearing may fail. If the tension is insufficient, the generator will work intermittently, and this can also lead to breakdown.
Removing the generator
For this process you need to take a Phillips screwdriver. In addition, you need to use a car tester or ohmmeter, a 10mm wrench and a test lamp.
To change the generator, it must be removed from the engine compartment. First, disconnect the wire and terminal of the battery with a negative charge. Next, disconnect the block with wires and the generator output, and take out the protective cover from there. Then, unscrewing the nut, disconnect the wires on the generator contact bolt. Then unscrew the bolt that secures the generator to the tension bar and pull it out. It is also necessary to unscrew the bolt-shaped fastening at the bottom of the generator.
Then you should remove the belt. After removing all the bolts, the generator must be removed from the bracket using a mounting spudger. To install a new one, you need to go through the entire process in reverse order.
After replacing the described electromechanical device, you need to inspect its drive belt and adjust its tension. But before you replace the old Niva Chevrolet generator with a new one, you need to make sure that the replacement is really necessary. There are times when you can do repairs yourself, without the help of specialists.
In order to avoid confusion, you need to note how the generator covers are correctly positioned. Next, you need to remove the plastic protective casing by unfastening the three latches on it. The voltage regulator and brush holder are removed together. In order to release the rectifier unit and capacitor, it is necessary to disconnect the wires from the regulator terminal. The stator winding has three terminals. And in order to carry out the operation to remove the rectifier unit and capacitor, you need to bend these leads a little. Use a flat-head screwdriver to pry off the side where the slip rings are located and remove the cover from the generator.
Purpose of the mounting block
The Chevrolet Niva mounting block combines a fuse and relay panel. To get to it, you need to unscrew the screws securing the cover under the steering column, and then pull this cover towards you. The purpose of the mounting block elements depends on the year of manufacture of a particular model. In 2009, the Chevrolet Niva underwent restyling, therefore, along with other changes, the functions of the protective devices also changed.
Fuse box before 2009
In 2009, changes were made not so much to the appearance of the panel as to the purpose of the fuses. In models produced before restyling, the relative arrangement of all electrical elements was as follows:
Each protective device ensures the integrity of a separate circuit consisting of one or more consumers.
(current strength, A)
Fuse box after 2009
Since 2009, the appearance of the mounting block and the relative position of all its components on it have changed. The appearance of the relays and their purpose have changed.
The purpose of the protective elements installed in the same position has also changed.
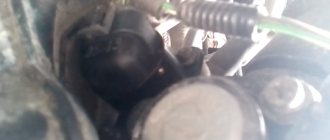
The wire came off the generator
There may be several reasons and it is better to eliminate them in a car service center or garage, and you just have to hope that the energy reserve in the battery is enough to get to them. To reduce current consumption when driving a car with a faulty generator, if possible, turn off the radio, unnecessary lighting devices, heater fan, etc. Experienced car enthusiasts can be advised to check the generator voltage regulator.
The operation of the voltage regulator is to continuously automatically change the generator excitation current so that the generator voltage is maintained within specified limits when the generator speed and load changes. Checking on a car To check, you must have a DC voltmeter with a scale up to class B, accuracy no worse than 1.0.
Niva Chevrolet: Generator is the most common problem
The voltage should be within 13.6 V. The diodes are indicated by numbers in the diagram: The glow of the lamp indicates that the diodes have been shorted, which leads to the conclusion that the diode bridge will have to be replaced. Be attentive to the indications on the instrument panel.
Often the icon lights up half-heartedly and is not noticeable in bright light. Video of current leakage and poor charging at the same time: The charging lamp does not light up.
Since the indicator on the instrument panel is a link in the generator excitation circuit, the absence of flashing when the ignition is turned on leads to loss of its functionality.
Whether the lamp is to blame or the reason lies in another relay-voltage regulator, the contact group of the lock can be understood by disconnecting terminal 61 from the generator with the ignition on, followed by shorting the wire from the instrument panel to the car body.
That’s why it was decided to buy a diode bridge and a relay regulator from this particular manufacturer.
I was pleased with the asking price. Relay-regulator VAZ, That is, from a budget point of view, VTN products certainly rule.
Chevy-Niva :: View topic - no charge
Experienced car enthusiasts can be recommended to check the generator voltage regulator. The operation of the voltage regulator is to continuously automatically change the generator excitation current so that the generator voltage is maintained within specified limits when the generator speed and load changes.
Video starting the engine: What are the reasons for the charging failure, how to fix the problem right on the road or in the garage - this is covered in this manual. Why, knowing its weak points and moving from the obvious to the complex.
There are problems with charging, a preliminary diagnosis is needed
You will quickly find the root cause. Principle of connecting the generator, drawing: Basic information about the state of the charger can be obtained from the behavior of the instrument cluster - flashing of the indicator, emergency operation of the electrical equipment, headlights, interior lighting, heater and engine.
The battery charge indicator light is constantly on.