The multi-steering wheel on Vesta is only available in the Multimedia option package of the Comfort and Luxe trim levels. Owners of luxury cars are luckier, because... on these versions of cars there is partial preparation for connecting steering wheel buttons. Let's look at the instructions for installing the multifunction steering wheel on Vesta in more affordable trim levels (Classic and Comfort).
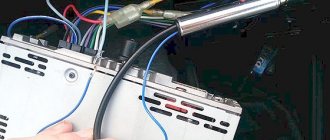
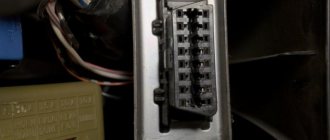
We check that the steering column switch (volatile) has a connector for connecting the block with wires (photo No. 2 below), as well as the presence of a gray bundle of wires going into the steering wheel (photo No. 3 below). To do this, you need to remove the upper part of the plastic steering wheel cover (photo No. 1 below) by removing the two Torx screws from the bottom. And then, looking for gray wires, look between the steering wheel and the casing (or remove the airbag):
- If there are gray wires for the buttons on the steering wheel (they should be on the “Lux” version), then modification will not be difficult (instructions are here).
- If there are no wires (they were not found on the “Classic” and “Comfort” versions), then the modification will be a little more difficult (more on this later in the article).
How does the “Lux” version of Vesta differ from “Classic” and “Comfort”:
- A steering column switch (snail) with wires for the buttons on the steering wheel is installed;
- There is wiring from the snail to the ECU to control the cruise control and speed limiter;
- The instrument panel has a different firmware version (there is an indication of the operation of the cruise control and speed limiter).
Before starting work, disconnect the negative terminal of the battery.
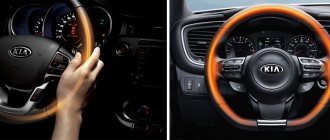
Multifunctional steering wheel
The name multifunction steering wheel is an abbreviation for the generally accepted term - multifunctional steering wheel. What is hidden under this designation?
As mentioned earlier, all automobile designers strive to make driving a car very convenient. Since modern vehicles have many different gadgets and bells and whistles, which often require switching and adjustments during a trip, the driver has to be regularly distracted by them, which in turn can lead to emergency situations. It was this factor that was decisive for auto engineers in creating a multifunctional steering wheel. They tried to transfer some of the control elements to the steering wheel and save the driver from having to throw the steering wheel and switch all sorts of buttons and levers.
Multifunction steering wheel (multifunctional steering wheel) is a regular steering wheel on which various auxiliary elements for controlling the electrical equipment of the car are located. In modern cars this can be a very advanced technological device.
What could be on the steering wheel?
On our roads you can find vehicles of various classes; naturally, the electronic components of such cars will be significantly different. Multifunctional steering wheels will also differ depending on the class. So, for example, in an inexpensive car, at best the steering wheel will control the audio system, and even then only the function of turning it on or off. Sound adjustments and other settings will most likely have to be made as usual.
If the car is of a slightly higher class, then the steering wheel will most likely also have controls for adjusting the climate system, controlling the on-board computer and cruise control.
In even more advanced versions, you can find the ability to control a mobile phone from the steering wheel. This feature is called “hands free” or “hands free”. Today, many smartphones have the ability to access car audio systems, and by controlling the smartphone from the steering wheel, you can also control the multimedia system.
In addition to the listed functions, the multifunction steering wheel buttons can control:
- Operation of manual and automatic transmissions.
- Monitoring transmission functions in vehicles with all-wheel drive.
- Adjusting the operating modes of the suspensions, which changes the ground clearance and their rigidity.
Multifunctional steering wheels in cars with very expensive equipment, most of the prestigious brands, usually have all these capabilities.
Advantages of the work of Yudu masters
Both have their own specific advantages and disadvantages.
One of them is responsible for the car radio memory, and the other is for control; It is recommended to connect the negative wire of the car radio to the car body, or even better to the negative terminal of the battery, which will avoid the appearance of interference; The antenna wire, or REM as it is labeled in English, is designed to turn on the amplifier or antenna automatically as soon as the car radio receives power; Speaker wires often have paired colors, so that the connection to a specific speaker is carried out correctly; Car radio and wiring kit It is useful to know that each pair of speaker wires also has a monotonic wire, as well as a ground wire; It is important to connect the speaker wires correctly. The procedure is carried out using a special multimeter equipped with a nine-volt battery and an audible alarm. Disassembling the center console. You need to connect the power cable, the plug to which the speakers are connected, and the antenna to the corresponding outputs on it. We fix the bracket to the basket according to the marks with a clamp, drill holes, rivet or tighten the screws from the inside. How to connect a mirror with a rear view camera The method of connecting such a mirror is no different.
When electric current is applied to the coil, an electromagnetic field appears around the turns, which, interacting with the field of a permanent magnet, pulls in or pushes out the diffuser. If you still cannot do without trimming, it is highly recommended to use heat-shrinkable casings. All car radios can be divided into several categories. Questions, comments, criticism, additions and discussion on our forum Greetings to the readers of this site. There is no need to skimp on wiring. But you should understand that with such a battery connection scheme, the audio system will discharge very quickly; in fact, it is constantly in standby mode and consumes energy. That is, instead of a music player made in the PRC under license from a well-known manufacturer or an original Chinese factory brand, you will most likely be handed a crappy copy, made by no one knows how or by whom.
Features of Chinese car radios
Built-in Bluetooth adapter. Adapter First of all, I made an adapter to connect the radio to the Mazda audio jack. The procedure is carried out using a special multimeter equipped with a nine-volt battery and an audible alarm. The method of mounting the head unit depends on the design of the car and the player itself. Not everything is smooth with the installation either.
If necessary, the system can be synchronized with a mobile gadget or tablet, which will allow you to read data from third-party devices. It is at this stage that most mistakes are made. It all depends on the size of the vehicle and the features of its design. Collecting everything in China, including radios, is very cheap. In this article we will talk about the advantages and disadvantages of 2 DIN devices, as well as how to choose the right audio system for your car.
Let's take the second path. This is due to financial gain. 2DIN radio from Aliexpress. Installation + diagram
We connect the radio to the steering wheel
Almost all cars with a multifunction steering wheel have a standard radio installed. But a situation may arise that there is a desire to replace the music installation with a more advanced one. In this case, you need to be prepared for the fact that the buttons located on the steering wheel will not control the new system. Some work will need to be done to resolve this issue. Despite the apparent simplicity of the work ahead, connecting a non-standard radio may take several hours. The success and speed of work will depend on your skills in working with electronics, otherwise it is best to contact a specialist. If you nevertheless decide to test your strength and connect the radio to the multifunction steering wheel yourself, then following our instructions, you will achieve your goal.
What to cook
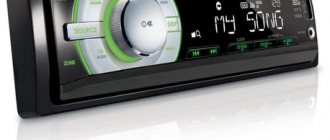
- The right radio for you. The most popular among drivers are Pioneer or Sony players.
- ISO adapter - this adapter is most often included with the equipment.
- We buy another adapter of the same type.
- An adapter for connecting an antenna also needs to be purchased.
- An adapter that allows you to connect the buttons on the multifunction steering wheel and the radio.
Adapter selection
The adapter is necessary for correctly connecting an aftermarket radio to the multifunction steering wheel. Manufacturers offer a fairly diverse selection of these devices. These can be models that are suitable only for a specific car or universal ones that can be connected to almost any car.
Among the universal models, the most popular is the adapter with programming capabilities - under the ACV brand. These devices look like a small module with wires of different colors. These wires are routed out, which facilitates the process of connecting to the wires on the radio block. These adapters are suitable for all radios, regardless of brand, that have a remote control and the programming process will take place directly from the remote control. The ACV SWI-1 adapter allows you to retain all the functions of the buttons located on the steering wheel and even expands their capabilities, namely, it allows you to program two functions for the same button. This is achieved by short or long press.
Installation
- First, we connect the radio following all instructions. We connect the antenna and check the correct operation of the device.
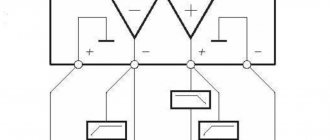
- We connect the wires of the steering wheel block and the adapter wires, adhering to the following diagram.
- The white wire on the adapter must be disconnected from ground.
- Line 1 (blue wire) – STRG SWA.
- Line 2 (green wire) – STRG SWB.
- GROUND (black wire) – STRG GND, to minus (vehicle body).
After connecting all the wires, the actual programming process begins.
- The adapter is supplied with +12V power - one of the LEDs should blink.
- We connect the white wire to MASS, and the device enters the learning process.
- On the multifunction steering wheel we find the volume control button, press and hold it until the LED lights up.
- On the remote control, press the sound boost button and point the remote control at the adapter - the LED on the case should go out at this time.
- If you need to place a second command on the same button on the steering wheel, then you need to press and hold it until both LEDs light up.
- On the remote control, hold down the button until the LEDs go out.
- We program all other buttons using the same principle.
- We disconnect the white wire on the adapter and insulate it.
- The setup is completely completed, and you have independently connected the multifunction steering wheel to the aftermarket radio.
Some craftsmen decide to connect the radio to the steering wheel without having buttons on it. A natural question arises before them - how to make a multifunction steering wheel with your own hands. This is quite possible for those who are closely “friends” with electronics. I can give advice to everyone else - just buy a ready-made multifunctional steering wheel, this will save you from wasting time and money.
To help car enthusiasts
Modern car manufacturers are doing everything possible to ensure that they cannot be installed in their cars. After activation, you should check the operation in different key positions, especially in key2. We lay the wire behind the headliner and lay it on the side of the windshield behind the trim; for convenience, you can remove the visor. So, on the modern market you can find Chinese models that have a built-in GPS module.
Four years later, the national German standard was adopted as an international standard with an ISO number. Owners purchase ready-made frames or make elements themselves based on standard parts and epoxy resin elements.
The principle of operation is as follows: The red wire is connected to the lights, the black wire is connected to the ground of the car. After connecting the power, acoustics and antenna wires to the ISO connector, this entire harness is pulled inside the container so that their ends with connectors extend into the car interior to a length convenient for work, approximately as shown in the photo at the beginning of the article, and are connected to the appropriate connectors on the back wall of the radio.
By the way, after about half an hour of this “Kama Sutra” you will probably begin to think about buying a new car radio antenna. If everything works fine, then it can be inserted into the container until it stops; the latches on the sides will work.
There are clear regulations, rules and standards from which the performing plant in China has no right to deviate. We unscrew the socket with the buttons, the screw is located at the bottom: This is what the removed socket looks like, bottom view: We disassemble it: We unsolder the resistors from the board from R1 to R6. We insert the radio into the basket and screw it on. Moreover, I advise you to study this issue separately in more detail. Connecting an Android radio to a Volkswagen