Acoustic shelves for Lada Priora models are expensive. And the factory elements do not have the proper quality. Therefore, most motorists try to make structures with their own hands. Self-made acoustic installations are much stronger and more durable. In addition, a shelf made at home can be decorated at the owner’s discretion. This solution is relevant for lovers of unique designs in car interiors.
In addition to appearance, homemade shelves significantly increase sound quality. It all depends on the materials chosen to create the acoustic shelf.
How to make a rear shelf on a Priora Hatchback with your own hands
Every car enthusiast can make an acoustic shelf for a Priora Hatchback with sidewalls. As a basis for making a prototype, a sheet of plywood with a thickness of at least 12 mm should be used, which will provide sufficient sound insulation and strength to the product. The workflow is quite simple and is divided into the following steps:
- 1. Template marking. As a template, you can use the factory decorative upholstery of the rear panel of the Hatchback, the contours of which are transferred to cardboard and adjusted to the required size. At this stage, the holes for the speakers are marked;
- 2. Transferring the contours of the parts onto a sheet of plywood and then cutting them out along the intended lines. For convenience, it is better to use a jigsaw and a drill;
- 3. Covering the speaker holes with a metal mesh on the inside;
- 4. Covering the front side of the parts with carpet coating or other suitable material using a furniture stapler and glue.
How to Create a Shelf Layout
To make a model, the factory form of the Priora shelf is used. It is important to understand here that there is a difference in the forms of the Priora hatchback, sedan or station wagon. The dimensions of the standard shelf are taken as a basis. Based on them, the required dimensions of the new acoustic shelf are calculated.
First, the shelf is removed from the Lada and applied to cardboard material prepared in advance. The product is laid out flat, pressed tightly against the cardboard and outlined with a marker. It is important to remember to outline the slots for the seat straps.
Mounting an acoustic shelf
Then the place where the speakers will be is selected and indicated on the layout. The template is cut along the contour lines with sharp scissors. The layout is ready. It is applied to the material with which the base will be sheathed. The marker is already outlined on the fabric.
Improving sound insulation when installing an acoustic system for Lada Priora
When installing speakers with higher power on a VAZ 2172, the sound insulation of both the rear panel and the car doors, instrument panel and ceiling should be improved. You can get rid of extraneous sounds in your car using vibration and noise insulating materials, as well as protective covers.
Since the new acoustic shelf of the Priora Hatchback is made of dense plywood, sound insulation begins with the installation of vibration-absorbing materials, such as vizomats, ECO, vibroplasts, etc. Next, a second layer of sound-absorbing material such as “Accent” or “Isoton” is applied. In this case, the thickness of the sound insulation layer should be taken into account, otherwise the installation of plywood parts will become impossible.
Selection of material for construction
It is recommended to choose natural wood for the manufacture of parts. The wood is pre-treated with special moisture-resistant compounds that improve the quality of the material.
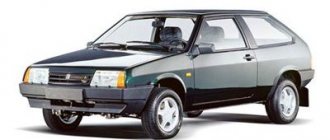
LADA Priora sedan
And for finishing the base, materials are chosen based on the effective appearance of the product. For example, to achieve solidity, the structure is decorated with leather or its substitute (a cheaper option). Some people like suede, velvet, thick brocade. But, you should understand that fabric surfaces will collect a lot of dust. They are more difficult to clean and fade over time. While leather is quite easy to clean and lasts longer.
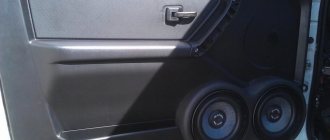
Speaker shelf
Installing an acoustic shelf on a Priora hatchback
Before installing the acoustic shelf on the Priora Hatchback, you should prepare a place for its mounting by following these steps:
- 1. Fold down the rear seats;
- 2. Find the places where the rear panel is attached to the trunk cross-section. This could be a hinge or a piano hinge for tilting the shelf;
- 3. Remove the factory panel from the Hatchback body;
- 4. De-energize the vehicle.
After the preparatory work has been carried out, the Priora Hatchback acoustic shelf is inserted into the installation site and the mounting points are marked. To connect the plywood to the body, automotive self-tapping screws are used, for which it is necessary to drill holes with a diameter of 3.6 mm in the previously marked places. When everything is prepared, the plywood parts are screwed to the car body.
Speakers can be installed both before and after installing the shelf. To do this, you should cut holes in the carpet covering, departing 1-1.5 cm from the internal cuts of the plywood. The speakers themselves are attached to the plywood using wood screws, and the resulting gaps are filled with silicone. The installation of the rear shelf is considered complete after connecting the wires to the speakers.
The factory rear shelf is being replaced with a heavier wood, acoustic shelf. It will improve the sound of the speakers and eliminate squeaks and rattles. We are learning how to make a trunk shelf for a Priora hatchback yourself.
Features of creating shelves
Acoustic shelf in Priora sedan
You can create an acoustic shelf for a Priora at home in different ways. In general, there are several main methods used during such a process. Fans of loud music can even create an acoustic stage in their car. Most often, inexpensive materials (chipboard, plywood or MDF) are used to make shelves. Subsequently, it is covered with carpet. Working with such materials is not difficult, especially since the end result will please many. However, some choose expensive options to realize this goal - natural wood, leather, and the like.
Acoustic shelf for Priora sedan
Note: To avoid problems with rattling and vibration after fixing the shelf, it should be installed in hard places using high-quality fasteners.
Manufacturing process
You will need: 2 sheets of 10 mm plywood, a tool, a jigsaw, a drill, furniture corners, carpet, glue or a furniture stapler.
We cut out a shelf from plywood according to the drawing. The sides will be more accurate if you remove the plastic sides from the car and trace them in the place where the shelf will fit.
production of acoustic shelf for Lada Priora production of acoustic shelf for Lada Priora
The side part of the shelf is an optional part of the acoustic shelf (if you buy a ready-made rear shelf, this element is not present). We fix it at an angle to the shelf using furniture corners. We bend them in place on the car.
We make another copy of the shelf template without a lid, only leaving small protrusions that will hold the lid. We fasten two sheets of plywood together with glue and screws. The lid is held in place by these hinges.
making an acoustic shelf cover making an acoustic shelf cover making an acoustic shelf cover
All that remains is to tighten the rear shelf with carpet using glue or a furniture stapler.
acoustic shelf Lada Priora hatchback reupholstering acoustic shelf Lada Priora hatchback
We install the resulting structure into the car, securing it around the perimeter in four places in the trunk.
installation of an acoustic shelf on a Priora hatchback installation of an acoustic shelf on a Priora hatchback acoustic shelf on a Priora hatchback
The result is a non-removable, acoustic shelf with sidewalls. This drawback can be solved by using simpler fasteners, or by using a different design where the side parts will remain standard. Let us remind you that if you decide to leave the standard rear parcel shelf, but it creaks terribly, follow these recommendations.
Photo source: in-flight magazine BarMaLei-07
In your shopping cart.
© 2005-2017 Alamar LLC
Acoustic shelf for car: VAZ 2172 (coupe) (with sides). Available for different speaker sizes. The price is indicated for the standard configuration. When using imported fabrics, prices increase. Manufactured by VS-Avto LLC, Tolyatti. Accessories are not included. Sent by a shipping company, in exceptional cases by Russian Post, after prepayment.
speaker 6x9; speaker 13cm; speaker 16cm; speaker 20cm;
weight:8kg. dimensions:100x60x40 cm
Acoustic shelf for car: VAZ 2110, 2170 (sedan) (directional). Available for different speaker sizes. The price is indicated for the standard configuration. When using imported fabrics, prices increase. Manufactured by VS-Avto LLC, Tolyatti. Accessories are not included. Sent by a shipping company, in exceptional cases by Russian Post, after prepayment.
speaker 6x9; speaker 13cm; speaker 16cm; speaker 20cm;
speaker 6x9; speaker 13cm; speaker 16cm; speaker 20cm;
weight:6kg. dimensions:130x45x30 cm
Acoustic shelf for car: VAZ 2110, 2170 (sedan) (directional, brake light). Available for different speaker sizes. The price is indicated for the standard configuration. When using imported fabrics, prices increase. Manufactured by VS-Avto LLC, Togliatti. Accessories are not included. Sent by a shipping company, in exceptional cases by Russian Post, after prepayment.
Making an acoustic shelf with your own hands
To improve the appearance of the product, it is recommended to use artificial or natural leather. High-quality casing made of sound-permeable materials will help hide the speakers from prying eyes. If you choose the size and shape of the shelf wisely, you can achieve maximum effect when playing low frequencies using budget playback equipment.
You should create a layout after purchasing the speakers, since the holes in the finished product must exactly match the dimensions of the built-in devices.
Creating a Layout
To create a layout, you can use the shape of a standard acoustic or regular Priora shelf. Taking its dimensions as a basis, calculate the required dimensions. First you need to remove the shelf from the car and attach it to a previously prepared cardboard sheet. Next, use a marker to outline the product, including the slots for the seat belts. After this, you can select any location to install the speakers and mark it on the layout.
The excess part of the cardboard is cut off with scissors or a stationery knife, and holes for the speakers are also cut out. If there are podiums for speakers on the factory shelf, then they are also removed and used to create a layout.
To work you will need the following tools:
- material of suitable size and thickness - plywood, chipboard, OSB, MDF;
- jigsaw;
- wooden bars;
- self-tapping screws of different lengths;
- sealant;
- fine-grained sandpaper;
- epoxy resin based adhesive;
- stationery knife;
- sound-absorbing material for finishing.
First, you need to attach the cardboard model to the material that will be used for the future acoustic shelf, and trace all the lines with a marker. For manufacturing, it is advisable to use composite materials made of thick wood. Usually this is a panel up to 25 mm thick, for the manufacture of which a plywood sheet or MDF panel is used.
Making a shelf for a sedan
The creation process includes the following steps:
- The shape of the product is cut out with a jigsaw, and all unnecessary parts are cut off.
- Several wooden blocks should be attached between the holes for installing the speakers, using sealant and self-tapping screws. The bars will act as stiffening ribs, preventing rattling when playing music at high volume.
Podium templates are cut out on a separate piece of material using a jigsaw. They are fixed to the workpiece using mounting foam. After the sealant has completely hardened, excess pieces should be cut off with a stationery knife. Slots are cut for seat belts.
The workpiece is processed on all sides with fine-grained sandpaper until the surface is smooth, after which all seams are sealed with sealant. The shelf is covered with finishing material - you can use adhesive bases based on epoxy resins for this.
If non-vibroplast is used for finishing, then it is better to additionally apply any sound insulation.
Now all that remains is to install the structure in its original place. To secure it, it is better to use strong bolts that will not loosen over time. If you are installing a homemade product, it is important to adjust the dimensions correctly.
Creating a shelf for a hatchback and station wagon
The same materials are used for manufacturing and the algorithm of actions is also almost identical. The difference is that the standard shelf without sidewalls in cars with these body types consists of two parts. One of them reclines for easy loading of luggage.
There are two main manufacturing methods:
- Two parts are cut out of the material based on a template created according to the dimensions of a standard shelf. One part should be 2-3 cm shorter than the other. Using epoxy glue and self-tapping screws, both halves are fastened to each other.
- To make the part that folds up, a thinner sheet of plywood is used. If desired, you can modify the folding element from the old shelf, making it heavier with sound insulation. Fasteners can also be taken from an old product. Holes for speakers are cut out as desired on the folding or fixed part.
First, the rear seats should be removed from the interior. The standard shelf must be removed - a new one is cut out using its template. The difference from the previous method is the presence of sidewalls. They can also accommodate speakers of any size and shape.
You need to dismantle the sidewalls and create a cardboard mockup based on them. You don’t have to do it, but transfer the dimensions directly to the workpiece material using a marker. Then all actions repeat the algorithm already described above.
When placing speakers on podiums, point them towards the glass - this way the sound will spread better throughout the cabin.
To raise and rotate the podium in the desired direction, you can use metal plates that are attached to the workpiece. To fill the resulting free space, you can use polyurethane foam. After hardening, its excess parts are cut off, and the inside of the structure is covered with vibration and noise insulation materials. Then the sides are upholstered, the speakers are installed, and the shelf is mounted in its regular place.
What are the advantages of a homemade shelf in a hatchback compared to a purchased one?
Those who decided to equip not only the rear shelf, but also the sides of the car, highlight the following advantages of making all the components themselves:
- A homemade rear shelf will fit perfectly into the dimensions of the trunk,
- It is possible to choose the wiring diagram for the speaker system yourself, in which the sound of all musical compositions without exception will cause frantic joy,
Attention! If you decide to make a shelf manually, then it is best to choose natural wood for the body, which will be treated with a special moisture-resistant compound. This will significantly increase the durability of the structure.
What do you need to know before making an acoustic shelf for a Priora hatchback?
- For upholstery, experts advise using materials made from artificial and natural leather. This will give the shelf a solid look, and a high-quality finish will completely hide the new speakers from your fellow travelers.
- By choosing the right size and shape of the shelf, you can achieve maximum effect in sound and bass, even when purchasing budget speakers for Priora,
- When creating a layout for the rear parcel shelf, you must first calculate its dimensions according to the diameter and dimensions of the purchased speakers. Otherwise, at the installation stage you will have to redo the assembled circuit again.