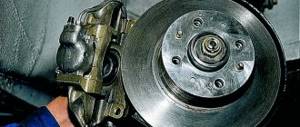
Front wheel hub bearing - replacement
Removal
1. We prepare the car for work (see “Preparing the car for maintenance and repair”). 2. Remove the decorative cap from the wheel (see “Wheel - replacement”). 3. Place wheel chocks under the front wheels of the car. Attempting to remove the hub axle nut without straightening the jammed edge may damage the threads on the axle. 4. Tapping the punch with a hammer, bend the edge of the nut jammed into the grooves of the drive shaft (in two places).
5. An assistant presses the brake pedal and holds it down. 6. Use a 30 mm socket wrench with a long wrench to loosen the front wheel hub nut.
7. Remove the front wheel (see “Wheel - replacement”) and unscrew the hub nut. 8. Remove the brake caliper without disconnecting the brake hose from it (see “Front brake caliper - removal and installation”). 9. Remove the brake disc (see “Brake disc - removal and installation”). 10. Unscrew the two bolts securing the ball joint to the steering knuckle (see “Ball joint of the strut - removal and installation”). 11. Unscrew the nuts securing the upper support of the strut to the body a few turns (see “Front suspension strut - removal and installation”). 12. Having pressed the lower suspension arm down, we move the lower end of the strut to the side and remove the shank of the outer CV joint from the hub (see “Front wheel drive - removal and installation”).
13. We rest the paws of the puller against the steering knuckle and, rotating the bolt nut, press the hub out of the steering knuckle.
14. Using a puller, squeeze and remove the retaining ring from the outside of the hub bearing.
15. On the back side of the steering knuckle, use a puller to squeeze and remove the other retaining ring of the hub bearing.
16. Install the device and press the bearing out of the steering knuckle.
17. If the inner ring of the bearing remains on the hub, press it with the puller from the kit or with a universal two-jaw puller (there are special recesses on the hub for installing the puller arms).
Installation
1. Thoroughly clean the bearing mounting hole in the steering knuckle from dirt and corrosion. 2. Use a puller to install the retaining ring on the outside of the bearing.
3. Press the new bearing into the steering knuckle until it stops against the retaining ring.
4. Use a puller to install the retaining ring on the inside of the bearing.
5. Using a tool, press the hub into the inner ring of the bearing.
6. Insert the drive shaft into the splined hole in the hub. 7. We put a thrust washer on the shaft and screw in a new hub nut. 8. Install all removed parts in reverse order. 9. Install the wheel (see “Wheel - replacement”) and lower the car. We fix the wheel with wheel chocks, and an assistant presses the brake pedal. 10. Tighten the hub bearing nut to a torque of 225.6–247.2 Nm (23–25.2 kgfm). 11. We jam the edge of the nut into the grooves of the drive shaft (in two places) and install the hub cap.
Lada Kalina Station wagon "Kalinka" › Logbook › Replacing rear wheel bearings
Bearing SAMARA SPZ-4.
Bearing number.
Let's start replacing the bearings. I want to say right away that no pullers or vices were used during the replacement. Everything was done the old fashioned way on “knees” and birch wood.1). I took off the wheel;
The bearings have not been changed from the factory, this is indicated by the factory paint. The nuts were not touched and that's a fact.
2). Unscrewed the hub nut;
I had to increase the leverage.
3). Removed the pads;4). I removed the hub by hand (I didn’t believe it myself), the tension was small.
There is factory marking paint.
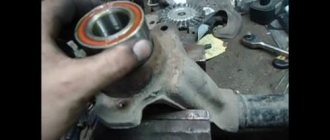
I removed the hub assembly.
5). Removed the retaining ring. I knocked out the old bearing with a 32 head.
I disassembled the bearing for analysis. According to the Vologda labeling.
I disassembled the bearing and found it with lubricant without cavities, damage or dirt. It means it has simply exhausted its resource.
No shells, cracks, etc.
6). I washed the hub and pressed in a new bearing, having previously lubricated the seats with a thin layer of grease. Just in case, I checked whether there was grease in the new bearing.
There is grease in the new SAMARA bearing.
I pressed in the new bearing using a birch block and a race of the old bearing.
At first he pressed it against the chick like that, with gentle blows.
This is how I pressed it further using the old bearing race.
7). I installed the retaining ring by hand without tools and this is possible.8). I installed the hub in place using a 32 socket and then pressed it in with the hub nut. The tension was small. Perhaps because he lubricated the seats.
Gently tap slowly on the inner race of the bearing.
Everything is in place. I tightened the nut just like at the factory. According to old marks.
9). We put everything back together in reverse order and check if there is any play. In my case it is not on both wheels.
A pile of used bearings.
P S. Now find, as they say, “three differences.” Today I went to the garage to put things in order after repairing the car. I cleaned the bearings of grease and found the following differences, see below.
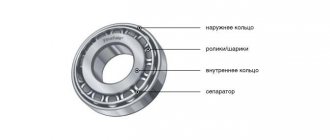
What does a bearing consist of?
The markings are printed in different fonts. Not visible in the photo.
The separators are plastic and come in different colors and different barely noticeable shapes.
One has a collar, the other does not. There are also different collars on the inside.
Different beads in shape.
The work is done. Good luck to everyone on the roads.
Replacement algorithm
Before starting work, you need to place wedges under the front wheels of Kalina.
- We remove the protective cap of the hub nut so that it does not interfere with us in the future.
- We pull off the nuts and only then jack up the wheel.
- We unscrew the wheel bolts, after which the wheel should be removed.
- Remove the nut located in the center of the hub.
- We unscrew the guide bolts (sometimes they should be tapped with a hammer first).
- We treat the fasteners holding the brake drum with WD-40 (or an equivalent), and then remove it. To do this, you can use a special puller.
- Now we can remove the central nut.
- We press out the hub axle. Examine it carefully. If there are signs of bearing rotation, the hub must be replaced. If not, move on to the next steps.
- Take the pliers and pull off the hub retaining ring.
- We remove the bearing using a special puller.
- We clean the bearing seat from dirt. Wipe and treat with lubricant.
- We install a new bearing. To do this, place the hub on a flat surface. Apply grease to the bearing and use a light hammer to drive it into the hub. To do this, you need to carefully tap along the entire circumference of the part, as a result of which the bearing is completely immersed in the part. Be aware that excessive force may cause the bearing to crack.
- Reinstall the retaining ring.
When to change
The rear wheel bearing is characterized by gradual wear. It can fail immediately only in the event of an accident. Often wear occurs so slowly that many motorists do not notice a deterioration in the car's performance.
Let's look at the main signs that the rear wheel bearing has failed:
- While driving, a hum is heard from the rear wheel. This indicates significant depletion of the part.
- Gradually the hum increases and begins to be accompanied by a crunching sound.
- There are problems with controllability. The car is driven to the sides.
- When you tap the tires with your foot, you feel play and the car begins to wobble.
How to change the rear wheel bearing on Kalina
Before you begin the replacement procedure, you need to give the car a working position - hang the rear wheels, while securely fixing the front ones. It is enough to post only the side on which repair work is planned. Next, we sequentially follow the algorithm outlined below:
- We unscrew the wheel bolts and remove the wheel from the “damaged” side;
- Remove the nut in the center of the hub and the cap;
- Lightly tap the guide bolts with a hammer and then remove them;
- We dismantle the brake drum: before the procedure, it is recommended to treat the fasteners of the part with VD-40 (for these purposes, car shops have special drum pullers);
- After dismantling the drum, access to the central nut opens. We remove it;
- Push back the hub axle to gain access to the bearing races. Before proceeding with dismantling, you need to carefully inspect the unit. If there are signs of bearing rotation on the axle, then the hub is not suitable for routine repairs - replacement is required;
- Use pliers to pull off the hub retaining ring; after this, the edge of the ring is thoroughly coated with “Vedashka” or liquid to remove corrosion spots;
- Now you can remove the hub completely and remove the race with bearings. The part can be removed using a special press or puller. But most “experienced” people simply knock out the cage with a sledgehammer, having first secured the hub in a vice;
- The bearing seat is cleaned of dirt, rust, etc. using sandpaper. Then the landing niche must be treated with lubricant: used motor oil is quite suitable.
- Now you need to start “driving” the new bearing into the hub. First, place the hub on a flat, hard surface;
- The new bearing is generously lubricated with a special lubricant (the specification of the lubricating fluid can be clarified in the vehicle’s operating manual. Using a lubricant that does not meet the operating requirements accelerates the wear of this chassis element);
- Now you can “drive” the part into the hub. This is done using a light (up to 1.5 kg) hammer: the cage is easily tapped around the circumference, the bearing is gradually immersed inside the hub. Caution should be exercised as the double row bearings may crack if applied with excessive force. In this case, before installation, it is recommended to apply a series of gentle blows to the part in order to further compress the bearing;
- The bearing must be tapped so that there are no distortions while it is being inserted into the working hole. You can use the clip of the old component to guide the movement of the working part;
- When the bearing reaches its extreme position, put the retaining ring in place. But before this, you must check that the bearing has reached the “bottom” of the hub;
- Replacement of the Kalina rear wheel bearing is completed.
Upon completion of the work, you need to hang the car and rotate the wheel. If there is no noise or crunching, the hub is “healthy”.
Bearings Lada Kalina (VAZ-1117, 1118, 1119)
In the list, numbers are indicated only with significant additional designations (for example, A - reinforced, Ш - noise requirements, etc.), if there are other modifications that are less suitable, the numbers for the VAZ are indicated in full.
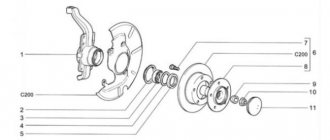
Operations for removing (replacing) the rear wheel wheel bearing Lada Kalina
1. Remove the protective cap.
2. . and loosen nut 5 (see Fig. 1) securing the hub.
3. Engage 1st gear and place chocks under the front wheels, 4. Loosen the wheel bolts and hub nut. The hub nut is tightened with a large torque, so it is recommended to use, for example, a piece of pipe as a lever.
5. Raise the rear of the car and place it on secure supports.6. Remove the wheel from the bearing to be replaced and the brake drum7. Completely unscrew the hub nut and remove the thrust washer.
8. Install the puller and press the hub off the axle.
9. Clamp the hub in a vice and remove the retaining ring 8 from it (see Fig. 1).
10. Using a puller, press the bearing out of the hub, clean the inner cavity of the hub, press in a new bearing and install the retaining ring. Make sure the retaining ring is completely seated in the hub groove.
11. Press the hub onto the axle using a suitable mandrel, applying force to the inner race of the bearing. Then install the brake drum and wheel. Before installing the brake drum, thoroughly clean the mating surfaces of the hub and drum from rust and scale, since even the smallest particle sandwiched between the mating surfaces will cause drum beating and vibration during braking. To press in the bearing, use the appropriately sized mandrels from the kit. If there are no mandrels, you can use rings from an old bearing.12. Finally tighten the hub nut in the same manner as the wheel bolts with the vehicle on the ground. It is best to use a new hub nut or a nut from another wheel (so that the old, jammed parts B of the nut flange do not fall into grooves A on the shank of the outer CV joint when cored).
13. After final tightening of the hub nut, lock it and install the protective cap in place.
If while driving (especially when cornering - approx.) you find that there is excessive noise or buzzing from the rear wheel, it is possible that the hub bearing on the rear wheel has failed. If similar symptoms are observed at the front, then the front wheel bearing should be checked. It is quite simple to diagnose this problem; it is enough to make successive loosening movements on the suspended wheel, and if significant play is felt on it, then it is time to change the bearing.
Replacing the rear wheel bearing on a Lada Kalina in this video:
Causes of rear wheel bearing failure on Kalina
There are a number of factors that contribute to wheel bearing failure. The most common:
Troubleshooting
As noted above, a constant hum is the main sign that the wheel bearing has become unusable. Extraneous sounds begin to appear at speeds of 40-60 km/h. Another old-fashioned diagnostic method is tapping the tires with your foot. If the wheel wobbles or there is play, then most likely the hub is faulty.
You can also check the serviceability of the element by hanging the back of the Lada and rotating the wheel. Play, crunching, and vibrations in a suspended wheel will indicate a hub failure.
Buying a new part
The components for the rear wheel hub are unified, so they are suitable not only for Kalina, but also for Granta and Datsun. Depending on the manufacturer, the cost of a set of parts will be in the range of 600-1100 rubles.
Installing the wheel bearing in its place
First of all, thoroughly lubricate the inside of the hub, as shown in the photo below:
And also, without removing it from the vice, it is necessary to install the new bearing in place. To do this, we set it exactly in the center, and use a suitable spacer to hammer it in. If you act carefully, you can do this even with the help of an ordinary block (wooden), tapping evenly from different sides so that there are no distortions:
Then you can also take a 30mm head or an old bearing and drive in a new one until a seat for the retaining ring appears:
We install the ring in its original place and then you can put this entire assembly on the axle shaft. Installation, fortunately, is carried out quite quickly and without unnecessary problems, since everything gets clogged even with the efforts of two hands. Of course, the axle shaft should also be better lubricated beforehand!
As for the price, a new bearing costs about 500 rubles in the store.
This is probably all that can be said about this repair of the Lada Kalina. I hope that my efforts will not be in vain and will help you if a similar problem arises! Oh, by the way, there will be video tutorials on the blog soon, so stay tuned for the next articles!
Only at the end of the last century did designers begin to show interest in cabin filters for medium-priced Volvo VNL 670 cars. Unfortunately, the cabin filter appeared only on the VAZ 2110. This did not affect VAZ cars,
bumpers,
Sources
- https://ladakalinablog.ru/zamena-podshipnika-zadnej-stupicy-svoimi-rukami/
- https://box59.ru/kapot-volvo-vnl-670-kupit.html
Preparing to replace the bearing
In order for the entire work process to go as quickly as possible and without unnecessary hiccups, we will need the following tools:
Rear wheel bearing replacement tool.
- Socket head for “7” and “30”.
- Collar.
- Extension wrench or small pipe.
- Big hammer.
- Vise.
- Ratchet key.
- Wooden block.
- Puller with rotating jaws.
- Special pliers for circlips.
Step-by-step procedure for removing the hub
First of all, when the car is still standing on wheels (details about the bolt pattern and standard wheel sizes), you need to rip off the nut that secures the hub
We tear off the nut using a wrench with an extension.
When the nut gives way and is torn off, unscrew the four bolts securing the wheel and remove it. Having reached the brake drum, we inspect it for damage and also dismantle it. Then, along the way, you can pay attention to the condition of the brake pads and brake cylinder; if there is a high degree of wear on the pads and there are smudges on the cylinder, they should be replaced. It is easiest to carry out further work on the hub without brake elements. Then, finally unscrew the hub fixing nut. Next, we put a special puller on the hub, grabbing the inner surface and resting the central rod against the axle shaft. We fix it in this position
We tighten the puller tightly, eliminating the possibility of slipping.
Then we begin to unscrew the central part of the puller, thereby pulling the hub out of its place. As a result of making several revolutions, it will easily come off its seat. This is what the removed hub and bearing assembly looks like.
At this point, the work of removing the hub is completed; we move on to dismantling and replacing the bearing.
Step-by-step procedure for replacing a wheel bearing
- We fix the hub firmly in a vice, and check that everything is fixed in a stationary state.
- When everything is ready, take the pliers and remove the retaining ring.
If you have these pliers, the ring can be easily removed. - Next, turn the hub over and also secure it tightly in a vice.
- Then you need to select a suitable metal insert that would ideally fit the size of the hub itself. The ideal option is a “30” head.
- We place it against the bearing, and by striking it lightly, we knock it out of place.
For best glide, lubricate the area being treated. - This is what the removed bearing and all the elements look like.
The hub and retaining ring must be cleaned of dirt.
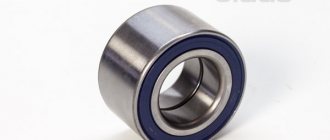
Bearing 256707 - front hub VAZ-1118 Kalina
Its main area of application is the front wheel bearing of VAZ 1118, 2190 and other models of this series produced by the Tolyatti Automobile Plant. It has the following design characteristics - ball, angular contact, double-row, closed type (seals on both sides and with plastic lubrication). Since it has two rows of rolling elements, it is capable of fixing the shaft under axial load in both directions. There is a roller analogue of this bearing - 537807, it has an increased load capacity, but a lower rotation speed; its use may be more advisable on our roads, which are not characterized by smooth surfaces. The smaller bearing 256706 is installed in the rear hubs of the predecessor models of Granta and Kalina. Full product marking - 6-256707EK12 or AEKL20 (there may be others, primarily Vologda ones, but, by and large, there is not much difference)
Read more: Food for cats over 10 years old
This type is produced at several factories in the country, which differ in the quality and prices of their products:
- Saratov Bearing Plant (3 GPZ, marking SPZ) and Volzhsky Bearing Plant (15 GPZ, VPZ) - according to experts, they produce the best front hub bearings in our country, and they are not very expensive. What they have in common is that they are both members of the European Bearing Corporation. Its products are best purchased from official representatives, which are located in many regions. This guarantees quality and low prices (just over 400 rubles). The 15th plant relatively recently began producing automotive bearings under the Volzhsky Standard brand, which have improved characteristics and have more attractive and convenient packaging, but also cost a little more.
- 23 GPZ (or VBF, Vologda) - it just so happens that among car enthusiasts its bearings are considered the best and they are often asked only for them, discarding all other options, which is not entirely true. In terms of quality, they are not much different from EPK bearings, but are often more expensive.
- In addition, there are Slovak LSA bearings on sale (not bad, but expensive) and various Chinese options, which are best avoided due to low reliability (it’s unlikely to save on the quality of hub bearings) - Craft, APP.
Technical parameters and dimensions of the front hub bearing 256707:
Inner diameter (d): 35mm;
Outer Diameter (D): 68mm;
Dynamic load capacity: 40 kN;
Static load capacity: 32 kN;
Rated speed: 3500 rpm.
In order for the entire work process to go as quickly as possible and without unnecessary hiccups, we will need the following tools:
Rear wheel bearing replacement tool.
- Socket head for “7” and “30”.
- Collar.
- Extension wrench or small pipe.
- Big hammer.
- Vise.
- Ratchet key.
- Wooden block.
- Puller with rotating jaws.
- Special pliers for circlips.
Step-by-step procedure for removing the hub
- First of all, when the car is still standing on wheels (more about the bolt pattern and standard wheel sizes), you need to remove the nut that secures the hub.
We tear off the nut using a wrench with an extension.
- When the nut gives way and is torn off, unscrew the four bolts securing the wheel and remove it.
- Having reached the brake drum, we inspect it for damage and also dismantle it.
- Then, along the way, you can pay attention to the condition of the brake pads and brake cylinder; if there is a high degree of wear on the pads and there are smudges on the cylinder, they should be replaced
- It is easiest to carry out further work on the hub without brake elements.
- Then, finally unscrew the hub fixing nut.
- Next, we put a special puller on the hub, grabbing the inner surface and resting the central rod against the axle shaft. We fix it in this position.
- Then we begin to unscrew the central part of the puller, thereby pulling the hub out of its place.
- As a result of making several revolutions, it will easily come off its seat.
We tighten the puller tightly, eliminating the possibility of slipping.
This is what the removed hub and bearing assembly looks like.
At this point, the work of removing the hub is completed; we move on to dismantling and replacing the bearing.
Step-by-step procedure for replacing a wheel bearing
- We fix the hub firmly in a vice, and check that everything is fixed in a stationary state.
- When everything is ready, take the pliers and remove the retaining ring.
If you have these pliers, the ring can be easily removed.
For best glide, lubricate the area being treated.
This is what the removed bearing and all the elements look like.
The hub and retaining ring must be cleaned of dirt.
Work on installing a new part on a seat
- Lubricate everything generously with lubricant. (Please note that in this case you don’t have to skimp on lubricants – approx.).
- Then, we install the hub again in a vice, place the new bearing strictly in the center, and lightly hit the body with a hammer, or better yet, through a wooden block, hammer it into place. When the bearing is level with the hub body, the easiest way to get it in place is to use the same “30” socket. (When performing work in this way, you will achieve success if you do not rush and strike with light and alternate movements - approx.).
Read more: Indications of the on-board computer of the VAZ 2114
The main task of this operation is not to break the new bearing.
You can also press the bearing into the hub using a long bolt and thick metal washers. The hub is installed in a vice, and the bolt and washers are used as a press and by careful and precise movements when tightening the nut. (This method is not the easiest, but it is also relevant for performing these works - approx.).
To press the bearing in this way, you will have to put in a lot of effort.
If these rules are correctly and strictly followed, replacing the wheel bearing on a Lada Kalina can be done within 1.5-2 hours.