More than 20 years ago, development of a car began, which later received the name Lada Kalina. Although prototypes of cars with various body styles were presented to the public back in 1999-2001, the first Kalinas for mass use rolled off the assembly line only 5 years later. Interestingly, Kalina was initially produced only as a sedan. Now this series is classified as the first generation of cars.
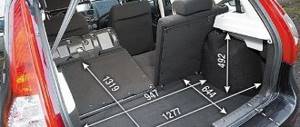
The second generation has 2 body styles: hatchback and station wagon. AvtoVAZ positions the Lada Kalina as a compact, maneuverable city car with a European level of showroom comfort. At the same time, it is emphasized that the car’s suspension height is almost comparable to SUVs. And, of course, Lada Kalina is famous for the fact that the current president of the country once drove along the federal highway.
Like any car, the Lada Kalina has its pros and cons in design, operation, and repair. However, now we are interested in a small but very important detail - the trunk lock of the Lada Kalina with station wagon and hatchback body types. We will talk about it in detail.
Features of opening the trunk of the Lada Kalina
Owners of the Lada Kalina car are almost unanimously surprised: with all the bias towards Europe, the trunk lock of the Kalina hatchback in the basic configuration for some reason can only be opened with a key. For many, the situation immediately became quite common: the driver gets into the car, starts the engine, and then remembers that he needs to put something from the passenger compartment into the trunk. Further actions are similar to a joke.
You need to turn off the engine, remove the key from the ignition, get out of the car, and so on. If you imagine all this in an environment of time shortage, one can only feel sorry for the owner. In addition, if someone happened to approach the trunk of a car with something heavy in their hands, the procedure for opening it with a key turned into something difficult. Another problem could have arisen: in regions where real frosts occur in winter, the lock cylinder would at times freeze tightly.
What’s interesting is that any car owner sees a separate button on the Kalina key, which for this brand of car replaces the standard key fob. She's supposed to open the trunk. If you press and hold such a button for a couple of seconds, you can hear a click - this is a signal that everything is in order with the electrical package control unit.
Then another interesting detail became clear: the craftsmen who climbed under the trunk trim to understand the internal structure realized that there was still a place for the lock activator and even a standard electrical connector for wires. And then the same craftsmen began to solve the problem of how to modify Kalina to increase the comfort of use. The complete trunk lock drive is not available for sale as a single set, so the parts will have to be obtained separately.
How to dismantle the lock to replace the cylinder?
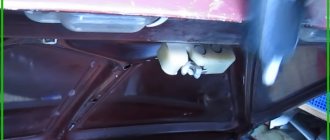
You can gain access to the lock mechanism by removing the plastic upholstery inside the luggage compartment. This protective component is fixed by means of two bolts, which are located in the places where the special handle is installed. They are also called latch caps. They are pryed off with an ordinary screwdriver.
Structurally, the trunk lock in the Lada Kalina is made of two parts, regardless of the body type, hatchback, station wagon or sedan. They are presented in the form of a cylinder and the unlocking mechanism itself. If it is necessary to replace the trunk lock, then the dismantling of these components is carried out in a separate order.
Installation of the activator: preparatory work
Since there is space for a trunk lock activator in Kalina, it makes sense to use it. Absolutely any activator will do. Of course, for those who are interested in the quality and long service life of the entire device, it is better not to stop at extremely cheap options. Experienced car owners still advise choosing domestic Kalina electric lock drives, regardless of body type. They are somewhat more expensive than similar products made in China or Taiwan, but still more reliable. Main parameters of the activator:
- 12 volts;
- two-pin;
- lock-unlock functions.
In order for the system to open doors by pressing a button to work fully, one activator will not be enough. You will also need such a thing as a rotary washer. According to many car owners, the easiest way is to grind it yourself. You will need a steel plate and a machine. There are quite enough drawings with dimensions that will show what kind of rotary washer for the Kalina activator should be on various auto forums.
It is possible that after the washer is manufactured, it will have to be modified when installing the activator. The activator installation technique itself will require some tricks. For example, the first step is to remove the trunk trim. It is secured with pistons, which immediately became unusable for most car owners. Conclusion: pre-purchase of “hedgehogs” for subsequent installation of the trunk trim in place is mandatory.
Another nuance lies in the types of locks on the Lada Kalina. Firstly, locks on cars produced before 2010 and after differ in their design. Accordingly, the types of activators will differ slightly. This issue is resolved upon purchase. Secondly, most of those who independently installed the lock activator for Kalina station wagon either modified the lock itself or replaced it with another one. It remains to figure out why this is needed and how it is done.
The bottom line is that the trunk lock is equipped with two “tongues”. After modifying the lock to open it with a button on the key, the existing problems were partially solved, but a new one arose. If, when opening the trunk with the key button, someone did not support the trunk lid in time, it would lower, as a result the trunk would close again. And only on one “tongue”. And this meant that the key fob certainly became useless. Now it was possible to open the trunk again only with the key. This is where two options for solving the problem appeared.
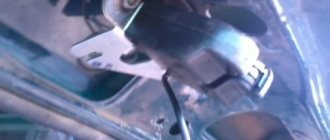
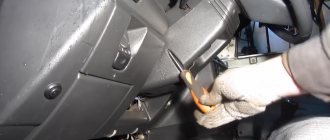
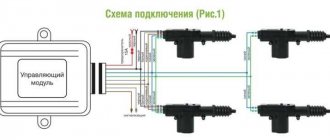
Installing an electric lock on the trunk is a simple operation and requires a minimum of knowledge, tools and tools. But first, let’s understand the operating algorithms and select the desired installation option. On all machines, wires are already stretched to the activator, but there is no activator itself. There are two installation options: standard and non-standard. In addition, the non-standard option provides 2 control options.Now more details. 1. Standard option. In this version, the installed activator locks/unlocks the push-button drive of the lock. When disarming, even if the lock is locked with a key, pressing the button can open the trunk. This is convenient because the trunk lock is always locked and there is no chance of leaving the car with the trunk open after arming it. Disadvantages of the normal mode: to open the trunk you have to press the button. If the doors are unlocked, the trunk is also unlocked, which means that anyone can come up and open the trunk with a button. Device: The activator is installed in ready-made holes for its fastening. The photo schematically shows the drive device. A metal plate, the contours of which are schematically drawn in red, is driven into rotation by the activator through a rod (blue line). When the alarm is armed, the plate is rotated so that when you press the button, the “tongue” passes by the lock rod lever (the white plastic part in the photo). This is exactly the position in the diagram. When the alarm is disarmed, the activator moves the “tongue” of the plate so that it becomes in the position as in the photo there is a black button disk, i.e. When you press the button, the “tongue” presses the traction lever and the lock opens. To implement this scheme, it is necessary to make a plate of 2 mm iron. Dimensions like a plastic black disc. The diagram shows it quite clearly. Important note: the activator must be fixed in two extreme positions in the absence of voltage. Otherwise the system will not work. Alternatively, the plate on the axis should rotate with some force and not move under the action of the spring when the activator is turned off. 2. Non-standard option. In this case, the installed activator acts directly on the lock rod. This means that the trunk is always closed until the button is pressed. The lock button opening function is retained. Those. If the activator malfunctions, you can always open the trunk with the key. You can control the activator in two ways: a) a button is embedded in a convenient place in the cabin. Through this button, power is supplied to the activator via a separate wire. Disadvantages: you can only open it from the inside, you will have to stretch the wire through the entire car. b) standard signaling wires are used. You can open the trunk from the key fob, or from the button on the driver's door. But the driver's door button is just an ambush. If you press the door unlock button in “normal” mode, the trunk will open at the same time. That’s why I practically don’t use this button to unlock doors; I open it with the remote control. On the “luxury” (with 4 ESP) it’s done a little smarter. There, the first press of the button unlocks the driver's door, the second - the remaining doors and trunk. But it's still inconvenient. It would be optimal, for example, to unlock only the doors with a button, and a long press on the button would open the trunk. But, alas. The illogical way of opening the trunk from a button on the door is the main drawback of the emergency mode with this method of control. Therefore, option a) appeared, although, in my opinion, it is worse. The methods of installing an electric lock described below will be in a non-standard version, with control from a signaling system. Installation of activators in a sedan and hatchback has its own characteristics, so we will consider them separately. I haven’t seen the fifth door of the station wagon, but I can assume that the system is similar to the hatchback. The most important part of the drive is the activator. We need a two-wire one. Sold in almost every auto store, price from 80 rubles. Well, now the installation instructions: Sedan Tools and materials: Phillips screwdriver, drill, d4 drill, pliers, activator, electrical tape, 3 nuts for M6 thread (or 1 high M8). 1. Remove the upholstery from the trunk lid. Fastening pins are considered disposable, but can be reused without harmful consequences. 2. We try on the activator so that one of its mounting holes fits into the hole of the harness fastening clip (we first remove the clip), mark and drill the second hole. Drill carefully! You can use a drill to hit the opposite wall. Therefore, you need to hold the drill well, or it is better to put some kind of limiter, tube, or, say, a piece of foam plastic on the drill. 3. Using self-tapping screws from the activator kit, attach the activator. We place nuts under the rear mount of the activator (we drilled a hole), between the metal of the cover and the activator itself, so that the activator stands leveler relative to the lock rod. 4. Insert the rod from the activator kit, bend it with pliers as in the photo and attach it with a clamp to the lock rod. We break off the excess rod. Perhaps bending the activator rod is the most difficult part of the installation. The entire operation of the system depends on its shape and position relative to the lock rod. We make the rod as straight as possible, but so that it does not interfere with pressing the trunk lock button. When tightening the clamp, we preload the lock rod, otherwise the working stroke of the activator may not be enough. We achieve clear operation of the lock when moving the activator rod. Tighten the clamp well. 5. Connect the wires. I don’t know if Chinese activators have any standards for the color of the wires, I connected the red wire of the machine to the green activator and the yellow wire of the machine to the blue activator. If the activator fires in the wrong direction, swap the wires. We insulate the connection with electrical tape. 6. Check the operation of the electric lock. It should work 100% of the time. If the drive sometimes does not work, we adjust the rod by bending it and positioning it relative to the lock rod. 7. We install the trim in place, we are proud of ourselves Hatchback Installing an electric lock in a hatchback is a little more complicated, although the principle is similar. Tools and materials: Phillips screwdriver (possibly a slotted one if the screws have a head for it), drill, d4 drill, activator, 1 M4x45 screw, 2 M4x15 screws, 3 M4 nuts, washers for these screws, electrical tape. In addition, in the hatchback the fifth door upholstery is plastic, so to prevent it from rattling, it is better to install new pistons. They are of two types: “eight” white and... on the price tag in the store it was written “bald hedgehogs”, they are black. You need 4 white and 2 black 1. Unscrew 2 screws of the inner handle of the casing, remove the handle, remove the casing, overcoming the resistance of the pistons. 2. Drill an additional hole in the metal, and at the same time drill out one mounting hole in the activator. Drill carefully! You can use a drill to hit the opposite wall. Therefore, you need to hold the drill well, or it is better to put some kind of limiter, tube, or, say, a piece of foam plastic on the drill. 3. From the strip included in the activator kit, we make a U-shaped bracket for attaching the activator, and attach the activator. The photo shows how: Using a self-tapping screw from the activator kit, we fasten the activator to the manufactured bracket, using short M4 screws we fasten the bracket to the door, and using long M4 screws to fasten the activator to the door. 4. Insert the rod from the activator kit, bend it with pliers as in the photo and attach it with a clamp to the lock rod. We break off the excess rod. Bending the activator rod is the most difficult part of the installation. The entire operation of the system depends on its shape and position relative to the lock rod. We bend the rod so that the axis of movement of the lock rod and the activator rod are as coaxial as possible, so that when the activator is activated, its rod does not bend. When tightening the clamp, we preload the lock rod, otherwise the working stroke of the activator may not be enough. We achieve clear operation of the lock when moving the activator rod. Tighten the clamp well. 5. Connect the wires. Unlike the sedan, the direction of movement of the activator rod is the opposite. We connect the wires of the yellow car with the green activator, the red car with the blue activator. If the activator fires in the wrong direction, swap the wires. We insulate the connection with electrical tape. 6. Check the operation of the electric lock. It should work 100% of the time. If the drive sometimes does not work, we adjust the rod by bending it and positioning it relative to the lock rod. 7. Another feature of the lock of the fifth door of a hatchback: if on a sedan the lock latches with one click, then on a hatchback it latches with two clicks. Therefore, when the activator is triggered, you must immediately lift the door by hand, otherwise it will remain closed with one click. I drove like this for a year and a half, but I decided to eliminate this drawback by cutting off one tab on the lock. To work you will need a grinder. It is advisable to remove the lock for this, but I could not unscrew the screws, so I did it by car. The work requires accuracy and compliance with safety precautions. The photo shows the red cut line of the tongue. If the work is carried out on the lock that has not been removed, the grinder should have a disk with the smallest possible diameter. Before work, you must jam the lock in the open position. It would be good if there was an assistant who would hold the door half open and press the lock button. Opening the lock is necessary so as not to accidentally cut off another tongue that is in contact with the one being cut off. Result in the photo: Check: if now the lock is fixed in only one position, then everything is fine, otherwise we finish the tongue. We clean the sawdust and lubricate the lock. 8. Put the upholstery in place using new pistons. Taking this opportunity, we place foam rubber under the possible knocking points. We are proud of ourselves
Methods for installing the trunk lock activator
The first option is to saw off one “tongue” from Kalina’s lock. Particularly gifted craftsmen do this without any removal of the lock, right on the spot, using an angle grinder. You have to work very carefully. If you don’t have a grinder, the same steps can be done with a hacksaw. It just takes much longer, and one can only guess about the physical effort required for such a process. If you are not confident in the intricacies of your own work, it is better to remove the lock for modification. In this case, it will be easier to work with both a grinder and a hacksaw.
The second option is to replace the lock. Many car owners installed a trunk lock for their Lada Priora instead of the original one. This option is perfect for those Kalina owners who do not have the desire and/or ability to cut anything. All other steps for installing the Kalina station wagon trunk lock activator are extremely simple.
- A rotary washer is installed on the plastic activator pusher, then the entire system is secured with a locking ring.
- The complete activator is placed in a standard place.
- The activator wires are connected to the corresponding connectors. Naturally, all electrical work is carried out only with the battery disconnected. The point is not what can “knock” an electric current: 12 volts of direct current for a person is just nonsense. But capricious electronics, if something suddenly “shorts”, may suffer. In the best case, problems with functionality will begin, in the worst case, something will completely fail.
- The next stage is installing and adjusting the rods.
- A check is in progress. First, the lock itself, regardless of whether the original one was modified or another one was installed (from Priora). All detected problems are corrected. The activator is being tested.
If everything worked perfectly, then it is quite possible to install the trunk trim in place, if only there were “hedgehogs”. Car owners are advised, since they had to remove the trunk trim, to also check which parts are making noise, knocking or vibrating. If such small problems are discovered, they can be solved by installing plugs from pieces of foam rubber of the required size. This will not only solve the problem with the lock, but also increase comfort when driving the car.
Luggage compartment lock
You can, if desired, modify the trunk lock of the Kalina hatchback in exactly the same way as was considered in the case of the Kalina station wagon. One of the main nuances, oddly enough, is not in the electrics or body design features, but in the fastening of the trunk trim. The point is that the Kalina hatchback is supported not only by pistons, but also by plastic corners.
That is why, when removing the trunk trim of a Kalina hatchback, you must pull the trim from the top: while the “hedgehogs” are easy to replace, the stationary plastic holders are only easy to break. And more about plastic. The bottom line is that the Kalina hatchback has a plastic trim on the trunk lid. According to the observations of many car owners, these are two problems at once. The first is that plastic is not entirely suitable for this part.
Constant efforts to open the fifth door, combined with a small number of stiffeners, gradually lead to the appearance of cracks in the plastic. Then everything follows domino rules. Perhaps the plastic will soon “fly”, and then you will have to think about repairs. Or, which is no easier, the plastic cover may remain in place, but will begin to “walk” along the metal part. And these are scratches on the coating and subsequent corrosion.
There are also aesthetes among Kalina hatchback owners who simply do not like the look of the trunk lid opening button. In general, all of the above reasons often lead hatchback owners to the same decision: an opening button on the fifth door is not needed. To solve all the problems at once, you can not only modify the Kalina trunk lock, but also remove the button from the fifth door, and, on the contrary, install a button in the car interior.
Electric trunk lid lock (Hatchback) for Kalina, Priora
Dear customers, in order to avoid errors when sending the trunk lid lock with electric drive to the VAZ 1118 Lada Kalina, Kalina 2, Priora, in the “Comment” line, indicate the model of your car, year of manufacture.
A lock is a mechanical, electronic or combined locking device. It is used to lock doors and other door structures used in the car, as well as to ensure their blocking in order to prevent the theft of objects from the vehicle interior. Depending on the operating principle of the drive, mechanical and electronic locks are distinguished.
A car lock is designed to close doors, hood, trunk and prevent unauthorized access to the car. A modern lock is an important element of a car's passive safety system.
The trunk lock 1118-5606010-10 with an electric drive (activator) ensures automatic opening of the trunk lid of Lada Kalina / VAZ 1117, 1118, 1119, Lada Kalina 2, Lada Priora Hatchback / VAZ 2172, which significantly simplifies the life of the driver of this vehicle.
The automatic trunk opening function is a fairly new option, the existence of which most car owners of new car models are just beginning to get used to.
Structurally, the electronic lock of the trunk lid assembly in the car Lada Kalina / VAZ 1117, 1118, 1119, Lada Priora Hatchback / VAZ 2172, Lada Kalina 2 combines mechanical and electronic parts.
- Lock washer 6 (00001-0025982-71), 2. Nut M5 with toothed shoulder (00001-0038318-01), 3. Trim of the trunk lid lock (11180-5606058-10), 4. Button (21080-6302015-00) , 5. Lock drive (11190-6305070-00), 6. Lock drive gasket (11180-5606075-00), 7. Lock cylinder (21230-6105420-00), 7. Lock cylinder (21230-6105420-10), 7. Lock cylinder (21230-6105420-20), 8. Lock drive rod (11180-5606054-20), 9. M6 nut with toothed shoulder (00001-0038321-01), 10. Trunk lid lock (11180-5606010- 10), 11. Lock retainer (11180-5606064-20), 12. Lock washer 6 (00001-0026068-70), 13. M6x16 screw (00001-0033130-01).
The mechanical part ensures the implementation of basic functions: closing, opening, locking, unlocking. The electronic part is represented by various electronic control systems for the mechanical part - central locking, remote control, intelligent access system.
The mechanical part of the lock has a different design depending on the manufacturer, car model, and door type. At the same time, the following general structure of a car lock can be distinguished: locking, lever and locking mechanisms.
The locking mechanism of car locks of different brands, as a rule, has a different design. When the door is closed, depending on the design of the vehicle, the rotary latch engages behind the lock holder bracket. The locking pawl secures the position of the rotary latch using a locking notch. The design of the dog has two fixing recesses - the main one and the additional one. In the main recess of the pawl, the rotary latch is located when the door is completely closed.
The locking mechanism locks and unlocks the vehicle. The essence of the lock is to deactivate the lever mechanism, i.e. does not allow the door mechanism to be opened using the handle. For the most part, the external drive is blocked. The locking mechanism has two types of drive - mechanical and electromechanical, which are implemented in parallel to each other. A mechanical drive connects the lock cylinder to the locking mechanism and allows you to lock (unlock) the lock using a physical key.
The mechanical drive duplicates the electromechanical design of the drive. The electromechanical drive of the locking mechanism combines an electric motor and a worm gearbox built into the lock body. The electric motor in the drive design is the actuator of the central locking system. The electromechanical drive converts the rotational movement of the electric motor into the translational movement of the locking lever, which locks the lock lever mechanism.
The essence of the operation of the activator (electric drive), which makes it possible to achieve such a result, is, in principle, not complicated: when someone presses the corresponding button in the car interior, the trunk lid lock is activated through this part, as a result of which it opens.
It’s a small thing, but it makes life so much easier for vehicle owners, especially during the cold season (the keyhole freezes). This device is compatible with a standard (mechanical) lock, which means that when opening the luggage compartment lid, you can use two methods simultaneously, which, by the way, increases resistance to burglary.
When using the trunk lid lock of a VAZ 1118 Lada Kalina, Priora, Kalina 2 with electric drive, the luggage compartment can be opened using the remote control key fob button, or using a button mounted in the luggage compartment lid.
The trunk lid lock 1118-5606010-10 with electric drive for Lada Kalina, Priora, Kalina 2 is certainly a useful and necessary thing, but only if its installation is justified.
Other article numbers of the product and its analogues in the catalogues: 11180560601010, 11180-5606010-10.
VAZ 1117-1119 / Lada Kalina, VAZ 2170-72 / Lada Priora, VAZ 2192-94 / Lada Kalina 2.
Any breakdown is not the end of the world, but a completely solvable problem!
How to install and replace the electric trunk lid lock on a Lada Kalina car yourself.
AvtoAzbuka Internet Store, repair costs will be minimal.
Just COMPARE and BE SURE!!!
Don’t forget to share the information you find with your friends and acquaintances, as they may also need it - just click one of the social networking buttons below
Installation of the locking device drive
Removing the fifth door opening button is the easiest thing. It is more difficult to seal the remaining hole. This can be done using a special putty. One of the tricks is to process the hole cavity so that the surface becomes as rough as possible. This will create optimal adhesion to the putty. Next comes sanding, priming and painting. The work can be done independently without special training and practical skills. After that, you don't have to worry about aesthetics.
Of course, all dismantling work can be carried out only after the installation of the electric drive is completed, as well as the installation of the trunk opening button in the cabin. The trunk lock drive and how to install it are all relatively clear. Both the location and the connector of the wires in Kalina are determined in advance for this.
But where to install the button will have to be decided by the owner himself. The two most popular places are the dashboard in front of the gear shift and the driver's door. The first method is convenient because the button can be reached from almost anywhere in the cabin. The button on the driver's door is primarily a convenience for him.
Once the location for installing the button has been selected, it is time to install the electrical wiring. About 4 m of wire will be required. The connection point is located under the rear seat. The connection is made to connector 13, it is signed, so searching will not cause any difficulties. The work can easily be done independently. Thus, it became clear how to make a trunk lock drive.