February 17, 2020 Lada.Online 15 141 0
In the event of a car breakdown related to electrical equipment, first of all, check the integrity of the fuses and relays. If a fuse is blown, you must first determine the cause of its blown before replacing it. Details about the mounting block (popularly “black box”) of the Lada Niva (Chevrolet) are described in the operating manual, but the most complete information is contained in the repair manual for the Chevrolet Niva 1.7, which was developed by ITC AUTOSPHERE LLC at the request of JSC "GM AVTOVAZ".
Location and appearance of the part
Not all drivers know where the Niva Chevrolet starter relay is located. For this brand it is located on the left side for ease of maintenance . You need to look for it near the steering column. You need to look below the dashboard. The relay dimensions are small. Feature: the element is created in such a way that it cannot be removed. Visually, the starter relay resembles a small box (its color is black).
There are various reasons for breakdowns:
- contacts are burnt out;
- worn out from time or duration of use;
- parts inside the mechanism were destroyed.
If the starter relay is broken, I report the following malfunctions::
- characteristic buzzing under the hood. It begins when the engine starts;
- the starter works, but the engine does not start;
- The starter makes clearly audible clicks, but does not start.
Car models up to 2009
The element in question is located under the steering column . Look at the bottom left, under the instrument panel. Fuses indicate breakdowns - it is important to know what each symbol means.
Explanation of fuse values and description
There are several notations that you need to be able to decipher in order to understand what problem has arisen (notation F) :
- The problem area is associated with the lighting lamps, which allows you to distinguish car numbers in the dark or on the dashboard. In this case, the number 1 is displayed.
- 2 is displayed - you also need to look at the lamp under the hood of the car or the one responsible for the presence of side lights (for the left side): it is recommended to check not only the lamps themselves, but also the connectors and wiring, as they can sometimes burn out or melt;
- 3 – the high beam in the left headlight, as well as the high beam indicator lamp, requires attention;
- 4 - a problem in operation may be related to the operation of the backup (8) fuse;
- 5 - the problem is related to the way the front door power windows, as well as their relays, function.
- 6—the problem affects the control unit for blocking all existing door locks.
Such values are typical for models 2004, 2005, 2009 . Designations A may be used (5,10, 30 and 15, respectively).
Main settings
- damage to contacts (burnout)
- winding damage
- spring or armature wear
- destruction of the body or parts.
It is important to remember that the device is made in the form of a solid body, so its repair is not always possible or advisable. Therefore, it is better to replace the relay completely.
Also interesting: Niva Chevrolet front hub repair
To understand when replacement is required, you need to pay attention to some characteristic signs when starting the car.
- When the engine starts, the relay does not return the bendix back, which causes the starter to rotate. At the same time, a strong buzzing sound appears under the hood.
- The starter works, but the engine does not start
- When you turn the key, you can hear the starter click, but it does not rotate.
To ensure that replacement is necessary, check the starter solenoid relay. To do this, just use a screwdriver to close its contacts located on the back of the device. It is not recommended to use thin wire, as a welding effect may occur and the wire will be soldered to the contacts.
This will close the circuit and the starter should start working. If the relay clicks, but the starter remains motionless, it will need to be repaired.
Before replacing the relay, you must make sure that the contacts of the device are not oxidized and are in good working order. To do this, you can wipe them with gasoline or kerosene. Do not use sandpaper or files. If the contacts are in good condition and the threads on the stud are not broken, then the device should be completely replaced.
Replacement is carried out in several stages:
- Unscrew 3 mounting bolts
- the faulty relay is removed
- a new device is being installed
- The functionality of the starter is checked.
If the work is done correctly, the car should start the first time.
This block is located to the left of the steering column and is closed from below with a lid. To get to it, you need to tighten 2 screws, then press the top edge of the cover and gradually free it from all fasteners.
The block that appears will be held on a special bracket. The fuse diagram itself and the number of elements on it may vary depending on the configuration and year of manufacture.
photo of the fuse box in a Chevrolet Niva
The fuse and relay box is located in the vehicle interior, to the left of the steering column.
Cars considered were 2002, 2003, 2004, 2005, 2006, 2007, 2008, 2009, 2010, 2011, 2012, 2013, 2014
Where is the fuse and relay mounting block located?
Most fuses and relays are located in the mounting block under the instrument panel on the left side.
To get there you need to unscrew two screws with a screwdriver.
By pressing the top edge of the cover, we remove it from engagement with the instrument panel
Next, moving the cover up, remove the cover pins from the rubber bushings and remove the cover
behind the cover is the fuse box
Decoding for cars from 2009
Mounting block fuses in the Chevy interior
Fuse designation (rated current, A)
License plate lights, side light lamps in the left headlight and left rear light, engine compartment lamp, side light indicator lamp
Low beam lamp (left headlight)
High beam lamp (left headlight), high beam indicator lamp
Left fog lamp
Power window relay, front power windows
Horn Relay, Horn, Trunk Lamp
Heated tailgate glass element, heated tailgate glass relay, heated outside rear view mirror elements
Heated tailgate switch, windshield wiper relay, windshield wiper motor, windshield washer pump, right steering column switch, glove compartment lamp, reverse lamps
Remote control unit for electrical accessories (door locking)
Side light lamps in the right headlight and right rear lamp, instrument lighting brightness control
Low beam lamp (right headlight), gear motors for headlight beam control
High beam lamp (right headlight)
Right fog lamp
Outside mirror control unit, electric outside rear view mirrors, heated seat control unit
Relay-breaker for direction indicators and hazard warning lights (in hazard warning mode)
Interior lamps, anti-theft system status warning lamp, brake lights, additional brake light
Heater fan, heater fuse
Relay-interrupter for direction indicators and hazard warning lights (in turn signal mode), instrument cluster (except for engine management system malfunction warning lamp), starter relay
Fog lamps in the rear lights, anti-theft control unit, buzzer
Relay of the mounting block in the car interior
K1 (not used)
Windshield wiper relay
Windshield wiper motor
Relay-breaker for direction indicators and hazard warning lights
Turn signal lamps
Low beam relay
Low beam headlight bulbs
High beam relay
High beam lamps for headlights
Tailgate heated relay coil, heater fan, windshield wiper and washer, tailgate wiper and washer
Heated tailgate glass relay
Tailgate glass heating element
Remote relays are attached to the bottom of the mounting block
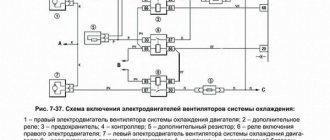
1 — fog lamp relay; 2 — power window relay; 3 — seat heating relay; 4 — sound signal relay; 5 - starter relay
Fuse and relay block for Chevrolet Niva up to 2009
Remote relays
Chevrolet Niva engine management system fuse and relay block.
Where is it located?
Attached to the controller bracket.
To get to the fuses and relays, you need to remove the glove box.
Click on the image to enlarge
Location of relays and fuses in the Chevrolet Niva block
1 - additional relay (turns on the right electric fan through an additional resistor at low rotation speed); 2 - fuse (50A), protecting the power circuits of the additional relay and the right electric fan relay; 3 - fuel pump (fuel pump) fuse (15A), protecting the power circuits of the electric fuel pump relay;
4 - fuse (15A) protecting the constant power supply circuit of the controller; 5 — right electric fan relay; 6 — left electric fan relay; 7 — electric fuel pump relay; 8 - main relay; 9 - fuse (50A), protecting the circuits of the left electric fan; 10 - fuse (15A), protecting the power circuits switched on by the main relay; 11 - controller
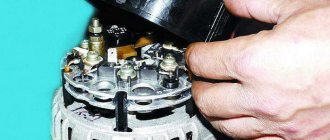
To replace the fuse and relay, remove it from the block, you can pry it off with a screwdriver.
To replace the relay and fuse for the air conditioner, remove the left screen of the instrument console
We remove the relay by hand. Install new fuses and relays in reverse order
Chevrolet Niva fuse diagram
How to remove the relay and fuse mounting block
Remove the block cover, then use a Phillips screwdriver to unscrew the self-tapping screw securing the mounting block
We remove the block holders from the bracket and disconnect the five wires of the instrument panel harnesses from the block
Pressing the latches of the remote relay pads
and sliding it off the block guides, remove the pads assembled from the relay, similarly remove the remaining pads
Removing the mounting block
Installing the unit in reverse order
The radiator cooling fan does not work (does not turn on) - reasons, troubleshooting
— blown, check the fuse that controls the fan
— the fan switch sensor (DVS) is faulty
- faulty fan relay
- faulty fuse box
- power cable break
— break in the output path to the radiator sensor wire
— the gasket under the head is burned out (coolant does not pass into the cylinder)
Problems with the cooling fan usually occur in used cars with decent mileage. This breakdown manifests itself in different ways; the fan may not work stably, may turn on late or not turn on at all.
There can be quite a few reasons why the fan does not turn on, from a banal fuse blown to more complex problems associated with a malfunction of the thermostat or problems with the electrical wiring of the vehicle's on-board network.
If the engine boils, but the fan still does not turn on, then the first thing that comes to mind for most motorists is problems with the fan wiring. However, very often the wiring has nothing to do with it, and the real reason lies precisely in the thermostat. The device designed to monitor the temperature of the coolant (coolant) may fail or simply jam, after which the coolant stops circulating through the radiator, as a result, the radiator sensor does not work, and the fan itself does not turn on.
Then check the fuse that controls the fan; if the fuse is blown, replace it with a intact one. If the cause is not a fuse, you need to check the fan itself directly. The power wires come to it; often they simply crumble or break off due to age. Alternatively, the reason may lie in the plug, so if everything is fine with the wiring, turn off the power to the fan and check the plug for a malfunction. Connect power to the fan directly, for example, from the battery; if the fan does not react in any way, we conclude that the fan is faulty.
Check the fan switch sensor (FSW) located on the radiator. To do this, you need to disconnect the plugs and then connect them together; if the fan does not work, the DVV is faulty and requires replacement.
Also interesting: Generator Niva 2121, 21213, 21214: which one is installed, replacement
It is necessary to connect the wire going to the fuse box directly to ground (usually white with a black stripe). If after this the fan starts working, we can conclude that the second black wire has broken; try to find the break and check whether its connection to ground is reliable. After that, we connect the two wires together and see what happens, if the fan turns on, then the problem was a bad connection.
Check the fan relay, it is quite possible that the problem is there. In order to find out, simply replace it with an adjacent relay, then connect the radiator sensor wires to each other, see above. The fan will turn on - the problem is a faulty relay.
- Unscrew the fastening bolts and remove the crankcase protection along with the mudguard.
- Remove the protective strip of the resistor and unscrew the part.
For cars manufactured after 2009
To determine the problem, you also need to look at the values indicated by the fuses. On new units that were released after 2009, the purpose of the installed fuses has changed.
Fuse identification and description
The changes are that in the additional relay block the manufacturers added a part to enable the heating system for the front and rear seats.
The fuse box has 5 fuses . A 15 amp protective insert for the fuel pump has appeared. The mechanism is controlled by a separate relay.
Scheme for Niva Chevrolet
You need to know exactly where the starter relay is located. For this purpose, it is recommended to study the layout of all fuses . A new element that is installed during repairs must have the same current marking.
For cars up to 2009
Values to be specified:
- K1 – element for monitoring the operation of all installed lamps;
- K2 – is responsible for cleaning the windshield automatically;
- K3 – turn signals and emergency lights;
- K4 – low beam from headlights;
- K5 – high beam requires attention;
- K6 – ignition switch contacts;
- K7 - heated glass located in the luggage compartment.
K8 is a reserve (additional).
For those released after 2009
The values are relevant for models whose year of manufacture is 2010, 2011,2012 . This period also includes 2013 (the symbol also remains K): 1 – windshield, 2 – element of turn signal breakers, hazard warning lights, 3 – low beam, 4 – high beam headlights. Fuse number 5 - this signal notifies you about the heated glass of the tailgate door and the status of the fan. The next signal is 6 – contacts of the ignition switch, 7 – heated glass located in the luggage compartment.
Fuse number 8 is also a backup.
Checking the mechanism: step-by-step instructions
To understand what the fuse means and whether the relay is functioning, it is recommended to pay attention to the following signals :
- a whirring sound coming from under the hood with the engine running but not turning over;
- starter operation without a running engine;
- Starter clicking sounds (won't start).
If such signs are present, the relay should be changed . Before this, a check is carried out. The device is removed. The contacts on the back wall are closed. To close the circuit, you need to attach a piece of metal or wire. If after this the starter starts working without failures, then the main problem lies in the relay of this element. When the starter starts to operate and the relay starts, then it is the starter that will need to be repaired or replaced.
Niva Chevrolet: engine cooling fan relay
To maintain the optimal temperature in the engine, a cooling system is installed in the car.
One of the main elements in this system are fans, thanks to which the required amount of air is supplied to the engine through the radiator core. If it stops working, the Niva Chevrolet cooling fan overheats as excess heat begins to accumulate. Unlike classic cars, it has two fans, making the functioning of the systems much more complicated. If the arrow that shows the temperature is in the red area, and the cooling system refuses to work, and at the same time the cooling fan does not turn on, then the car should be taken to a car service center as quickly as possible, or you should try to find the cause of the malfunction yourself.
The first thing you should pay attention to when the system is not working is the state of the fuses, which are located under the front panel, on the passenger side, in a special mounting block. A pair of fuses are responsible for the cooling operation; if the right one fails, then both fans stop working, and if the left fuse blows, then one element can continue to operate.
In addition, the mounting block has three relays that are responsible for operating the fans at different speeds. And if the relay responsible for operation at low speeds burns out, then the cooling system works correctly only at high speeds, and at low speeds the engine begins to heat up. Power is supplied to the relay through a special fuse, which can also fail, causing system failure.
Failure of temperature sensors also affects proper cooling operation. They are located on the engine. They operate when the desired temperature is reached, one when it reaches 90 degrees, and the second when it reaches 101 degrees. It is recommended to start checking with them, this is done this way: the connector is disconnected from the electric motor, and power is supplied to them directly through the battery; if the electric motor is running, then the reason is in the sensors.
If after checking everything, fuses, relays and sensor are in order, you should pay attention to the fans.
Fans of the Niva Chevrolet cooling system are used for forced ventilation of the radiator. They increase the intensity of heat dissipation while driving at low speeds and are the only way to cool the antifreeze in a plug or “toffee”.
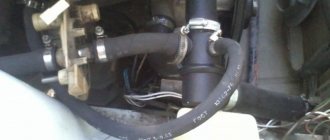
The electrical circuits of Niva Chevrolet cars produced before and after 2009 are different. In both cases, 50-amp fuses protecting the electric fan power circuits are located in an additional unit. It is located behind the glove box on the passenger side of the cabin. The figure shows where the fan fuses are located.
If the permissible current is exceeded, the insert melts and the circuit opens. Therefore, fuses are the first thing to check if the electric cooling fan does not work. The performance of a part can be assessed visually or using an ohmmeter (multimeter). To do this, you will first have to remove the fuse from the socket.
The additional block contains not only fuses. There are also three electromagnetic relays that control the operation of the electric motors of the cooling system. Their control circuits are powered from the ignition switch and on-board controller outputs, and the power current comes from the battery through fuses.
The relay operates as follows:
- Voltage is applied to the control terminals.
- Current passes through the inductor, resulting in an electromagnetic field.
- The steel contacts attract and close.
- The current passing through the relay drives the electric motor.
As soon as the control voltage disappears, the contacts open under the influence of the spring and the fan stops.
You can check the functionality of the relay in three ways:
- Replace the relay with a known working one and test the operation of the system.
- With the engine off and the ignition on, disconnect the temperature sensor connector. You should hear the relay click.
- Dismantle and test the output contacts with a multimeter, applying voltage to the terminals of the induction coil.
The control unit receives information about the antifreeze temperature from a temperature sensor. It is a resistor whose resistance changes with heating and cooling: from 1.3-1.8 kOhm at 30℃ to 155-196 Ohm at 90℃. You can check its performance using an ohmmeter and a thermometer. To do this, you need to remove the part, immerse it in water and measure the resistance at different temperatures.
The sensor is located on the engine head in the area of the exhaust pipe of the cooling system. You can unscrew it with a socket or socket wrench.
1.Both fans do not work. The electric motors may fail, the temperature sensor may malfunction, or the power wires coming from the battery or ignition switch may be broken.
2. The second fan does not work. Causes: sensor malfunction, fuse or electromagnetic relay failure. It is also possible that the power cable may be broken.
3. The left fan does not turn on. Causes: faulty power resistor or temperature sensor, blown fuse or relay. It is also possible that the power cable may be broken.
4. Only two fans turn on at a time. This happens when an additional resistor in the circuit of the first electric motor breaks.
And also interesting: Generator Niva 2121, 21213, 21214: which one is installed, replacement || How much does a Niva generator produce?
5. The fan does not turn off. Typically, the fan runs constantly when the relay is broken or the coolant temperature sensor is faulty.
Repair of fans, sensor, relays, fuses and additional resistor is not provided. If these parts break, they should be replaced with new ones.
Everyone knows that modern cars have a water engine cooling system in their design, which allows many times to increase the service life of not only the engine, but also the entire mechanism as a whole. The Chevrolet Niva also has a radiator in its design that is filled with coolant.
This liquid circulates through the system, thereby cooling the car engine. But the engine temperature exceeds 100 degrees, so if this liquid is not cooled, it will soon turn from cooling to heating. This is precisely why there is a radiator cooling system, the operation of which is carried out by a fan.
But since the Chevrolet Niva is equipped with a powerful 1.7-liter engine, two fans are used to cool the radiator. In this article, we will look at how these devices work, or rather, what is the main element of turning on these devices on a Chevrolet Niva SUV.
The cooling fan is powered by a constant voltage of 12 V from the battery. They turn on when two sensors located in the engine reach a certain temperature. So, when the first sensor reaches a temperature of 99 degrees Celsius, it is triggered, which causes the first fan to turn on.
It has two rotation speed positions - high and low rotation speeds. When the second sensor reaches a value of 101 degrees, then, accordingly, the second device turns on. Thus, the cooling devices of the Chevrolet Niva engine are briefly activated. But we are interested in what role such a small device as a relay, of which there are three on the Chevrolet Niva, plays in this process.
The radiator cooling fan does not work (does not turn on) - reasons, troubleshooting
— blown, check the fuse that controls the fan
— the fan switch sensor (DVS) is faulty
- faulty fan relay
- faulty fuse box
- power cable break
— break in the output path to the radiator sensor wire
— the gasket under the head is burned out (coolant does not pass into the cylinder)
Problems with the cooling fan usually occur in used cars with decent mileage. This breakdown manifests itself in different ways; the fan may not work stably, may turn on late or not turn on at all.
There can be quite a few reasons why the fan does not turn on, from a banal fuse blown to more complex problems associated with a malfunction of the thermostat or problems with the electrical wiring of the vehicle's on-board network.
If the engine boils, but the fan still does not turn on, then the first thing that comes to mind for most motorists is problems with the fan wiring. However, very often the wiring has nothing to do with it, and the real reason lies precisely in the thermostat. The device designed to monitor the temperature of the coolant (coolant) may fail or simply jam, after which the coolant stops circulating through the radiator, as a result, the radiator sensor does not work, and the fan itself does not turn on.
Then check the fuse that controls the fan; if the fuse is blown, replace it with a intact one. If the cause is not a fuse, you need to check the fan itself directly. The power wires come to it; often they simply crumble or break off due to age. Alternatively, the reason may lie in the plug, so if everything is fine with the wiring, turn off the power to the fan and check the plug for a malfunction. Connect power to the fan directly, for example, from the battery; if the fan does not react in any way, we conclude that the fan is faulty.
Check the fan switch sensor (FSW) located on the radiator. To do this, you need to disconnect the plugs and then connect them together; if the fan does not work, the DVV is faulty and requires replacement.
It is necessary to connect the wire going to the fuse box directly to ground (usually white with a black stripe). If after this the fan starts working, we can conclude that the second black wire has broken; try to find the break and check whether its connection to ground is reliable. After that, we connect the two wires together and see what happens, if the fan turns on, then the problem was a bad connection.
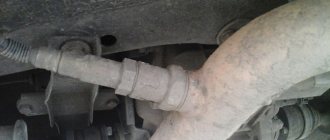
Replacement: step-by-step instructions
Proper replacement of the starter requires a number of measures. There are no difficulties in the work, but you need to follow a certain sequence of actions .
For vehicles on sale before 2009
Replacing the Niva Chevrolet starter relay is performed as follows::
- the terminals from the car battery are disconnected (if this action is neglected, a short circuit may occur, which will also lead to the replacement of the electrical wiring);
- the fuse box located on the left side below the instrument panel opens;
- The starter is being replaced.
To work, you will need a set of tools and hand protection.
For those released after 2009
The main stages of producing a relay replacement will be similar . Pay attention to the fuses, since the circuit is different.
Removing and replacing the fan resistor
To understand whether they work or not, you need to disconnect the connector from their motors, and connect a lamp to the wires through which voltage is supplied; we do the same with the sensor; if both lamps light up, then the problem is in the fans.
To remove them you need to do the following:
- Disconnect all wires
- Removing the upper pipe
- Removing the bumper
- If there is an air conditioner, bend the tubes (this must be done carefully, as they may burst) or drain the freon (filling it back will not be cheap), then remove the air conditioner radiator.
- You need to loosen the nuts on the radiator casing
- Tilt the radiator so that you can remove the fan unit
- Unscrew the bolts that secure the block and remove it
After removal, it is recommended to immediately replace both with new ones, since there is a possibility that a little time will pass and the second element will fail and all replacement work will need to be done again. You can do this procedure from below, but you will need special equipment, and you will need to move the engine ten centimeters back, which is very labor-intensive.
If the fan motors do not start when the wires from the battery are connected directly to the power terminals, the devices must be replaced.
And also interesting: Phase sensor NIVA 21214; 2123 Euro-3; 4; 141.3855 (camshaft positions) 2111-3706040-02 Autoelectronics 2859 - Engine elements
To do this, you will need a set of wrenches ranging in size from 10 to 17 mm and a Phillips screwdriver.
Before starting work, you need to drive the car onto an inspection ditch or a lift and turn off the power to the on-board network by removing the negative terminal of the battery.
Fans are dismantled as follows:
- Remove the crankcase protection and mud guard.
- Unscrew the screws and remove the thick spider-shaped plate and a couple of tin covers that are located in front under the bottom of the car.
- Unscrew the radiator frame cross member.
- Loosen the tension and remove the power steering belt and pump.
- Remove the 4 bolts holding the power steering pump.
- Push the pump back, hanging it on the hoses.
- Remove the air conditioner drive belt.
- Remove the bolt holding the timing belt pulley.
- Remove the pulley and belt.
- Unscrew the four nuts at the corners of the electric fan housing and the two bolts securing it in the middle.
- Remove the fan unit from the studs and pull it down.
This method is probably suitable for restyled Niva Chevrolet models. On older cars, you will have to remove the radiator grille and bumper, unscrew the fasteners and move the air conditioning and cooling radiators forward. After this, access to the electric fans will be open.
During dismantling, you should carefully remember the procedure. Assembly is carried out in reverse order.
Before starting work, you must go to the inspection hole and remove the terminal from the battery. For repairs you will need 10-13 wrenches, a screwdriver and a new resistor. The part is installed in the beam below the radiator. The removal procedure is as follows:
- Unscrew the fastening bolts and remove the crankcase protection along with the mudguard.
- Remove the protective strip of the resistor and unscrew the part.
Assembly is performed in reverse order.