Purpose of the generator
The generator set is designed to provide power to consumers included in the electrical equipment system and charge the battery when the vehicle engine is running.
The output parameters of the generator must be such that in any mode of vehicle movement the progressive discharge of the battery does not occur. In addition, the voltage in the vehicle’s on-board network, powered by the generator set, must be stable over a wide range of rotation speeds and loads. A generator set is a fairly reliable device that can withstand increased engine vibrations, high engine compartment temperatures, exposure to a humid environment, dirt and other factors.
Specifications
- Maximum output current (at 13 V and 5000 rpm), A 55
- Adjustable voltage limits, V 14.1+0.5
- Maximum rotor speed, rpm 13000
- Engine-generator gear ratio 1:2.04
Features of the device and principle of operation
Generator type 37.3701 - alternating current, three-phase, with a built-in rectifier unit and electronic voltage regulator, right rotation (drive side), with a fan at the drive pulley and ventilation windows in the end part. To protect against dirt, the back cover of the generator is covered with a protective casing.
The operation of the generator is based on the effect of electromagnetic induction. If a coil, for example, made of copper wire, is penetrated by a magnetic flux, then when it changes, an alternating electrical voltage appears at the coil terminals. Such coils, placed in the grooves of the magnetic circuit (iron package), represent the stator windings - the most important stationary part of the generator - they are the ones that generate alternating electric current.
The magnetic flux in the generator is created by the rotor. It also represents a coil (excitation winding) through which a direct current (excitation current) is passed. This winding is laid in the grooves of its magnetic core (pole system). The rotor, the most important moving part of the generator, also includes a shaft and slip rings. When the rotor rotates opposite the stator winding coils, the “north” and “south” poles of the rotor appear alternately, i.e., the direction of the magnetic flux penetrating the stator windings changes, which causes the appearance of alternating voltage in them.
It would be possible to use a permanent magnet as a rotor, but the creation of magnetic flux by an electromagnet allows the generator output voltage to be easily adjusted over a wide range of rotation speeds and load current by varying the excitation current.
In order to obtain a constant voltage from an alternating voltage, six power semiconductor diodes are used, which together form a rectifier unit installed inside the generator housing.
The field winding is powered from the generator itself and is supplied to it through brushes and slip rings.
To ensure the initial excitation of the generator, after turning on the ignition, current is supplied to terminal “B” of the voltage regulator through two circuits.
- Plus battery – contact 30 of the generator – contacts 30/1 and 15 of the ignition switch – contact 86 and 85 of the ignition relay winding – minus the battery. The relay turned on and the current flowed through the second circuit:
- Battery plus – track 30 of the generator – tracks 30 and 87 of the ignition relay – fuse No. 2 in the fuse block – track 4 of the white connector in the instrument cluster – 36 Ohm resistor in the instrument cluster – battery charging warning lamp – track 12 of the white connector in the instrument cluster – track 61 – terminal “B” of the voltage regulator – excitation winding – terminal “W” of the voltage regulator – output transistor of the voltage regulator – minus battery.
After starting the engine, the excitation winding is powered from the common terminal of three additional diodes installed on the rectifier unit, and the voltage in the vehicle's electrical system is controlled by an LED or lamp in the instrument cluster. If the generator is working properly, after turning on the ignition, the LED or lamp should light up, and after starting the engine, it should go out. The voltage at the 30th pin and the common pin of 61 additional diodes becomes the same. Therefore, no current flows through the indicator lamp (LED) and it does not light up.
If the lamp (LED) lights up after starting the engine, this means that the generator set is faulty, that is, it does not produce voltage at all, or it is lower than the battery voltage. In this case, the voltage at pin 61 is lower than the voltage at pin 30. Therefore, current flows in the circuit between them, passing through the LED/lamp. It/she lights up, warning that the generator is faulty.
Generator design on Niva Chevrolet
Generator Niva Chevrolet 9402.3701-01:
1 – rectifier block; 2 – bearing sleeve; 3 – rear bearing of the rotor shaft; 4 – slip rings; 5 – protective sleeve; 6 – terminal “B+” of the generator; 7 – gasket; 8 – casing; 9 – voltage regulator with brush holder; 10 – tightening screw; 11 – back cover; 12 – stator; 13 – front cover; 14 – spacer ring; 15 – front bearing; 16 – pulley; 17 – washer; 18 – rotor.
Voltage regulator: purpose and principle of operation
The generator set is equipped with a semiconductor electronic voltage regulator built inside the generator. The voltage of a generator without a regulator depends on the rotation speed of its rotor, the magnetic flux created by the field winding, and, consequently, on the current strength in this winding and on the amount of current supplied by the generator to consumers. The higher the rotation speed and the excitation current, the greater the generator voltage; the greater the current of its load, the lower this voltage.
The function of the voltage regulator is to stabilize the voltage when the rotation speed and load changes by controlling the excitation current.
Electronic regulators change the excitation current by turning on and off the excitation winding from the supply network (additional diodes).
As the rotor speed increases, the generator voltage increases. When it begins to exceed the level of 13.5 ... 14.2 V, the output transistor in the voltage regulator is turned off and the current through the field winding is interrupted. The generator voltage drops, the transistor in the regulator unlocks and again passes current through the field winding.
The higher the rotation speed of the generator rotor, the longer the time the transistor is in the locked state in the regulator, therefore, the more the generator voltage decreases. This process of locking and unlocking the regulator occurs at high frequency. Therefore, voltage fluctuations at the generator output are unnoticeable, and it can practically be considered constant, maintained at a level of 13.5...14.2 V.
Characteristics of the standard generator
The main characteristics of the generator installed by the manufacturer in Niva 21214, 21213, 2121 will be considered using the example of generator type 9412.3701:
- current – 80A;
- voltage – 13.2 V,
- rotation is right.
The cost of standard models of electric generators is 5-7 thousand rubles. If the unit breaks down, it is possible to replace its components or completely replace it with the original or analogues. The prices of the most common ones are presented in the table.
| Analogue | vendor code | Cost, in rubles |
| Generator VAZ-2104-21073,21214 | 9412.3701-03 | 5900 |
| Generator VAZ-2104-21073,21214 | 372.3701-03/05 | 3800 |
| Generator VAZ 2121-21213,21214 | 9412.3701 | 5450 |
The table shows that in the process of replacing a generator on a Niva, you can give preference to a cheaper universal analogue.
Also interesting: Where is the Chevrolet Niva starter relay located?
| Analogue | vendor code | Cost, in rubles |
| Generator VAZ-2104-21073,21214 | 9412.3701-03 | 5900 |
| Generator VAZ-2104-21073,21214 | 372.3701-03/05 | 3800 |
| Generator VAZ 2121-21213,21214 | 9412.3701 | 5450 |
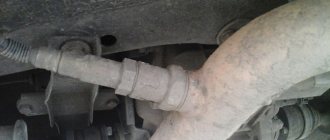
Generator drive and mounting it to the engine
The generator is driven from the crankshaft by a belt drive using a V-belt. Accordingly, for this belt the generator drive pulley is made with one groove.
To cool the generator, plates are spot welded on the back side of the pulley. On the pulley they are located almost perpendicularly and perform the function of a fan.
The lower mounting of the generator on the engine is made on two mounting legs, articulated with the engine bracket with one long bolt and nut. The top one is through the pin to the tension bar.
Nuances of moving a generator
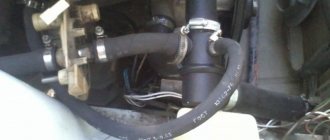
When replacing a generator with a Niva 21213, 2121, 21214, a number of subtleties arise, and one of them is the location of the generator unit. It is located at the bottom of the engine compartment.
Actually, this is why problems arise with the operation of the structure: while driving, various contaminants get on the generator, and coolant drips. If you don’t want to constantly change the generator unit, it is recommended to move it upstairs.
To ensure that no problems arise during the operation of the car, it is important to monitor the condition of the car. First of all, it is recommended to regularly inspect the generator.
So, when the “battery” light blinks on the dashboard, if suspicious noises or creaking sounds occur, you should be wary and think that the generator is not working correctly.
Timely inspection will help to avoid unpleasant situations in the form of breakdowns of the constituent elements of the generator, and as a result, failure of entire electrical systems.
The disadvantage of domestic Niva SUVs is the location of the generator unit - at the bottom of the engine compartment. It constantly gets contaminated when driving off-road, and coolant constantly drips. The problem is solved by moving the generator upstairs (the author of the video is SARTANETS).
Also interesting: Replacing a Chevrolet Niva radiator without air conditioning
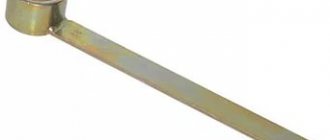
To transfer, you will need a set of keys, a bracket, mounting bolts, and a V-belt. You can make a generator transfer bracket with your own hands according to the drawing below.
Drawing of a homemade bracket
Sequence of actions during transfer:
- We dismantle the propeller, pump and remove the belt.
- By unscrewing the standard bracket, you can remove the generator.
- We cut off the bead around the side of the cylinder head and on the cylinder block.
- Then you should unscrew the two bolts and two studs.
- Next, the assembly is installed on a new bracket and final assembly is performed.
Thus, moving the generator unit upstairs is not difficult.
Precautionary measures
The operation of a generator set requires compliance with certain rules, mainly related to the presence of electronic elements in them.
- The generator set must not be operated with the battery disconnected. Even a short-term disconnection of the battery while the generator is running can lead to failure of the voltage regulator elements.
If the battery is completely discharged, it is impossible to start the car, even if you tow it: the battery does not provide excitation current, and the voltage in the on-board network remains close to zero. It helps to install a properly charged battery, which is then replaced with the old, discharged one while the engine is running. To avoid failure of the voltage regulator elements (and connected consumers) due to increased voltage, it is necessary to turn on powerful electrical consumers, such as heated rear windows or headlights, while the batteries are being replaced. In the future, after half an hour or an hour of engine operation at 1500-2000 rpm, the discharged battery (if it is in good condition) will be charged enough to start the engine.
- It is not allowed to connect electrical sources of reverse polarity (plus to ground) to the on-board network, which can happen, for example, when starting the engine from an external battery.
- Any checks in the generator set circuit with the connection of high voltage sources (above 14 V) are not allowed.
- When carrying out electric welding work on a car, the ground terminal of the welding machine must be connected to the part being welded. The wires going to the generator and voltage regulator should be disconnected.
Chevrolet Niva generator malfunctions, device repair instructions
Everyone knows that in terms of build quality, domestic cars are in many ways inferior to foreign cars. Especially when it comes to electrical devices and components of the Niva car. One of the devices that car owners encounter is the generator of the Niva Chevrolet car. In this article we will talk about malfunctions and talk about repairing the device.
Content
[ To uncover]
[Hide]
Features of the generator
The generator device on the Niva Chevrolet is designed to ensure the functionality of the electronics system. Since optics are an integral part of this system, if malfunctions are detected, the car owner should identify the breakdown as quickly as possible and fix it. Otherwise, operating a car without working headlights can lead to dire consequences.
The situation is similar with the battery - its recharging while driving is provided by a generator unit, which is characterized by fairly high durability. If the generator unit fails, recharging the battery will be impossible. Moreover, if the car owner does not know about this, he will use all electronic devices as usual. And this, in turn, will lead to a complete discharge of the battery and, accordingly, the inability to operate the vehicle.
Design of the Niva generator unit
Possible faults
All breakdowns associated with the operation of the Niva generator can be identified through detailed diagnostics.
In accordance with the operating diagram, the cause of a unit malfunction can be:
- Wear or damage to the pulley structure.
- Wear of current collecting brushes.
- Failure of the rectifier element.
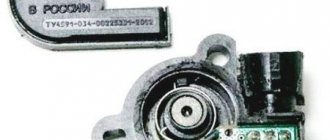
- Failure of the voltage regulator. The voltage regulator in this case plays a very important role in the operation of the system - it is thanks to it that the incoming charge is regulated.
- Collector failure is most likely due to wear.
- Bearing failure is also usually caused by either wear or destruction of the device.
- Damage to the wiring in the charging circuit.
The car owner must know about all the causes of possible breakdowns in order to know what actions to take to eliminate them. To accurately understand that a generator device needs diagnostics and repair, we recommend that you familiarize yourself with the main signs of its breakdown.
Signs of failure
- The indicator on the instrument panel is constantly on or intermittently lights up, indicating that the battery is low. In this case, checking the battery shows that the battery is fully charged and holds a charge normally.
- When you turn on the optics, you begin to notice that the headlights work dimmer. At the same time, pressing the gas, the headlights become brighter.
- The battery begins to quickly lose charge.
- Electronic devices began to work less stably than before (video author - Avto-Blogger channel).
Do-it-yourself device repair
Now let's talk about how a generator is repaired. The repair procedure can be performed at a service station or in a garage, of course, if you have an idea of what needs to be done.
Replacing the alternator belt
How to change the alternator belt correctly:
- First of all, the connector with the DPKV is dismantled, after which the screw that secures this regulator is unscrewed and removed.
- The nut that secures the device should be loosened slightly, but not completely unscrewed. The generator assembly can be moved towards the block, after which the strap on the displaced device can be removed without problems, since it will be loosened.
- Using a jack, which must be installed in advance on the side where the unit is located, you need to slightly raise the car by turning on first gear.
- Next, pull the strap itself so that it can move away from the pump shaft. Then spin the wheel until the tension point reaches the pulley.
- The next step in replacing the alternator belt will be to remove the belt from the other shafts.
- As for installing a new one, it should first be put on the shaft of the unit and the crankshaft, only after these steps can it be installed on the pump shaft.
- The wheel turns until the strap hits the pulley. Then the device is put in place, the strap is tightened, after which the assembly is fixed to the bracket using a nut. The final stage will be the installation of the DPKV in place (author - Ig K channel).
Replacing the tension roller
Repair of the Niva Chevrolet generator may involve replacing the tension roller. The main part of this element is the bearing, so if the strap is loose, then first of all it is necessary to check it. If the roller is in good condition, then the bearing will rotate quietly and there should be no jerking.
To replace an element, follow these steps:
- First, install a crowbar or other tool so that the clutch shaft is blocked. This will prevent the crankshaft from moving.
- Then the screw that secures the roller itself is loosened, and the tension on the strap is relieved.
- The axial screw is unscrewed, after which the roller can be removed.
- A working roller is installed and the strap tension is adjusted. After replacement, make sure the device is working properly.
Replacing the brush
Worn and new voltage regulators
- To replace these components, the regulator must be completely removed. Also, the “-” terminal is disconnected from the battery and the wiring coming from the generator unit is disconnected.
- Next, the block of wires is dismantled, from the tips of which the rubberized cap is removed - this component is intended for protection. After this, you need to unscrew the nut from the wires that secured them to the mechanism block.
- Then you need to disconnect the spring fasteners and remove the plastic casing, using a Phillips-head screwdriver to unscrew the regulator clamps.
- The regulator is dismantled along with the brushes, after which the wires need to be disconnected from this element.
- The brushes are changed, and further assembly of the structure is carried out in the reverse order. Brushes should be replaced if their length is less than 0.5 cm. If the length of the brushes is normal, and the generator device is not working correctly, it is necessary to diagnose the regulatory element, as well as the electrical circuit in the area from it to the brushes.
Dismantling the generator
- Replacing the generator begins with removing the device from the engine compartment. All wiring going to it is disconnected, and we must also not forget about disconnecting the battery. The protective plastic casing is removed.
- The nut securing the wires and the screw securing the assembly are unscrewed. The fastening in the form of a bolt is detached; it is located at the bottom of the structure, after which the strap is removed.
- When all the bolts are unscrewed, the mechanism can be removed from the bracket; a mounting spade may be needed for this.
- To install a new unit, all steps should be repeated in the reverse order. After the new generator is installed, it is necessary to diagnose the condition of the drive belt and also adjust the tension.
Sorry, there are no surveys available at this time.
Video “Diagnostics of the regulator relay at home”
To make sure that the relay needs to be changed, you first need to check it; learn more about the diagnostic process from the video (the author of the video is the Vyacheslav Chistov channel).
labavto.com
Generator Maintenance
Maintenance of the generator set is kept to a minimum and does not require any special knowledge or skills; this work can be performed by every car enthusiast.
Start servicing the generator by cleaning the external surfaces. Check the fastening of the generator to the engine, the reliability of the connection of the wires to the generator and voltage regulator, as well as the tension of the fan drive belt. If the tension is weak, the generator operates unstably; if it is strong, the belt and bearings wear out quickly.
Also check the condition of the drive belt. There should be no cracks or delaminations on it.
The condition of the bearings can be checked by rotating the generator rotor by hand with the drive belt removed. When the bearings are in normal condition, the shaft rotation should occur smoothly, without jamming, strong play, noise or clicks.
In principle, this work can be limited to until any malfunctions appear.
Generator replacement
The instructions below will help those Niva owners who decide to remove the generator for repairs or to completely replace it. Usually, it is not necessary to change the entire device so often, since most of its components are sold in stores, the same rotor, stator or diode bridge. All these spare parts can be replaced with new ones if one of them fails. If you still decide to install a completely new generator, then again, the instructions described below will help you with this.
Or is it still better to take a more powerful one - 100 amperes? I recently thought about this question, because either my gene has become quite worn out and can no longer produce the required voltage. That’s why my battery is almost always dead, so I almost have to immediately turn off the appliances, the stove, etc. In general, if the gene is bad, then you can’t even listen to music in nature for a couple of hours, the battery will die. And if the time has come to change it, then maybe immediately take a more powerful one?
I recently changed the alternator belt, there was a whole story about how it broke and I got home with grief in half. Be sure to read it, I think it will be useful to many. And take a second spare with you))
Also useful information for Shevik owners - cars before September 2003 have a lower-mounted generator, this is not a hum, when overcoming deep puddles and fords it usually floods and this situation is not a fountain, you understand. It’s not for nothing that many car enthusiasts carry genes that are much higher, both in Nivas and Cheviks.
But since September 2003, Sheviks have come with an overhead generator, this is already an excellent solution. The gene is located at the top right if you are facing the open hood. When overcoming puddles, it will be much more difficult to fill it than the lower ones.
So I started thinking, maybe I’ll install a more powerful generator, because I plan to install a trunk and, of course, a chandelier; I think 4 lamps from hella will fit in quite well. Plus I will also install a winch, and it also drains the battery pretty badly. And if the gene is weak, then when fighting off-road, we can get a situation where we are skidding in the dark, the chandelier is turned on, the engine is boiling - both fans are threshing at full strength, we are pulling with a winch - will the gene be enough for 80 amperes? Such energy consumption, of course, will not happen often, but when it happens, it’s better to be safe, isn’t it?
So I’m looking at a 100-amp Pramo gene, it costs about 3,500 rubles. But first, let's check the generator that I got with the car by default. It seems to me that either the brushes there are worn out, or something else - well, it cannot charge the battery normally; in 4 months of summer operation I have already recharged the new battery 3 times. Apparently the gene charges only superficially.
Also interesting: Replacing the heater valve (heater valve) Niva VAZ 21213, 21214, 2131 lada 4×4
On the other hand, wouldn’t a 100 ampere battery drain the battery? After all, the battery is new and it would be wrong if it only lasts a year or two. As I read again on the forums, a more powerful gene shortens the life of the battery.
I read the reviews of Shnivovodov - the majority say that betting on a hundred is a good thing, but only when it is actually needed, in the sense of needing a gene of increased power. Because the staff is quite enough if it works as it should. But if the car has a winch and additional light, then it is better to install a 100-amp generator. We'll keep thinking ))
Who thinks what, share your thoughts in the comments.
There are three types of generators that can be installed on popular Russian SUVs. The output voltage is the same, but other parameters vary. For carburetor engines, a power of 600-750 W is sufficient. The maximum current that could be removed was 40-50 amperes.
Important! The generator for old modifications of Niva cannot be installed on new engines. Overloading will quickly damage it and require repairs.
If replacement is necessary, such a solution can only be temporary.
Injection engines produced before 2003 were equipped with power from 1100 to 2000 W. Load current from 80 to 130 amperes. Both generations were equipped with a mono-V pulley. Generators of this type
without consequences.
Modern overhead motors are equipped with similar energy sources, only the pulley is designed for a larger load - it is poly-V-ribbed, like a belt.
To repair or replace the generator, the car owner will have to remove the unit completely from the car or turn to professionals for work. If you still want to carry out the replacement yourself, then first you will need to prepare all the necessary tools:
- hammer;
- extension;
- keys to "10" and "19".
The procedure consists of the following sequence of actions:
- First, you will need to park the car in a place designated for inspection and repair. The car will also need to be secured using special wheel chocks. Finally, in order for the work to be carried out safely, you should disconnect the battery by disconnecting the terminals from it.
- After this, you need to remove the engine protection. It is attached to several bolts, and they must be unscrewed to get to the lowest bolt of the generator.
- After this, you will need to knock out the mounting bolt using a hammer. It is recommended to knock carefully so as not to damage the thread and to prevent the bolt from coming out in the opposite direction. A hammer is necessary, since a wrench or any other tool simply cannot handle a bolt.
- Next, you need to remove the bolt, swinging the generator from side to side. It is necessary to bolt in any case, as this makes it easier to remove the rod.
- The fourth step involves disconnecting the wiring. To do this, the power wires connected to the housing are disconnected from the unit. In this case, you can first disconnect the plug from the wires.
- Wires are also attached to the generator, tightened with a nut or bracket. In this case, the nuts must be unscrewed with a wrench, and then the loose wires must be pulled out.
- Finally, after disconnecting the wires, you can begin to unscrew the upper fastening element with the belt tensioner. For this you will also need a wrench, as well as a small extension cord.
- Disconnecting the fastener will allow you to remove the belt and alternator. Then you can start cleaning the vacated space with a brush and installing a new unit.
The structure is assembled in the reverse order; the entire procedure will take about two hours if you have all the necessary tools.
Additionally, it is worth noting that when everything is assembled, you will need to adjust the position of the generator using the tensioner. To do this, you need to unscrew the tensioner nut and tighten or loosen the belt, while observing the battery charge.
If the indicator returns to normal, then the selected tension is sufficient. There is no need to tighten the structure, as the generator bearing may fail. If the tension is insufficient, the generator will work intermittently, and this can also lead to breakdown.
Checking and tensioning the drive belt
To check the tension, push the belt to the side. The belt tension is considered normal if the belt bends 10 mm when pressed firmly with the thumb. If the deflection is greater, loosen the nut 6 securing the generator 4 to the tension bar 5. Moving the generator away from the engine using a mounting blade, tighten the Chevrolet Niva generator belt and tighten the nut 6 again.
After 10 thousand km. mileage, and in some cases even earlier, it is recommended to check the tension of the drive belt and, if necessary, tighten it.
Average rating:
5.00 ( 1 out of 5)