The first models of car tires came with tubes that could be easily repaired with your own hands. It was enough to disassemble the flat tire, use a container of water to find the hole, clean the radius around the hole or cut, dry it, apply glue and press it for a day. This method was used not only before, but also now, who are used to troubleshooting problems with their own hands. Now, due to the fact that tubeless tires (tubeless) have taken market share, they are found on most cars. But how to fix a hole in a tubeless tire?
What to do if your tire gets punctured?
If, while driving, you feel that you have run over something sharp and punctured the wheel, then you should not immediately pull out this nail, wire, screw, etc. You need to stop, get out and see how bad the tire damage is. If there is a nail or something stuck there, then let it sit there, in this position you can pump up the wheel to get home or to the repair site. If you notice that the wheels are braking unevenly, with one wheel grabbing sooner, then perhaps it’s time to change the brake pads. It is also possible to do it yourself by replacing the rear brake pads and replacing the front brake pads.
Due to the composition of the rubber and the design of the tire, the presence of a foreign object in the cord, the rubber completely envelops the object and almost does not allow air to pass through. A cousin once said that he drove with a self-tapping screw in a tubeless tire for about a year. Although it is possible to drive with such a problematic wheel, it is better to fix the problem immediately.
If the steering wheel suddenly starts beating, then this may be one of the signs of a faulty steering rack.
When there is a puncture, it is possible that the tire goes flat very quickly. In this case, you can temporarily fix it in two ways:
- Using a tourniquet or patch.
- Using sealant.
How to seal a tubeless tire with your own hands
Today, many modern passenger cars are equipped with tubeless tires. This type of tire has a number of advantages compared to tube tires, such as ease of installation on the rim, fairly low cost (no tube), lighter weight of the wheel, and ease of repair in the event of a puncture. How to seal a tubeless tire with your own hands. Very often you can seal the tire yourself without beading.
Repairs to cuts on the side should be carried out by specialist auto repair shops. To locate punctures, you can use a plastic water bottle on the tread of an inflated tire. The air escaping from the hole will produce a characteristic hissing sound.
If you can’t seal the tires, there is only one option left - buy inexpensive and high-quality new tires - tires Ukraine https://rezina.cc/shiny and Russian suppliers have tried their best, rubber is now in a large assortment, it’s amazing!
How to seal a tubeless tire with your own hands
To seal a tubeless tire, you will need a portable compressor to inflate the tires, a knife, pliers, a tubeless tire repair kit, a wheel wrench, a jack, and special wheel chocks to secure the vehicle when it is lifted with a jack. Place the vehicle on the handbrake, secure its position using the anti-roll device, lift it with a jack and remove the wheel. Carry out a careful inspection of the wheel to find any punctures. Very often, a puncture can be identified by a foreign object protruding from the protector (a nail head, a screw, a piece of glass), which should be removed using pliers. Apply a few drops of glue to an awl with a screw tip. Then plunge the awl into the puncture hole, making back-and-forth movements with this tool (7-10 times) leaving it inside the hole. How to seal a tubeless tire with your own hands - insert a strip of raw rubber into an awl with a needle-shaped hole, so that there are strips with equal parts on both sides and apply a thin layer of glue on it. Remove an awl with a screw tip from the puncture, then quickly insert in its place a tool with a strip of raw rubber installed on it so that there are tails on the outside of the tire up to 1.5 cm long. Next, pull the awl back and pull it out of the hole. The strip of rubber folded in half should remain inside the hole. Using a knife, you need to cut off the ends of the rubber that protrude, inflate the wheel, bringing it to working pressure and install it on the vehicle. This method is suitable for sealing tire tread punctures with holes up to ten millimeters in diameter. To briefly repair large damage, it is possible to use two strips of raw rubber at the same time.
We told you how to seal a tubeless tire with your own hands - good glue and the problem is quickly solved!
Did you like the article? Share with your friends on social networks!
Special harnesses for repairing tubeless tires: cord, rubber and anchor
Special harnesses for repairing a puncture in a tubeless tire are also different:
- cord bundles;
- rubber bands;
- anchor harnesses.
How to repair with a cord harness
The use of such a harness is the most common method of repairing tubeless tires in the field. Composition of a cord harness: a strip of nylon, which is impregnated with glue made from rubber.
Installation of such a harness is done with two awls: spiral and installation. A spiral awl is needed to pierce the puncture site. It is used to turn the tire out and clean it of dirt. And with the second, installation awl, the already cleaned and expanded area is pierced and a tourniquet is inserted. After inserting the harness, the first spiral tire must be pulled out, and the installation awl along with the harness must be inserted even deeper. Then, the second awl is also pulled out, but the tourniquet remains. The tourniquet will stick out from the cut in the tire. The protruding part of the harness must be cut off.
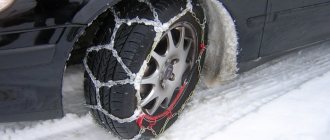
Did you know that there are chains and there are snow bracelets? The difference between chains and snow bracelets is that in order to put on the bracelets, you do not need to jack up the car.
This method has a number of advantages:
- fast;
- effective;
- easily;
- The tourniquet lasts about 6 months.
How to repair a tubeless camera with a rubber band
The quality of rubber is better than cord. And the price of a rubber band is higher. The principle of working with such a harness is slightly different.
When working with a rubber band, you should not use an awl-rasp, because it can damage the material of the band during installation into the tire.
Before installing the harness, it must be lubricated with glue, preferably one recommended by the manufacturer of the harness.
How to repair a tubeless tire with an anchor
There is a harness that has an anchor-shaped patch at the end. The principle of installing such a harness is similar to the previous ones. This tourniquet clogs the hole and is glued to it from the inside with a patch. In order for it to stick, after inserting the tourniquet, you need to pull it back a little.
To carry out such work on sealing tires, you need to buy a cutter with a diameter of 6 mm for inserting an anchor. Using an anchor harness is the most reliable way to repair tubeless tires.
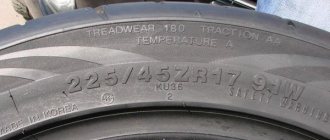
None of the types of harnesses are used for repairing tubeless tires. Repairing punctures yourself is a temporary fix. If you plan to use the car over a long distance, then it is better to go to a tire shop and get it done efficiently. If the tires cannot be repaired, you will have to buy new ones. To choose the right tires, you need to learn how to decipher the tire speed and load indices.
How to disassemble a tubeless wheel yourself
A huge advantage of tubeless wheels is that they can be repaired without removing them.
We wrote above about how to properly patch a puncture on a tire. It is necessary to understand the topic of dismounting a tubeless wheel. This is necessary, for example, when repairing a side cut of a tubeless tire or when replacing it with a new one if the puncture is too large.
Disassembling a wheel is a rather difficult process if it is old. The difficulty is that over a long period of time driving the car, the tire sticks to the rim and is difficult to remove. In order to peel off a tire, there are two methods of beading, which will be discussed later. But if the wheel is new, then disassembling it is not a problem.
Beading
The first method is shock
From the name it is clear that in this method you need to hit the wheel with something heavy. This could be, for example, a sledgehammer.
Procedure:
- Place the car on a jack and remove the wheel.
- Air is being released from the tire. It is also necessary to stand on the wheel to make sure that any excess air that interferes with beading has escaped.
- It is worth carefully placing mounting blades or a corner under the disk.
- It is necessary to hit the entire circumference of the wheel with a sledgehammer.
- When the tire comes unstuck from the metal surface of the disk, a narrow rubber strip of the tire (bead) is pulled out towards you using convenient equipment.
- The wheel is turned over to the opposite side and the whole process is repeated again.
Note!
The process is quite easy, but it requires special care and precision, because you can damage the wheel or disk itself, or damage your limbs with a sledgehammer.
Impact method
The second method is unstressed
Its advantage is that you can remove the wheel without damage, although you will have to put in more effort. This method requires the help of a second machine and a strong board.
You might be interested in Goodyear tire review (Goodyear)
It is necessary to place the board so that it is very close to the rim. The second car should drive over the hanging board so that the rubber narrow strip of the side comes off from one edge (ideally along the entire perimeter). Using its own force, the bead extends along the entire circumference of the wheel. Similar actions are repeated on the other side.
It is worth choosing a method that is convenient primarily for the car enthusiast, and doing everything extremely carefully and carefully.
Using sealant
Applying tubeless tire sealant is the fastest and most popular method, helping you get back on the road in minutes.
An object that has pierced a tire does not need to be pulled out. You need to connect a can of sealant for tubeless tires and pump the contents of the can into the wheel.
Advantages of sealant repair:
- quickly (you can fix a tire puncture while standing in a traffic jam);
- Just;
Disadvantages of using sealant:
- disturbs the wheel balance;
- It is not advisable to drive fast with such a wheel.
How to repair a tire using harnesses
It is quite possible to repair a puncture in a tire in several ways, which will be quite effective. A puncture in a tubeless tire can be repaired quickly and easily using a tourniquet. This device is sold as a repair kit, which also includes a file, glue, a knife for cutting flagella and an awl.
A special type of glue for repairing a puncture in a tire can be purchased separately. In this case, repairing a puncture in the tire will be a little more difficult than using sealant, since you will have to dismantle the tire.
In order to repair a tire puncture using a harness, you should:
- remove a sharp object from the tire;
- Mark the location of damage with chalk or pencil;
- thoroughly clean the puncture site from dirt;
- reduce the tire pressure to one-half atmosphere;
- clean the puncture with a file;
- coat the tourniquet with glue from the kit, inserting it into the awl;
- insert the awl with a tourniquet halfway into the puncture site;
- carefully pull out the awl, leaving the loop of the flagellum inside and pulling the tip out;
- After the procedure, you should check the tire for air leaks, adding another harness.
In some cases, a tourniquet can successfully replace a special patch for a while, but applying it in the field will be very difficult. You should not try to revive a tire with cuts that are located close to the rib or on the rib, since the patch will simply fall off when turning.