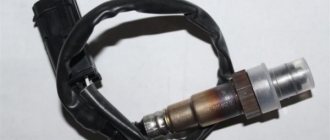
Where is the oxygen sensor located?
On Chevrolet Niva models up to 1995. The controller is installed on the metal body of the exhaust manifold. The second generation Chevrolet Niva (after 1995) is equipped with two DCs: diagnostic and control.
The first is located in the exhaust manifold housing, the second is after the manifold coupling.
Access to equipment for preventive maintenance from under the bottom of the car, as well as through the top of the engine compartment.
The average service life of the recreation center is 80 – 110 thousand km. depending on the driver's compliance with the manufacturer's recommendations.
Signs of a malfunctioning oxygen sensor on a Chevrolet Niva car
The symptoms are in many ways similar to other breakdowns, so it is important to correctly identify the breakdown at the initial stage.
- Difficulty starting the engine “cold” or “hot”;
- Increased fuel consumption;
- Power reduction;
- Passive acceleration dynamics;
- The engine is not running properly;
- An indicator on the instrument panel indicates the presence of system errors in the electronic control unit;
- Periodic shooting sounds are heard from the exhaust pipe, which indicates an enrichment (leanness) of the combustible mixture;
- Blue, gray, black smoke from the exhaust pipe.
If one or more signs are detected, immediately contact a service station specialist for a comprehensive diagnosis.
Oxygen sensor for Chevrolet Niva: original, analogues, price, articles
The main purpose of the DC is to assess the quantitative oxygen content in the exhaust gases and send data to the electronic control unit. The latter, based on the analysis, adjusts the position of the ignition angle. Thus, the combustible mixture becomes enriched and depleted.
Systematic operation, low-quality fuel, high temperature conditions are the main factors for premature failure of the mechanism.
The replacement process is not at all complicated, but requires care on the part of the repairman. However, here too, not many car owners are ready to buy original spare parts, preferring cheaper analogues.
So-called “fake devices” are installed instead of standard sensors. After 100 - 130 thousand km. The Chevrolet Niva catalyst becomes unusable, as evidenced by a number of signs. At the request of the client, the service station technicians remove (cut out) the standard catalyst from the exhaust system and replace it with a “dummy”.
To prevent the electronic control unit from identifying a system error, the lambda probe is replaced with one of the following types of decoys:
Do-it-yourself controller diagnostics on a Chevrolet Niva
To check the equipment we use a multimeter. Most motorists have the device in their garage. The sequence of actions is as follows:
- We place the car above the inspection hole;
- Remove the limit switches;
- Connect the multimeter terminals;
- We activate the device to the “Resistance measurement” position;
- We analyze the received data.
If the arrow tends to infinity, the lambda probe is working; if the arrow drops to zero, the part is damaged. Remember that the controller is non-separable and cannot be prevented.
Installing an oxygen sensor on a Chevrolet Niva
- We install the machine on the inspection channel (pit);
- We turn off the engine, open the hood;
- We wait until the exhaust system cools down to a safe temperature so as not to damage the skin of the hands;
- Remove the limit switches;
- Use the key to “17” to unscrew the sensor;
- We screw in the DC, put on the terminals;
- We start the engine and check the functionality.
DIY replacement completed.
How to check the oxygen sensor on a Chevrolet Niva
Chevrolet Niva (2009+). Oxygen sensor malfunctions
Main malfunctions of the oxygen sensor:
- heater malfunction; -burnout, contamination of the ceramic tip; - oxidation, contact failure.
The lambda probe can fail due to its service life limit (about 60-80 thousand kilometers). The condition of the oxygen sensor is also monitored by a self-diagnosis system. When a malfunction is detected, the warning light on the instrument panel lights up.
Indirect signs of sensor malfunctions are unstable operation at low speeds, increased fuel consumption and low dynamics. It must be remembered that these external signs accompany malfunctions of the injection system and malfunctions of the ignition system.
In addition to the listed elements of the exhaust system, other parts of the exhaust system may be faulty: the exhaust manifold, corrugation and resonator. These elements can burn out, rust, suffer mechanical damage, or fail due to the age of the elements. Signs of malfunctions may include noise during operation of the exhaust system, the smell of exhaust gases in the vehicle interior, a drop in engine power, vibration and other negative consequences. If you find it difficult to determine the malfunction of the exhaust system of your car, then the best way to solve the problem is to contact a car service center in Nagorny to identify the malfunction and repair the exhaust system of your car.
Signs of a malfunctioning oxygen sensor:
— car fuel consumption (consumption) increases significantly; — engine operation becomes unstable; — premature failure of the catalyst.
- the car moves jerkily on the road - fuel consumption has increased, - the car is “stupid”, drives poorly and picks up speed - the engine is unstable at idle - immediately after stopping, a characteristic crackling sound is noticeable in the area where the “lambda” is located - upon external inspection of the sensor, it becomes clear that that he heated up to a red-hot state (turned red).
Signs and causes of sensor malfunction
According to statistics, oxygen sensors fail gradually, so you can identify its malfunction if you pay attention to the following “symptoms” in time:
- The idle speed began to drop or “float”.
- The car jerks, and after starting the engine, popping noises uncharacteristic of the engine are heard.
- The engine power has decreased and when you press the gas pedal there is a slow response.
- The engine overheats greatly and fuel consumption has increased.
- The smell in the exhaust pipe has changed (exhaust gases have become more toxic).
Also interesting: Rain sensor DDA15 for VAZ 2108-21099, 2113, 2114, 2115, 2110, 2111, 2112, Chevrolet Niva
As a result of a failed sensor, the quality of the fuel mixture entering the combustion chamber deteriorates, which disrupts the smooth operation of the engine. There can be many reasons for this:
- Incorrect operation of the filament circuit or reduced sensitivity of the sensor tip.
- Low-quality fuel with a high content of iron, lead, oil decay particles and other harmful inclusions. All these substances stick to the platinum electrodes, causing the sensor to malfunction.
- Problems with the lambda probe heating system. If the heating stops functioning as it should, the oxygen sensor will produce inaccurate data.
- Overheating of the regulator housing. This happens if the ignition timing is incorrectly set.
- Worn oil scraper rings. In this case, engine fluid enters the exhaust pipe, which affects the lambda probe.
- If the engine is started repeatedly.
- Using sealants (especially silicone) to install lambda probes.
- The compression level in the engine cylinders is impaired. In this case, the combustible mixture burns unevenly.
- Clogged engine petrol injectors.
If you notice that the lambda probe is not working, you should not ignore the symptoms, as otherwise you will cause yourself a lot of problems with your car. The fact is that most modern cars are equipped with an emergency locking unit, which can work at the most unfortunate moment. However, the impossibility of further movement is not the worst thing. If the sensor becomes depressurized, the injection system will fail and you will have to pay for expensive repairs to a more serious unit.
Therefore, it is recommended to periodically check the condition of the lambda probe. You can do this yourself.
If the lambda probe is faulty, the exhaust gases become more toxic. This can be determined using special diagnostic equipment. In this case, there will be no external signs, just as there will be no special smell.
Fuel consumption increases. Drivers, as a rule, monitor how full the fuel tank is and try to determine the speed at which consumption is minimal. The increased consumption will be immediately noticeable. Depending on the severity of the oxygen sensor failure, the flow rate will increase from 1 liter to 4 liters.
Catalytic converter overheating. If the lambda is faulty, an incorrect signal is sent to the ECU. This may cause the catalyst to malfunction. It overheats until it turns red and fails.
How to check the lambda probe?
Ford Mondeo I 1993 - 1996
How to check the lambda probe and signs of malfunction? Will a Bosch universal fit?
- The car jerks when you drive at low speeds - 1 answer
First of all, when the lambda fails and malfunctions, several tangible consequences appear in the car’s behavior:
- Increased fuel consumption
- Unstable operation of the car engine (jerks)
- The operation of the catalyst is disrupted (toxicity increases)
Then, to check the lambda probe, you can first unscrew it and carry out a visual check (just as a visual check of the spark plugs can tell you a lot).
Several types of lambdas are installed on cars; the sensors can have one, 2, 3, 4, even five wires, but it is worth remembering that in any of the options, one of them is a signal (often black), and the rest are intended for heater (usually they are white).
Video “Checking the lambda probe”
Recommendations for checking the lambda probe are shown in the video filmed by the author of the channel “v_i_t_a_l_y”.
Knock sensor " Chevrolet Niva"
": design and mechanism of operation
Knock sensor " Chevrolet Niva"
"is needed to ensure normal operation of the motor. It allows you to ensure normal operation of the motor in all operating modes. With the introduction of a configuration of the ignition timing and fuel injection timing, it is possible to achieve the greatest power. Detonation is one of the defects that can greatly harm the engine. It occurs due to the fact that the fuel mixture burns in the combustion chambers of the cylinder.
What and how can you check the lambda?
To check, you will need a digital voltmeter (preferably an analog voltmeter, since its “sampling” time is much shorter than that of a digital one) and an oscilloscope, if possible, the measurements will be more accurate. Before checking, you should warm up the car since lambda operates correctly at temperatures above 300C°.
First we look for the heating wire:
We start the engine, do not disconnect the lambda connector. We connect the negative probe of the voltmeter (ordinary gauge) to the car body. We “poke” the positive probe on each wire contact and observe the voltmeter reading. When the positive wire of the heater is detected, the voltmeter should show a constant 12 V. Next, using the negative probe of the voltmeter, we try to find the negative wire of the heater. We connect to the remaining contacts of the sensor connector. If a negative contact is detected, the voltmeter will again show 12 V. The remaining wires are signal wires.
Checking the lambda probe with a tester
We take an electronic constant voltage millivoltmeter and connect it in parallel with the LZ (“+” “-” to the LZ, - to ground), and the lambda probe must be connected to the controller.
When the engine warms up (5-10 minutes), then you need to look at the voltmeter needle. It should periodically move between 0.2 and 0.8 V (i.e. 200 and 800 mV, and if less than 8 cycles occur in 10 seconds, it’s time to change the LZ. Also replace if the voltage “stands” at 0 .45 V.
When the voltage is always 0.2 or 0.9 V, then there is something wrong with the injection - the mixture is too lean or too rich. Since the oxygen sensor voltage should change all the time and jump from ≈0.2 to 0.9V.
There is another quick way to check the lambda probe . You should do this:
Carefully pierce the positive contact of the tester (black lambda wire), the other contact to ground. With the engine running, the readings should range from 0.1 to 0.9V. Constant readings (for example, 0.2 all the time) or readings that go beyond this range, or fluctuations with a smaller amplitude indicate a malfunction of the probe.
- all the time 0.1 - little oxygen
- all the time 0.9 - a lot of oxygen
- The probe is fine, the problem is something else.
If you have the time and desire to bother, you can conduct several tests on a rich and lean mixture and additionally check the lambda probe sensor .
- Disconnect the oxygen sensor from the block and connect it to a digital voltmeter. Start the car and, by pressing the gas pedal, increase the engine speed to 2500 rpm. Using a device for enriching the fuel mixture, reduce the speed to 200 per minute.
- If your vehicle is equipped with an electronically controlled fuel system, remove the vacuum tube from the fuel pressure regulator. Look at the voltmeter reading. If the instrument needle approaches the 0.9 V mark, it means the lambda probe is in working condition. A malfunction of the sensor is indicated by the lack of response from the voltmeter, and its readings are less than 0.8 V.
- Do a lean mixture test. To do this, take a vacuum tube and provoke an air leak. If the oxygen sensor is working properly, the digital voltmeter reading will be 0.2 V or lower.
- Check the operation of the lambda probe in dynamics. To do this, connect the sensor to the connector of the fuel supply system, and install a voltmeter parallel to it. Increase engine speed to 1500 rpm. The voltmeter readings with a working sensor should be at the level of 0.5 V. Another value indicates a failure of the lambda probe.
Operating principle of the oxygen sensor
The principle of operation of the oxygen sensor is quite simple. The lambda probe must compare the readings with some ideal results in order to understand how the percentage of oxygen in the mixture changes, so measurements are taken in two places - atmospheric air and combustion products are measured.
This approach allows the sensor to feel the difference if the fuel mixture ratio changes.
The ECU must receive an electrical impulse from the lambda probe. To do this, the sensor must be able to convert measurements into electrical signals. For measurements, special electrodes are used that can react with oxygen.
Lambda uses the principle of galvanic cells - changing the conditions of chemical reactions leads to a change in the voltage between the two electrodes. When the mixture is rich and the oxygen content is below the lower threshold, then the voltage rises. If the mixture is lean, the voltage will drop.
Next, the impulse that occurs at the stage of chemical reactions is sent to the ECU, where the parameters are compared with the fuel maps stored in the memory. As a result, the operation of the power system is adjusted.
Also interesting: Generator Niva 2121, 21213, 21214: which one is installed, replacement
The oxygen sensor operates on chemical reactions, but its design is relatively simple. The main element is a special tip made of ceramic materials. Zirconium dioxide and, less commonly, titanium dioxide are used as raw materials.
The tip is coated with platinum - it is this layer that reacts with oxygen. One side of this tip is in contact with the exhaust gases, the other side with the air in the atmosphere.
The lambda probe electrodes have one feature. So that the reaction is more efficient and the indicators are accurate, measurements of the oxygen content in the exhaust are carried out under certain temperatures.
In order for the tip to reach the performance characteristics and the required electrical conductivity, the temperature of the environment should be 300-400 degrees.
To ensure the required temperature regime, the lambda probe was initially installed in close proximity to the exhaust manifold. This ensured the desired temperature after warming up the internal combustion engine. The sensor did not start working immediately. Before the lambda warmed up enough and began to produce accurate parameters, the ECU used signals from other sensors. The optimal mixture was not prepared during the heating process.
Some oxygen sensor models are equipped with electric heaters. Thanks to them, the lambda can quickly reach operating temperature conditions. Heating uses energy from the vehicle's on-board network.