Hello, dear motorists! Let's continue the theoretical work on engine tuning. More specifically, camshaft tuning. You have already made your choice of a sports camshaft. We have already realized that without a split gear, all efforts to optimize valve timing are in vain.
What is a phase sensor used for and how does it work?
The camshaft position sensor determines the operating cycles of the internal combustion engine. The camshaft cams drive the valves, and the DF determines which valve is open. This is an integrated control unit, that is, it includes a sensitive element and a signal conversion system. There is a Hall element there - data is taken based on changes in the magnetic field.
The converter has a bridge circuit, a converter block, and an output stage. The work is that the DF determines the intake and exhaust phases of the 1st cylinder.
For carburetor engines it is not needed because the spark is supplied at the moment of compression and at the end of the exhaust gases. DPKV is sufficient for this.
Roughly speaking, the VAZ 2114, 2115 phase sensor functions as a fuel injection system. If it breaks down, the work of sparking falls on the crankshaft position sensor. The designs that are used on 16-valve cars differ from eight-valve ones.
Now let's try to explain in simple words how the phased injection system works. It turns out something like this: the DF gives a signal to the electronic engine control system (ECM), and it, in turn, gives a command to inject fuel, while the intake valve begins to open, and after it has opened, air is sucked in and mixed with gasoline to form a mixture.
Troubleshooting
If the DF fails, a certain instability in engine operation may occur at idle. There is also engine tripping and fuel consumption increases.
All this is due to the fact that the on-board computer, that is, the electronic control unit, does not receive data regarding the ignition angle at one time or another during engine operation. If there is no signal from the sensor, the ECU goes into emergency mode, that is, it operates according to a predetermined program.
In this case, errors are sure to occur, indicated by codes 0343 or 0340.
Preliminary activities
If you find primary symptoms indicating a malfunction of the DF, there are several recommendations for preliminary work. They will allow you to visually determine what may be causing the on-board computer to not receive information.
What to see
For what
Check the DF for external damage
Damage to the device body is an obvious cause of failure
Contacts for moisture
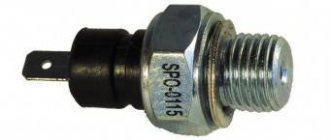
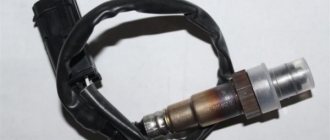
How to check phase sensor 2114
You can check the sensor using a voltmeter. Below are several options for checking phase sensors.
Checking the phase sensor 21110-3706040
It is necessary to set the voltage on the voltmeter V1 on the power supply E to 13.5 ± 0.5 V, the voltage at contact “B” of the sensor must be at least 0.9 Up.
Next, we bring the plate to the end of the sensor and look at the operation of the sensor. It should work. This can be determined on contact B. When the sensor is triggered, the voltage on contact “B” should be no more than 0.4V.
We remove the steel plate from the end of the sensor and measure the voltage again, it should change to a value of at least 0.9 Up.
Checking the phase sensor 21120-3706040
Set the voltage at voltmeter V2 on power supply E to 13.5±0.5V, the voltage at contact “B” should be no more than 0.4V.
Bring a steel plate made of soft magnetic material with a width of at least 20 mm, a length of at least 80 mm and a thickness of 0.5 mm to the end of the sensor as shown in the figure, placing it in the slot of the housing. The voltage at contact “B” of the sensor must change and be at least 0.9 Up.
Remove the steel plate, and the voltage at contact “B” of the sensor should change to a value of no more than 0.4V
Signs of breakdown
see also
There are several signs that indirectly indicate a breakdown of the phase sensor:
- Increased fuel consumption.
- Changing acceleration dynamics.
- Machine self-diagnosis problems.
- "CheckEngine" or errors 0343 and 0340.
The latter happens when the phase sensor on the VAZ 2114 dies completely.
The algorithm for detecting an internal error by the machine is as follows:
- The key is turned to the “Ignition” position.
- The starter turns on and the ECU sends an injection request to the sensor.
- If there is no response, the ECU switches the car to dual injection mode.
The car drives, but the injection is controlled only by data received from the DCPV. It is impossible to drive a car normally without a sensor, but do not rush to change it, you need to check it first.
If you notice one of the signs of this breakdown, you need to check the functionality of the device, this is done using a multimeter (universal automotive electrical tester). It is inexpensive and useful, often better to buy it.
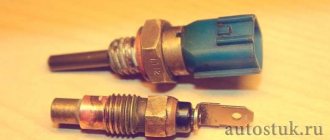
On 8-valve VAZ 2114, a sensor model 21110-3706040 is installed; it can be checked independently without the need to contact specialists.
- On the multimeter, we connect one probe to contact “E”, the second to “B”, on the first one you need to set the voltage to 13.5 V, and on the second 0.9 V. The multimeter should be in V1 mode.
- We close the circuit at the above contacts and bring a metal object to the end of the mechanism (the easiest way is a screwdriver). If the device is working normally, then contact “B” will show a voltage drop to 0.4 V at the moment the screwdriver appears and an immediate return to 0.9 when the metal object is removed. If the readings are different, then the sensor is to blame for the problem and needs to be replaced.
How much does a phase sensor cost?
Depending on the manufacturer, the cost of the sensor varies. Before you think about replacing the sensor, you need to remove and see which sensor you have installed from the factory.
- Phase sensor /2110/ (distribution) 8 cells. (v 1.5) (Autoelectronics Kaluga) from 250 rub.
- Phase sensor /2110/ (distribution) 8 cells. (v 1.5) (BAUTLER) price from 300 rub.
- Phase sensor /2112/ (distribution) 16 cells. (v 1.6) (Autoelectronics Kaluga) from 300 rub.
- Phase sensor /2112/ (distribution) 16 cells. (v 1.6) (BAUTLER) price from 250 rub.
How to replace a phase sensor with your own hands
If you are absolutely sure that the phase sensor is faulty, you can replace it yourself. It is located at the end of the cylinder head next to the air filter.
Replacing the phase sensor begins by disconnecting the power from the battery. In this case, the control unit memory will be reset.
If this is not done, it will continue to operate in the same mode as with a faulty phase sensor. Normal operation will begin after a few engine starts.
The tool that will be needed is just a ten key and sealant. Next, disconnect the wires from the phase sensor and remove it using a key.
The new sensor needs to be coated with sealant, the layer should be small, and it should be left for about five minutes before installation. We install it on the seat and connect the wires.
Next, connect the battery, start the engine and see if the check engine light comes on. If it no longer lights up, then the sensor is installed correctly.
Replacement
Alas, a visual inspection does not always provide an answer to the question about a non-working phase sensor. Therefore, you have to carry out dismantling work, inspect and, if necessary, replace the device.
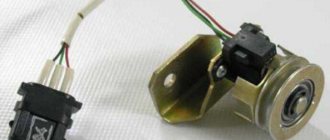
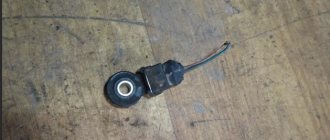
Dismantled DF
Let's get to work. The procedure for replacing the DF on 8-valve and 16-valve engines is somewhat different, so we will consider both situations separately.
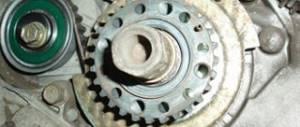
Replacing the DF on an 8-valve engine
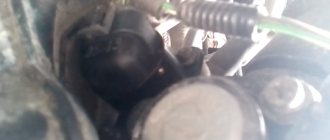
- First of all, we determine where our sensor is located. And it is located at the top of the engine, on the right near the air filter.
- The device is fixed using one bolt. A regular 10mm wrench will help you unscrew it.
- After unscrewing the fastener, remove the camshaft sensor.
- Be sure to close the slot where the device is inserted. This will prevent debris and foreign objects from entering. This way you guarantee the correct operation of your new device.
- Having picked up the device, visually examine its current state according to the instructions given above.
- If dirt or dust has accumulated on the surface, remove it using an ordinary dry cotton rag. Wipe the device to remove moisture and dirt, and then try to put it back in place.
- If the above errors appear again on the screen of your on-board computer, you will have to remove the device and put a new one in its place.
- In some very rare situations, even replacing the meter does not solve the problem. This is due to the shift of the pressed control gear. It happens rarely, but who knows, maybe a similar situation is your case. Such a breakdown can only be corrected with the help of specialized equipment. It is impossible to solve the problem with your own hands, even if you want to.
- Somewhat more often, DF errors occur due to the fact that the timing belt was incorrectly installed during the replacement process, or it became too stretched as a result of installation or long-term operation.
Making our way to the device
Replacing the DF on a 16-valve engine
If you are dealing with a 16-valve power unit, then the procedure for removing and replacing a damaged camshaft sensor will look slightly different.
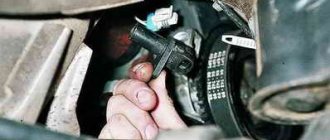
- The desired device is located on the front part under the air manifold. Look for the device in the immediate vicinity of the first camshaft pulley.
- Now that the location of the device has been determined, dismantling work can begin.
- Remove the radiator grille.
- Using an extension with a 10 mm socket, unscrew the two fasteners.
- Visually examine the condition of the measuring device, make sure the contacts are clean and the wiring is intact.
- If defects are found on the old sensor, replace it with a new one.
- During the replacement process, do not under any circumstances use additional sealants or sealing agents, since the sensor is constantly located in a very aggressive environment where the temperature changes regularly. Excessive compounds can cause breakdown of the oil system and even the entire engine.
Functionality check
So, you managed to replace the DF. The work is not difficult, but it has its nuances. The hardest part is getting to the device you are looking for. Everything else is a matter of a couple of movements.
But installing a new DF is not enough. You also need to make sure that the device works and sends the necessary information to your electronic control unit.
To check you need:
- Return the negative terminal to the battery;
- Start the engine;
- Using a scanner or controller, check the machine for errors;
- Listen to the operation of the power unit, which should function stably without signs of malfunction;
- Check the instrument panel to ensure that the Check light is not on;
- Be happy if the replacement is carried out correctly.
Practice shows that in the case of a 16-valve engine, work takes slightly longer compared to 8-valve power units. In any case, it should take you no more than an hour to check and replace.