Original equipment
There is a wide range of products on the market, but the equipment is not always of the required quality. Several system options can be installed on the Lada Granta; standard parking sensors are characterized by the following features:
- The sensors are located in the front and rear bumpers.
- The signal goes to the controller and converter, which creates the signal. Based on the frequency of the signal, you can determine the degree of proximity to the object.
The original device costs much more, but is highly accurate. There are also Chinese sensors on sale that also cope with the task.
How to install parking sensors on a Lada Granta with your own hands in a sedan or liftback body
A modern and common option is parking sensors. It is responsible for determining the distance from the vehicle to the nearest obstacles. Not all cars are equipped with this element, so many add it themselves. Installing parking sensors on Grant involves the use of various tools and consumables.
What to replace with
If the car is not equipped with a device to simplify maneuvering during parking, you can install parking sensors on the Lada Granta liftback yourself.
There are a large number of different devices available in Chinese online stores.
The main selection criteria are:
- Sensing distance range. In most cases 0.3-2 m.
- The voltage required to power the device is 9-12 V. Therefore, power can be supplied from various electrical elements of the vehicle.
- Operating temperature (varies within -35…+45°C).
- Sound signal with volume up to 80 dB.
- The presence of a housing with protection from environmental influences.
- Installing a display that shows the location of the sensor.
The Chinese Myhung driver can be downloaded on the Internet and is also included in the package.
Installing parking sensors on a Lada car
The safe parking system (parking sensors) is installed by the factory on some top-end configurations of Lada cars. Simpler versions of the car (“Standard” or “Norm”) do not have this useful accessory. Let's look at the features of self-installation of parking sensors on modern Lada cars.
The instructions for installing parking sensors for Lada Granta, Priora, Kalina, Vesta, Niva and XRAY are similar. There is a separate photo report for Lada Largus. Also see the instructions for installing front parking sensors on Lada XRAY.
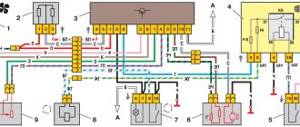
We study the instructions that come with the parking radar and, according to the attached diagram, mark the locations for the sensors on the bumper. We make the holes using a drill and a bit (crown), which comes with the kit. Try not to overheat the plastic of the bumper. We fix the parking sensors in the resulting holes, taking into account the top and bottom of the sensor (see markings).
You can drag the wires from the parking sensors into the trunk (in this case, Lada Granta liftback) without removing the bumper. It is enough to unscrew a couple of screws from below to gain access to the standard hole on the left side. We route the wiring through a tight rubber seal.
We place the parking sensor control unit in the trunk using double-sided tape. To connect, you will need to find the “plus” after engaging reverse gear; on Lada cars this is the green wire of the rear light. Mass - black. The parking sensor display is most often mounted above the mirror. To do this, we stretch the wires from the trunk to the front of the car under the floor lining. Then behind the panel, behind the windshield pillar trim and under the headliner (removing the sun visor).
By the way, if you fix the parking sensor screen on the ceiling in the trunk (of a hatchback, station wagon or liftback) or in the interior of a sedan, then you can monitor the distance through the interior mirror, and there is no need for additional wires throughout the cabin.
The process of installing parking sensors on the Lada Granta is also shown in the video:
Let us remind you that you can buy inexpensive parking sensors on AliExpress.
How to install and connect
You can install parking sensors yourself. The instructions look like this:
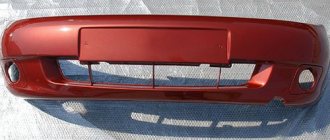
- The sensors are placed in the bumper. It is recommended to install 4 sensors front and rear.
- For convenient work, it is recommended to dismantle the front and rear bumpers. Otherwise, you won’t be able to get high-quality holes.
- After dismantling the bumper, masking tape is applied. It is required in order to carry out correct markings and eliminate the possibility of damage to the paintwork.
- The recommended sensor placement height is 50-60 cm above ground level. The optimal distance between individual elements is 1/3 of the length.
- The surface is being marked. This requires measuring instruments and a pencil. The quality of the result depends on the correct marking, so you need to be careful.
- Appropriate holes are required to position the sensors. They can be obtained by drilling when selecting a suitable nozzle. When working, you need to be careful, because a mistake can cause damage to the bumper.
- Once the holes are created, the masking tape is removed and the edges are cleaned. To do this, you can use a knife and needle files.
- The wire passing through to connect the sensor is lowered into the hole. It is placed so that it is slightly recessed into the hole. If necessary, you can press on the sensor ears with a sharp object; a tight fit ensures long-term operation.
- All sensors must be positioned strictly horizontally. Many manufacturers mark the housing with a corresponding arrow, which simplifies installation. If the device is pointed at the ground, it can be triggered by the ground. Fastening is carried out using special glue and silicone.
- Secure the control unit in the luggage compartment. It is recommended to create a special sealed box for it, which will protect the main elements from environmental influences. The wires are routed through a standard rubber seal; additional insulation is provided to eliminate the possibility of damage.
- From the front bumper the wires are routed backwards. To do this, they are located under the casing or plastic protection.
After this, the bumper is installed in place and the entire system is tested. The instructions are as follows:
- Maneuvering is carried out in the courtyard; it is not recommended to immediately drive onto a public road.
- The vehicle should be approached at different angles towards obstacles. Mistakes made can cause dead zones to appear.
- When the system is activated, you should stop the car and check the distance.
At first, you have to get used to the way the parking sensors work. When installing it yourself, you have the opportunity to carry out subsequent repairs and maintenance.
Modifications of parking sensors on the Lada Granta Liftback
| Name | Quantity / indicator |
| Number of sensors / sensors (pcs.) | 4 / 6 / 8 |
| Diameter (mm) | 18 / 19 / 20 / 21 / 22 / 26 |
| Control block type | Wired/wireless |
| Screen | Display / LED scale / without screen |
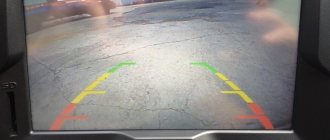
The installation location of the monitor (display) is universal, at the driver’s personal discretion. For convenience, the DP is mounted on the front console above the rearview mirror.
The parking sensors beep if the distance to an obstacle is 0.2-0.5 m. The shorter the distance, the more frequent the signal.
Lada Granta Liftback Lux › Logbook › Installing parking sensors without removing the bumper
Hi all.
I encountered a parking problem; the view through the rear window was poor. I decided to install parking sensors. I bought it in Chinese. For a long time I was looking for information on how to install parking sensors on a liftback grant without removing the bumper, but I really didn’t find anything, someone goes to the service center, someone removes the bumper... In the end, I managed to install parking sensors without removing the bumper, I didn’t take many photos, because . I was working alone and had to get there before it got dark. What was done: — glued masking tape, marked the installation locations of the sensors, every 40 cm; — I unscrewed the 3 bolts securing the bumper from below, I managed to bend the bumper a little. I made sure there was no amplifier inside; — I drilled holes in the bumper with a crown, it was included with parking sensors; — wired all the ends from the sensors into one hole;
— I removed the plastic trim in the trunk, under it there was a technological hole with a rubber plug, it was sealed with vibration from the factory, I had to tear it off, through this hole I pulled the wires from the sensors into the trunk;
— punched a hole in the rubber plug and pulled all the wires through it. It is unlikely that it will be possible to return the plug to its place from the inside, I pushed it into the hole, stuck my hand under the bumper from below and inserted the plug from the back side; on one side it is cone-shaped;
— I screwed on the bumper mount, twisted the wires from the sensors and hid them in a niche under the plastic trim inside the trunk.
This was the worst thing for me, I was afraid of ruining the bumper, then it’s simpler: - I connected the minus to ground, and took the plus from the green wire of the reversing light. Sometimes the parking sensors come with a nut for connecting the wires, I didn't have one. I didn’t cut the flashlight wire, I added a small piece and tied the power supply wire for the parking sensors and insulated it accordingly; — the control unit was secured in a niche under the rear light; — I ran the monitor wire from the trunk under the carpet and plastic sills. Initially, I wanted to install a monitor on the rearview mirror, but the wire was not long enough. Installed it in a niche on the panel. If it's inconvenient, I'll rearrange it.
Everything works, I checked every sensor). I haven't had to park in a confined space yet. I checked it experimentally and it shows the distance correctly. The work took 3 hours.
source
Lada Granta norma→lux › Logbook › No. 05. INSTALLATION OF PARKTRONICS
I haven’t updated my blog for a long time! First the hard drive on the computer crashed, then the business trip. And then the time came for the session and I returned home for student leave. I never thought about installing parking sensors, but one wonderful day my brother bought three sets of parking sensors: for himself, his wife and me for my birthday. But I didn’t get around to installing it, and I didn’t have much time. And then the day came when I decided to install them, especially since I had already glued the screen to the rearview mirror and ran the wiring when I installed the door sill trim from the viburnum, but that’s a completely different story! =) To begin with, I took a screwdriver, a centimeter and started measuring holes.
Measured it out. Well, I started drilling with a special drill, which was included with the parking sensors!
I drilled out and began to insert the sensors, they indicate how to insert them with an arrow and the inscription “up”. To do this, I needed a small flathead screwdriver to push the silicone holders inside the bumper.
After inserting all the sensors, I began to route their wires into the trunk. By the way, in order to get to the wires from the inside of the bumper, you will need to unscrew the bolts securing the bumper and push it forward a little. I brought all 4 wires to the rubber plug and began to push them through, but before that I removed the plastic covering under which the wires pass to the headlight. I inserted a hole in the plug and began installing the parking sensors unit.