Video “Visual aid for tightening cylinder head screws on a VAZ 2109”
The majority of today's cars do not need tightening of the head bolts, but on the VAZ 2109, it is required at least to undergo maintenance.
If moisture begins to accumulate in those places where the block comes into contact with the cylinders, then this is a sure sign that urgent tightening of the bolts is required. Moisture in the above areas is a sign of a lubricant leak. The main reasons for tightening bolts are:
- damage to the cylinder head due to engine overheating;
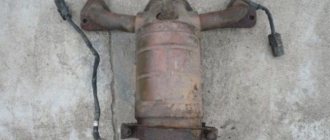
Cylinder head
- loss of tightness of the cylinder head gasket;
- the mileage specified in the instructions has been completed.
At the end of the operational period or if the integrity of the cylinder head gasket is damaged, the element must be replaced.
The main sign of a malfunction or gasket wear is the formation of coolant and oil leaks at the junction of the engine block and the cylinder head.
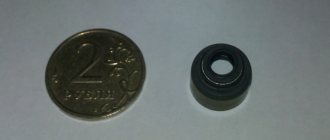
Cylinder head seals
To change the gasket, you will need to dismantle the assembly, get rid of the worn cylinder head gasket and reassemble the structure in the reverse order, following the recommendations regarding the tightening torques of the cylinder head bolts. We will tell you about all this in more detail.
When is it necessary to puff?
How is the tightening torque of VAZ 2109 bolts adjusted?
Video “Visual aid for tightening cylinder head screws on a VAZ 2109”
If it is necessary to tighten the cylinder head of a Nine engine, it is important to observe not only the strength and degree of tightening of the bolts, but also other conditions. Below we will look at how to correctly stretch the cylinder head on a VAZ 2109.
What will you need?
The procedure for tightening fasteners after removal and repair, as well as when installing the cylinder head, is carried out exclusively with a torque wrench.
In addition to the key, you will also need a caliper or a regular ruler.
User Marat Ibatullin made a video in which he clearly showed how the task of tightening the screws is performed.
Scheme of work
The order of tightening the bolts on cars with an injector or carburetor engine is determined by the manufacturer and is indicated in the service book for the car. According to the diagram, the pulling procedure begins with the central two cylinder head bolts.
The cylinder head bolts must be tightened as follows:
- First, you need to twist the screws with a force in Newtons of 2.0 kg/cm.
- Then the bolts are tightened to a torque of 7.5-8.5 kg/cm.
- After this, all screws must be tightened 90 degrees.
- At the end, each bolt is rotated 90 degrees again.
How to tighten the head screws of a VAZ 2109 block with your own hands:
- The torque wrench holder is placed in the zero position. This indicates that the instrument data corresponds to the moment of the initial position.
- Evaluate the indicators on the key before starting the tightening procedure.
- The tool holder can now be rotated. Monitor the readings as you complete the task.
- If it happens that the torque does not change during tightening, then the head mount may be stretched. This is quite normal, as it should be. First, use a wrench to tighten the screws to 2 kg/cm. Follow the tension sequence shown in the diagram.
- At the next stage, the covering is performed again in the same sequence. Only now the bolts need to be pulled to approximately 8 kg/cm.
- At the end of the procedure, the screws must be tightened once 90 degrees in a circle, and then again 90 degrees.
Channel RUS13 in its video showed how to install the cylinder head on a VAZ 2109 engine and tighten the bolts.
Tightening rules
What nuances should be taken into account when carrying out this procedure:
- Observe the appropriate tightening torque for the VAZ 2109 cylinder head.
- The use of wrenches and other tools is not allowed, since the degree of tension can only be determined using a dynamometer.
- To perform tensioning, only working screws are allowed. The bolts must meet the requirements of the power unit installed on the machine.
- Before completing the task, make sure that the holders are in good working order.
- If the cylinder head has been replaced or repaired, then the old bolts cannot be used for tension; new ones must be purchased. On sixteen-valve power units, it is allowed to re-use screws to fix the block head, but only if the length of the parts is no more than 9.5 cm. It is necessary to measure the length of the screw only with a washer. If the bolts are larger than 9.5 cm, they must be replaced.
- If the vehicle is equipped with an aluminum head, then the cylinder head is fixed with TTU type screws. They cannot be tightened because they are screwed into a thread with a certain degree.
- When purchasing a cylinder head gasket, you need to pay attention to the manufacturer's specifications. They often prescribe a certain tightening ratio required for specific gaskets. Please note that the indicated moment of force should not diverge much from the one applied during the work process.
- In power units equipped with aluminum cylinder heads, the tightening procedure is carried out on a cold engine. As for cast iron engines, in such internal combustion engines it is necessary to perform the tightening while it is hot.
Engine Repair Channel! And interesting! published a video demonstrating the procedure for tightening the cylinder head bolts on a Nine with a description of all the nuances of this process.
Do-it-yourself maintenance of the cylinder valve body. The cylinder head (cylinder head) is the most important component in the car engine system. The process of tightening the cylinder head bolts will be within the capabilities of a car enthusiast with certain skills. To work, we need a special tool and self-confidence. The instructions provided will help you cope with the task and avoid common mistakes.
Read more: Volkswagen Passat volkswagen Passat - reviews photos of the VW model range video
First, let's determine in what cases it is necessary to tighten the bolts.
Violation of the block head structure. Such consequences are most often caused by engine overheating. Violation of the tightness of the cylinder head gasket. This fact also indicates the need to tighten the bolts. It is recommended to adjust the tightening torque after passing a certain mileage and without fail, after repairing the cylinder head.
How to adjust the tightening torque of VAZ 2109 bolts. Before starting work, you must read in detail the original instructions for the car (VAZ 2109). The included manual will tell you the details of tightening the bolts according to the manufacturer's requirements. Depending on the specific brand of car, the work may include important details. It is necessary to pay tribute to the manufacturer's advice and take them into account during the work.
The order of tightening the cylinder head bolts, according to the VAZ 2109 manufacturer's diagram. The tightening torque. Knowledge of the bolts that need to be adjusted.
Since most modern cars do not provide additional tightening, the bolts have certain characteristics. In this case, the manufacturer implies exclusively factory adjustment of the bolts. Therefore, after repeated exposure, the structure of the bolts is disrupted. With outside intervention, the bolts quickly become unusable.
Subsequently, they may rupture. In order to avoid adjusting the bolts, on earlier car models (VAZ 2109 or similar models), it is necessary to correctly repair the cylinder head. Work on the cylinder head requires a mandatory replacement of the cylinder head gasket. In this case, it is necessary to use gaskets to prevent shrinkage. This way you can eliminate the need to retighten the bolts.
If tightening the bolts is still required, you must strictly follow the manufacturer’s recommendations. When carrying out work, it is necessary not to deviate from the original instructions. For correct adjustment, it is necessary to strictly and confidently follow the sequence.
Compliance with the tightening torque of the cylinder head bolts. To control the process, you must follow a certain technique. In this way, the process can be controlled, preventing errors. To do this, you need to use a special key. A torque wrench will allow you to control the tightening torque.
First of all, using a torque wrench, set the holder to the zero position. This means the readings of the device are equal to the moment of the initial position of the holder. Now, you need to pay attention to the device indicator at the moment the fastener starts. We begin to twist the holder and look at the indicators.
If, when tightening the bolts, the torque increases, the holder is durable and there is a need to replace it. If there is a decrease in the tightening torque, the fastener is damaged and also needs to be replaced. During the operation of a VAZ 2109 car, the cylinder head bolts are constantly exposed to destructive impact.
Read more: What is the knock sensor responsible for, where is it located and how does the operating principle of the device affect engine operation?
Tightening rules
Removing and installing the cylinder head on a car
The cylinder head is removed from the engine on the car if the entire engine does not need to be disassembled to eliminate the problem. For example, if it is necessary to remove carbon deposits from the surface of combustion chambers and valves or to replace valves or valve guides.
Remove the cylinder head in the following order:
— place the car on a lift and disconnect the wire from the negative terminal of the battery;
— raise the car and drain the coolant from the radiator and cylinder block by opening the heater tap and unscrewing the drain plugs on the radiator and cylinder block;
| Rice. 2.33. Installation of the intake pipe and exhaust manifold: 1 – exhaust manifold; 2 – bracket for the supply pipe of the coolant pump; 3 – inlet pipe; 4 – warm air intake |
— disconnect the exhaust pipe of the mufflers from the exhaust manifold, remove bracket 2 (see) of the supply pipe of the coolant pump;
— lower the car, remove the air filter, disconnecting the hoses of the crankcase ventilation system from the cylinder head cover and from the carburetor, as well as the warm air supply hose from the air filter thermostat; close the carburetor with the technological cover;
— disconnect the wires from the spark plugs and the ignition distributor, from the oil pressure indicator lamp sensors and the coolant temperature indicator, from the carburetor;
— remove the ignition distributor sensor with the bracket for fastening the high voltage wires, disconnecting the vacuum hose from the carburetor and the distributor sensor;
— disconnect the fuel supply hose from the fuel pump, and the fuel drain hose from the carburetor; disconnect the econometer tube and the hose going to the vacuum brake booster from the inlet pipe;
| Rice. 2.17. Removing cooling system components: 1 – coolant temperature indicator sensor; 2 – outlet pipe of the cooling jacket; 3 – hose for supplying fluid from the heater; 4 – fluid drainage hose to the heater; 5 – supply pipe of the coolant pump; 6 – thermostat |
— disconnect the hoses from the outlet pipe 2 (see) of the engine cooling jacket;
— disconnect the carburetor throttle and air damper drive cables from the engine;
— remove the front protective cover of the toothed belt and the cylinder head cover;
| Rice. 2.29. Checking the alignment of the timing marks on the camshaft pulley and the rear protective cover |
| Rice. 7.22. Markers for setting ignition timing. 1 – scale; 2 – mark on the flywheel |
— set the gear shift lever to the neutral position and turn the crankshaft clockwise to such a position that the mark on the flywheel (see), visible in the clutch housing hatch, is opposite the middle scale mark. In this case, the mark on the camshaft pulley (see) should be opposite the installation mark on the rear cover of the toothed belt;
— unscrew the nut securing the tension roller axle and remove the axle along with the roller and spacer ring; remove the belt from the camshaft pulley;
— holding the camshaft pulley from turning with tool 67.7811.9509, unscrew the fastening bolt and remove the pulley with the key;
— Unscrew the nut securing the rear cover of the toothed belt to the cylinder head;
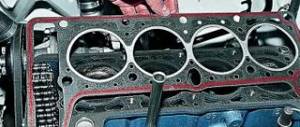
— Unscrew the fastening bolts and remove the cylinder head with the gasket.
Install the cylinder head in the reverse order of removal, following the recommendations outlined in the “Engine Assembly” subsection. The gasket between the head and the cylinder block cannot be reused, so replace it with a new one.
| Rice. 2.65. Cylinder head bolt |
If the cylinder head mounting bolts are extended and their length exceeds 135.5 mm (see ), then replace the bolts with new ones. Tighten the bolts in four steps in the order specified in the “Engine Assembly” subsection.
The compressed nuts for fastening the exhaust pipe of mufflers (used before 1988) are not allowed to be reused.
After installing the cylinder head, adjust the belt tension, ignition timing and carburetor drive. Check and, if necessary, adjust the clearances in the valve mechanism.
Video “Visual aid for tightening cylinder head screws on a VAZ 2109”
Tightening rules
Cylinder head seals
Now comes the turn of the electrical cables. In order to remove the block with the ignition wires, you will need to press the latch. The central high-voltage loop is switched off in the same way.
Next, you need to remove the fuel hose coming out of the pump - here you will need to disassemble the clamps holding it. Then the traction of both the air and throttle valve drives from the carburetor is disconnected.
You should also de-energize the solenoid valve - to do this, just disconnect all the wires leading to it. After this, remove the hose from the vacuum booster. The sleeves that supply heat to the interior are completely removed.
Only after all of the above can you remove the cylinder head. As a rule, to remove it completely, you will need to not only unscrew all the bolts, but also pull the entire assembly towards you several times.
After removing the gasket that has become unusable, it is necessary to clean all parts adjacent to it from fragments of rubber and other dirt. After this, everything needs to be wiped dry with a clean rag.
Before reassembling, you need to make sure that the bolts holding the cylinder head in place are the correct length. The thing is that they stretch out over time. The standard value is 13.55 centimeters. If they do not meet the requirements, they must be changed.
Cylinder head seals
Tightening rules
Cylinder head seals
Tightening rules
Cylinder head seals
Cylinder head seals
Tightening rules
Replacement procedure
To replace the gasket, it is necessary, first of all, to completely dismantle the entire assembly, remove the seal that has become unusable and reassemble everything in the reverse order. At the final stage, it will be extremely important to tighten the bolts correctly.
The procedure is carried out in the same order for engines with both 16 and 8 valves. First of all, it will be necessary to disable the sensors that control the coolant temperature and oil pressure.
- before dismantling the thermostat, drain all the coolant;
- unscrew the housing protecting the air filter;
- the carburetor is left in place;
- disconnect the exhaust pipe at the muffler, on the side of the exhaust manifold.
After all this, you will need to remove the drive gear from the camshaft. Before this, the piston located in the first cylinder must be moved to top dead center (TDC).
Only after this is it possible to remove the casing and the drive belt itself, loosen the bolts securing the gear and remove it completely.
Now comes the turn of the electrical cables. In order to remove the block with the ignition wires, you will need to press the latch. The central high-voltage loop is switched off in the same way.
Next, you need to remove the fuel hose coming out of the pump - here you will need to disassemble the clamps holding it. Then the traction of both the air and throttle valve drives from the carburetor is disconnected.
You should also de-energize the solenoid valve - to do this, just disconnect all the wires leading to it. After this, remove the hose from the vacuum booster. The sleeves that supply heat to the interior are completely removed.
Tightening procedure
Reassembling the unit again will not be difficult if you follow the above instructions in reverse order.
At the same time, it must be especially emphasized that in order to correctly replace the gasket, it is necessary to very accurately adjust the tightening of the bolts securing the cylinder head.
For this, it is allowed to use only a torque wrench - it allows you to accurately control the tension moment itself. Before working with the previously mentioned tool, its holder must be set to 0 (zero). This will set the original position as the reference point.
When starting to tighten the bolts, you need to monitor the indicators from the very beginning. If they do not change, it means, most likely, that the fasteners have succumbed to tension, which generally corresponds to the norm. There are no problems to worry about here. However, with a sharp increase in torque, it will be necessary to stabilize the tension of the holder.
Diagram of broaching the cylinder head of a VAZ 2108
First of all, it is important to remember that you need to pre-tighten the bolts in this order:
- the first two are installed above and below in the central holes;
- the third and fourth below, respectively, to the right and left of the middle one;
- the fifth and sixth at the top are also on both sides of the central one;
- the seventh and eighth go into the leftmost holes;
- the ninth and tenth to the right.
Next, you will need to tighten all the bolts in this order:
- the first stage - twisting is carried out to 2 kgf*m;
- on the second round, tightening is carried out according to the above algorithm, with the only difference being that the force is brought to 8 kgf*m;
- on the third pass, all bolts are turned exactly 90 degrees;
- The fourth stage fully corresponds to the previous one and is the final one.
Content
[ To uncover]
[Hide]
When is it necessary to puff?
On most injection and carburetor cars with engines of 8 and 16 valves, there is no need to tighten the cylinder head bolts during operation of the car. But in the case of the domestic “Nine”, it is necessary to correctly stretch the cylinder head and tighten the screws at least when carrying out maintenance of the machine.
For what reasons may a tightening be necessary:
- The device has been damaged due to engine overheating. Operating the motor in conditions of excessive temperature is fraught with serious malfunctions. The cylinder head of the power unit will need to be repaired, polished and then installed with tightening.
- The cylinder head gasket is damaged or has lost its tightness. If this problem is not resolved in a timely manner, engine fluid will enter the cooling system. A damaged gasket must be replaced. After changing the part, the head bolts must be tightened correctly.
- The engine has run for a certain time.
Read more: Checking and calibrating instruments
How is the tightening torque of VAZ 2109 bolts adjusted?
In order to do everything correctly and avoid mistakes, you must strictly adhere to certain rules and follow the order of execution.
First, using a torque wrench, set the holder to the zero position. This means that the device data is equal to the moment of the original position. Then, you need to look at the indicator of the device when starting the fastener. Rotating the holder, we monitor the indicators. If the moment has not changed, this means that the fastener can be stretched and this is normal, as it should be. If the torque increases rapidly, bolt movement must be achieved. This indicates low stretch of the holder. This means stabilization is needed.
While the vehicle is running, the bolts that secure the cylinder head are constantly experiencing various impacts. They constantly heat and cool, which over time leads to the destruction of the structure of the fasteners.
For all power units there are specific rules that must be followed during operation:
- Strictly follow the data specified in the practical manual for the VAZ 2109.
- Adjustment is carried out only with a torque wrench. The use of another device will not allow this work to be performed correctly.
- Use only good bolts.
Replacement bolt kit
The most important data regarding adjustments is in the annotation for each specific car. As a result, you must carefully study and adhere to what is written in it. During operation of the vehicle, you must strictly comply with all manufacturer's requirements and systematically diagnose the car. Correct and smooth operation of the VAZ 2109 power unit prevents the need to adjust the cylinder head holders.
Since the cylinder head of the VAZ 2109 is a complex unit, it is necessary to carry out repair work only with absolute confidence in your actions. Strictly observing the order of work. If a deviation in the operation of the motor is detected, immediately carry out diagnostics. This will avoid more expensive repair work.
- torque wrench;
- caliper or ruler.
Puff
Reassembling the unit if you strictly follow the instructions for dismantling work will not pose any particular problems.
An incredibly important aspect of replacing the cylinder head gasket and all other activities associated with removing the head is the correct adjustment and tightening of the bolts.
Tightening the bolts is done strictly with a torque wrench, which will allow you to control the tension torque.
Here are some guidelines for using this specialized wrench and checking the current tension condition:
- Place the holder in the zero position. This will indicate that now the key data is equal to the moment of the original position;
- Look at the torque tool readings as you begin to tighten the bolts;
- Rotate the holder, monitor the indicators;
- If the torque does not change, the fastener may be stretchable, which is normal. This is exactly what should happen;
- If the torque increases rapidly, bolt movement should be achieved. That is, the stretch of the holder is small, it needs to be stabilized.
Golden rules of tightening
To properly reassemble the cylinder head, you need to adhere to the golden rules:
- Strictly follow the tightening torque data corresponding to the VAZ 2109;
- Make adjustments only using a torque wrench. Other tools do not allow you to get the desired result;
- To install the cylinder head, use only serviceable bolts that meet the requirements of your engine installed on the VAZ 2109;
- Before work, make sure that the holders are in good condition.
Checking the bolts
Tightening diagram
In addition to observing the required tightening torques for the cylinder head mounting bolts, one more rule must be observed here.
Returning the bolts to their places is carried out strictly according to the diagram below.
Tightening sequence
Next, do the work according to the table, and you will do everything right.
Tightening is performed in four circles, following the sequence of work with the mounting bolts indicated in the diagram.