January 26, 2016 Lada.Online 98 898 2
The standard location of the Lada 4×4 generator is at the bottom, which cannot be called a good solution. During off-road driving, water and dirt easily get on it, or antifreeze drips, which significantly reduces its service life. To protect an important part from moisture, owners resort to modifications. Let's look at how to move the generator up to a Lada 4×4.
DIY Niva generator transfer bracket
Niva is an excellent domestic SUV that can compete with modern jeeps. VAZ 21214 received a durable body, a powerful power plant and a reliable suspension. Like any car it has its drawbacks.
These include the location of the generator - the unit is installed in the lower part of the body. When testing for strength in forest and mountainous areas, dirt, sand, and water get into it.
Another unpleasant point is that coolant constantly drips onto the unit.
The problem can be solved by moving the generator upstairs.
After reading this article, you will learn:
- What is needed to move the generator upstairs. How does the process work for cars with and without power steering? Is it worth buying a new unit for VAZ 21214.
Study this drawing carefully. The author decided to make a bracket for moving the generator with his own hands. The part is made of metal, the thickness of which should be 4 mm, and the width and length should be 80 mm. To assemble the bracket, you will need parts from other domestic cars:
- Belt 6РК1290; Adjustment bar; Crankshaft pulley from tens.
Photo, details of the manufactured bracket 21214:
As you can see in the photo, the standard fan is installed on a pump pulley from GAZ 3110, we also take a crankshaft pin from 2110 and a 6RK1290 brand belt.
The generator should be located on the top left side. It must be attached to the top using an M8 cylinder head bolt; at the front, a standard bolt and studs are used.
For fixation, the bracket must be secured with an additional lock nut.
This generator transfer drawing differs from the first one in that it uses a belt with a size of 1375 mm. There are fewer steps here, but you will have to work with a grinder - you need to reduce the plane on the head located in the area of the M8 bolt.
The front cover will need new bolts and studs. This drawing of a bracket for mounting a generator is also suitable for other models, for example, for 21213.
The drawing suggests moving the generator to the place of the hydraulic booster. To do this, you need to make a bracket and install it next to the power steering. You need to select washers for the bracket ears in advance.
This option uses a belt with a size of 1220 mm. It is important that the angle of its wedge must be exactly 40 degrees. An excellent solution would be to buy a belt with ZIL 157.
The return hose has a center length of 1115 millimeters, and the high-pressure pressure hoses are 1450 mm. Check all dimensions carefully, remember the saying: measure 7 times, cut once, there is no need for mistakes here.
There is no standard hole for these hoses in the right casing, so you will have to take it and cut it yourself.
The bracket itself for moving the device upstairs is made according to this drawing:
Moving the generator upstairs in Niva VAZ-21213
In order to move the generator upward on the Niva, it is necessary to make a special bracket. It is made of metal, the thickness of which should not be less than 4 millimeters. Its width and length are about 80 millimeters. In order to assemble this device, you will definitely need some other spare parts from domestically produced cars. Namely:
- adjustment bar;
- belt 6РК1290;
- crankshaft pulley suitable for VAZ-2110.
You will also need an upper adjustment bar, which can be borrowed from the good old Volga. To begin with, it should be cut in place, and then drill a new place for future fasteners.
The diameter of this hole should be 8.5 mm.
A fan is mainly installed on the pump pulley from the Volga, and the generator itself is located at the top left. The cylinder head is attached on top of it thanks to an M8 bolt, while standard studs and a bolt are most often used on top. In order for the resulting bracket to hold well, it is best to secure it with another additional nut.
But there is also a second option for moving the generator on the Niva to the top. In this case, you should use a belt whose size is 1375 millimeters. You will have to perform much fewer actions, but you simply cannot do without working with an angle grinder. This tool will be necessary to reduce the plane of the head, which is located near the M8 bolt.
In addition, you will definitely need new studs and bolts for the front cover. By the way, this method is perfect for moving the generator up to the VAZ-21214.
It is very noteworthy that if you are the owner of a VAZ-21213 car, but you have no desire to perform the above actions yourself, but have a sense of saving, you can buy a ready-made set of spare parts. Finding it is quite easy, since it is sold in almost all stores that sell spare parts for the Niva. Or you can resort to an even simpler method, but, unfortunately, it will entail large financial costs. In accordance with this method, your car is driven to a specialized service station, where real professionals will do all the work for you.
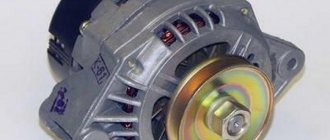
The generator is the source of electrical energy for the vehicle. The article discusses the 21214 generator, its design features, possible problems and troubleshooting methods, and provides step-by-step instructions on how to remove and connect the device.
Moving the KZATE 80A generator upstairs (without power steering)
| NIVA-FAQ | FORUM | NEW FAQ | SITE MAP | SITE SEARCH |
| Moving the KZATE 80A generator upstairs (without power steering) Author: Brigadir335 |
Step-by-step instructions for a 1.7 carburetor engine without power steering.
The bracket was kindly made by Vlad_aka_SoHm.
- What do you need:
- — generator 21214 or similar; — generator mounting bracket 21214-3701650 with two nuts and bolts with a thin head, for fastening to the KIT kit; — KIT generator transfer kit; — generator belt 1350 mm long; — mounting bolt for generator 2110 assembly; — two bolts M8x20 and M8x30 with nuts;
- - four M5x35 bolts and eight washers.
- 1) Remove the spare wheel from under the hood, unscrew the extension on which it was lying.
2) Unscrew two studs and two bolts above the crankshaft pulley. We replace them with four longer bolts. If there are no problems with unscrewing the bolts, then there may be an ambush with the pins. It’s not difficult to solve; you can either weld a bolt to the stud, or sharpen the stud with a file on both sides and turn it out with pliers (idea from Udalilsya). Everything turned out for us without any problems!
3) Now we take a grinder or a file and sharpen the engine block for the upper mounting of the bracket (the bolt to the left of the distributor, if they are located at the driver’s fender). On the block the tide has a round shape, but we reduce it to a rectangular shape!
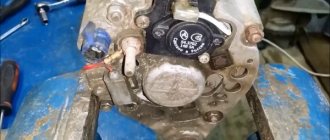
4) We attach the generator mounting bracket 21214-3701650 to our massive structure:
This is where the first problems appear; the bracket 214 of the generator should not rest against the outlet fitting of the fuel pump. On the KIT bracket there are three installation positions for the bracket from the 214 generator:
- We chose the middle one, other options are possible: - top (requires a 1375 mm belt);
- — lower (replacement of the fuel pump with 2108 is required).
- 5) Attach the bracket to the engine block.
6) Disconnect the “-” from the battery, remove the belt from the generator, disconnect the wires from the old generator. We unravel the braid of wiring from the lower generator to the level of the battery itself and the electrics. wiper motor (this length was enough for me to reach the upper generator) We pack the wiring in corrugated:
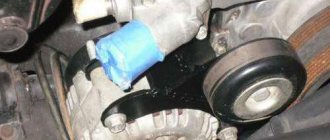
7) Install the generator on the upper bracket, put on the belt. We check the alignment of the pulleys. If necessary, adjust the position of the bracket from the 214 generator. Install the tension bar. Let's tighten the generator belt!
We connect the wires, start the engine, check the voltage! (we didn’t succeed the first time due to a defective relay-regulator.
 We secure the wiring with plastic clamps. We pull the coolant hose to the gas hose mounting eyelet, which goes from the fuel pump outlet fitting to the carburetor:
9) We inspect the engine compartment for the presence of jambs, making sure that they are absent, close the hood.
Niva is ready for new adventures!
04.02.13.
Source: https://www.niva-faq.msk.ru/tehnika/elektro/generat/g_v.htm
Generator replacement
The instructions below will help those Niva owners who decide to remove the generator for repairs or to completely replace it. Usually, it is not necessary to change the entire device so often, since most of its components are sold in stores, the same rotor, stator or diode bridge. All these spare parts can be replaced with new ones if one of them fails. If you still decide to install a completely new generator, then again, the instructions described below will help you with this.
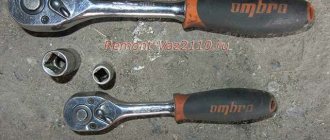
To repair or replace the generator, the car owner will have to remove the unit completely from the car or turn to professionals for work. If you still want to carry out the replacement yourself, then first you will need to prepare all the necessary tools:
- hammer;
- extension;
- keys to "10" and "19".
The procedure consists of the following sequence of actions:
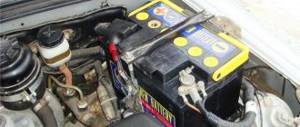
- First, you will need to park the car in a place designated for inspection and repair. The car will also need to be secured using special wheel chocks. Finally, in order for the work to be carried out safely, you should disconnect the battery by disconnecting the terminals from it.
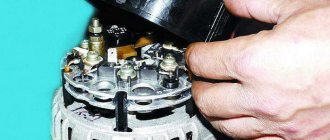
- After this, you need to remove the engine protection. It is attached to several bolts, and they must be unscrewed to get to the lowest bolt of the generator.
- After this, you will need to knock out the mounting bolt using a hammer. It is recommended to knock carefully so as not to damage the thread and to prevent the bolt from coming out in the opposite direction. A hammer is necessary, since a wrench or any other tool simply cannot handle a bolt.
- Next, you need to remove the bolt, swinging the generator from side to side. It is necessary to bolt in any case, as this makes it easier to remove the rod.
- The fourth step involves disconnecting the wiring. To do this, the power wires connected to the housing are disconnected from the unit. In this case, you can first disconnect the plug from the wires.
- Wires are also attached to the generator, tightened with a nut or bracket. In this case, the nuts must be unscrewed with a wrench, and then the loose wires must be pulled out.
- Finally, after disconnecting the wires, you can begin to unscrew the upper fastening element with the belt tensioner. For this you will also need a wrench, as well as a small extension cord.
- Disconnecting the fastener will allow you to remove the belt and alternator. Then you can start cleaning the vacated space with a brush and installing a new unit.
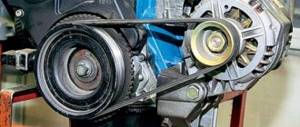
The structure is assembled in the reverse order; the entire procedure will take about two hours if you have all the necessary tools.
Additionally, it is worth noting that when everything is assembled, you will need to adjust the position of the generator using the tensioner. To do this, you need to unscrew the tensioner nut and tighten or loosen the belt, while observing the battery charge.
Also interesting: Niva Chevrolet alarm connection points
If the indicator returns to normal, then the selected tension is sufficient. There is no need to tighten the structure, as the generator bearing may fail. If the tension is insufficient, the generator will work intermittently, and this can also lead to breakdown.
Replacing the alternator belt Lada 2121 4×4 21217 (VAZ Niva)
Bracket for transferring the generator VAZ 2121 Add. equipment... * Generator transfer bracket for Niva (2121-21214). ... The design of the product allows the installation of a large number of types of generators ... TECHNICAL REQUIREMENTS * Apr 5, 2020 ... If any device or device is not mandatory, .....
The brand and power of the generator are not limited, as well as ... removal of unused wires, replacement and transfer of pre-. What happens to the VAZ 21214 m generator when forcing ... * May 14, 2014 ... What happens to the VAZ 21214 m generator when forcing a ford, ... Niva modifications .
Snorkel, generator transfer, stove, everything...Electric power steering for Niva 4×4, VAZ 21214, 2131 with... * Bracket for transferring the Generator VAZ 2121...Electric power steering for Niva 4×4 (carburetor) from Lada Priora... Since electric power steering for Niva cars 2131, 21214 are temporarily or permanently discontinued, ...Electrical diagram of the VAZ 21213 car * Generator VAZ 21213. 8. Side direction indicator. 9. VAZ 21213 battery. 10. VAZ 21213 heater electric motor. 11. Additional ...CHIPTUNER.RU - Actuator: Masses (ground) * On Niva 21214, the mass is taken from 2 sides of the block. Next, both wires enter the common harness and go to the ECU connector. In front of the connector there are twists for...Buy an expeditionary trunk for Niva 2121, 2131 and their... * Are you looking for an expeditionary trunk for Niva? You can buy it from us at the price from the manufacturer! Delivery throughout Russia. Contact us, we will help you with ... Transferring a generator for VAZ 21213 NIVA - YouTube * February 26, 2014 ... 3:33. Replacing the NIVA alternator belt. Alternator belt after 25 km. on NIVA 21214 - Duration: 12:26. Andrey Lapochkin 29,097 views.Sitemap * VAZ 2131, 2130, 2129, 21217, 21214, 21215, 21216, 21217, 21213 Niva · VAZ 2121, 21211, 21212 Niva · Minivan "Nadezhda" (2 120-21 , 2120-41) …. Alternator belt · Transferring the alternator to the location of the power steering pump.... Drawing of the dashboard 2115 with pinout for Niva and documentation · External sensor...Lower level control system for a car with... * decision to use a production car VAZ-21214 "Niva" with gasoline..... We will describe the internal structure and operating principle of each device. Table 1 ... generator drive mounted on the crankshaft [9]. For …. When transferred to a real car, the pedal release algorithm. Heater control unit * VAZ auto parts and automotive electronics in the Elektro-Stavr online store. Welcome to the auto parts and tuning store...Tuning for hunting and off-road Niva, Chevrolet Niva * Automatic light control device for Chevrolet Niva. 13 Feb 2020 17:41 ... Ball joints for Niva 21213-214 and 21214M · all news ... Transfer of the ignition module ... 135A generator installed. And also ...UPGRADE GARAGE.RU ZST Production, sales and ... * Transfer of the generator ... 12 Messages: Last message Snorkel "Smerch" Niva 21214Shniva 2123. ZST ... Niva elevator. Lockus Lift lift kits: assembly for any task. ... Convenient hood lock in the field (hood moderator) ... 25 Topics: 110 Messages: Last message Drawings and dimensions. | VKontakte * May 31, 2020 ... GROUP RULES. 1 message ⋅ Latest from NIVA 4×4 OFF ROAD ➃.. Jan 6 in ... Drawings, photos of do-it-yourself upgrades. Homemade upper mounting of the generator on the Niva - YouTube * March 24, 2015 ... Installing a bracket for transferring the Niva 21213 generator (injector) - Duration : 3:47. 11 REGION 44,710 views · 3:47. Another one... SUV Store * ... and on order with delivery throughout Russia. Go to the catalog. search for spare parts. Watch a video about us. Choose a brand. Niva spare parts catalog. A. L. SRPM * SRPM (steel front axle gearbox) VAZ 21213, VAZ 21214, VAZ 2131 (LADA ... SRPM (Steel front axle gearbox housing) at NIVU ... Eternal construction: Unfinished process of creation ... * Nov 11, 2011 ... Construction of this " Niva" began 10 years ago, and the process continues until ... And in place of the generator, a power steering pump from UAZ is mounted. ... By moving the mounting point of the front gearbox, some ... Current prices of Lada Kalina * ... (there are creaks) on Lada Vesta · Review of panel organizer linings Lada Largus · Drawings for transferring the generator to the top of the Niva (VAZ 21213, 21214) ...Electrical equipment - Bracket for transferring the generator... * The product “KIT of transferring the generator 2121-21214” is intended for... The design of the product allows the installation of a wide range of... The product is intended for cars of the Niva 2121-21214 family without hydraulic booster.
Gentlemen, in order to avoid misunderstandings, we kindly ask you to carefully read this recommendation. Otherwise, we will delete the question.
On the page we provide advice only on technical issues ; questions regarding the cost of work are deleted . Our answers are based on many years of experience, are advisory in nature, and may be considered or rejected by you. In both cases, you will be right.
The administration of this resource is not responsible for offers of paid consultations (transfer of funds to a webmoney account, etc.). We strongly recommend that you do not respond to such offers and do not put your well-being and cars at risk!!!! ALL ANSWERS ON THIS RESOURCE ARE FREE!!!!
All fields must be filled in:
Source: https://avtozam.ru/vaz/zamena-remnya-generatora-lada-2121-4×4-21217-vaz-niva.html
Generator - device, characteristics, operation check
Start the engine, let it run for a few minutes, then, pressing the gas pedal, bring the crankshaft speed to 3000 rpm. Turn on the high beam headlights, heated rear window, and heater fan.
Measure the voltage at the battery terminals, which should be above 13.2 V for generator 9412.3701 and 13.6 V for generator 371.3701.
If this is not the case, the voltage regulator with the brush assembly, the generator windings are faulty (open or shorted) or the contact rings of the field winding are oxidized.
The removed voltage regulator of the generator 9412.3701 can be checked by connecting a lamp (1–5 W, 12 V) between the brushes, and a power source to the “D” and “ground” terminals (DC only, “minus” to ground!) , initially with a voltage of 12 V, and then 15–16 V.
In the first case, the lamp should be on, in the second - not. If the lamp lights up in both cases, there is a breakdown in the regulator; if it doesn’t light up, there is a break or broken contact between the brushes and the regulator terminals. In both cases the regulator should be replaced. To check the generator regulator 371.3701, the current source should be connected to terminals “B” and “C” (“plus”) and “ground” (“minus”).
Also interesting: Generator Niva 2121, 21213, 21214: which one is installed, replacement
To check the valves of the rectifier unit, disconnect the wires from the battery, generator and from the voltage regulator terminal(s).
Connect the “plus” of the battery through a lamp (1–5 W, 12 V) to terminal “B” of the generator 9412.3701 (to terminal “30” of the generator 371.3701), and the “minus” to its body.
If the lamp is on, then there is a short circuit in both the block of “positive” and the block of “negative” valves.
To check the short circuit in the “positive” valves, connect the “plus” of the battery through a lamp to the “B” terminal of the generator 9412.3701 (with the “30” terminal of the 371.3701 generator), and the “minus” - to the terminal of one of the phase windings of the stator. If the lamp is on, one or more positive valves are broken.
To check the short circuit in the “negative” valves, connect the “plus” of the battery through a lamp to the terminal of one of the phase windings of the stator, and the “minus” to the generator housing. If the lamp is on, one or more negative valves are broken or the stator windings are shorted to the generator housing.
To prevent short-circuiting of the windings, remove the generator from the car and, having disconnected the windings from the voltage regulator and rectifier unit, check their short circuit to ground with a lamp or ohmmeter. The generator valves can also be checked with an ohmmeter without connecting the battery and test lamp.
The short circuit of additional diodes can be checked by connecting the “plus” of the battery through a lamp to terminal “D” of the generator 9412.3701 (to terminal “61” of the generator 371.3701), and the “minus” - to the terminal of one of the phase windings of the stator (to one of the mounting bolts of the rectifier block ). If the lamp is on, one or more additional diodes are broken.
A break in the main valves is determined by a sharp decrease in the output current (voltage drop under load). However, it can also be caused by an open or shorted circuit in the generator windings.
A break in the additional valves can be determined by the low voltage at plug “D” of generator 9412.3701 or plug “61” of generator 371.
3701 (below 14 V) at low and medium generator rotor speeds.
The serviceability of each diode (main or additional) can only be determined with a removed rectifier unit using an ohmmeter or a test lamp. If the rectifier unit fails, it is recommended to replace it as an assembly.
It is possible to replace individual valves, but the main valves will require repressing them in the holder - an operation that requires care and skill.
Read news about the new Niva
- Niva generator transfer bracket drawing
- Niva Chevrolet front hub repair
- Niva Chevrolet where is the starter relay located?
- Do-it-yourself Niva suspension lift. How to lift the front and rear suspension of a Niva car?
- Generator Niva 2121, 21213, 21214: which one is installed, replacement
- Generator Niva 2121, 21213, 21214: which one is installed, replacement
- Generator Niva 2121, 21213, 21214: which one is installed, replacement
- Generator Niva 2121, 21213, 21214: which one is installed, replacement